Question 1: Radio
1. The first question is a radio list. Add the 'Radio List' to the 'page' section of the second page "Recent purchase".
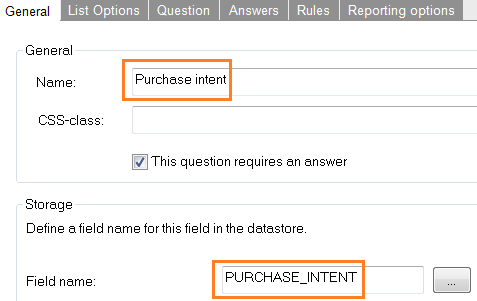
2. Name the component "Purchase intent' and rename the component's field name to "PURCHASE_INTENT" on the 'General' tab. Set this question as a required.
It is always a good idea to give the field name a short descriptive name. These are the names uses for the fields in the survey list. A default column name like Q001 will not be easily identifiable in the database.
3. The tab 'List options' is specific for each component. Here you can change the List Type (radio, checkbox, drop-down...), load answers from an option list, sort the answers or define some list settings.
4. On the question tab enter the question "You [purchased] [did not purchase] at [Company name] the past 3 months. Are you planning to purchase in the near future?"
5. The question text "purchased" or "did not purchase" depends on the value of N_BUYS_3MON in the profile extension PURCHASE_METRICS. You can change this text with an IF function just like in the Editor: ~(IF(PURCHASE_METRICS.N_BUYS_3MON>0,'purchased','did not purchase'))~. The complete question is as follows:
You ~(IF(PURCHASE_METRICS.N_BUYS_3MON>0,'purchased','did not purchase'))~ at Parana the past 3 months. Are you planning to purchase in the near future?
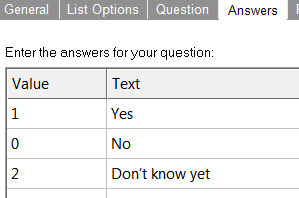
6. On the 'Answers' tab enter the text: Yes – No – Don’t know yet. As values set 1,0,2 respectively.
Error messages
With each question you can decide to overrule the default error messages. Under the 'Question' tab, check 'Alternative error message' and type your message.
You can also change the default messages under the 'Translations' tab on the survey overview page.
In this example, we will leave the defaults for each question. For a radio component the message is "This is a required field" if the contact did not select a value.
Question 2: Checkbox
7. A 'Checkbox List' component is about the same as a radio list. Drag it below the first question within the 'page' section. Name the component "No purchase reason" and rename the component's field name to "NO_PURCHASE_REASON".
8. On the 'List options' tab check 'Enable user defined answer'
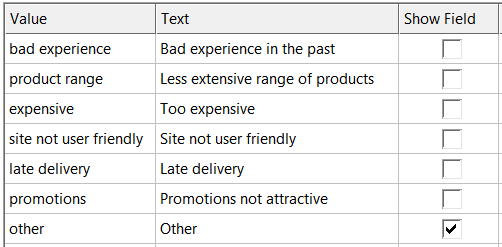
9. Enter the question "Why?" and define the answers. Click the 'Show field' checkbox behind "Other". This is the user defined answer.
Question 3: Text field
10. Drag a 'Text field' component below the previous question. Name it "Bad experience" with a field name "BAD_EXPERIENCE".
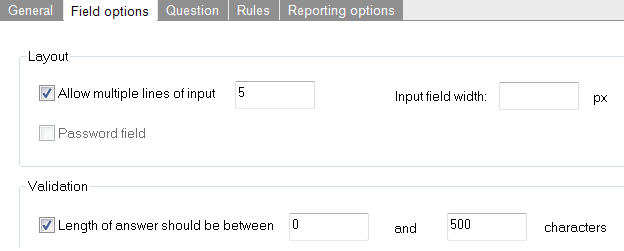
11. On the 'Field options' tab, check 'Allow multiple lines of input' and set the line number to 5. under 'Validation' set the 'Length of the answer should be between' 0 and 500 characters.
12. Enter the question "What was your bad experience?"

