The Article Container
Create the container
1. Click the Article Container component in the Components tab and select 'Create new'. The Article Container properties panel will open.
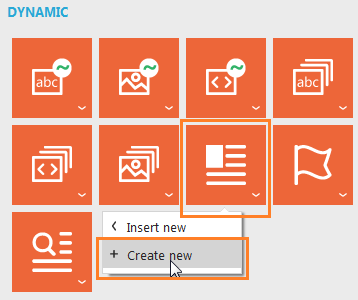
2. Give the component the name 'WEEKLY_PRODUCTS'. We will use 'Weekly products' as the alias that will be used in Express.
- Include only selected articles — Indicates that Express users are responsible for adding articles.
- Allow manual sorting — Adds up and down arrows in Express so the Express user can move articles up and down.
IMPORTANT NOTE:When 'Include only selected articles' is not selected, ALWAYS define a Filter in the Article Container to limit the amount of articles being loaded. When 'Include only selected articles' is unchecked, all articles in the Article list that match the given filter are loaded for each email that is generated for each contact. This will put a great load on the system if no filter is defined, or if the filter does not limit the loaded articles enough. Approximately 5000 articles can be loaded without affecting performance. For example, you could use a DELIVERY_AFTER_DATE field to filter the selection, with DELIVERY_AFTER_DATE <=GETDATE() as the filter criteria. GETDATE() returns the current date.
4. Click OK when done. The Article Container is listed under Used in this email on the 'Components' tab.
Configure the fields in the container
We need to define how the article fields can be used in Express, whether as an image, text only, hyperlink, etc.
1. Click the article container name under 'Used in this email' on the components tab to see the field names
2. Right-click CREATED_DT and select properties. Here you can define the field's behavior under 'Usage' (image, text only, hyperlink, etc.) and set an alias. The alias will be used as the field's name in Express:
- CREATED_DT, MODIFIED_DT and TAXONOMY — These can be set to "Not editable". The fields will not be shown in Express. An alias is not needed.
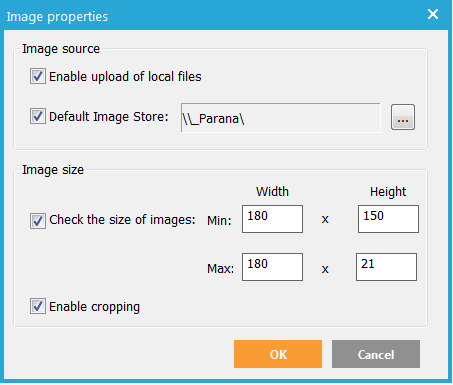
- IMAGE — Set the alias and usage to "Image". When you set the usage, the details button will be active. Click it to define additional image settings:
-
- Allow the Express user to upload local images.
- Set a default image storage folder.
- Set the minimum and maximum image size. For this design, the image must always be 180px width. The height can very a little between 150px and 210 px. The best size would be 180x180px.
- Allow the Express user to crop their images to the allowed
size.
- TITLE — Alias "Title", usage "Single line of text"
- PRICE — Alias "Price", usage "Number"
- LINK — Alias "Link", usage "Hyperlink"

Add the article container to the template
1. Make sure "Show table borders" is turned on in the top editing bar

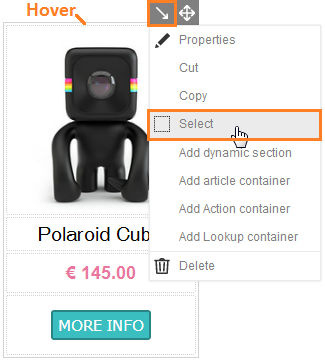
2. Next, hover the example table border, and when the two small editing icons pop-up, hover the left arrow icon. Choose 'Select' from the drop-down menu.
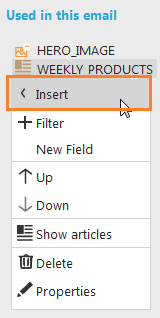
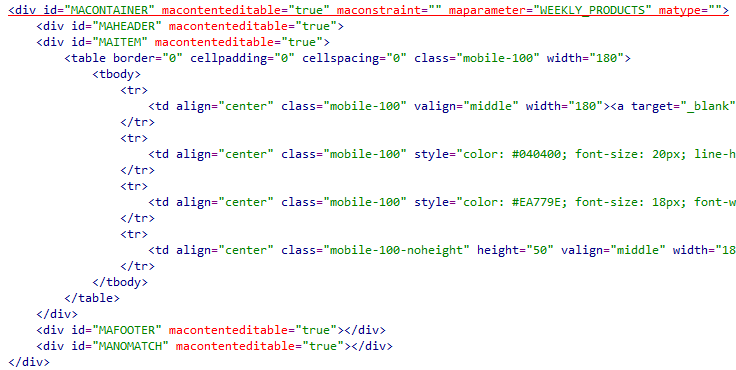
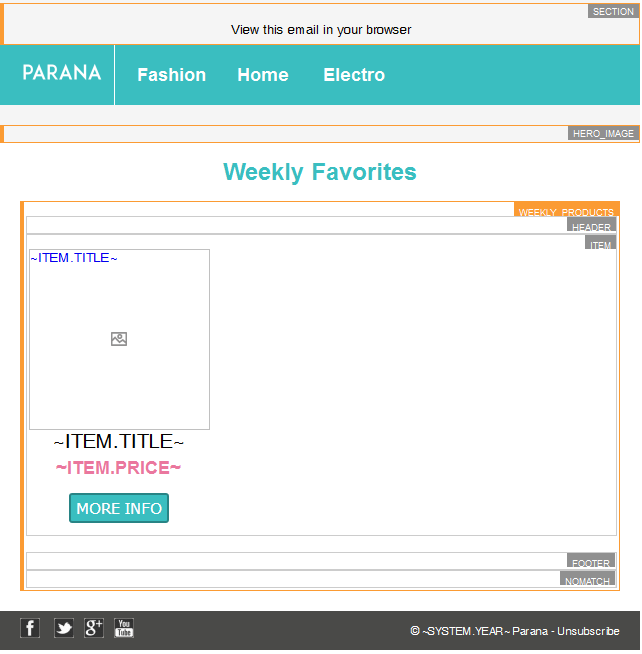
9. With the example table selected, right-click the article container under 'Used in this email' in the components panel and click Insert. This should wrap the article container around the example table. The article layout should ALWAYS be inside the "ITEM" (MAITEM) section.
NOTE: Only the content in MAITEM will be repeated for each article.
10. Alternatively, you can go in the source code, cut the example table, just below the "Weekly favorites" header, insert the article container and paste the example table within the MAITEM section in the container. The resulting HTML code is as follows (right side of the table cut off in the image):
11. Instead of the example content, we can use the article container
fields:
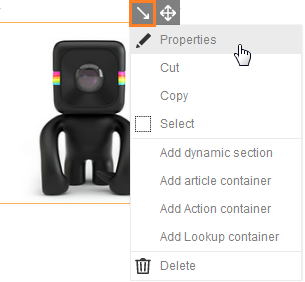
- The image attributes must remain, only its source needs to be replaced
with the IMAGE field and the alt tag with the TITLE field. Hover the
image and from the edit drop-down menu, select 'Properties'. For 'Source'
type ~ITEM.IMAGE~, and for alt. text ~ITEM.TITLE~
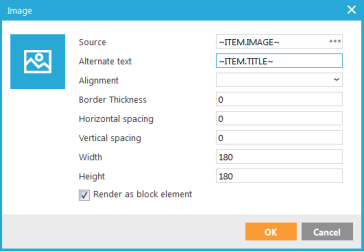
In our specific template, we need the height to be variable. It is set in the field properties earlier between 150px and 210px. So the height value cannot be set in the source code. When you edited the image properties, Selligent Campaign will require an image size and it has defaulted to the image attributes defined size.
Click the 'Source' tab and find the image. Hit ctrl+F and type ITEM.IMAGE. You should see the image tag. Delete "width: 180px; height: 180px;" from the style tag. The complete image tag is as follows:
<img alt="~ITEM.TITLE~" class="mobile-100" style="display: block; border: none;" width="180" src="~ITEM.IMAGE~" />
The class mobile-100 is used to make the image responsive. The class will override the image's width and height attributed. But not the style width: 180px; height: 180px; settings because the in-line style has a higher priority than the style tags defined at the top of the email.
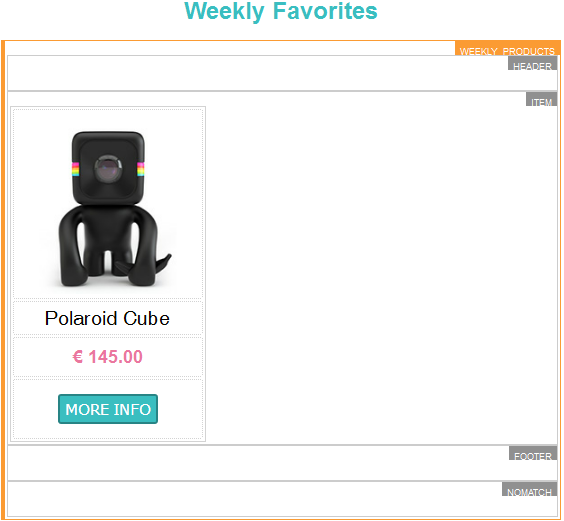
- In the source code, find the example title "Polaroid cube"
just below the image. Replace it with ~ITEM.TITLE~ but leave the a-tag
(hyperlink) that surround the title. Instead of typing it in, you
can also right-click the field in the components tab under 'Used in
the email' and select 'Insert'.
- Do the same for the example price. Find "€ 145.00"
in the source code just below the title and replace it with ~ITEM.PRICE~
- During html import, each element of the article received a sensor
linked to it with a fixed URL: the image, title, price and "more
info" button. We need a sensor with a variable url, depending
on the article. We will create one sensor for the article and use
it on the different article elements.
-
- Create a new sensor in the Sensors panel, give it the name
"Weekly products" and select the first option 'Send
the contact to an external location'. For an URL, use ~ITEM.LINK~.
Using the article container's LINK field only works if the sensor
is used within the ITEM (MAITEM) section.
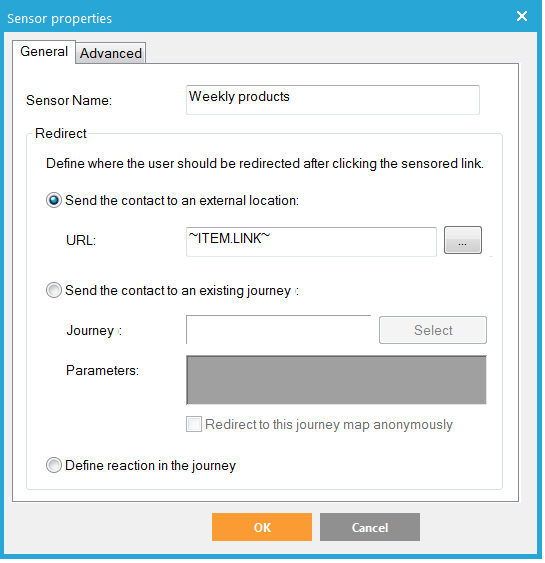
- Find the newly created sensor's ID in the Sensors panel. In
this example, it is 206. We will replace the existing hyperlinks
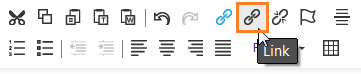
URLs with a new one for the sensor. Select an article element
and click the 'Link' icon in the top editing bar. Change the URL
to ~PROBE(206)~ where 206 is the ID of the newly created sensor.
'Protocol' should be "<Other>". Do the same for
each article element: image, title, price and "More info"
button.
- Create a new sensor in the Sensors panel, give it the name
"Weekly products" and select the first option 'Send
the contact to an external location'. For an URL, use ~ITEM.LINK~.
Using the article container's LINK field only works if the sensor
is used within the ITEM (MAITEM) section.
NOTE: By replacing the existing link's URL we make sure all other attributes of the initial design remain the same for this link (style, etc.)
-
- The original, and now unused sensors can be removed from the
Sensors panel. Right-Click somewhere in the panel (not on a sensor)
and select 'Delete unused sensors'. These are the remaining links
in this example:
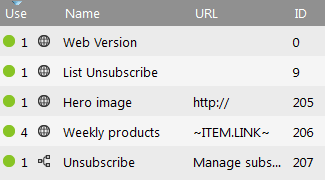
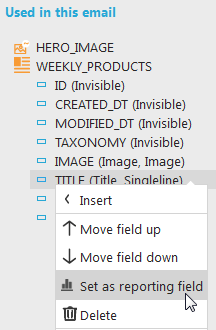
- In the reporting we would see the sensor name "Weekly
products" with all clicks of all the articles. By setting
the article container's field TITLE as 'Reporting field' the sensor
name would appear as a drop-down in the reporting with each article
title and the clicks per individual article. Right-click the article
container's TITLE field under 'Used in this email' on the Components
tab and select 'Set as reporting field'.
- The original, and now unused sensors can be removed from the
Sensors panel. Right-Click somewhere in the panel (not on a sensor)
and select 'Delete unused sensors'. These are the remaining links
in this example:
Span articles over multiple columns (COLCOUNT)
We need to show 3 articles next to each other in multiple columns, instead one article below the other. We can do this with 'Table-layout' on the article container.
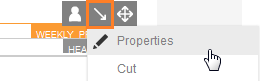
12. Hover the article container border in the email, when the 3 small editing icons pop-up, hover the middle arrow icon. Select 'Properties' from the drop-down menu.
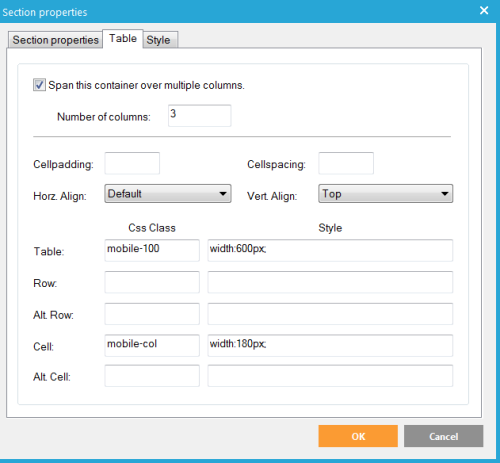
13. In the section properties panel, select the second tab 'Table'.
Check 'Span this container over multiple columns' and set the columns
to 3. An additional table is created in the eventual email around the
articles, splitting the articles in 3 columns. We want each article to
be aligned to the top of each cell of the generated table. Select 'Top'
from the 'vert. Align' drop-down.
To maintain the responsiveness of our design we'll add a table class and
style, and a Cell class and style to the generated table:
- Table CSS Class: mobile-100
- Table Style: width:600px;
- Cell Css Class: mobile-col
- Cell Style: width:180px;
When you set these properties, additional attributes
are added to the MACONTAINER section in the source code. The HTML of the
article container now looks like this (article table in MAITEM is trimmed
down to only the table-tags):
<div id="MACONTAINER" macontenteditable="true" maparameter="WEEKLY_PRODUCTS"
mashowalllanguages="FALSE" matable_colcount="3" matable_class="mobile-100"
matable_style="width:600px;" matable_tdclass="mobile-col"
matable_tdstyle="width:180px;" matable_halign="" matable_valign="Top"
mahidediv="true">
<div id="MAHEADER" macontenteditable="true"></div>
<div id="MAITEM" macontenteditable="true">
<table border="0" cellpadding="0"
cellspacing="0" class="mobile-100" width="180">...</table>
</div>
<div id="MAFOOTER" macontenteditable="true"></div>
<div id="MANOMATCH" macontenteditable="true"></div>
</div>
14. To create some 30px white space between the table cells we can add 'Separator' sections to the article container. These have to be added in the source code. These sections will create additional columns and rows in the generated table in between the table cells holding the articles.
- Switch to the 'Source' tab and find (ctrl+F) the MAITEM div.
- Just behind the MAITEM div and in front of the MAFOOTER div, enter the following lines:
<div id="MASEPTD" macontentEditable="true"
mahidediv="true">
<img border="0" class="mobile-5" height="30"
width="30" style="border: Solid 1px #808080; display: block;"
src="YOURIMAGELOCATION/spacer.png" />
</div>
<div id="MASEPTR" macontentEditable="true" mahidediv="true">
<img border="0" class="mobile-5" height="30"
width="30" style="border: Solid 1px #808080; display: block;"
src="YOURIMAGELOCATION/spacer.png" />
</div>
Replace YOURIMAGELOCATION with your image location (e.g. http://SUBDOMAIN.emsecure.net/images/)
When these column (MASEPTD) and row (MASEPTR) separator sections are added. Selligent Campaign will add the class "SEPTD" and "SEPTR" to the additional cells (TD) in the generated email. You can use these classes to style the cells. In this example the classes already have been defined in the original html you imported to maintain the responsiveness of the design.
The email now looks like this in the Editor:
Back to example: A template, step be step
See the Article Container topic for more detailed documentation on the subject.
