Introduction
The 'X' (formerly Twitter) Audience integration allows customers to exchange Engage Audience Lists for ads targeting in 'X' (formerly Twitter). An interface plugin has been developed which allows you to transfer (add/remove) data from Engage to 'X' (formerly Twitter) Tailored Audience lists. If the list doesn’t exist, a new one will be created.
Configure the Plugin
Create a Social Channel Endpoint in Engage
Create a new Social Channel endpoint for the 'X' (formerly Twitter) audience plugin at Admin Configuration > Global > Channel Endpoints. Fill out the following fields:
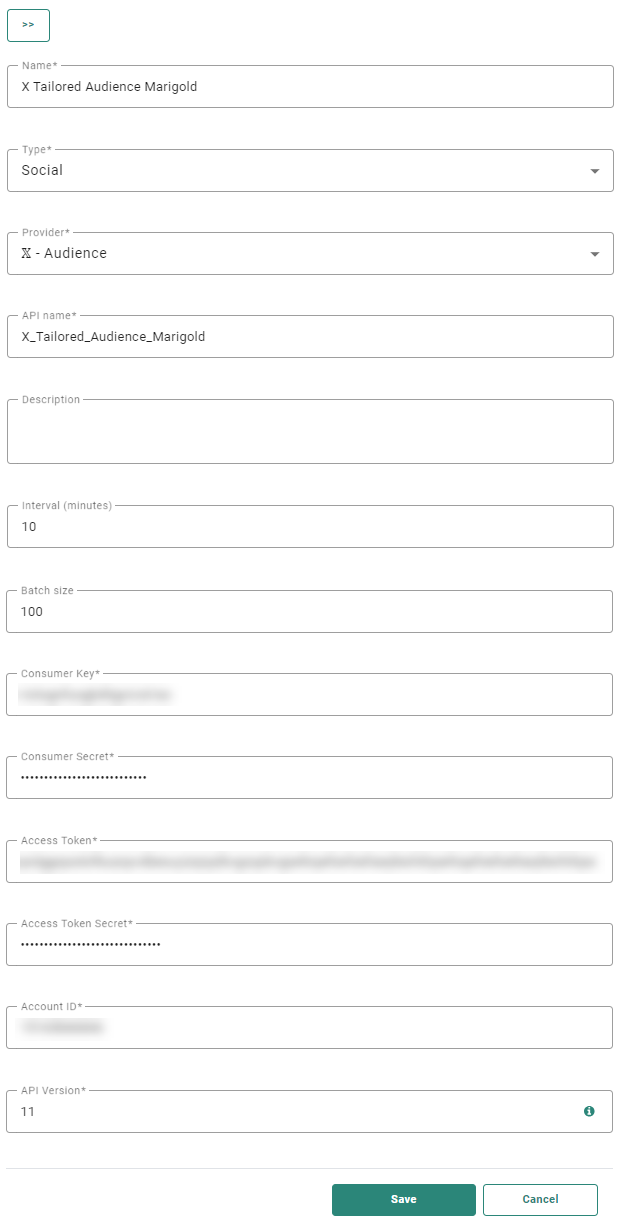
- Name — Name of the end point by which the endpoint will be identified in the Custom Journey.
- Type — Social
- Provider — Select 'X' (formerly Twitter)- Audience from the drop-down.
- API Name — The name that will be used by the API.
- Interval — Throughput interval, expressed in minutes. (minimum is 1 minute, default is 10 minutes)
- Batch size — Throughput batch size. It is recommended to set the batch size to maximum 25000 records per minute to avoid memory issues.
- Consumer Key* — The Consumer Key of the CustomAudienceApp
- Consumer Secret* — The Consumer Secret of the CustomAudienceApp
- Access Token* — The Access Token provided for the customer in step 3 of the Authorization process.
- Access Token Secret* — The Access Token Secret provided for the customer in step 3 of the Authorization process.
- Account ID* — The customers Tailored Audience Account Id
- API Version* — The version of the 'X' (formerly Twitter) API that should be used (default 7)
Connecting your 'X' (formerly Twitter) Instance to Your Organization
As you can create multiple instances of the 'X' (formerly Twitter) Audience plugin, you’ll need to define within the Admin Configuration which 'X' (formerly Twitter) instance you want to use within your organization.
1. In the Admin Configuration , click on Organizations tab and edit the one you want to configure.

2. Select the tab Endpoints and choose the preferred 'X' (formerly Twitter) Instance you like to use and click on Save.

Use the 'X' (formerly Twitter)Tailored Audience Component in a Custom Journey
When adding the 'X' (formerly Twitter) component to the journey, you can provide the following fields (data) that is needed to sync user data to a 'X' (formerly Twitter) tailored list.
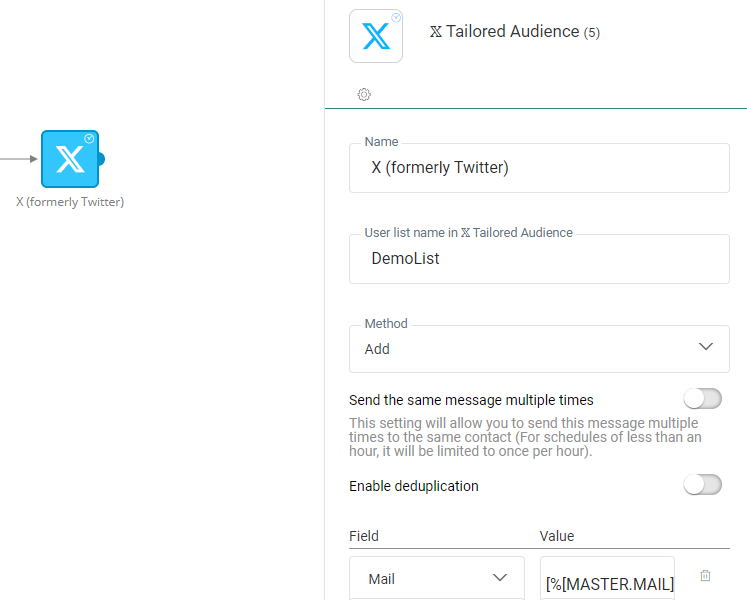
- Name — Choose a name
- User list name in 'X' (formerly Twitter) Tailored Audience * — 'X' (formerly Twitter) Tailored Audience Segment Name
- Method* — You can choose to Add or Delete the contact from the 'X' (formerly Twitter) audience
Add the following field mapping between the Engage Audience List and the 'X' (formerly Twitter) Tailored Audience.
- Mail — Trim leading and trailing white space and convert all characters to lowercase.
Set up in 'X' (formerly Twitter)
This section explains what steps are required to setup an app to push an audience to 'X' (formerly Twitter) through the 'X' (formerly Twitter) Audience social plugin.
Create a 'X' (formerly Twitter) Account
https://help.twitter.com/en/using-twitter/create-twitter-account
In order to start advertising with 'X' (formerly Twitter), you'll first need an 'X' (formerly Twitter) account! This allows you to log into Ads Manager. You can set up an account online or right from your phone.
1. Go to twitter.com/signup.
2. Click the Sign up button.
3. A Create your account pop up box will appear, and you’ll be guided through the sign up experience. You’ll be prompted to enter information such as your name and phone number or email address.
4. If you provided an email address while signing up, we will immediately send you an email with instructions so we can verify your email address.
5. If you provided a phone number while signing up, we will immediately send you a text message with a code so we can verify your number.
6. After entering your information, click Next.
7. In the Customize your experience pop up box, check whether you’d like to track where you see 'X' (formerly Twitter) content across the web and click Next.
Convert to a Professional Account
https://business.twitter.com/en/help/account-setup/professional-accounts.html
Follow these steps to switch your existing account to a Professional Account.
1. Go to either your profile settings or swipe open the sidebar when on your Home timeline in the app.
- If you’re in the sidebar, scroll until you see the 'X' (formerly Twitter) for Professionals tab and select it.
- If you’re in your profile settings, scroll until you see Switch to Professional and select it.
2. Once you've entered the conversion flow, select Get Started.
3. Select a category for your Professional Account and select Next.
Note: Remember to search for your most relevant category if you don’t immediately see it in the list.
4. Choose either Business or Creator and select Next.
Note: Remember to select whichever option is closest to how you identify as a professional on 'X' (formerly Twitter).
5. Congratulations! You are now a Professional on 'X' (formerly Twitter)!
Create an 'X' (formerly Twitter) Ads Account
https://business.twitter.com/en/help/account-setup/ads-account-creation.html
An 'X' (formerly Twitter) Ads account is how you can set up, run, and analyze Promoted Ad campaigns on 'X' (formerly Twitter).
1. Go to Twitter.com
2. Log in to the account that you want to promote Tweets from. This is the handle that your 'X' (formerly Twitter) Ads account will be created for.
3. Once logged in, go to ads.twitter.com
4. Select your country and time zone. Select the country whose currency you'd like to be billed in, and the time zone you'd like your campaign results to show up in.
Note: You cannot change these values once you've created your account.
5. You'll be brought to the campaign setup form or 'X' (formerly Twitter) Promote Mode setup, depending on your choice at step 4.
6. Enter your billing information to complete your ads account and start your campaign.
Authorization
https://developer.twitter.com/en/docs/basics/authentication/overview/pin-based-oauth
The authorization process must be done by the customer together with the TC, and allows CustomAudienceApp to use the customers’ accounts.
STEP 1
Make a POST-request to https://api.twitter.com/oauth/request_token?oauth_callback=oob
The authorization method is OAuth 1.0. You can get the Customer and Access Token and Secrets from our 'X' (formerly Twitter) app CustomAudienceApp in the Keys and tokens tab. (https://developer.twitter.com/en/apps/16403897)
As a response you will receive a oauth_token and oauth_token_secret. This data will be used in the next step.
STEP 2
Open a web browser and navigate to:
As a result you will see the following screen.
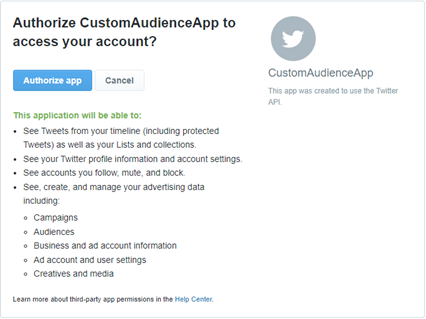
When you click the Authorize app button you will receive a PIN code. This code will be used in the next step.
STEP 3
Make a POST-request to:
https://api.twitter.com/oauth/access_token?oauth_verifier=[PIN Code]
The authorization method OAuth 1.0. The Consumer Key and Secret are the same as in STEP 1. The Access Token and Token Secret are those received in STEP 1.
As a result of this process you will receive a new Access Token and Access Token Secret. These will allow our CustomAudienceApp to use the customers account. You will need to provide this data to the Plugin.
Interesting Links
Intro into Custom Audiences:
https://business.twitter.com/en/help/campaign-setup/campaign-targeting/custom-audiences.html
'X' (formerly Twitter) Ads Account:
Professional 'X' (formerly Twitter) Account:
Get Started with 'X' (formerly Twitter) Ads:
https://business.twitter.com/en/advertising/get-started-with-twitter-ads.html
