An Export Task allows you to export Marigold Engage data to an external location. You can define when and how often the export must be executed and if someone needs to be notified about the status of the export task. Moreover, you can choose from a range of export locations where the data should be stored.
An Export Task can be created in two ways:
- From the fly-out menu available from the Data Exchange-entry in the left navigation bar. Click the + New button and select the type of task from the drop-down.
- In the Start page, select + New > Export task. A wizard guides you through the creation and configuration process.

Note: The steps overview can be used to go straight to a specific step when editing a task.
- Set the general properties
- Define the data source to use for the export
- Optional - Set the Trigger file
- Optional - Encrypt and zip
- Define the destination for the export file
- View the History
Set the General properties
Properties
- Folder Path — This is the location in the folder structure where the task is stored.
- Name and Description — Make sure to make it as explicit as possible to easily recognize the task in the Start page.
- Asset label — The label(s) assigned to this asset. Select one or more labels from the drop-down. (These labels are configured in the Admin configuration.) Users with the proper Access permissions can also create new labels here by typing the new label value in the field.
- API-Name — This name is used when the task is executed via the API. By default the API name is filled out with the name given to the task.
Schedule
The schedule switch indicates whether this task should have its own scheduling. This is unnecessary if this task will be part of a batch execution of tasks (batch job) – it inherits the scheduling of the parent batch job in that case.
When activated, the Schedule section defines the validity period of the task as well as the execution occurrence.
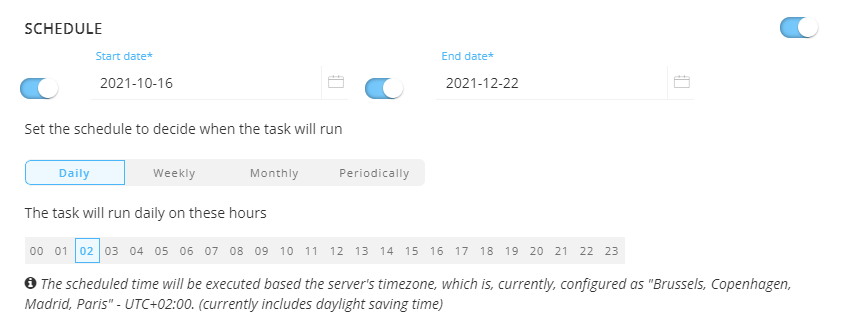
- Start and End date — You can set a start date and/or end date for the task. For example, your task can start now but needs to run indefinitely. The task can run more than once a week. You can also set the start time.
- Periodicity — Indicate when the task should run:
- Daily — Select the hours of the day on which the task should run. You can select more than one.
- Weekly — Select the day of the week on which the task should run.
- Monthly — Select the days of the month on which the task should run. You can also select the time of the day at which the task should start.
- Periodically — Set the recurrence of the task, expressed in minutes. For example, the task runs every 10 minutes.
Note: The scheduled time will be executed based on the server's timezone. The currently configured server's timezone is mentioned next to the info icon.
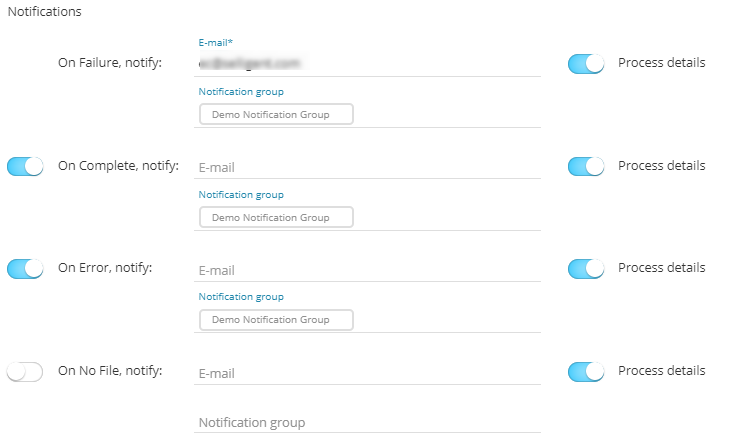
Notifications
- * OnFailure — When the process fails. At least one email address is mandatory.
- OnComplete — When the task is completed successfully.
- OnError — Completed with errors (job was completed but one or more tasks generated errors/exceptions).
- On No file — When no file could be found.
The details of the process can be included in the message. Additionally, the instance on which the problem occurred is included in the subject of the message.
To activate the option, simply flag the check box and enter one or more email addresses. (Multiple email addresses are separated by a semi colon). You can also select a notification group. These notification groups are created in the Admin configuration.
Note: Notification emails for when the task fails are mandatory. The other notifications are optional.
When done, press Next.
Set the scheduler (optional)
Note: The Scheduler section is only visible if there are schedulers configured on your environment. By default, there is 1 scheduler in which case this section is not shown as this default scheduler is used. If there is more than 1 scheduler configured, you will have access to the Scheduler section.
When multiple tasks, imports or exports are running it might be a good idea to use a different scheduler to make sure that long running tasks do not interfere with smaller tasks. Selecting a scheduler is optional and if you keep the default one all tasks/exports/imports will still run but if there is a bigger task, the smaller one will be executed only when the bigger one has finished.

You can choose between 3 different schedulers: the default one, custom scheduler 1 and custom scheduler 2. By selecting different schedulers for your tasks, they will be executed in parallel, without interfering with one another. So if you have long running tasks it might be a good idea to run these on a different scheduler.
Define the Data source
The Data source section allows you to define what data needs to be exported.
Datasource
In this section, you select the Stored Procedure that is used to retrieve the data from the database.

Click on the pencil icon to access the following dialog:

1. Select the Stored Procedure from the drop-down list. If the Stored Procedure requires parameters, additional fields are added to define the values for these parameters.
2. Next, set the Fail constraint. Use the return value of the Stored Procedure to define if it failed or not.
-
When no explicit return value is defined inside the Stored Procedure's design, value 0 is returned by default when it's successful. Other values imply a failure.
In this case you'd like to set the fail constraint to : Fail if return value <> 0.
-
When the Stored Procedure's design contains one or more custom return values, the values that are returned in case of success and failure depend on that design.
In that case you decide what you consider as a fail constraint.Example 1:
The Stored Procedure that is used, defines that value 10 is returned after execution of certain sql statements, and value 12 is returned after execution of another set of SQL statements.
You consider the part that defines the return value to be 12, to be the only successful part. In other cases, it should be considered as a failure.
In this case, you set the fail constraint to : Fail if return value <> 12.Example 2:
The Stored Procedure that is used, defines return values 1, 10, 50, 51, 52, 53, 54, 55, 56, 60.
You consider the return values 1, 10 and 50 as 'success' values. The others would indicate that something's wrong, and are thus considered as failures.
In this case, you can set the fail constraint to : Fail if return value >= 51.
3. If the Stored Procedure requires parameters, provide the values for the parameters. Parameters can be of type INPUT or OUTPUT. The value of an OUTPUT parameter can be set as a variable and this variable can be used as an INPUT parameter in another Stored Procedure.
4. You can include the Marigold Engage ID as column in the export file. This ID is a combination of the audience list ID and contact ID. If you want this, toggle the option on.
Save the settings for the datasource. You need to do this before being able to go to the following configuration options.
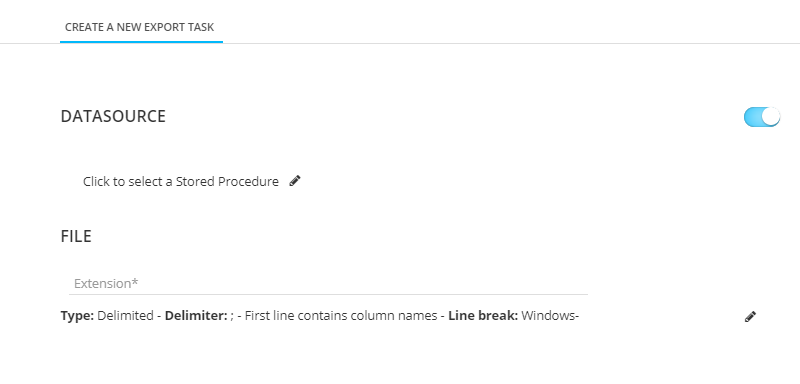
File
In this section, you define the generated file and its properties.
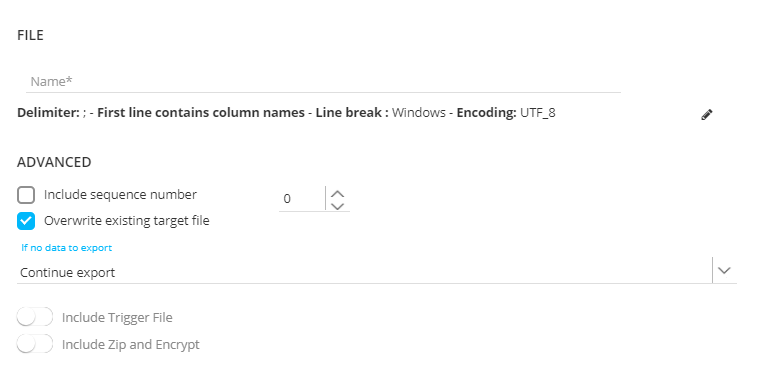
1. Define the name of the export file generated from the Stored Procedure.
Note: This file name can contain expressions. You can access these expressions through the Personalization Dialog: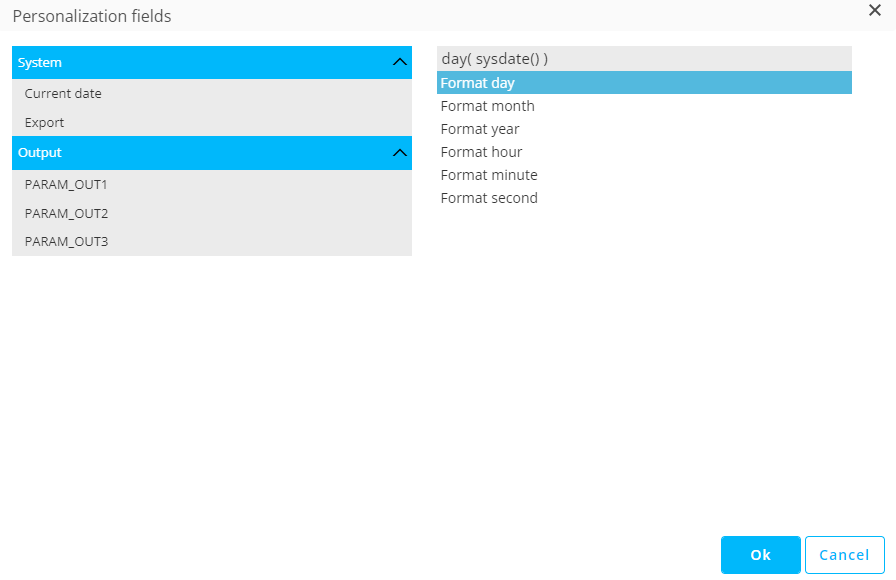
Export file names can be personalized with the following expressions:
For the current date:
* [%year(sysdate())%]
* [%month(sysdate())%]
* [%day(sysdate())%]
* [%hour(sysdate())%]
* [%minute(sysdate())%]
* [%second(sysdate())%]
For export-related expressions:
* [%export('sequenceNumber')%]
* [%export('rowCount')%]
* [%export('md5')%]
For output parameters:
* [%componentValue('OutputParameterName')%]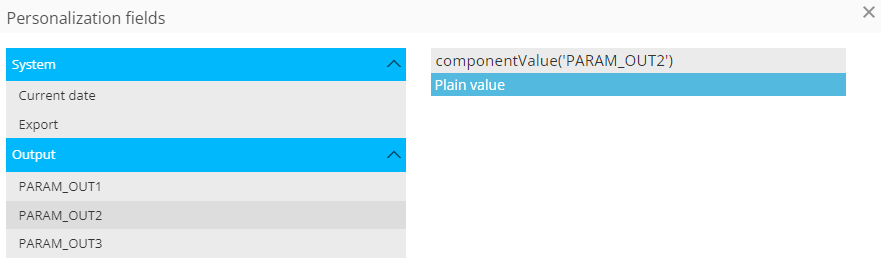
Note that output parameters can only be chosen when they're configured in the Stored Procedure selected above (in Datasource) :
If no output parameters are set in the Stored Procedure, the Personalization Dialog looks like this :
2. Next, set the options for the File type. Click the pencil icon to access the following dialog:
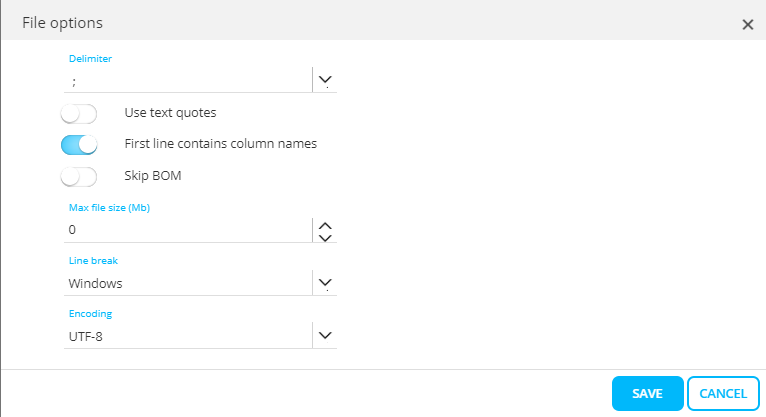
- The file delimiter can be set to colon, semi colon, tab or pipe delimited. By default the delimiter is set to ;.
- It is possible to wrap text with double quotes. Toggle the option on if you want this.
- You can also set the first row as the one containing the column names. This option is selected by default.
- The Skip BOM option allows you to not take into account the Byte of Order Mark at the beginning of a text stream.
- Set the maximum file size, expressed in Megabytes.
- Set the Line break either to Windows or Unix. Windows uses carriage return and line feed ("\r\n") as a line ending, where Unix uses just line feed ("\n").
- Set the type of encoding to apply to the file. Click the drop-down list to access an extensive list of encoding mechanisms.
3. When done with these options, press the Save icon to validate them. A summary of the selected options is now displayed and all options are hidden.
Advanced
The following set of options can now be configured:
- Include sequence number — Indicate if a sequence number must be added to the file name. This allows incrementing of the file names generated and is generally used to identify the files generated through consecutive exports.
- Overwrite existing target file and create folder location if non-existant — If the selected target file already exists, it will be overwritten if the option is selected. If the option is not selected the export will fail upon execution.
- If no data to export :
- Skip export — In case the selected list, segment and filter does not return any records, the export is not executed.
- Fail export — In case the selected list, segment and filter does not return any records the export is considered as failed.
- Continue export — The export will continue even if there is no data.
Next, you can indicate if a trigger file is used. If the option is checked, an additional step is added to the Export task creation wizard. Read more about this option in the following section.
Last, encryption and zipping can be activated. When this option is checked, the wizard contains an additional step.
Optional - Define the Trigger file
A trigger file is used for two reasons:
- A trigger file can indicate the status of a certain upload. For example, when the exports are being immediately picked up after they arrive at their destination, it is sometimes not possible for the receiving process to know if the file was already uploaded completely. In other words the receiving process might try to access data that is currently in transfer. A trigger file, which is created just after the data file was exported, can be used by receiving process as an indication of a completed/successful upload.
- Trigger files can also be used to store metadata about your export, like the number of records or the time the export was created. In theory, the file can contain everything that you can ‘query’ by the Stored Procedure (processor) that fills the contents of the trigger file.
Note: Any extension can be used for this trigger file (e.g., filename.tgr).
To define a Trigger file, perform the following steps:
Datasource
1. Enable the use of a trigger file.
2. Click on the pencil icon to access the following dialog:

3. From the drop-down list, select the Stored Procedure used to fill the trigger file. This does not have to be the same Stored Procedure as for the export file.
4. Next, set the Fail constraint. Use the return value of the Stored Procedure to define if it failed or not.
-
When no explicit return value is defined inside the Stored Procedure's design, value 0 is returned by default when it's successful. Other values imply a failure.
In this case you'd like to set the fail constraint to : Fail if return value <> 0.
-
When the Stored Procedure's design contains one or more custom return values, the values that are returned in case of success and failure depend on that design.
In that case you decide what you consider as a fail constraint.Example 1:
The Stored Procedure that's used, defines that value 10 is returned after execution of certain sql statements, and value 12 is returned after execution of another set of sql statements.
You consider the part that defines the return value to be 12, to be the only successful part. In other cases, it should be considered as a failure.
In this case, you set the fail constraint to : Fail if return value <> 12.Example 2:
The Stored Procedure that's used, defines return values 1, 10, 50, 51, 52, 53, 54, 55, 56, 60.
You consider the return values 1, 10 and 50 as 'success' values. The others would indicate that something's wrong, and are thus considered as failures.
In this case, you can set the fail constraint to : Fail if return value >= 51.
5. You can include the Marigold Engage ID as column in the trigger file. This ID is a combination of the audience list ID and contact ID. If you want this, toggle the option on and provide a name for the column.
6. Save the changes and fill out the properties in the File section.
File
1. Provide an extension for the trigger file. This can be any extension you want such as *.xp, *.trg or anything else.
2. Next, click the pencil icon next to the Type field to access the File properties dialog:
- Delimiter —The file delimiter can be set to a colon, semicolon, tab, or pipe.
- Use text quotes — It is possible to wrap text with double quotes. Toggle the option on if you want this.
- First line contains — You can also set the first row as the one containing the column names .
- Line break — Set the Line break either to Windows or Unix. Windows uses carriage return and line feed ("\r\n") as a line ending, where Unix uses just line feed ("\n").
3. When done, press Save.
Optional - Encrypt and Zip
This step allows you to encrypt and zip the export file and also choose which should be done first when both options are activated.
Zip — This option merely zips the export file before sending it to the Destination. When the option is selected, the user can opt for a customized name or a name generated automatically from the source.
Encrypt — Select this option to encrypt the generated export file. When the option is activated, the recipient's email address must be filled out. This address is used to send the public key used for the decryption.
Technical note:
To send an encrypted file from the Marigold Engage platform to an external location.
• Send the Public Key part of your PGP key to Marigold. You can attach this key to a Marigold Support ticket. A Support Engineer will make sure that this key gets configured properly in the platform.
--- If you have not yet created your own PGP key, please refer to section below “How to create a PGP key” in this document.
--- Never send the Private Key part of this PGP key to a third party! Marigold will also never ask you to send this part of the key to any of its employees.
• Configure a Data Export task to export this file to an external location.
--- In the Source options of this task, enable the ‘Include Zip and Encrypt’ option.
--- In the next step, fill in the ‘recipient’ field that is linked to your PGP key to encrypt the file.
How to create a PGP key?
Download your favorite PGP key management tool here: https://gnupg.org/download/index.html. Once downloaded, place the binaries in the C:\PGP folder to follow below example steps.
• Open a Command Prompt window
• Generate a signing key with command: gpg.exe --homedir “C:\PGP\PGPDB” --gen-key
--- Choose option: (5) RSA (Sign only)
--- Keysize: 4096
--- Key expiration: 0 (key does not expire)
---Is this correct? Y
--- Userid:
-------- Real Name: <YourCompanyName>
-------- Email address (recipient): <UniqueAddressPerPgpKey>
-------- Comment: 4096bit PHP key for <YourCompanyName>
-------- Confirm with: o (Okay)
---- Enter secure passphrase: <YourSecurePassphrase>
• Take note of the ID of the signing key that was created. We’ll need it in the next step. Retrieve this ID with command: gpg.exe --homedir “C:\PGP\PGPDB” –list-keys
• Generate an encryption key with command: gpg.exe --homedir “C:\PGP\PGPDB” --edit-key <ID>
--- Enter passphrase: <YourSecurePassphrase>
--- Command> addkey
--- Choose option: (6) RSA (encrypt only)
--- Keysize: 4096
--- Key expiration: 0 (key does not expire)
--- Is this correct? Y
--- Really create? Y
--- Command> save
• Export the public key of the PGP key that was created from the PGP keyring with command:
gpg.exe --homedir “C:\PGP\PGPDB” --export -a <UniqueAddressPerPgpKey> | Out-File -FilePath
“C:\PGP\MyPublicKey.asc”
Destination
The last step consists of defining where the export file should go. You can choose from the following options: Repository, FTPS, FTPS implicit, SFTP, Azure Blob Storage, Amazon S3 Storage, Google Cloud Storage or predefined. Depending on the medium, different settings are defined:
SFTP, FTPS, FTPS implicit — The name of the server as well as the user and password to connect to the server is required. The user can provide a specific sub-folder where the file should go. By default, a sub-folder is already selected.
Note: Expressions for SUBFOLDERS are now supported in the same way as they are for the file name definition in an Export task.
Private Key authentication
For SFTP, besides using a password to authenticate when connecting to the server, it's possible to use a private key instead:
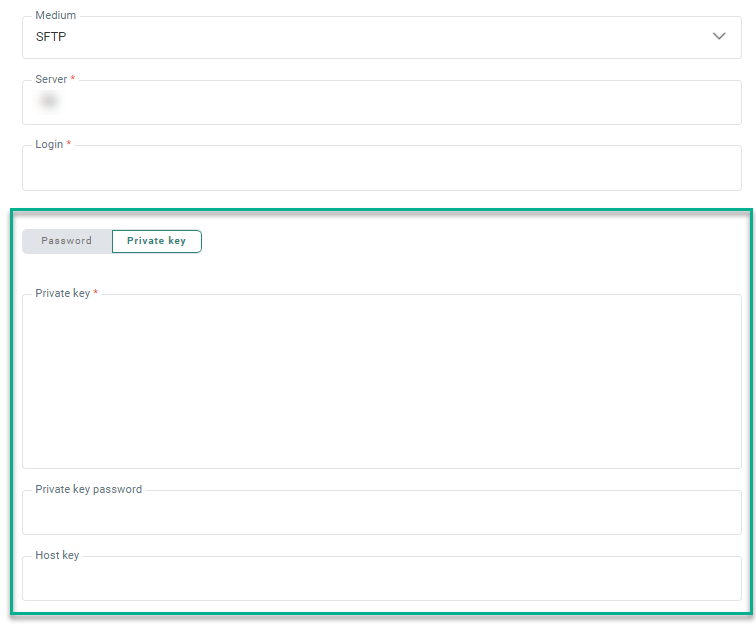
A toggle is available to select either Password or Private key.
When Private key is selected, you can enter (or paste) the private key data in the field Private Key.
If the private key requires a password (some servers do), you can enter the password in the Private key password field. This is an optional field.
Note: The data from both fields (private key and private key password) is stored encrypted in the database, and only used when transferring the files.
The Host key is an optional field that can be used as an extra verification step to make sure you’re connecting to the right server.
Note:
When saving the Export Task:
- The content of the private key field is emptied (for security reasons)
- The label for the private key field is updated to Specify a new private key in order to update the existing private key
- The content of the private key password field is emptied (for security reasons)
- The label for the private key password field is updated to Specify a new private key password in order to update the existing private key password
Repository — The repository is the local file system of the job agent. This file system already contains the folder Campaign data in which a sub-folder can be selected. Click the drop down menu to select the sub-folder to store the file.
Azure Blob Storage — Provide the connection string (you can toggle the visibility of the string on and off by clicking on the eye icon) and container, and an optional subfolder. (*)
Amazon S3 Storage — Provide the access key id and secret access key (you can toggle the visibility of both strings on and off by clicking on the eye icon), bucket name, region endpoint code, and an optional subfolder. (*)
Google Cloud Storage — Provide the type, project id, private key id and private key (you can toggle the visibility of both strings on and off by clicking on the eye icon), client email, client id, auth URI, token URI, authprovider X509 certificate URL, client x509 certificate URL, bucket name, and an optional subfolder. (*)
Pre-defined — When selecting this option the 'Predefined Transport Medium' field is displayed from where you can select a medium from a list of predefined mediums. These mediums are configured already in the Admin configuration and linked to your organization. When selecting one all corresponding settings are used.
* Note: Details on how to setup cloud storage configurations, can be found here.
Note: If you do not have the right to define mediums, the Medium section will be read-only when editing the task and when creating a new task only a predefined medium can be selected.
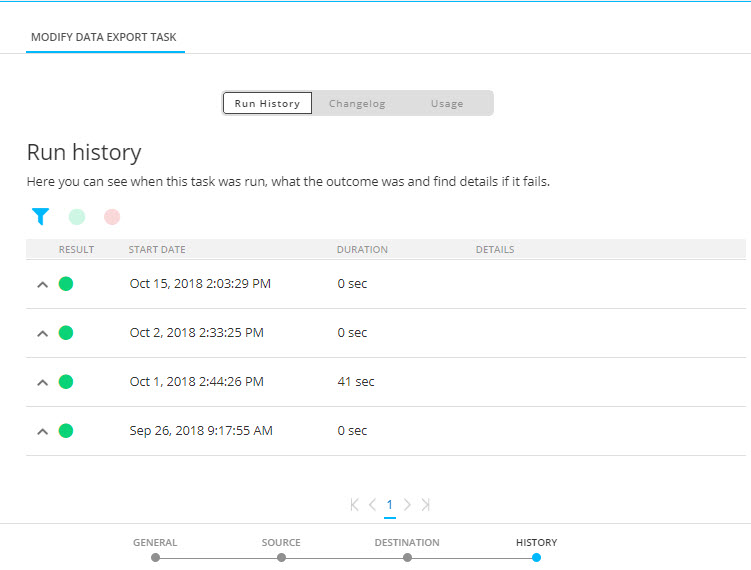
History
The History provides information on
- when this task was changed (updated, deleted) and by whom. This information is available from the Changelog tab.
- when the task was executed and the status of that execution. This information can be found on the Run history tab. If the task comprises subtasks, the execution history of these tasks can be consulted as well.
- where the task is used. This information can be found on the Usage tab.
Use the filter icons at the top to filter the Run history.
When done configuring the properties, you can choose to save the task or to save and enable it immediately.
