An Import Task can be created in two ways:
- Either from the fly-out menu available from the Data Exchange entry in the left navigation bar. Click + New and select the type of task from the drop-down list.
- In the Start page, select + New > Import task. A wizard guides you through the creation and configuration process.

Note: The steps overview can be used to go straight to a specific step when editing a task.
- Set the General properties
- Define the Source
- Optional define Post-Processing folders
- Optional Unzip and Decrypt
- Define the Destination
- View the History
General properties
In this section scheduling and notification options are defined for the Import Task.
Properties
- Folder path — Set the Folder path for the task. This is the location in the folder structure where the task is stored.
- Name & Description — Set a Name and Description for this task. Make sure to make it as explicit as possible to easily recognize the task in the Start page. For easier identification, it is recommended to use a prefix or naming convention which indicates the type of a job like: data load, data export, SQL, (parallel) batch and priority.
- Asset label — The label(s) assigned to this asset. Select one or more labels from the drop-down. (These labels are configured in the Admin configuration.) Users with the proper Access permissions can also create new labels here by typing the new label value in the field.
- API-Name — This name is used when the task is executed via the API. By default, the API name is filled out with the name given to the task.
Schedule
The schedule switch indicates whether this task should have its own scheduling. This is unnecessary if this task will be part of a batch execution of tasks (batch job) – it inherits the scheduling of the parent batch job in that case.
When activated, the Schedule section defines the validity period of the task as well as the execution occurrence.
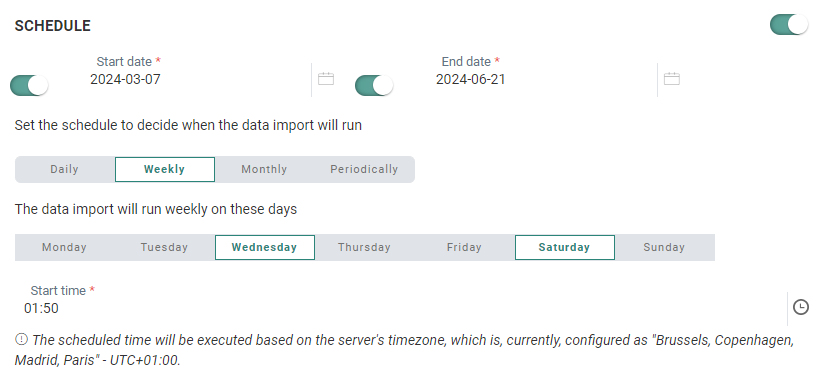
- Start and End date — You can set a start date and/or end date for the task. For example, your task can start now but needs to run indefinitely.
- Periodicity — Indicate when the task should run:
- Daily — Select the hours of the day on which the task should run. You can select more than one.
- Weekly — Select the day of the week on which the task should run. The task can run more than once a week. You can also set the start time.
- Monthly — Select the days of the month on which the task should run. You can also select the time of the day at which the task should start.
- Periodically — Set the recurrence of the task, expressed in minutes. For example, the task runs every 10 minutes.
Note: The scheduled time will be executed based on the server's timezone. The currently configured server's timezone is mentioned next to the info icon.
Trigger a journey after a task has run

This option allows you, if you wish, to trigger the execution of a Transactional Journey after the task has run successfully. This implies that the journey will not be executed if the task fails and the user is informed if this occurs.
Destination journey — Select a destination journey from the drop-down list. Only Transactional Journeys can be selected.
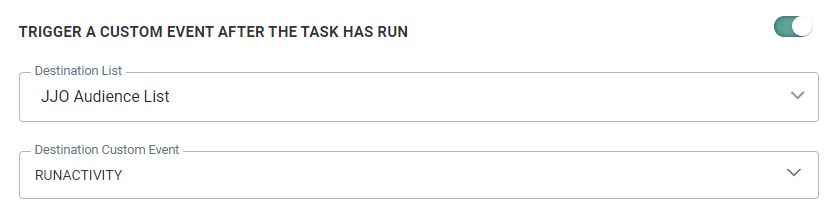
Trigger a Custom Event after the task has run
This option allows you to trigger the execution of an event-driven journey. For example, after importing data via a task into the Custom Events List in the database, you need to explicitly trigger the journey that uses that Custom Events List to ensure the records are processed.
First you need to select the Audience List and then a linked Custom Events List. The selected Custom Events Lists can only be used in one journey at a time and will automatically trigger that journey.
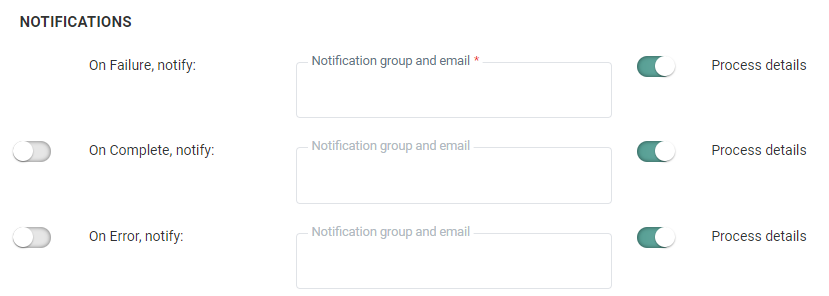
Notifications
A message can be sent either
- * OnFailure — When the process fails. At least one email address is mandatory. This can happen when there is a data mismatch, a column number mismatch between source and target, etc.
- OnComplete — When the task is completed successfully,
- OnError — Completed with errors (job was completed but one or more tasks generated errors/exceptions)
- On No file — When no file could be found
To activate the option, flag the check box and enter one or more email addresses. (Multiple email addresses are separated by a semi colon). You can also select a notification group. These notification groups are created in the Admin configuration.
Note: Notification emails for when the task fails are mandatory. The other notifications are optional.
Set the scheduler (optional)
Note: The Scheduler section is only visible if there are schedulers configured on your environment. By default, there is 1 scheduler in which case this section is not shown as this default scheduler is used. If there is more than 1 scheduler configured, you will have access to the Scheduler section.
When multiple tasks, imports or exports are running it might be a good idea to use a different scheduler to make sure that long running tasks do not interfere with smaller tasks. Selecting a scheduler is optional and if you keep the default one all tasks/exports/imports will still run but if there is a bigger task, the smaller one will be executed only when the bigger one has finished.

You can choose between 3 different schedulers: the default one, custom scheduler 1 and custom scheduler 2. By selecting different schedulers for your tasks, they will be executed in parallel, without interfering with one another. So if you have long running tasks it might be a good idea to run these on a different scheduler.
When done, press Next.
Define the source
Datasource
You can choose from a series of different data sources: Repository, Authorized URL, Public URL, Azure Blob Storage, Amazon S3 Storage, Google Cloud Storage, FTPS, SFTP, FTPS implicit. Depending on the medium selected, different connection options are configured:
Repository — The server on which the process runs contains a local file system with the folder Campaign Data. You can select a subfolder from the drop-down list to retrieve the import file from. Please note that when this option is selected, you also need to specify the Data Exchange path.
Note: Repository is only available for on-premise customers because it requires the configuration of a network and server location.
Public URL – Provide the URL. Accessible without login and password and supports HTTP or HTTPS.
Authorized URL – Provide the URL and user name and password to connect to it. Only supports HTTPS.
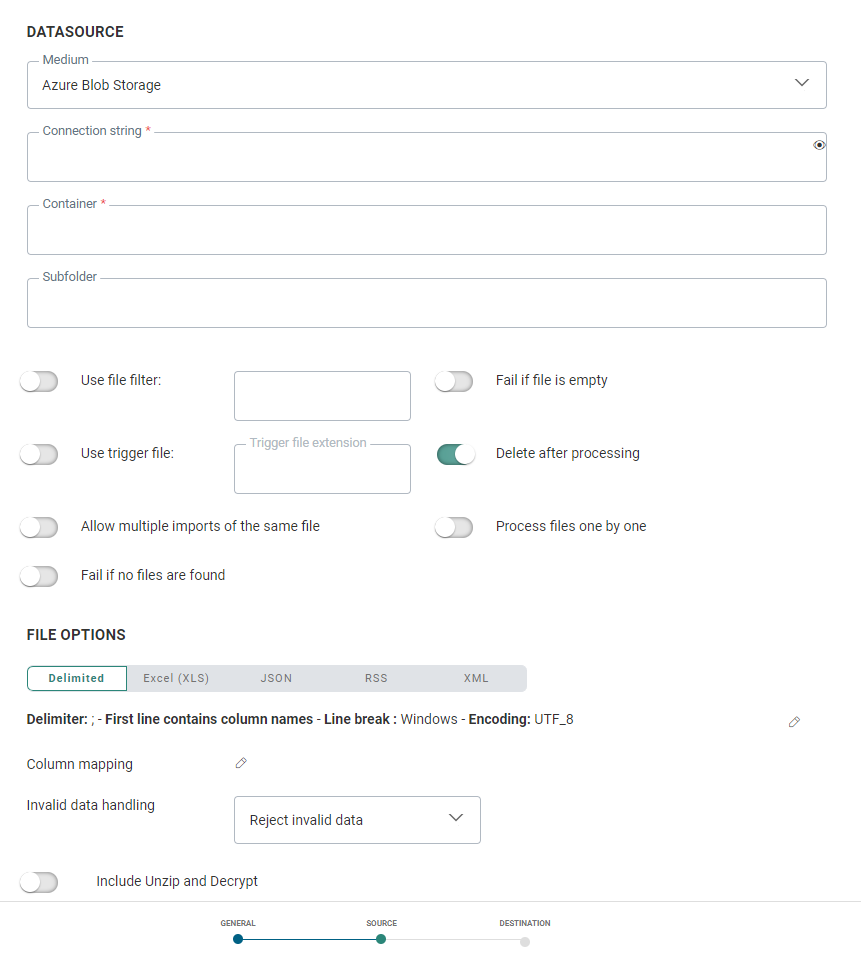
Azure Blob Storage — Provide the connection string (you can toggle the visibility of the string on and off by clicking on the eye icon) and container, and an optional subfolder. (*)
Amazon S3 Storage — Provide the access key id and secret access key (you can toggle the visibility of both strings on and off by clicking on the eye icon), bucket name, region endpoint code, and an optional subfolder. (*)
Google Cloud Storage — Provide the type, project id, private key id and private key (you can toggle the visibility of both strings on and off by clicking on the eye icon), client email, client id, auth URI, token URI, authprovider X509 certificate URL, client x509 certificate URL, bucket name, and an optional subfolder. (*)
* Note: Details on how to setup Cloud Storage configurations, can be found here.
Pre-defined — When selecting this option the 'Predefined Transport Medium' field is displayed from where you can select a medium from a list of predefined mediums. These mediums are configured already in the Admin Configuration and are linked to your organization. When selecting one all corresponding settings are used. You can select a subfolder from the drop-down list.
FTPS, FTPS implicit, SFTP — Provide the name of the server and the user and password to connect to the server. A subfolder on the server can be selected and one subfolder is selected already by default.
FTPS is the preferred option because of the extra security layer in the protocol.
SFTP can be provided by Marigold or on an external platform.
Only connecting IPs on default port 22 need white listing.
Private Key authentication
For SFTP, besides using a password to authenticate when connecting to the server, it's possible to use a private key instead:
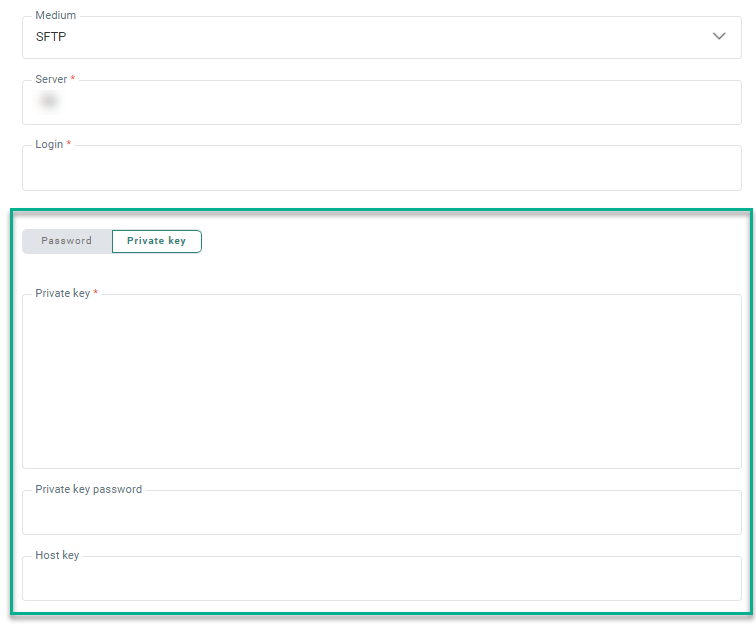
A toggle is available to select either Password or Private key.
When Private key is selected, you can enter (or paste) the private key data in the field Private Key.
If the private key requires a password (some servers do), you can enter the password in the Private key password field. This is an optional field.
Note: The data from both fields (private key and private key password) is stored encrypted in the database, and only used when transferring the files.
The Host key is an optional field that can be used as an extra verification step to make sure you’re connecting to the right server.
Note:
When saving the Import Task:
- The content of the private key field is emptied (for security reasons)
- The label for the private key field is updated to Specify a new private key in order to update the existing private key
- The content of the private key password field is emptied (for security reasons)
- The label for the private key password field is updated to Specify a new private key password in order to update the existing private key password
Note: Because of the internal security that is being enforced within the SAAS environment, FTP transfers to and from external servers are only allowed on default FTP ports.
Note: If you don't have the right to define mediums, the Medium section will be read-only when editing the task and when creating a new task only a predefined medium can be selected.
The above File location is followed by several additional options:
Use File Filter — Filter the files to import. The file mask filter uses the specified values as a search pattern. Only file names that match the pattern are picked up. You can enter for example the extensions of the files that must be imported. You can use * as a wildcard and you can even generate some personalization fields such as the current date.
Fail if file is empty — Determines whether the import fails if the file is empty.
Use trigger file — A trigger file can be used. Check the option and enter the extension of the file. The main functionality of a trigger file is to verify if the main data file has already been completely uploaded. It can happen that a dataloader picks up a file while it is still in the process of being transferred to the medium. The trigger file however, is much smaller and is created right after the transfer is completed, that way the data load knows for sure when the file is eligible to be processed.
Note: The trigger file has the same name as the import file, just a different extension.
Delete after processing — Check this option if the file can be deleted after the load. This option is typically used when using dynamic file names. If you use dynamic file names you will want to enable this option. If not, either the dataload will fail (if ‘allow multiple imports of the same file name’ is enabled) or every file will be picked up and processed at each interval. The latter is never a good idea. If you don’t enable ‘delete file after processing’ and the file is not overwritten before each execution interval, you will end up overwriting all records with the ‘old’ data from a previous the import file.
Allow multiple imports of the same file name — An import file can be uploaded more than once and the list of uploaded files is maintained over time. So, if this option is unchecked, import of the same file name in the same day will not be allowed.
Note: However, to be able to track and log the multiple dataloads it is advisable to always enable the option. With a unique file name, more information can be obtained.
Fail if no files are found — Determines whether the load fails if no files are found that match the file filter. Use this option if the import requires a file for processing at the defined interval.
Process files one by one — If checked, all files are processed one by one through the entire process from download through processing and finally handling the file on the server. If there is an issue with one of the files, the other files will still be processed.
When the option is not checked, further processing is aborted when an issue occurs in one of the files.
File options
You can choose between five file types:
- Delimited — Delimited files are files that use comma, semi-colon, pipe or tab as a delimiter for the columns.
- XML — The incoming XML file must be parsed. The XML format descriptor allows defining tables and fields that need to be distracted from the XML file. (technical note on XML parsing)
- JSON — The incoming JSON must be parsed. The JSON format descriptor allows defining tables and fields that need to be distracted from the JSON.
- Excel — An Excel file with or without row headers can be used as import file. XLS and XLSX can be used here. When multiple sheets are available in the XLS, only the selected one will be imported.
- RSS — The root node of the RSS file needs to be provided.
Delimited

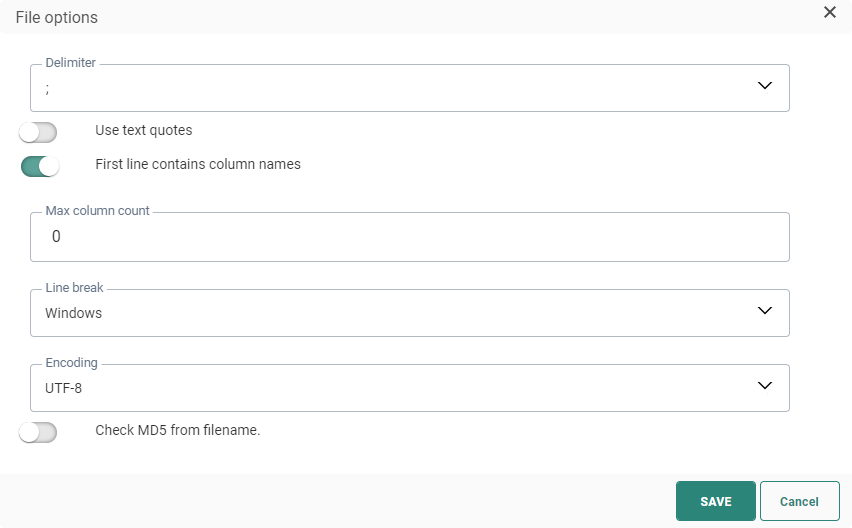
Delimiter — Set the delimiter of the file. A choice can be made from Tab, colon, semicolon and pipe. The default is ;
Use text quotes — It is possible to wrap text with double quotes. If this is the case, all the alphanumeric data is included in the quotes and ensures that a field containing the delimiter char will not be interpreted as an extra column.
Example: In a pipe separated file;
My favorite|color : would indicate that there are two fields but by placing the head and trailing text quotes it is considered to be one field.
“My favorite|color”
First line contains column names — You can also set the first row as the one containing the column names. This option is selected by default and is recommended because the column names of the file are translated into the column headers of your table.
Note: When a file contains the header row with column names, but no data, this does not constitute an empty file, but a valid file with no records and as a result it is processed without error.
Max column count — The maximum number of columns allowed in the file. Because of the dynamic nature of the dataload task, whereas the staging table will automatically adapt to the content of the flat file, it can be useful to set an upper limit for the columns that can be created.
Line break — Set the Line break either to Windows or Unix. Windows uses carriage return and line feed ("\r\n") as a line ending, where Unix uses just line feed ("\n").
Encoding — Set the type of encoding to apply to the file. Click the drop-down list to access an extensive list of encoding mechanisms.
Check MD5 from filename — This option is used to double check the content of the file. This MD5 key is added to the file name and created based on the content of the file. When the option is activated, the MD5 key is checked against the content of the file and enables the detection of changes in the file.
XML
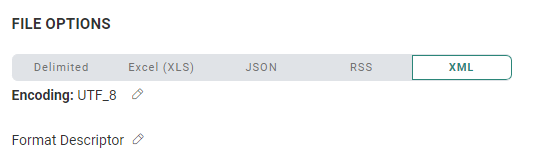
Encoding — Set the type of encoding to apply to the file. Click the pencil icon to access a dialog and an extensive list of encoding mechanisms. In addition, the option Check MD5 from filename is used to double check the content of the file. This MD5 key is added to the file name and created based on the content of the file. When the option is activated, the MD5 key is checked against the content of the file and enables the detection of changes in the file.

JSON

Encoding — Set the type of encoding to apply to the file. Click the pencil icon to access a dialog and an extensive list of encoding mechanisms. In addition Check MD5 from filename is used to double check the content of the file. This MD5 key is added to the file name and created based on the content of the file. When the option is activated, the MD5 key is checked against the content of the file and enables the detection of changes in the file.
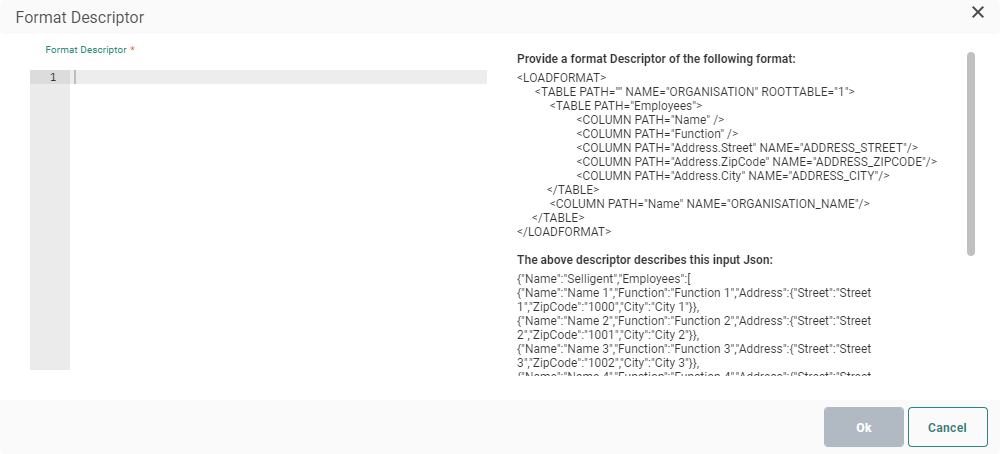
Click the Format Descriptor to define the tables and fields that need to be distracted from the JSON file. You can find an explanation of the format descriptor here.
Excel

Sheet name — The name of the sheet in the xls file that is subject of the import. When there are multiple worksheets, only the named worksheet is processed, all other worksheets are ignored. In case there are multiple worksheets to process, they have to be tackled as individual XLSX files as only one worksheet can be imported at a time.
First line contains column names — Select the option if the top row in your sheet contains the column names.
Rows to skip — Indicate the number of rows in the file that should be excluded
Encoding — Set the type of encoding to apply to the file. From the drop-down you have access to an extensive list of encoding mechanisms. In addition Check MD5 from file name is used to double check the content of the file. This MD5 key is added to the file name and created based on the content of the file. When the option is activated, the MD5 key is checked against the content of the file and enables the detection of changes in the file.
RSS

Root node (optional) — The root node of which all child nodes are retrieved. If the root node is not configured, the default Xpath in which data is expected is the Channel node. If the root node is configured, you can use that name.
Note: All <item> elements and their content inside the root node (eg. <channel>) can be imported.
If other elements appear directly under the root element (on the same level as <item> elements), those will not be imported.
Example 1 — When we don't configure a root node, the 'channel' node from this RSS file will be used as root by default (the item and its details will be imported) :
<?xml version="1.0" ?>
<rss version="2.0">
    <channel>
        <item>
            <title>News of today</title>
            <link>https://www.xul.fr/en-xml-rss.html</link>
            <description>RSS item 1</description>
            <name>Siyashree</name>
        </item>
    </channel>
</rss>Example 2 — We configure a 'customrss' element as root node. It will be used as root in the following RSS file (the item and its details will be imported) :
<?xml version="1.0" ?>
<rss version="2.0">
    <customrss>
        <item>
            <title>News of today</title>
            <link>https://www.xul.fr/en-xml-rss.html</link>
            <description>RSS item 1</description>
            <name>Siyashree</name>
        </item>
    </customrss>
</rss>
Encoding — Set the type of encoding to apply to the file. Click the drop-down list to access an extensive list of encoding mechanisms.
Check MD5 from filename — This option is used to double check the content of the file. This MD5 key is added to the file name and created based on the content of the file. When the option is activated, the MD5 key is checked against the content of the file and enables the detection of changes in the file.
Note: When using RSS files, Media RSS* is supported by default.
* What is Media RSS? It's an RSS extension that adds several enhancements to RSS enclosures, and is used for syndicating multimedia files in RSS feeds. It was originally designed by Yahoo! and the Media RSS community in 2004, but in 2009 its development was moved to the RSS Advisory Board.
Please consult https://www.rssboard.org/media-rss for more info.
Example of an RSS file containing media content :
<?xml version="1.0" ?>
<rss version="2.0">
    <channel>
        <item>
          <title>The latest video from an artist</title>
          <link>http://www.foo.com/item1.htm</link>
          <media:content url="http://www.foo.com/movie.mov" fileSize="12216320" type="video/quicktime" expression="full">
            <media:player url="http://www.foo.com/player?id=1111" height="200" width="400" />
            <media:hash algo="md5">dfdec888b72151965a34b4b59031290a</media:hash>
            <media:credit role="producer">producer's name</media:credit>
            <media:credit role="artist">artist's name</media:credit>
            <media:category scheme="http://blah.com/scheme">
              music/artistname/album/song
            </media:category>
            <media:text type="plain">
              Some text
            </media:text>
            <media:rating>nonadult</media:rating>
            <dcterms:valid>
              start=2002-10-13T09:00+01:00;
              end=2002-10-17T17:00+01:00;
              scheme=W3C-DTF
            </dcterms:valid>
          </media:content>
        </item>
    </channel>
</rss>
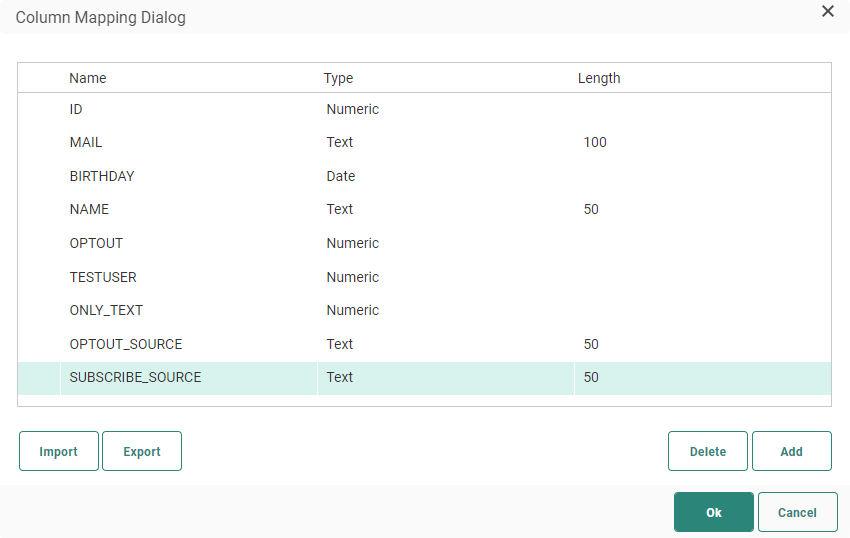
Column mapping
Column mapping allows you to map the columns in the database to the columns in the import file. The Column mapping defines the structure of the expected file. Fields can be added manually here with a name, type, and length.
Technical Note:
Adding column mapping becomes vital for creating successful data loads. Therefore, if no configuration is made to set the columns definition, warnings are being thrown. If no column mapping is defined, all columns of the staging tables will be created with data type NVARCHAR(MAX). This datatype has some significant disadvantages, therefore adding column mapping should be considered as a requirement to make sure that:
- You can avoid implicit converts when migrating data from the staging to the production table. The data types are already defined properly with the right setup of column mapping enabled and they should match the datatype of the production database
- You will only take up the minimum amount of storage needed when storing this data in the staging table. Remember, for each Unicode character or n(var)char you’ll need two bytes. This datatype leads to massive read operations that can be avoided when more suitable datatypes are used. The latter is especially true when the key values, on which the UPSERT in your dataload SP is based, are of the nchar type
- You can create indexes. One can’t place indexes on field(s) with the total sum of datatype * length that exceeds the 900 bytes’ mark. Therefore, placing indexes on NVARCHAR(MAX) is simply not possible database wise.
- Even without the advantages at the DB level, there are a lot of performance gains when implementing column mapping. Most apparent is that, because the final datatypes are known, more records can be loaded in memory from the flat file and being transferred to the DB at the same time.
Use the Export button to export the current defined mapping to a CSV file. Use the import button to import an existing CSV file and use the structure of the file for the mapping.
Additional options
Invalid data handling — This defines what should be done when there is invalid data. It mostly concerns delimiter and data type issues. Following options can be chosen from:
- Reject invalid data — Marks invalid records as rejected and the entire content of a line in the source file is placed in a reject file together with a description of the error.
- Skip invalid data — Continues without acting on the invalid data. Possibly certain rows will not be eligible for import because of issues like: wrong amount delimiters, wrong data types, truncation errors, … . Enabling this option will skip those records in the flat file and continue to the next one. Our advice would be, if you choose to enable this option, to always use it together with the next functionality.
- Keep invalid data — Stores the data in the staging table. However, the original data will be stored in one single field (as text) instead of filling in the required fields of the staging table. How that data is processed is up to you.
- Stop processing — Stops the process entirely and throws an error.
Use Processing folders — When this option is used, you will be able to control more and check on more of what happens during the processing of the file. This option is only available for the external file server data source (FTP). When this option is checked, an additional step is added to the wizard.
While being processed, files are put in the Processing folder. When completed, they are put in the Completed folder and if something went wrong, these files will be stored in the Failed folder. The folders are located on the (S)FTP(S) server .
Include unzip and decrypt — Set this option if the import file needs to be unzipped and decrypted. An extra step is added to the wizard when the option is selected.
Folders
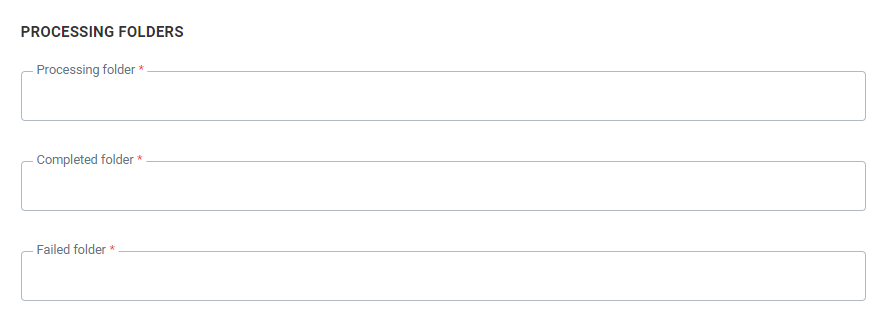
In this section, set the folders that should be used on the server:
Processing folder — Folder used before processing the file
Completed folder — Folders used when the file is processed successfully
Failed folder — Folder used when processing failed
Unzip and Decrypt

Select the options that should be executed and the order in which this should be done. Click the arrow to invert the order.
Unzip source files — If the source file is zipped, check the option to unzip the files first. Use the Filter field to filter the files. The filter can contain expressions. Click the personalization item on the Filter field to access the dialog and select the expression. Important remark here is that the zip file needs to correspond with the file mask that was specified in the file filter on the Source tab.
Following expressions are supported:
* [%year(sysdate())%]
* [%month(sysdate())%]
* [%day(sysdate())%]
* [%hour(sysdate())%]
* [%minute(sysdate())%]
* [%second(sysdate())%]
Decrypt source file using PGP — If the source file is encrypted with PGP, the user must enter the pass phrase and the recipient. The recipient is in fact an email address used to retrieve the public key. The Passphrase is used as a password to decrypt.
Technical note:
To send an encrypted file from an external location to the Marigold Engage platform.
• Encrypt the file using the Public Key that was provided by Marigold Engage.
• Upload the file to the Marigold Engage (S)FTP(S) server.
• Configure an Import task to import this file in the Marigold Engage platform.
o In the Source options of this task, enable the ‘Include Unzip and Decrypt’ option
o In the next step, fill in the ‘recipient’ and ‘passphrase’ fields with the values that are linked to your Marigold Engage PGP key to decrypt the file.
Define the destination
In this section, the user defines the destination of the imported file. A temporary staging table name must be provided.
Note: This is the name of a temporary table that is used to upload data from the source. With the processing of each file this table will be dropped and recreated. Keep this in mind when using indexes, constraints or other things on this table.
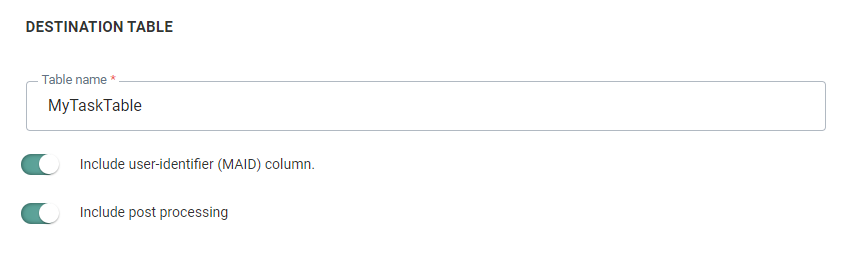
Include user identifier (MAID) column — Check the option to include a 'MAID' column if repeated imports occur. If this check box is activated, an extra numeric column 'MAID' is added to the table created by the job agent. This is handy to update the records in the main table with the corresponding records of the temporary table as it is used as the key field for an update or insert.
Include post-processing — If this option is checked, you have the possibility to do some additional data processing as well as Reject Management. An additional step is added to the wizard to configure these extra options.
Post-Processing
Data processing

If data processing is required, activate the option.
Click on the Edit button to select the Stored Procedure. The following dialog is displayed:
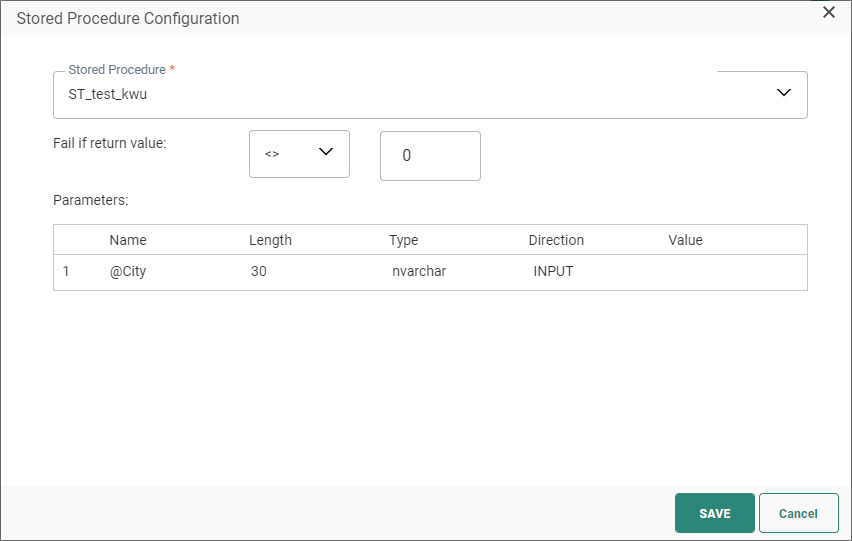
1. From the drop-down list, select the Stored Procedure used to fill the trigger file. This does not have to be the same Stored Procedure as for the export file.
2. Next, set the Fail constraint. Use the return value of the Stored Procedure to define whether it failed or not.
-
When no explicit return value is defined inside the Stored Procedure's design, value 0 is returned by default when it's successful. Other values imply a failure.
In this case you'd like to set the fail constraint to : Fail if return value <> 0.
-
When the Stored Procedure's design contains one or more custom return values, the values that are returned in case of success and failure depend on that design.
In that case you decide what you consider as a fail constraint.Example 1:
The Stored Procedure that's used, defines that value 10 is returned after execution of certain sql statements, and value 12 is returned after execution of another set of sql statements.
You consider the part that defines the return value to be 12, to be the only successful part. In other cases, it should be considered as a failure.
In this case, you set the fail constraint to : Fail if return value <> 12.Example 2:
The Stored Procedure that's used, defines return values 1, 10, 50, 51, 52, 53, 54, 55, 56, 60.
You consider the return values 1, 10 and 50 as 'success' values. The others would indicate that something's wrong, and are thus considered as failures.
In this case, you can set the fail constraint to : Fail if return value >= 51.
3. Parameters — Some Stored Procedures require parameters. When this is the case, an additional section is available where these parameters can be defined.
Click Save to store the selected procedure.
Reject Management
Reject Management is used when the data source needs to be validated. All the records that are not valid are exported in a separate file.

Basic concept:
- Data is transferred into a temporary table
- Two more columns are added (OPTI_REJECTED & OPTI_REJECTED_REASON) to the temporary table
- The Stored Procedure performs checks on data. If some records have corrupted information, the column OPTI_REJECTED has to be set to ‘1’ meaning that the record is rejected. A custom reject message can be set into the OPTI_REJECTED_REASON field.
Afterward, the Stored Procedure transfers all the valid data from the temporary table into the Marigold Engage table.
The list of possible medium types comprises Repository, Authorized URL, Public URL, Azure Blob Storage, Amazon S3 Storage, Google Cloud Storage, FTP, SFTP, FTPS. The parameters to fill out depend on the selected medium type. The user can select a sub-folder to store the file. The file type is ; separated by default.
Repository — The server on which the process runs contains a local file system with two folders already in it: Data In and Campaign Data. You can select a subfolder to retrieve the import file from.
Public URL – Provide the URL. Accessible without login and password and supports HTTP or HTTPS.
Authorized URL – Provide the URL and username and password to connect to it. Only supports HTTPS.
Azure Blob Storage — Provide the connection string (you can toggle the visibility of the string on and off by clicking on the eye icon) and container, and an optional subfolder. (*)
Amazon S3 Storage — Provide the access key id and secret access key (you can toggle the visibility of both strings on and off by clicking on the eye icon), bucket name, region endpoint code, and an optional subfolder. (*)
Google Cloud Storage — Provide the type, project id, private key id and private key (you can toggle the visibility of both strings on and off by clicking on the eye icon), client email, client id, auth URI, token URI, authprovider X509 certificate URL, client x509 certificate URL, bucket name, and an optional subfolder. (*)
* Note: Details on how to setup cloud storage configurations, can be found here.
Pre-defined — When selecting this option the 'Predefined Transport Medium' field is displayed from where you can select a medium from a list of predefined mediums. These mediums are configured already in the Admin configuration and linked to your organization. When selecting one all corresponding settings are used.
FTPS, FTPS implicit, SFTP — Provide the name of the server and the user and password to connect to the server. A subfolder on the server can be selected. By default, a subfolder is filled out.
Note: Besides password authentication, it's possible to use private key authentication instead. See this section above for more info.
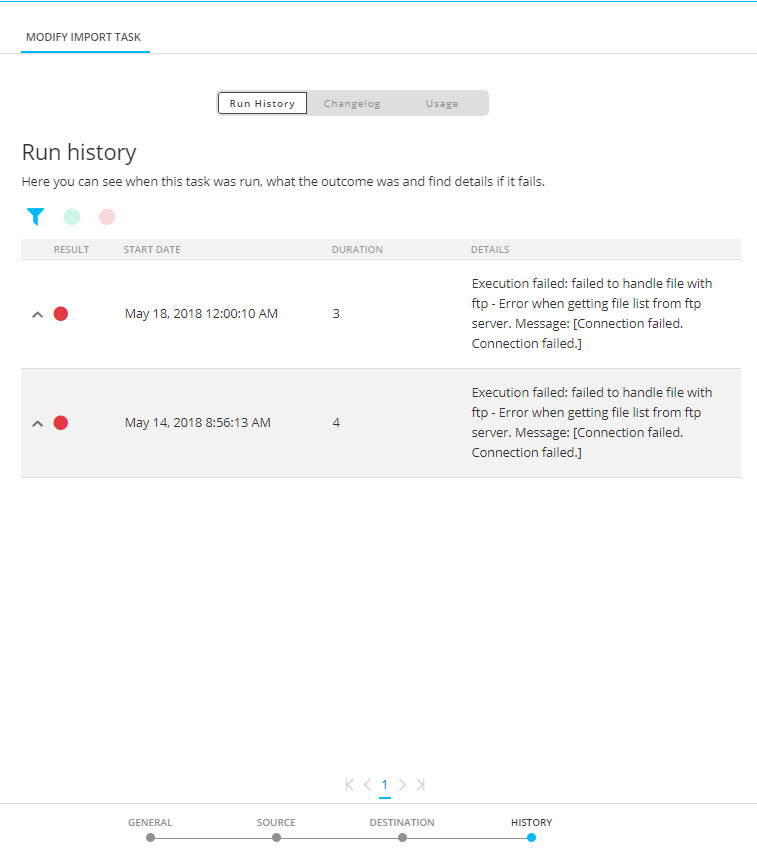
History
The History provides the user with information on
- when this task was changed (updated, deleted) and by whom. This information is available from the Changelog tab.
- when the task was executed and the status of that execution. This information can be found on the Run history tab. If the task comprises subtasks, the execution history of these tasks can be consulted as well.
- where the task is used. This information can be found on the Usage tab.
Use the filter icons at the top to filter the Run history.