AB Journeys allow testing different versions (2 minimum, 7 maximum) of
a message on a percentage of the audience so that the version with the best result can be sent to the remaining audience. The test audience is formed
randomly, by setting the test group size to a percentage of the audience.
For example, if two versions need to be sent to 10% of
the audience of 1000 contacts, one version will be sent to 5% or 50 contacts and the other version to
the other randomly selected 5% or 50 contacts of the audience. When the winner is selected,
it is sent to the remaining 90% of the audience.
Note: AB Journeys can be created for email messages and mobile push notifications. They cannot be tested simultaneously.
You can select one of four criteria for choosing which is the best or winning version of a message:
- Number of views
- Number of clicks
- Revenue generated from these emails. Shop tracking results are used for this.
- Number of orders generated from these emails. Shop tracking results are used for this.
The best version is evaluated at the specified time interval after the launch, expressed in minutes, hours, days or months. For example, the results may be evaluated one hour after the message versions are sent.
The winning version is selected based on unique contact actions (= criteria mentioned above).
Example:
When a contact views a specific email twice it will only count as one view for the AB winner selection using the condition 'number of views'. This is because it only counts the views for a single unique contact.
AB Journeys can be launched immediately or scheduled at a given date and time.
Setting the Journey Properties
Create the AB Journey
To create an AB Journey:
1. Go to the Journey entry. From the toolbar at the top select New and then Single Batch AB from the wizard.

The following is displayed:
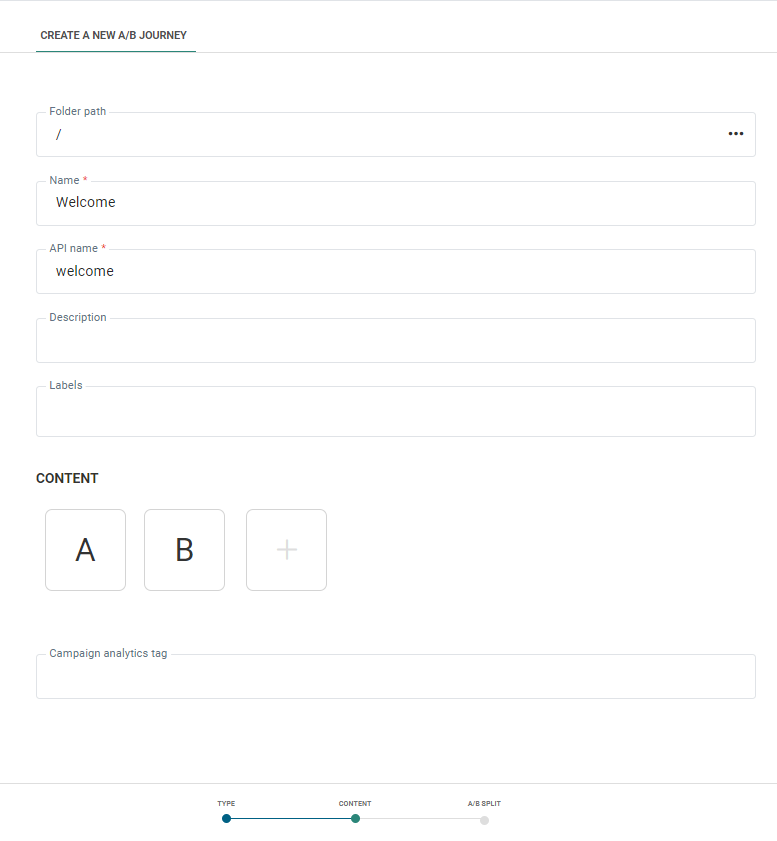
2. Set the Folder Path. This is the folder in which the journey is created. By default it takes the folder that is currently selected on the Start page when the journey is created. You can modify the path if required. Click the folder field to access the dialog and select a different folder.
3. Set a name and optionally a description.
4. Set the API-Name for the AB Journey. This name is used when the journey is executed via the API.
5. Asset labels are optional. Select one or more labels from the drop-down. (These labels are configured in the Admin configuration.) Users with the proper Access permissions can also create new labels here by typing the new label value in the field.
6. In the Content section, click the A button to add the first message. An Asset selector is displayed from where a message can be selected. Additionally, a message analytics tag can be defined. This allows individual tracking on this message in the AB reporting. You can still change this message and tags in the journey properties, after creation.
Note: When choosing a content that uses assets in a folder with no access, a warning explains that this content cannot be selected .
Note: Mobile
push notifications and email messages can be selected. Templates and SMS messages cannot
be used.
When a first message is selected, the drop-down list for all
consecutive messages will only contain messages of the same type and same audience. If no other message of the same type and audience is available, the drop-down will be empty.
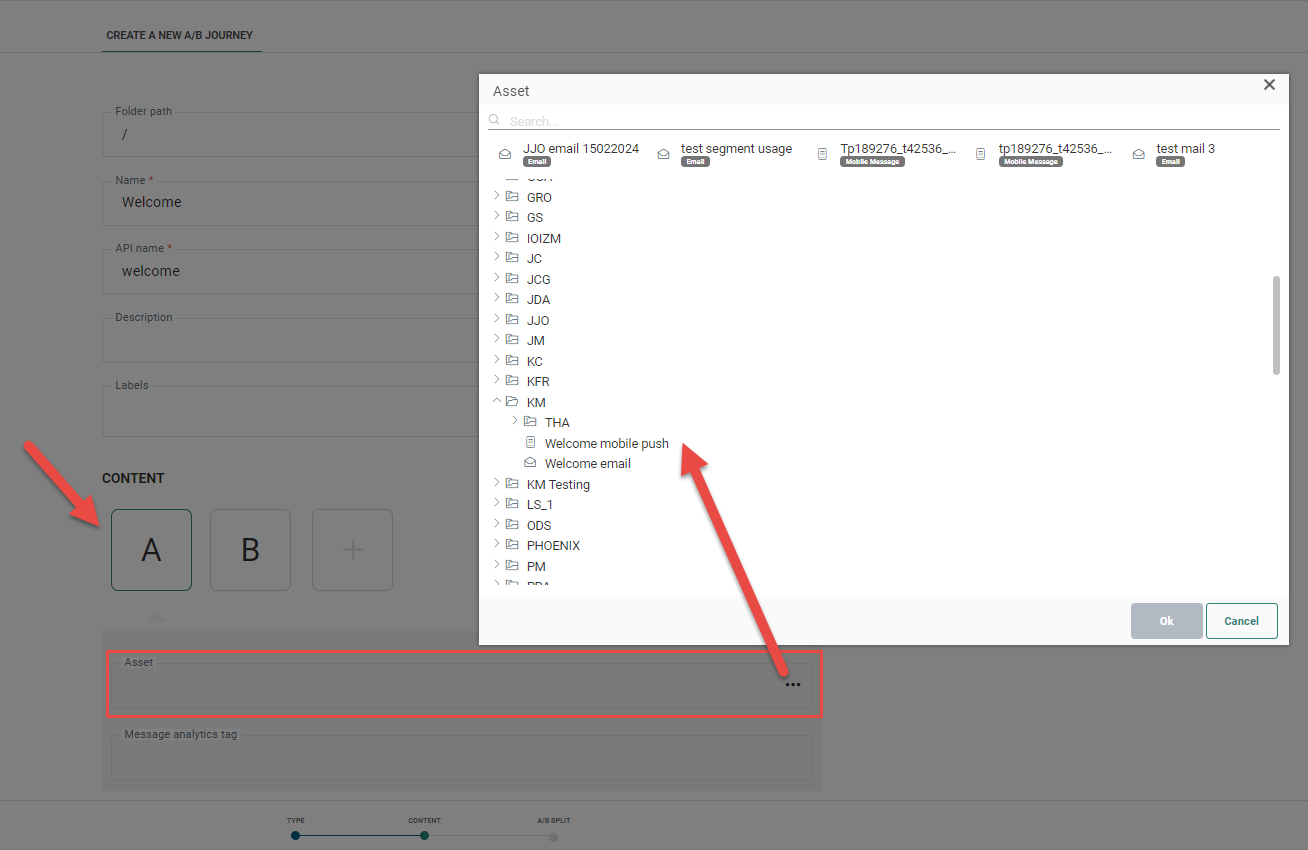
7. Enter the first characters of the message to filter the result and select the message.
8. Repeat the same for the second message, by clicking the B button and selecting a message from the list. If more than two messages are required, click the + button to add an additional one.
Note: You can
add up to 7 messages to be tested.
To remove a message from the AB Journey, hover the selected message and
click the bin icon in the upper right corner.
9. Last, set the Campaign analytics tag. The value entered for this analytic tag is passed on to a tracker when a tracker is activated.
10. When done adding the messages, press Next.
Technical Note:
The following checks are performed when messages are selected:
* All selected messages should have the same language configuration. This
implies that when one message has an English and French version, all other
messages require these same languages to be configured.
* All messages must have a language fallback for contacts without a language.
This is set in the properties of the message, but does not need to be the same language across all messages.
* All messages must have a language fallback for contacts with
no match on the language. This is set in the properties of the message, but does not need to be the same language across all messages.
* None of the selected messages can contain a journey-defined link. This
type of link allows you to define the next step within the journey. However,
this is not possible after journey creation.
* Number of versions should be smaller than the actual audience size. For example, there cannot be version A, B, C and D for an audience of only 3 targets.
11. On the AB Journey Properties screen, enter the settings that define the test conditions:
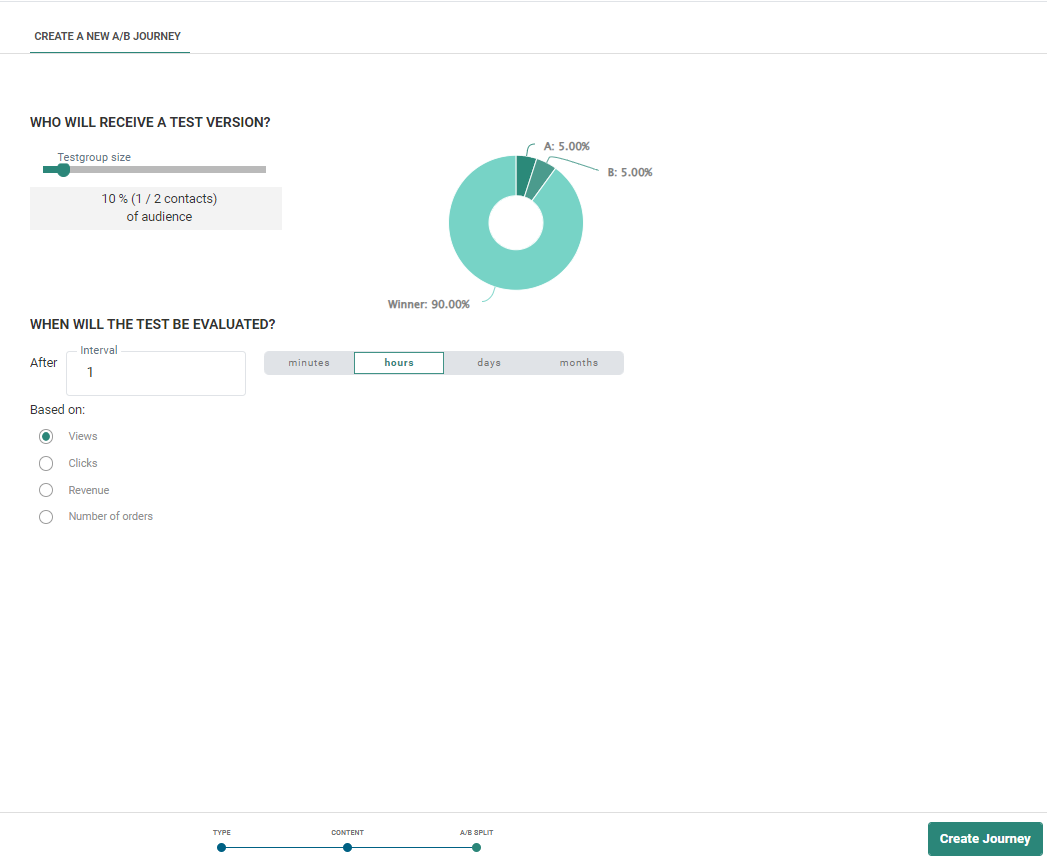
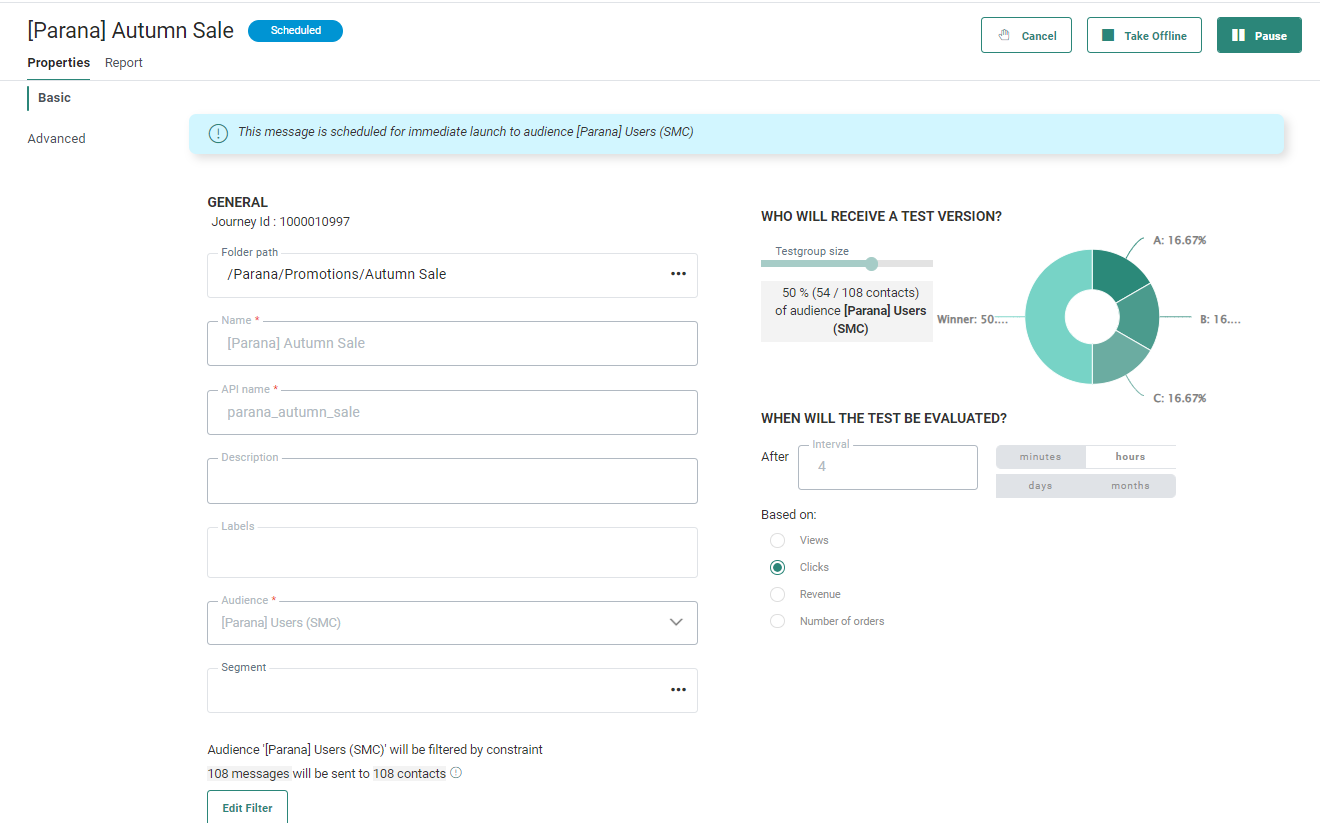
Who will receive a test version — Select the percentage of the audience that will receive a test message by moving the slider left or right. The corresponding number of test contacts is displayed. At the right hand side, a graph is provided indicating the percentage of contacts getting a specific version. The winning version will be sent to the remaining number of contacts.
When will the test be evaluated — Select the time interval after which the test should be evaluated. This can be expressed in minutes, hours, days or months.
Based on — Select how the best result will be defined:
- Views
- Clicks
- Revenue. To use the revenue, the Shop Tracker should be activated.
- Number of orders. To use the orders, the Shop Tracker should be activated.
12. When done, click Create Journey. The AB Journey is created and the journey properties panel is displayed:
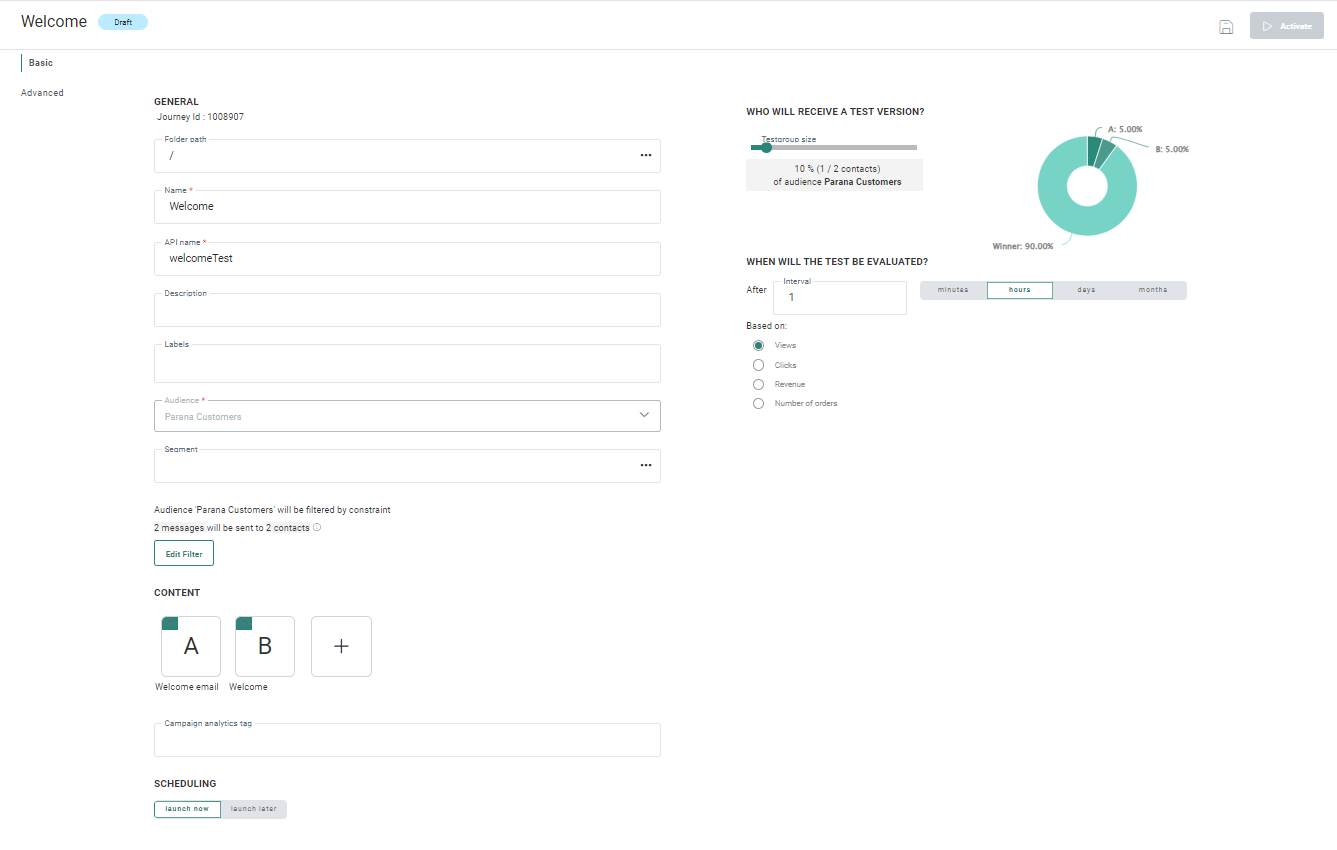
In the navigator on the left, a Basic and Advanced entry are available.
Setting the Journey Properties
Basic
The Basic entry is used to set the general properties for the AB Journey.
1. On this panel, the journey can be Scheduled for launch now or at a given date and time in the future. Use the buttons to indicate your choice.
Note: When a user defines a scheduled launch time on a journey, the time is expressed in their time zone. The journey will be launched in the time zone of this user at that time.
When a user with a different time zone views the journey, the scheduled time will be translated to their time zone, to reflect the local time.
Internally, the system uses a universal time zone, to make it possible to translate times to localized versions for every user. This means that updates by one user will be correctly represented in the local time zones of all other users.
Example:
User A has a time zone that is set to UTC -5 (Eastern Standard Time).
They schedule a journey to be launched at 6:00 local time (UTC -5).
User B has a user time zone that is set to UTC +1 (Romance Standard Time).
They see a scheduled launch time of 12:00 for that same journey, as their local time has a 6 hour difference compared to user A.
2. The journey audience is displayed based on the selected content. When the content uses a Engage audience, you can immediately select a segment of that audience as well.
Note: If the selected list is configured to require segment selection, you MUST select a segment for this list. The journey won't be executed as long as no segment has been selected.
The number of contacts in the audience is returned.
The ![]() icon provides additional details about:
icon provides additional details about:
- The languages available
- The fallback for contacts without a language or with a different language
- Audience limited to contacts with these languages
- Unsubscribes excluded
3. The audience can also be filtered. This filter can use following data:
- All parent list fields
- All data in linked lists, including 1:1 and 1:n linked lists
- Email metrics
- Historical data captured from the contact's channel interaction in a Custom, Recurring Batch, Single Batch and AB Journey. The user is presented a list of all Custom Journeys and a list of channels for each journey. Any interaction can be used, supporting fixed dates as well as relative dates.
- Segments of the selected audience by including or excluding records in the selected segment
4. Campaign and message Analytics tags can be set when a tracker is activated. This is optional. (For more information on this, check this topic.)
Advanced properties
In the Advanced entry, additional properties can be set:
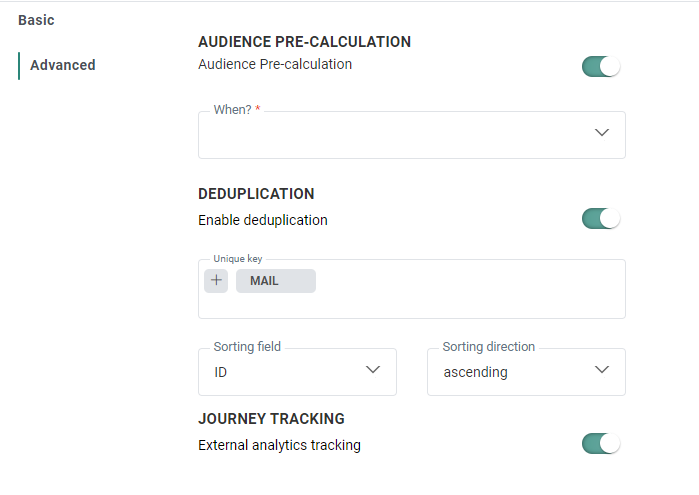
Audience pre-calculation
Audience pre-calculation — For some customers, it is beneficial to pre-calculate the audience for an action in a journey well before the actual go-live, or when there is a lower load on the environment. To save time, the actual journey execution will use the pre-calculated audience when it’s available. The option is by default disabled.
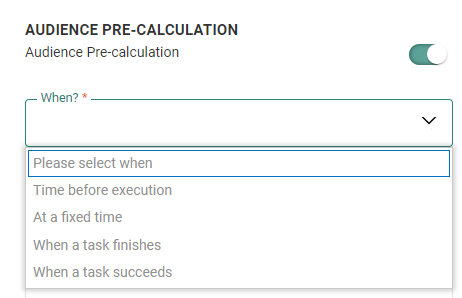
When — Only displayed when the audience pre-calculation is activated. You can choose from the following options:
- Time before execution — The audience is calculated at a specific time interval (expressed in minutes) before the journey is executed. The journey must be scheduled in this case.
- At a fixed time — The audience is calculated at a specific day and time.
- When a task finishes — The audience is calculated when the selected task is finished. You can select a task from a drop-down list of tasks.
- When a task succeeds — The audience is calculated when the selected task succeeds. You can select a task from a drop-down list of tasks.
Deduplication
Deduplication — If there are duplicate contacts in the journey's audience, you can use Deduplication to select a unique contact based on a field or a combination of fields. This avoids sending the email more than once to the same contact because the contact is in the Audience List more than once.
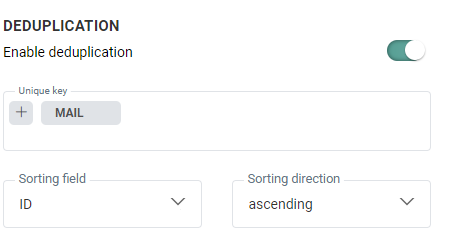
For each journey you can define if deduplication should be activated.
Unique key — You can define the field in the audience that should be used to perform deduplication. This can be a combination of fields as well, for example the name and email for a contact can be used to detect duplicates. Mail is by default selected.
Note: A maximum of 5 fields can be selected. Fields of type longtext, boolean, float and datetime are not allowed.
Prioritization — Here you define what field in the audience should be used to define the record that has priority over the others in case duplicate records are found. For example, you can use the last update date as a prioritization rule.
Sorting — Choose from ascending or descending to define the record that should be kept.
Journey Tracking
In some cases you don't need the journey to be tracked.
For example, a 'Password reset' journey does not require tracking.
Following option is available:
- External analytics tracking
By default, tracking is enabled. Toggle the option off to disable the tracking.
External analytics tracking.
External analytics tracking covers all the external trackers like for example Google UTM, Site tracker, Shop tracker.
When this type of tracking is disabled, no parameters from external trackers will be added to domain related links and hence the information can not be used by the external tracker. This will have an impact on:
- External analytics — E.g. Google analytics
- Site CRM identification — The m_bt parameter will not be added for domain links and hence CRM identification will not be done
- Shop tracker — The parameters that are added for the shop tracker will not be added and hence this will have an impact on revenue reporting
When done, you can Save the journey or Launch it.
Journey Execution priority
When multiple journeys are scheduled for execution at the same time, it is now possible to ensure that one journey will take priority over another. Some journeys might be more time sensitive or important than others, and this option allows you to prioritize journeys. By default the priority of the journey is set to medium, but priorities can range from low, over medium and high, to very high.
Example:
Journey A with high prio is scheduled at 09h00, Journey B with Medium priority is also scheduled at 09h00. Journey C with high priority is scheduled at 09h01.
Journey A is executed first. When execution is finished, Journey B and C are in the queue, but Journey C has higher priority than B and will be executed before Journey B.
Launching the Journey
When launching the journey, you are informed about the content that will be sent, the audience and filter applied and the number of contacts that will be targeted. A dialog is displayed with this information. The counts displayed in the dialog reflect the deduplication settings defined for the journey.
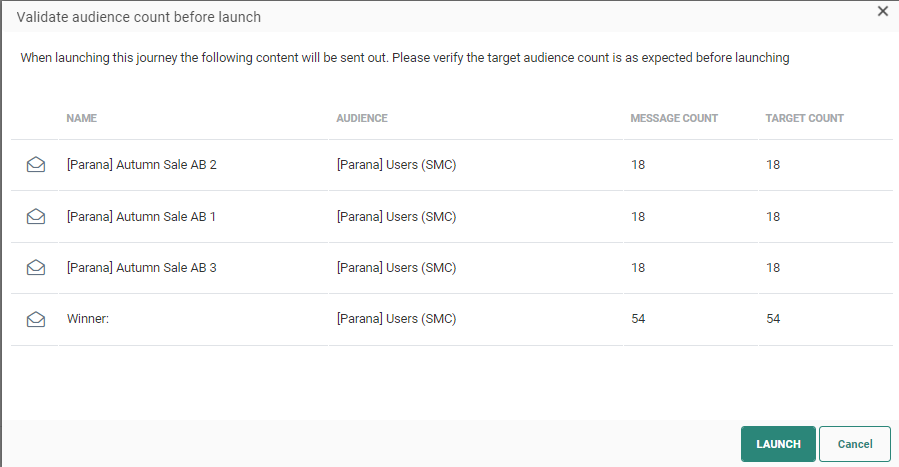
Note: This dialog is displayed only for users who have the right of audience validation. This right is set by default for every user.
You need to confirm that the audience count is as expected and then launch the journey. If the count is not yet available, you can only cancel the journey launch.
Journeys configured for launch now will immediately be launched. Journeys scheduled for launch in the future will be activated. As long as these journeys haven't reached the configured launch date, a Stop button is available. Use it to stop the launch and when required make the necessary modifications to the journey.
Note: As long as the journey has not been executed, changes can be made to the journey properties. Once it has reached the launch date and time, all fields are grayed out and are no longer editable.
Pausing the Journey
When pausing the journey, links in emails and pages will remain available. Only the sending of messages is paused. While a journey is paused, changes can be made, saved, validated and published. The journey can then be resumed, and newly processed messages will contain the changed content.
The toolbar contains an additional Pause button that becomes available after the journey was launched.

A paused journey can be activated again or taken offline completely.
Canceling the Journey
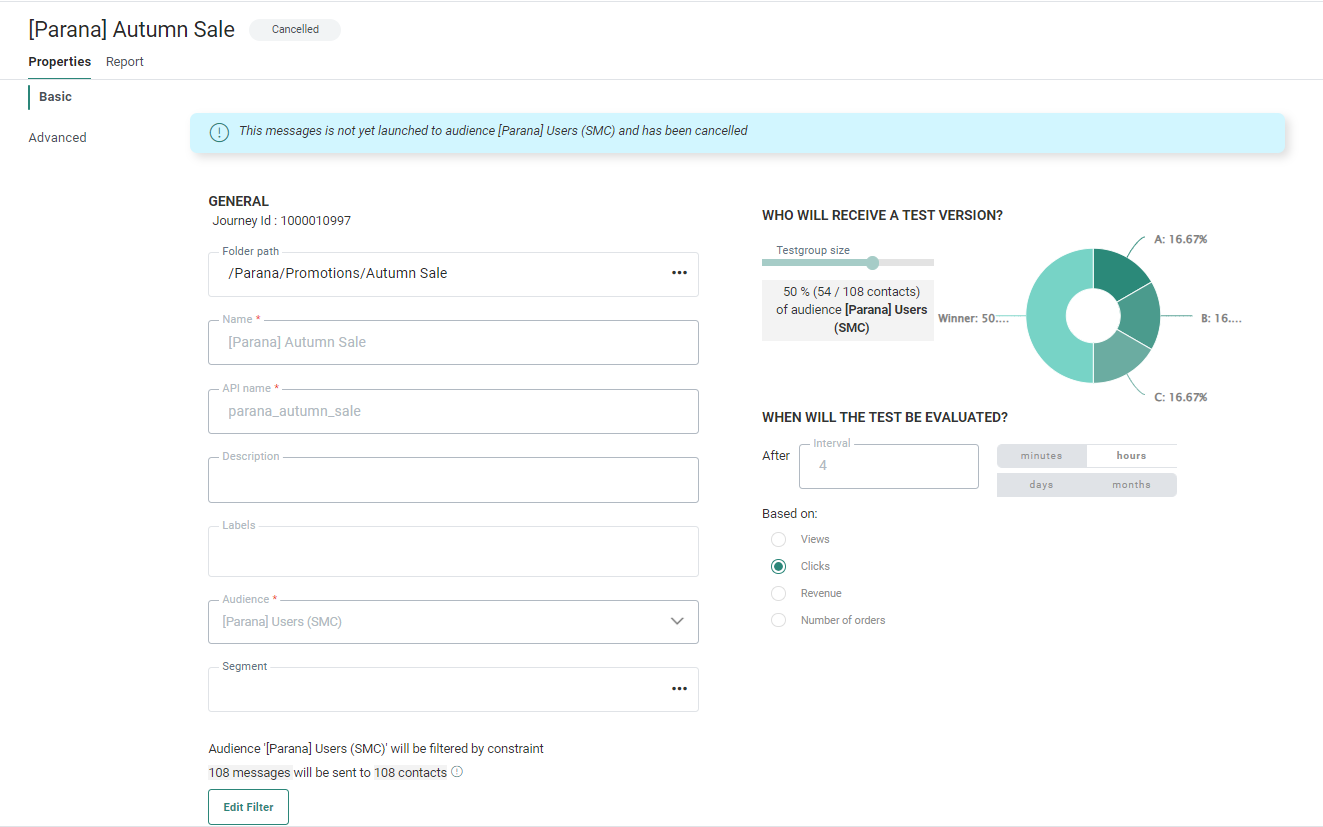
It is possible to cancel a journey after it has been launched. As long the journey processing is not finished, you can cancel the journey. The Launch button is replaced with the Cancel button.
Canceling the journey will stop sending out the new emails but if currently something is still being processed, these are being canceled as well to ensure these will not be delivered to the inbox of the recipients. Also, all links in already sent out emails will continue to work. The status of the journey will be available from the status bar at the top:
Note: When a Journey is canceled the user is presented different alerts, depending on the execution status of the journey:
Some messages have been processed already: A progress bar gives a very clear and visual representation of what has been processed. You can choose to cancel or keep the journey running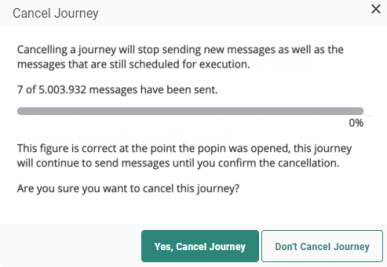
No processing data is available yet: You can choose to cancel the journey anyway or keep the journey running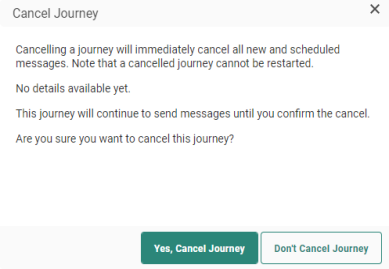
All messages have been processed: In this case, canceling is no longer possible, and the user is informed.
Note: Canceled journeys cannot be relaunched.
Taking the Journey Offline
When taking a journey offline, no messages are sent and links in emails and pages will no longer be available.
The toolbar contains an additional 'Take offline' button that becomes available when the journey has been activated.

An offline journey can be activated again or paused.
Reactivating the Journey
While a journey is paused or taken offline, it's possible to edit the content through the journey by clicking on the corresponding 'Edit content' button.
If you don't publish the content after you made changes to it, returning to the journey and trying to reactivate it, shows a pop-up explaining that there are unpublished content changes.

- Click OK to launch the journey with the last published version of the content (without the most recent non-published changes to the content).
- Click CANCEL to go back to the journey wizard and publish, if needed, your last content changes. That way, you can choose to reactivate the journey once more and launch it with the updated published version of the content.
Best Practices
When setting up the AB Journey it is important to know what to test exactly for more accurate test results.
-
For your AB test to be representative, you need to test the outcome on a large number of contacts. This will provide a better representation of the behavior of the average contact in your Audience list and extreme responses will be filtered out.
-
When creating the test groups for your AB test it is recommended to create a random group of contacts. By doing so, your test groups will be more similar in composition and the test results are more likely to be due to differences in the messages rather than to differences in the test group.
-
Before starting make sure you know what to test. When the differences between the versions in your AB test are rather small, it allows you to isolate the elements that have the biggest impact on the results. Or, when you go for more dramatic differences in the different versions, it allows you to discover the outliers and compare more elements in the message.
-
Start by testing the headlines of your message as this is the most visible part of the message.
-
Let the test run long enough to cover a complete business cycle. An average of 7 days is a good compromise. Do not stop a test mid-cycle. Often marketers are tempted to stop the test early when the results are in line with their expectations.
Example : Creation and usage of an AB Journey
