Lists - Custom Events
Events and event data are important information for marketers to act upon. Think of an abandoned cart, a purchase, a voucher being used, a visit to a store. All these events can be reasons for the marketer to interact with the audience contact. To be able to do so, Custom Events can be created. A contact in the audience with a record logged in the Custom Events can trigger the execution of a journey.
Custom Events are events that are stored in a dedicated list and are 1:N linked to an Audience List. This way, you have the possibility to drive journeys for contacts in your audience based on specific events for these contacts in the Custom Events List. Any type of message can be sent as the result of an event, including custom channels (print, 'X' (formerly Twitter), etc). These messages can be personalized with Custom Events details.
When creating an event-driven journey, the journey will be triggered for every new event that enters the Custom Event List. Processing of the event record can be instant or scheduled.
Typical use cases:
- Abandon basket - First message is sent a few hours after the contact abandoned the basket. A reminder is sent 2 days later when the process is not completed.
- Birthday message with personalized coupon codes.
- Card expiration - a specific card expiration message is sent with card details to holders of Mastercard. The audience is selected based on data in an event list that is loaded from an external system.
- ...
In this topic:
- Types of Custom Events
- Create Custom Events List
- Adding fields to a Custom Event
- Setting the properties of the Custom Events
- Data in Custom Events
- Usage
- Using Custom Events in Event-driven journeys
- Using Custom Events data in Content
- Using Custom Events Data in Journey Components
- Pausing and Resuming instant Custom Events
Types of Custom Events
Two types of Custom Events can be created:
- Scheduled — Custom Events processed at a given date and time and can be processed by only one journey.
- Instant — Custom Events processed continuously whenever a new event is added. An Instant Custom Events can be used in multiple journeys at the same time and be processed by any journey that has subscribed to it.
Create Custom Events List
To create a Custom Events List, activate the tab Custom Events for the Audience List to which it should be linked.
An overview of all existing Custom Events Lists is displayed. From here you can

- add new Custom Events
- delete or edit existing Custom Events. When you delete a Custom Events, a warning is displayed when the Custom Events is used and how many time.
To create a new Custom Events List, click New Custom Event in the top right corner.
A wizard is launched where you can make a choice between Instant and Scheduled.

Fill out the properties. The Properties panel contains the type of Custom Events that is being created:
- Name and description — Provide a clear name and description.
- Labels — The label(s) assigned to this asset. Select one or more labels from the drop-down. (These labels are configured in the Admin configuration.) Users with the proper Access permissions can also create new labels hereby typing the new label value in the Label field.
- List — The name of the audience list for which the Custom Events are created
When done, click Create Custom Events. The Custom Events List is added to the dashboard and opens straight away on the Fields definition.
Depending on the selected type of Custom Events, different system fields are generated in the list:
Instant:
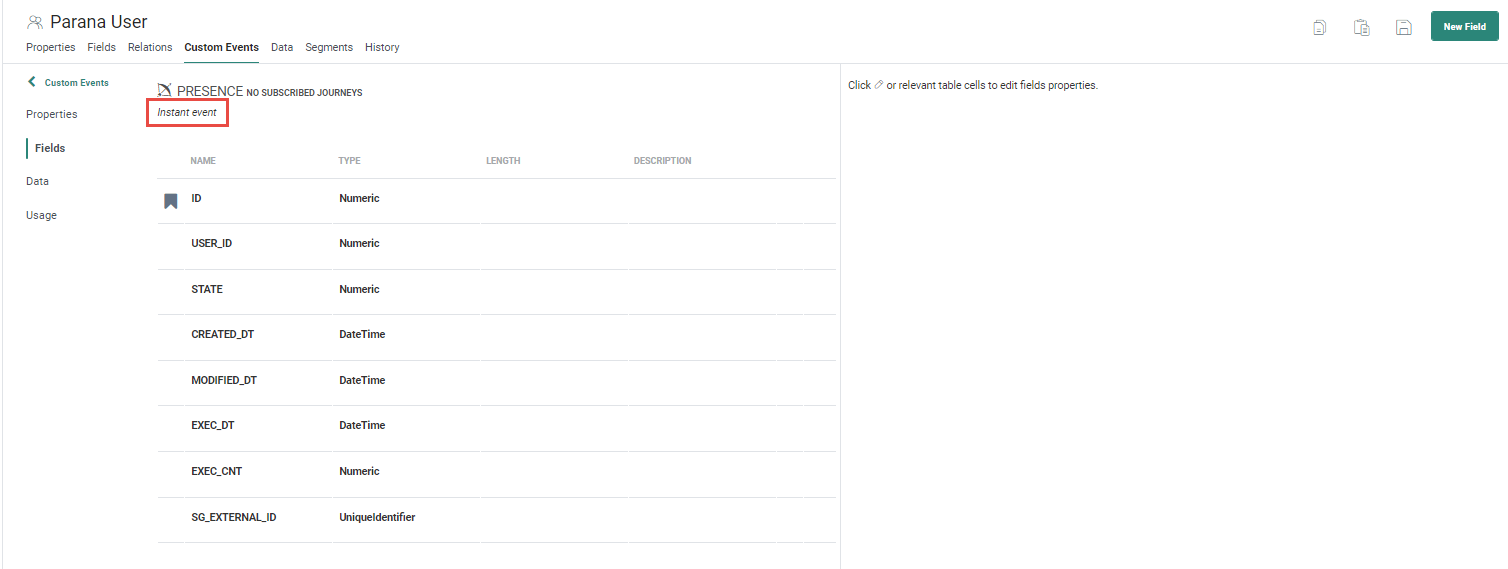
Instant Custom Events can be used in multiple journeys and processed multiple times. The EXEC_CNT field holds the number of times the Custom Events record has been processed in a journey.
Scheduled:
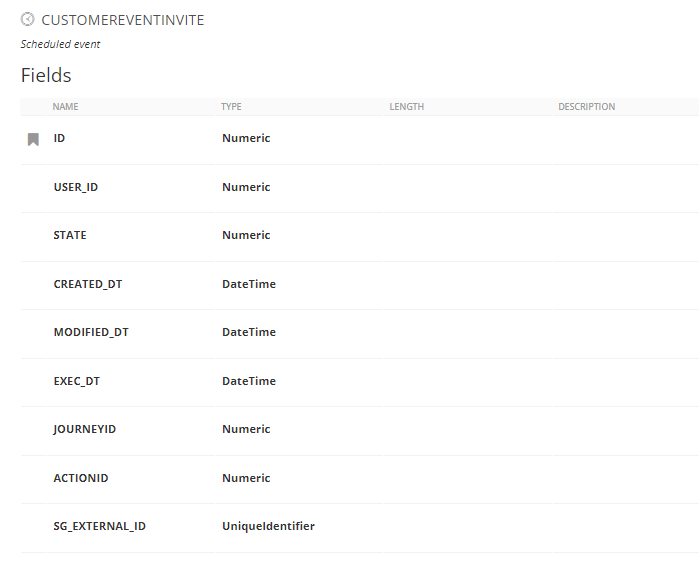
Scheduled Custom Events can only be processed by one Custom Journey. The JOURNEYID field holds the ID of the journey that is the first to pick up the Custom Event and is processing the Custom Events.
Technical note: A scheduled Custom Event is considered as processed when it is used on an uninterrupted path in a scheduled outbound component such as an email, mobile message, SMS, Custom Channel, Google or Facebook Component or Control Groups.
Adding fields to a Custom Event
At creation of a Custom Events list, default system fields are created such as ID, USER_ID and State and EXTERNAL_ID.
-
The USER_ID allows to link the Custom Events to the contact in the linked Audience List .
-
The EXTERNAL_ID allows to specify a unique external identifier providing Engage users with the ability, after execution, to link execution data to their own records. This field is optional. If it is not filled out, Engage will attribute a unique ID to it.
Important note: The External ID must respect the GUID format (UUID v4). Other types are rejected.
-
The SG_EXTERNAL_ID field is intended for a 32-character hexadecimal UUID in the form 8-4-4-4-12 (for a total of 36 characters).
The purpose of this field is to provide a codified reference for the calling third-party system, e.g.: a unique transaction code, a vendor part code, an event code - something meaningful to the system that raised the event or API call for traceability. Engage platforms simply store this as a value matching a UUID format (and there is no check for uniqueness).Examples:
12345678-aaaa-bbbb-9999-a1b2c3d4e5f6
abcd1234-5555-6666-7777-aabbccddeeff
23508685-0743-3124-7734-000012d16175Also see: https://en.wikipedia.org/wiki/Universally_unique_identifier
You can add additional fields in the same way as for any other list. (Check the topic Create list for more information). These fields will hold the details for the Custom Events and can be used for customization of messages sent to the contact.
Note: Fields in Custom Events List can be defined as JSON. A max of 5 fields can be of type JSON. For each field, the JSON structure needs to be defined, including the Name, Usage and Mandatory parameters. Note that the structure of a JSON field can be copied/pasted into another JSON field: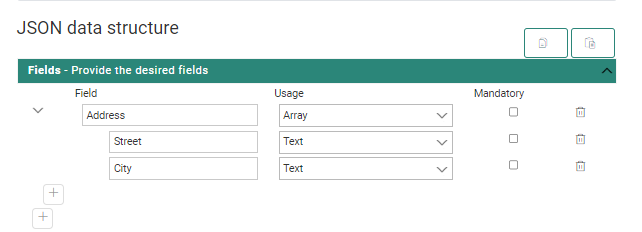
To obtain the data in a JSON field, use the following syntax :
[% jsonValue(field, JSON key) %]
where:
* field = an expression returning the JSON field, e.g.: eventValue('FAVORITESHOPS')
* JSON key = the path to navigate to the specific key in the JSON (array). Use "." as a separator and "[x]" as (zero-based) index operator.
Example:
A Custom Events field called FAVORITESHOPS contains the JSON structure as displayed above.
- To obtain the 'city' from the first element in the ADDRESS array, use:[% jsonValue(eventValue('FAVORITESHOPS'), 'ADDRESS[0].CITY') %]
- To obtain the 'city' from the second element in the ADDRESS array, use: [% jsonValue(eventValue('FAVORITESHOPS'), 'ADDRESS[1].CITY') %]
Note: A maximum of 25 array fields is allowed. Each array field can have a maximum of 25 characters.
Note: To speed up the definition of fields in Custom Events Lists, they can be copied and pasted into another Custom Events List.
Setting the properties of the Custom Events
After creating the Custom Events, you can still change the properties. Go to the Properties entry in the left navigation:

- Name and description — Provide a clear name and description.
- Labels — The label assigned to this Custom Event List.
- List — The name of the audience list for which the custom events are created
- Transaction Field - In your Custom Event list, select the field that contains the transaction's unique key. This allows different events to be linked to a single transaction.
- Advanced settings - Table name — This is the name used for the physical table created in the database.
Data in Custom Events
Important note: If you do not see the Data tab when accessing a Custom Events, you probably have the 'Hide Personal data' claim activated. Check with your administrator if this doesn't seem correct to you.
From the Data tab, you can view the data in the Custom Events list. Records can be entered manually or automatically through an import or via the Event Data Component in a Custom Journey.
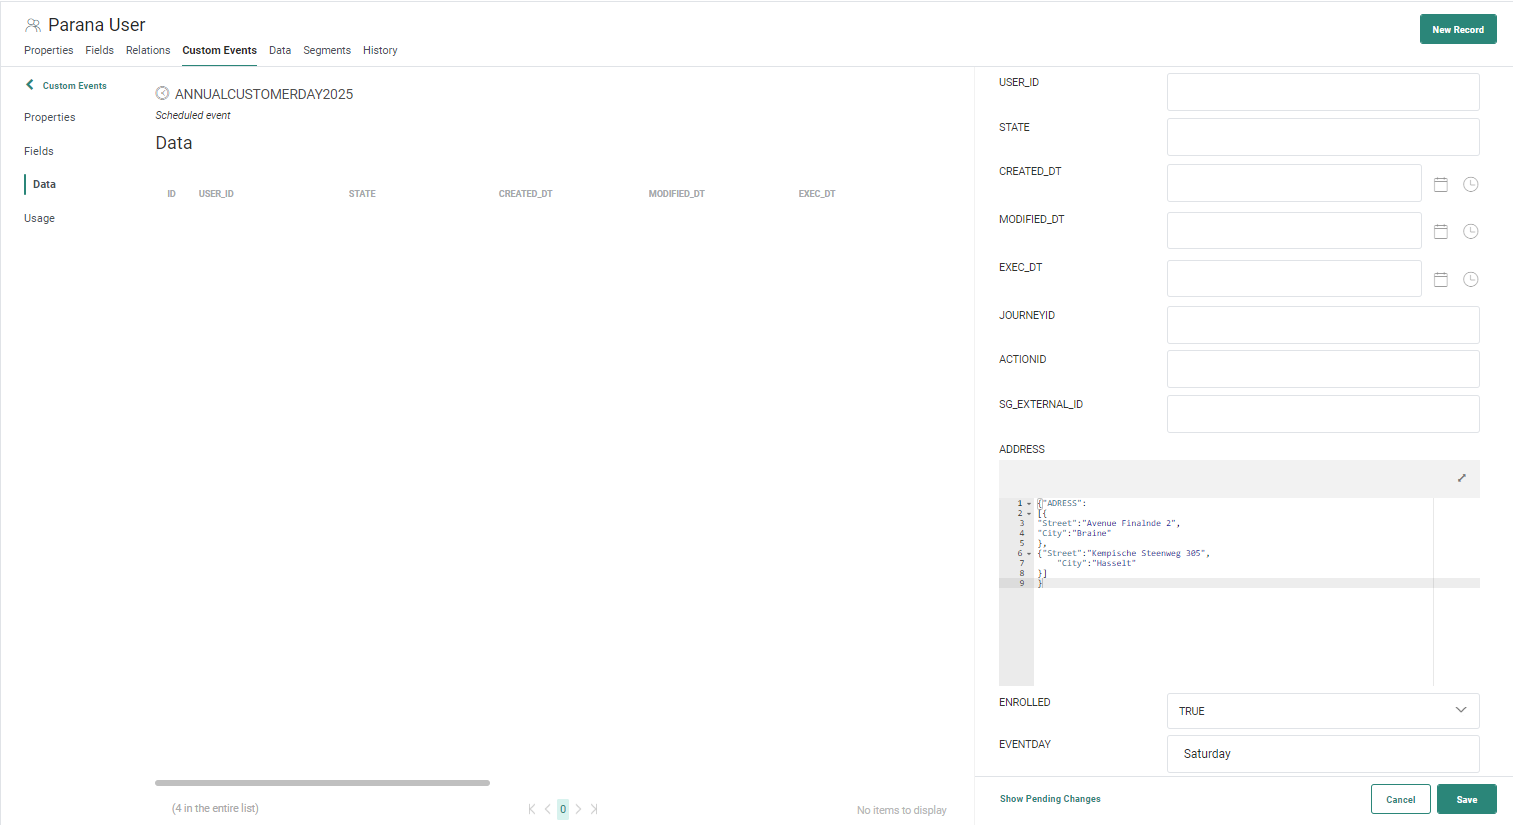
Example of JSON array data in a Custom Event record :
JSON array data can be entered in a text area (that can be expanded) :
The data corresponds to this JSON data structure that was defined before :
For more information on how to add data to your list, please check out this topic.
Technical Note: There is currently no API method that allows a Custom Event to be raised. Instead, use an API call to trigger a Custom Journey which contains an Event Data Component that writes the API data as a new event into the Custom Events list.
Example: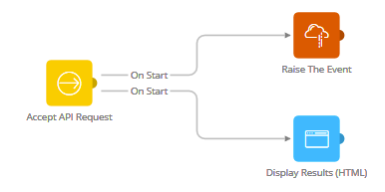
This Input Component will contain parameters corresponding to the fields in the Custom Events Lists. The Event Data Component will create the event in the Custom Events list and the landing page is required as the end of the journey.
This journey only requires to be published, it doesn't need to be activated. Note that the journey can be paused. When activating the journey again, no custom events are skipped but are instead processed with a delay.
The API method that triggers the above journey requires a POST method of the CUSTOM object.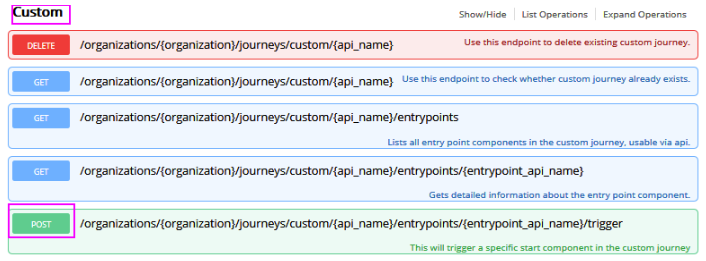
Following is an Example of the JSON used to pass on the values.
{
"user_id" : 13,
"parameter_values": {
"EVENTDAY": "Saturday",
"ENROLLED": "YES"
}
}
Usage
Custom Events that are used in a journey cannot be deleted and as a result, the corresponding Audience List cannot be deleted either. The Usage tab provides details on where the Custom Events are being used and whether it is currently being used.
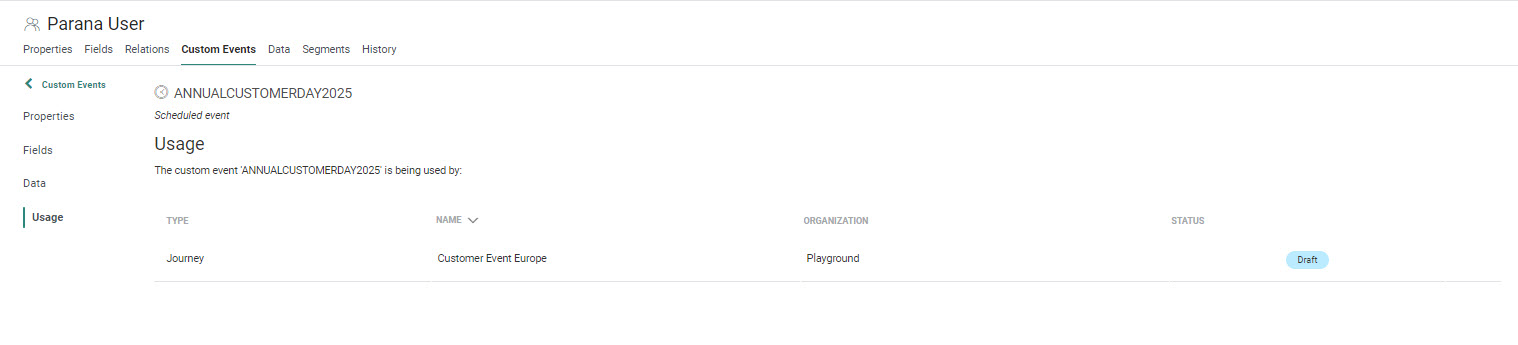
From this overview, you can click through to the journey, content, data imports or tasks where the Custom Events is used.
Using Custom Events in Event-driven journeys
Custom Events have been designed to be able to use contact related event information to trigger a journey. Instant Custom Events are processed continuously, scheduled Custom Events are processed at a given time during the activation period of the Custom Events.
Now, how can we use these Custom Events and act upon these events in a journey? To make this possible a new entry component "Custom Events" has been added to Custom Journeys that allows using the data in the Custom Events List.
For more information on this please check out the following topic.
Important note: Custom Events can be linked to a maximum of 20 journeys at a time. When you are reaching this limit, make sure that all linked journeys are still relevant. If not, pause these journeys.
Using Custom Events data in Content
The data in a Custom Events List can be used for personalization of your message.
Note: Custom Events data can only be used in a message, not in a template.
The Personalization Dialog gives access to this information once you have configured your message to use event data. This allows the marketer to personalize the message for each contact with information from the corresponding Custom Events record.

Example: Personalize the message subject with the date of the event.
When a Custom Events field of type JSON has an array defined in it, this array can be used as a possible data source in a data selection. This allows the marketer to use the data in the array to personalize the message.
Example:
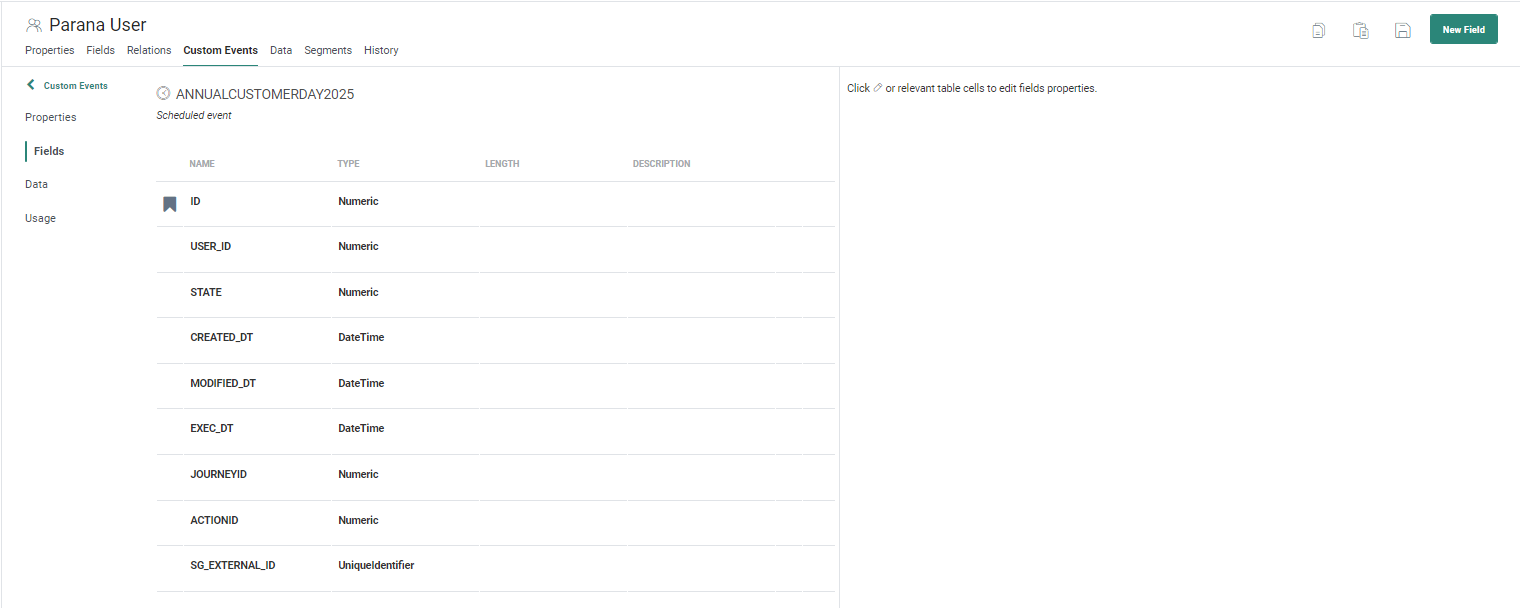
The Custom Events List AnnualCustomerDay2025 is linked to the Parana Users List. The Custom Events List contains a JSON field PREFERREDLOCATIONS, in which the ADDRESS is an array.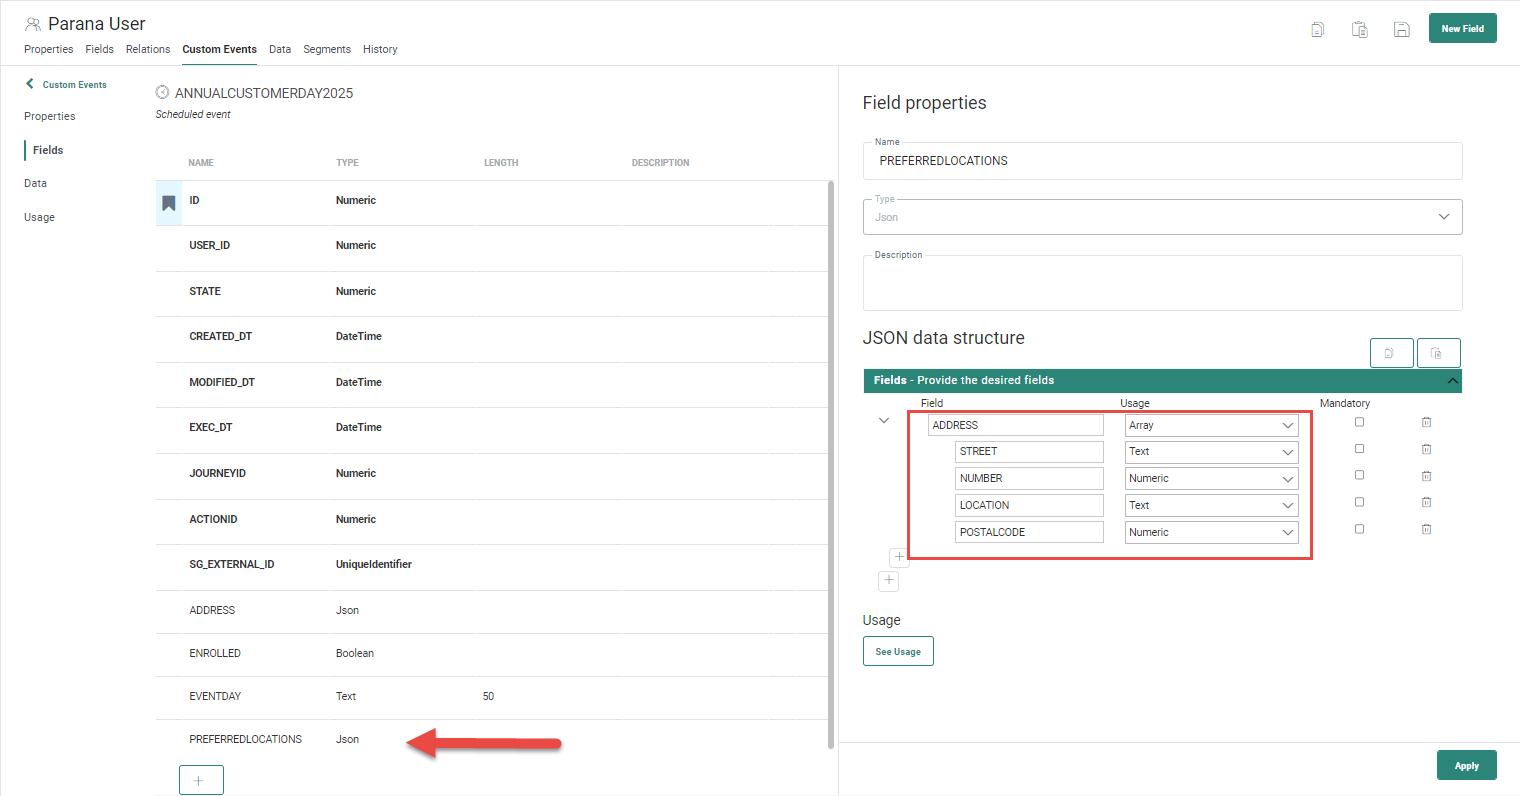
When this Custom Events List is used in a message, the array field (the address in our example) is available as a possible data source in the data selection. It is represented with the name of the JSON field (PREFERREDLOCATIONS) followed by the name of the array field in the JSON (ADDRESS):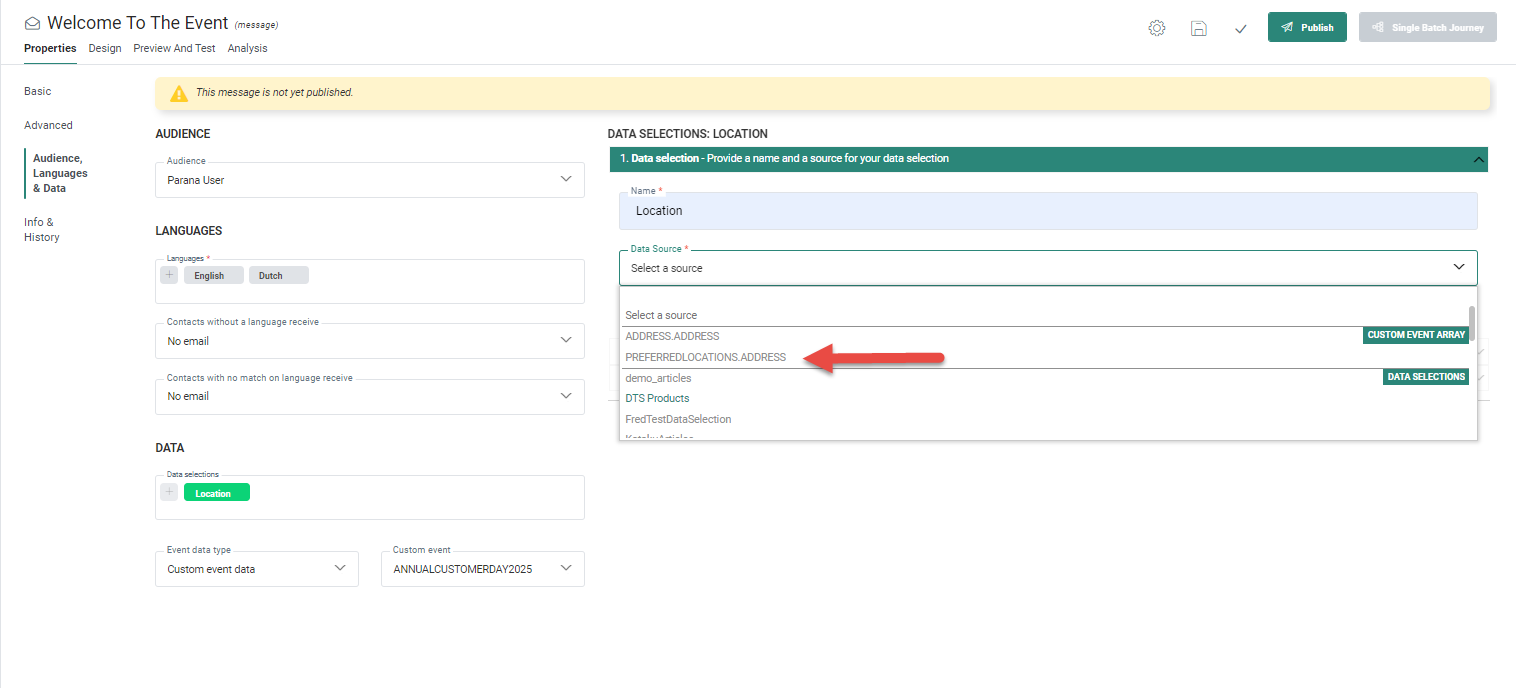
When the array field is selected as a source, the fields in this array can be selected from the Field selection section. 
This will make them available for personalization in the message:
Once this data selection is configured, the data in the array of the Custom Events field can be used in a repeater. It is listed as following in the Personalization Dialog.
Note: A confirmation will pop up when changing the Custom Event which is also used as a data selection in a message. If you decide to change the Custom Event, the data selection will become invalid and will be deleted. This is a safety precaution to make sure the marketer can’t corrupt his data.
Another way to use the Custom Events data is in a data selection filter. This way, data from the data selection can be filtered to return only the item(s) that match the information available in the Custom Events. Note that the following prerequisites are required:
- The Custom Events field to be used in the filter must be set as data Selection Identifier Set.
- The data selection must be configured as a lookup.
Example: In our example, we want to use the locationID field stored in the Custom Events list to filter the data selection and retrieve the details for that specific location.
We have an Audience list Parana Users with a Custom Events list ANNUALCUSTOMERDAYS2025. In this Custom Events list, we have marked the LOCATIONSID field as the Data Selection Identifier set, allowing us to use that information to look for the right location details in the data selection: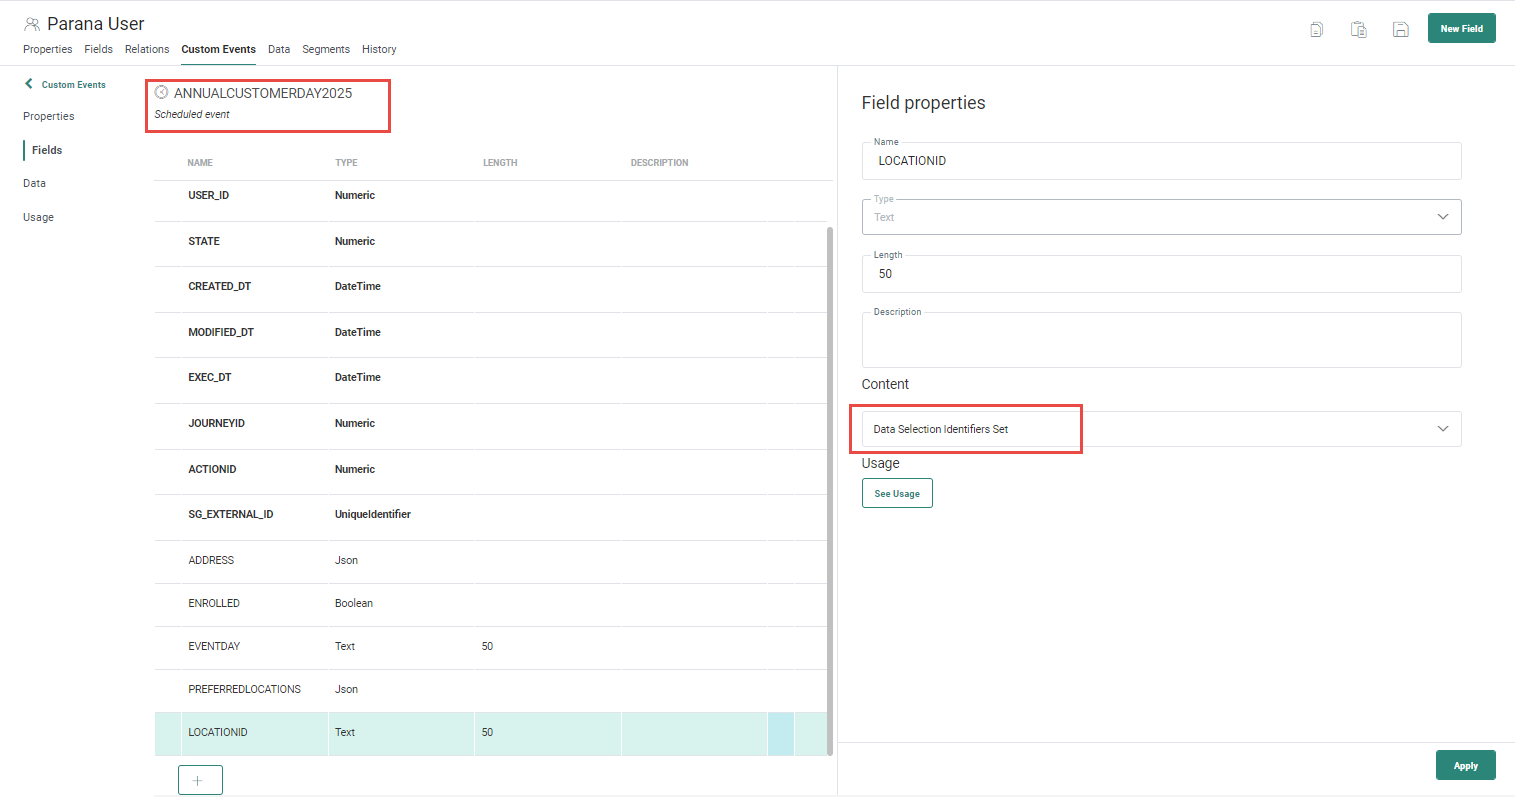
In the message, we selected the Custom Events List in the event data field. Once that is done, this Custom Events field can be used in the data selection filter: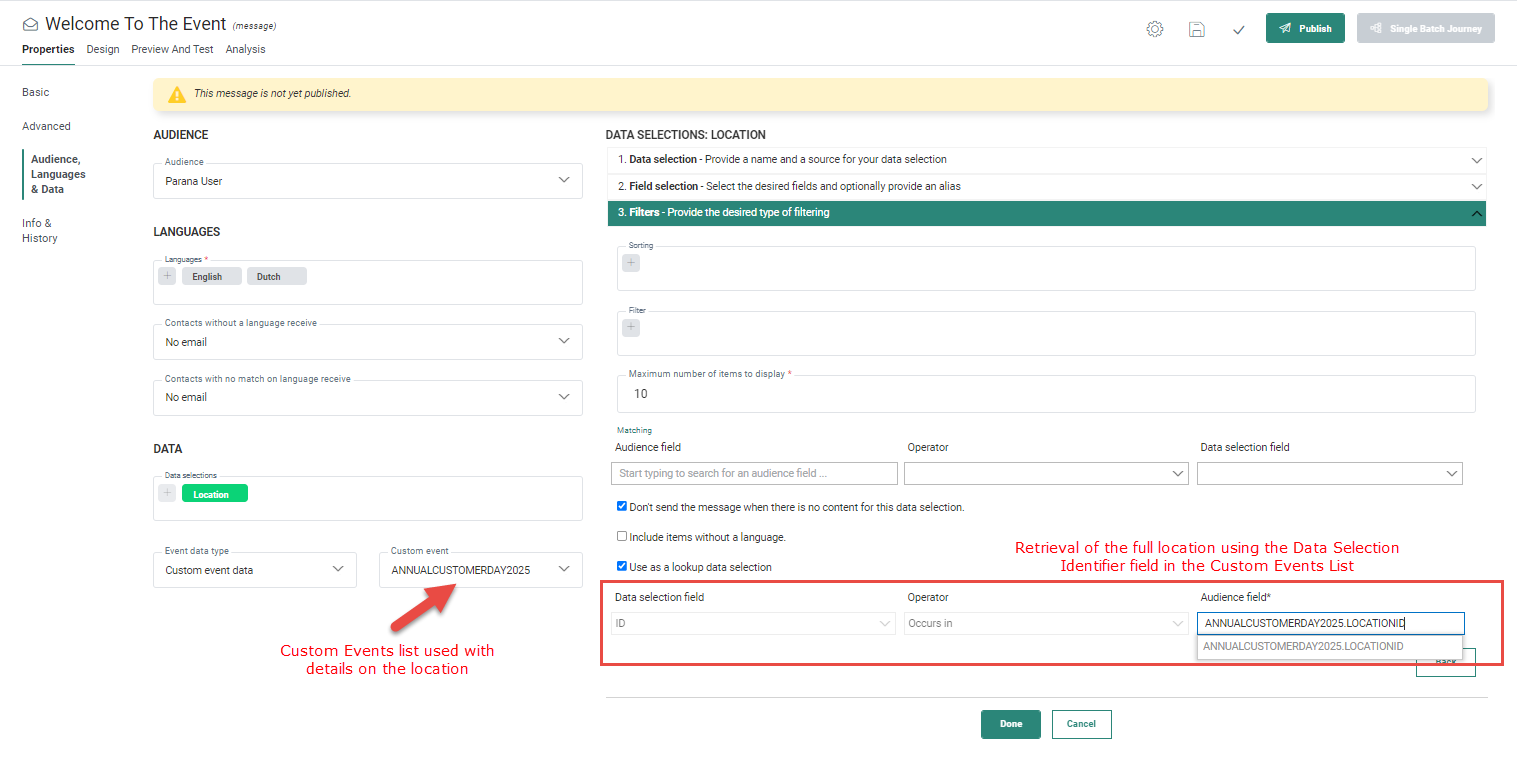
As a result, only the locations corresponding to the one in the Custom Events List are returned.
Using Custom Events Data in Journey Components
Data in Custom Events can be used to define the path of the contact in the journey. It is available
-
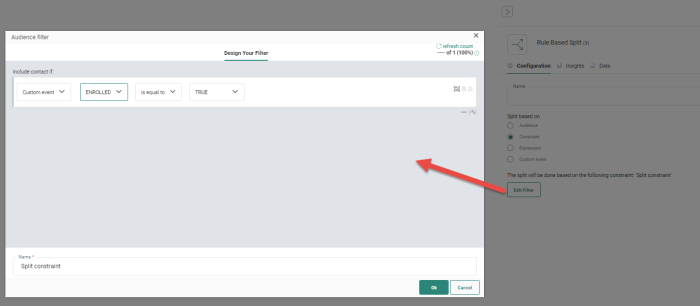
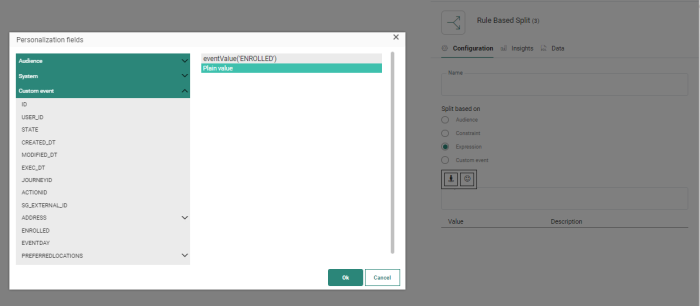
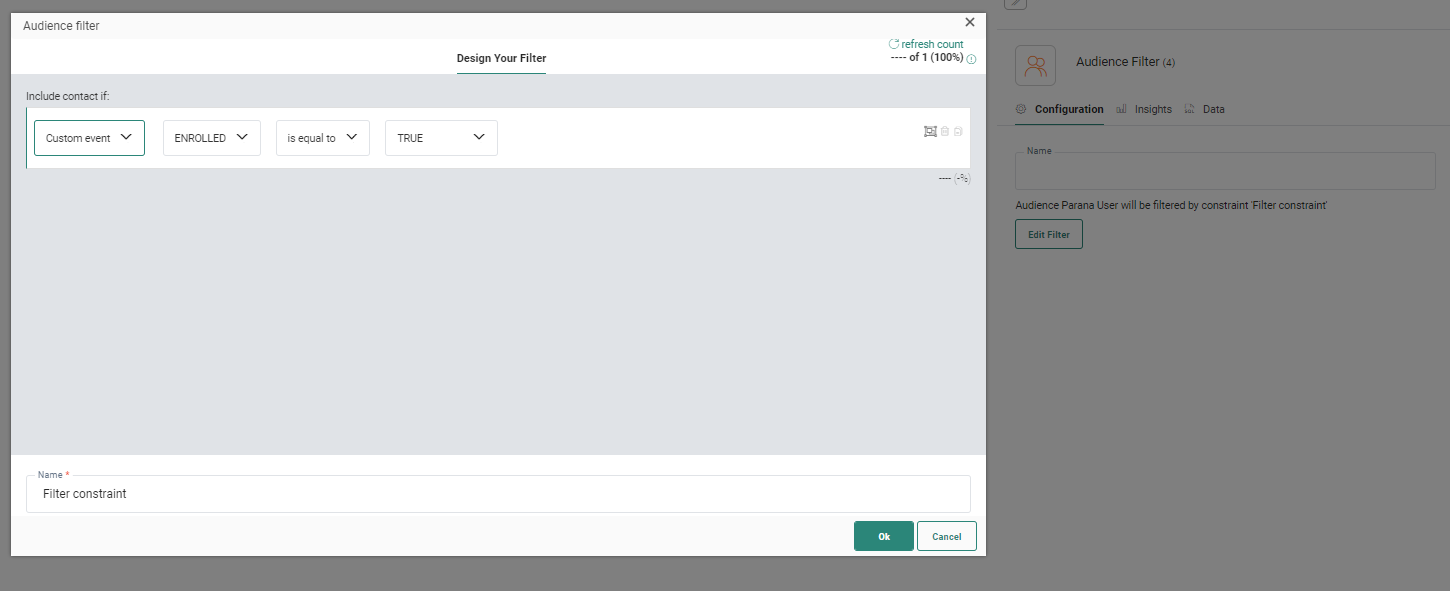
in constraints in the Rule Based Split Component, through the Constraint Builder
-
in expressions in the Rule Based Split Component, through the Personalization Dialog


-
in the Audience Filter Component, to filter the contacts :

-
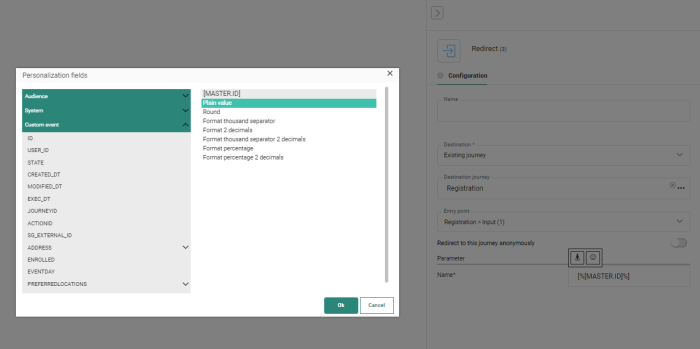
In the parameters of a Redirect Component, through the Personalization Dialog:

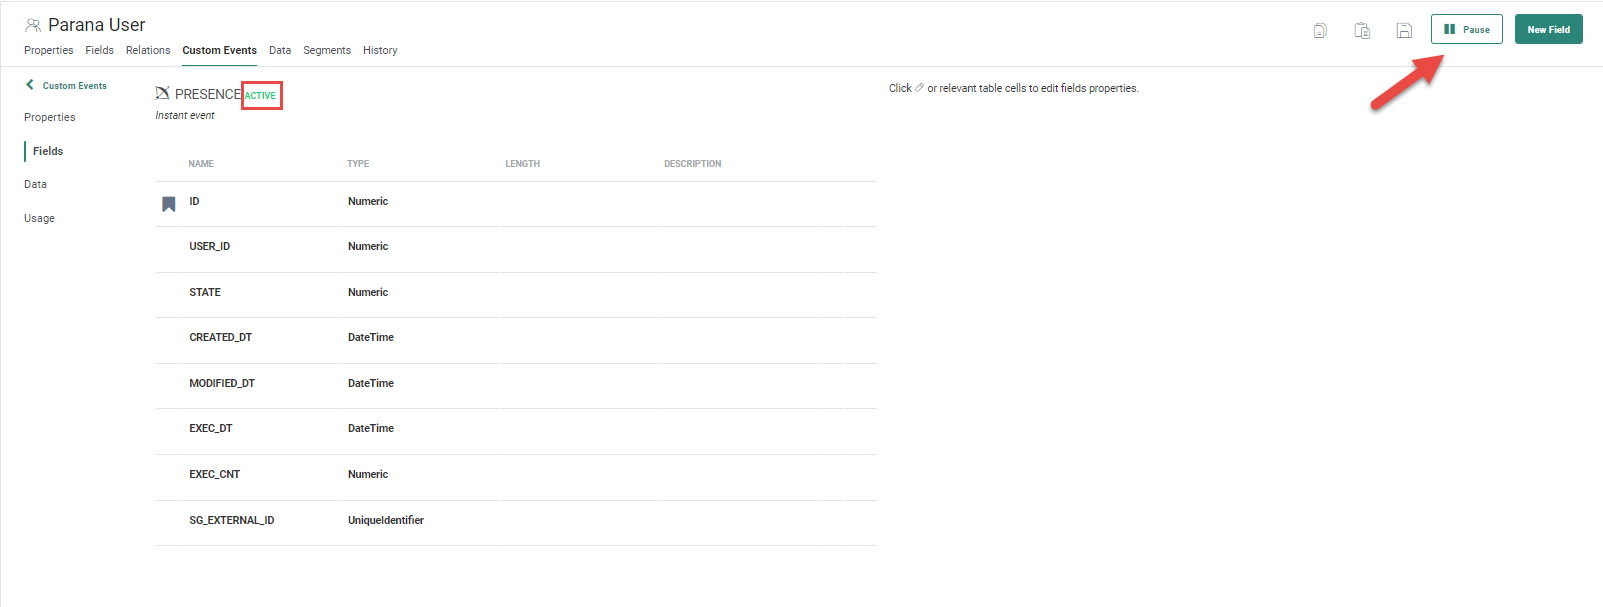
Pausing and Resuming instant Custom Events
At the top of the overview the name of the Custom Events list is displayed with next to it 3 possible states:
No subscribed journeys — This means that the Custom Events are not yet used in an active journey. There might be journeys already that contain a Custom Event Component linking to this Custom Events list, but as long as they are not active, the status remains at 'No subscribed journeys'.
Paused — This means that the Custom Events list is used in an active journey but has been paused. As a result new records can still be added to the Custom Events list but they will not be processed. They will remain in the Custom Events list until the list is resumed. Note that when activating the journey again, no custom events are skipped but are instead processed with a delay.
Active — This means the Custom Events list is used in an active journey and all records are currently being processed.
Pausing and resuming the instant Custom Events list is possible through the Pause/Resume button in the toolbar of the Custom Events.
This button is only available when the Custom Events are used in at least one active journey. Re-activation is not possible when no active journeys are linked. The user is informed if this is the case:
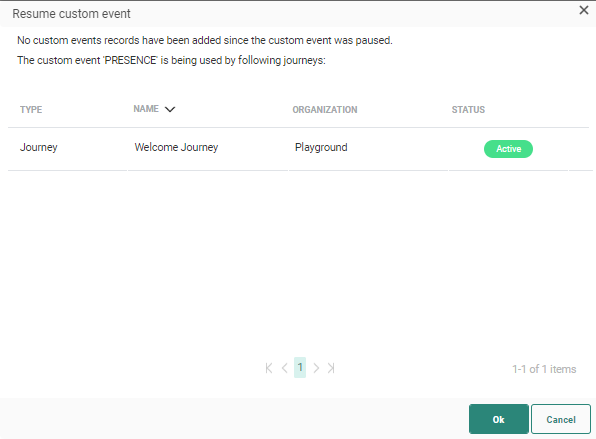
The Dialog provides information on the journey name and organization to which the Custom Event List is linked as well as the status of the journey.
Note: When pausing/resuming Custom Events, a choice is given to delete non-processed incoming events. This means that when this option is selected and the Custom Events resume, that all records that have been added to the Custom Events in the mean time will no longer be processed. These records will get a state=60. You can check this in the Data entry of the Custom Events list.
