Data selections are needed to define the content to be displayed in a repeater. The data source used for a data selection can be one of the following:
Below you can find the details for each one of these data sources and an example.
Data Selection List
A Data Selection List typically corresponds to the product catalog, a collection of all financial products, news articles and more. These are maintained in the List section of the platform. Records can be edited/added to the list manually or through import.
The records in the Data Selection List can be used to customize your message repeater and display a series of items corresponding to the filters and limits defined. The use of a Data Selection List as a data source is quite straight forward.
Use case 1:
Parana Products is a Data Selection List containing all products in the Parana product catalog, with information on prices, language, names, brand, description, images, unit costs, etc. The records in this list will be used to personalize a message and display a top 3 of items.
The following is the Parana Products list that will be used as the data source.
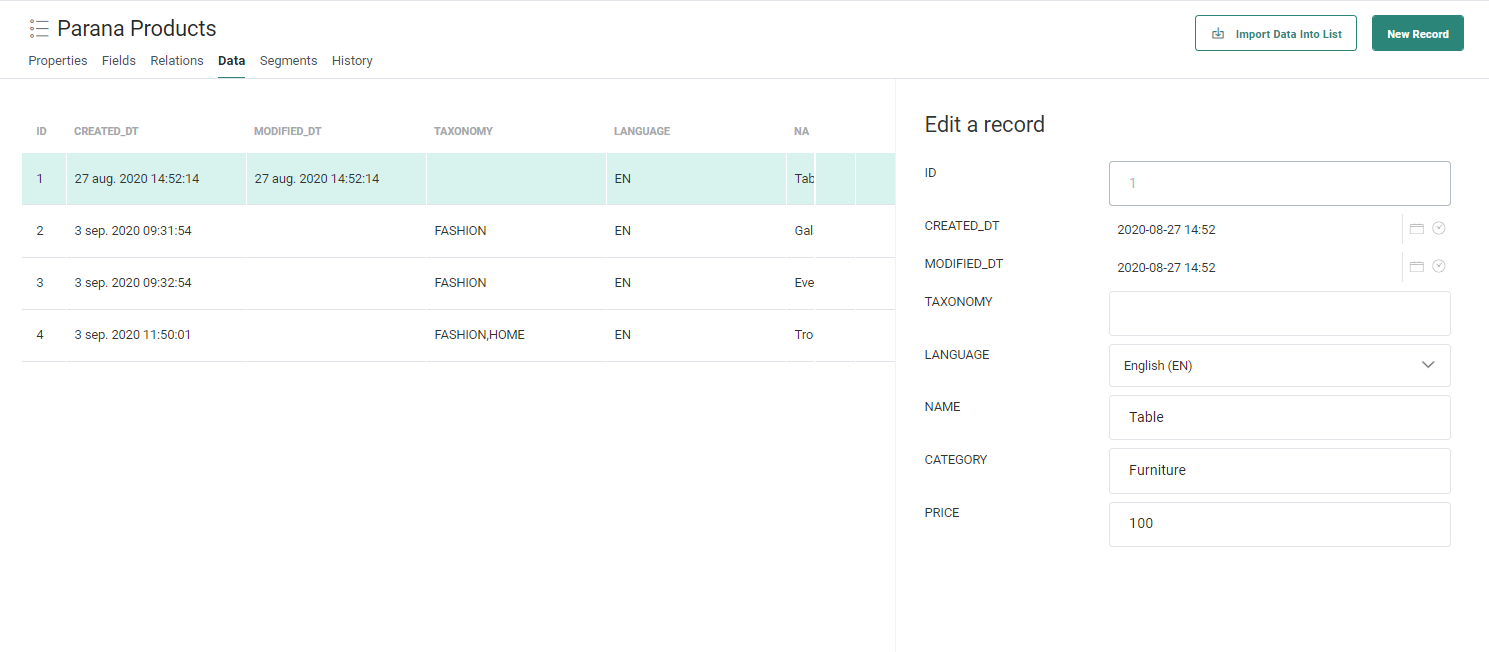
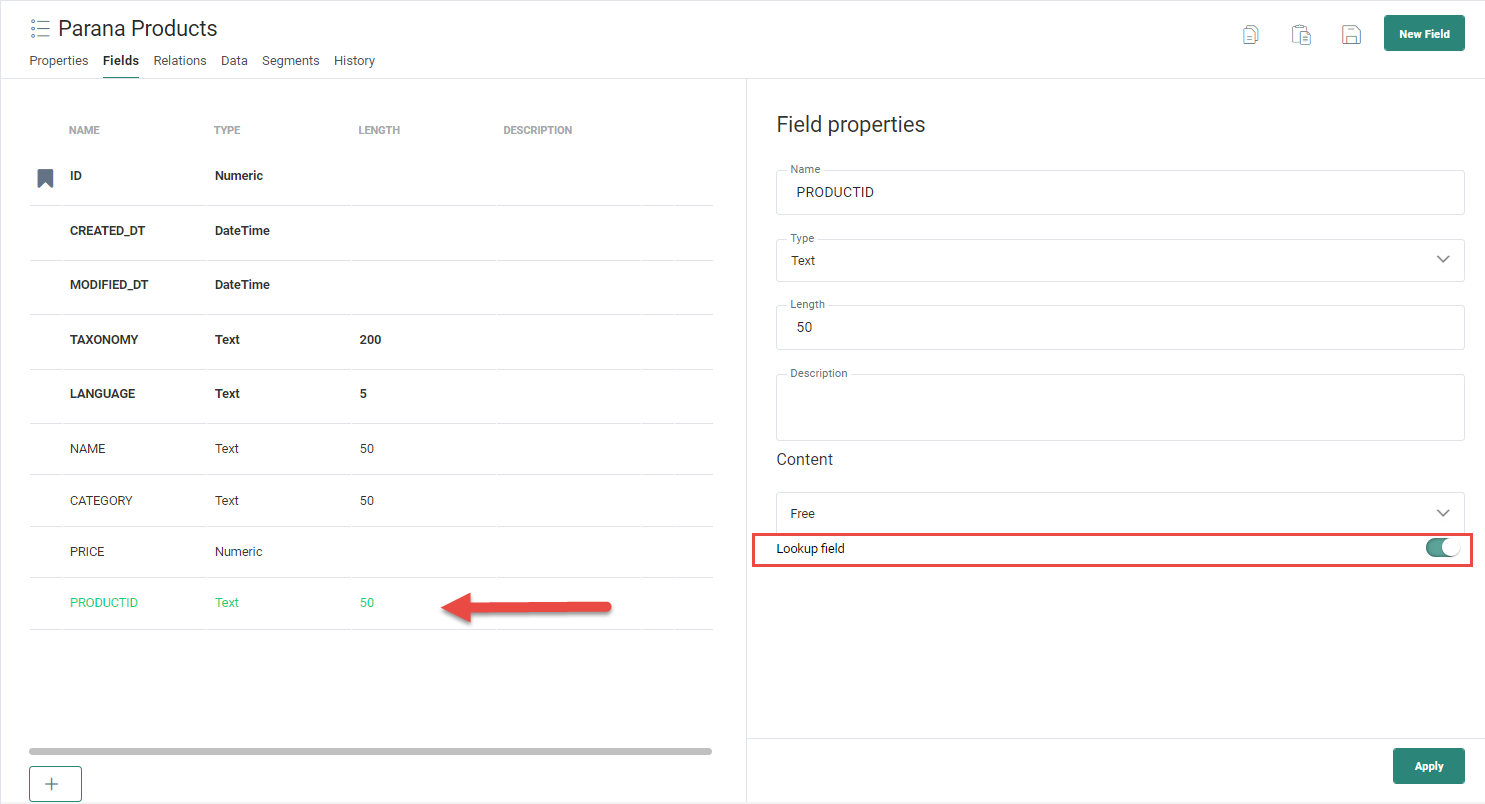
In this list, the field PRODUCTID has been set as lookup field. The field contains the unique product IDs and will be used in the second use case to filter the items returned by the data selection.
1. First, create a message and go to the Properties > Audience, Language and Data entry.
2. In the Data section, click the + icon to add a new data selection. The data selection contains the definition of the data source and the filters applied.
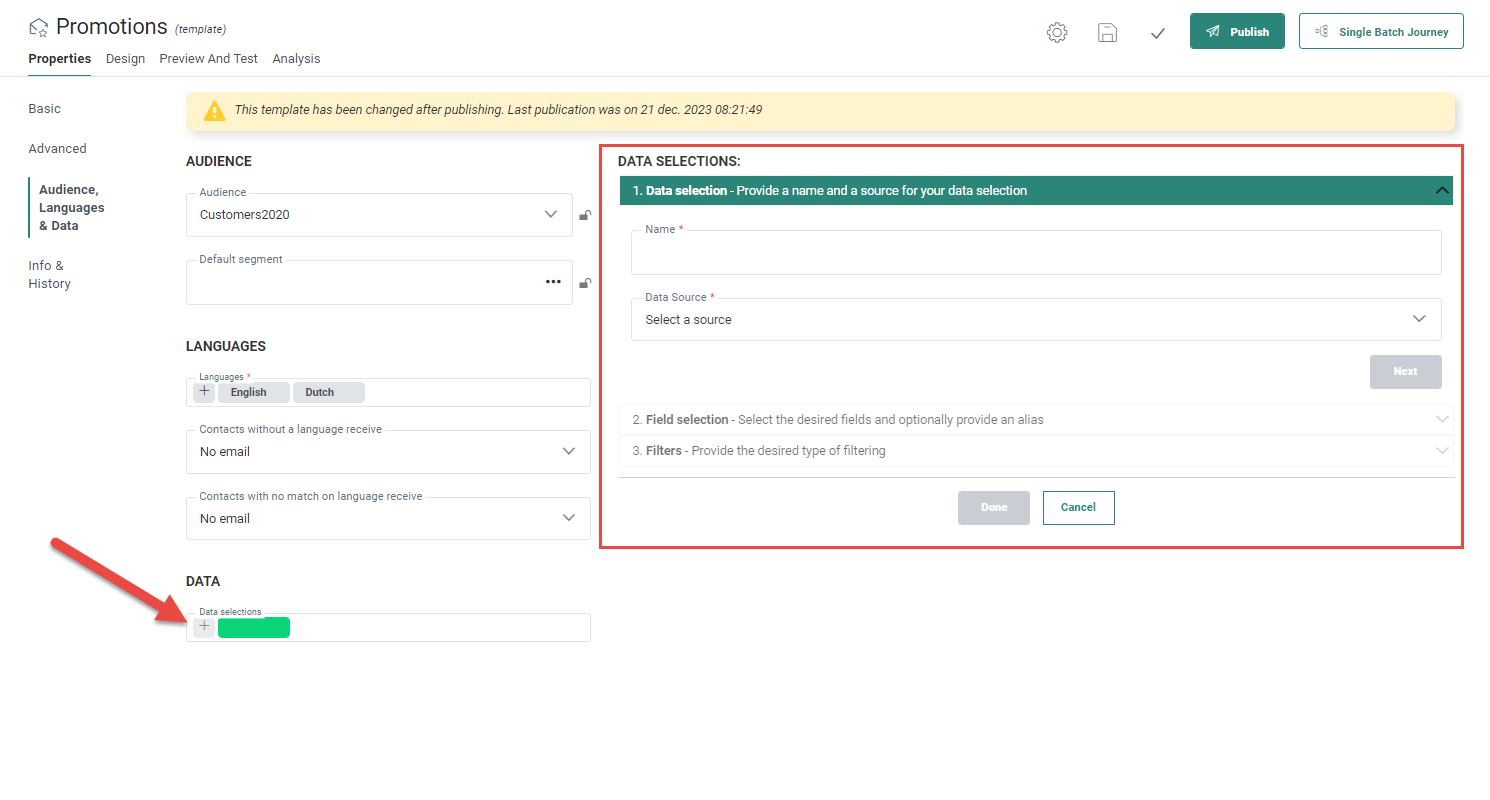
3. In the data selection properties panel on the right, select the Parana Products list from the drop-down linked to the Data source field. All Data Selection Lists defined for the current organization are listed.
4. Enter a name for this data selection. This name is used when configuring the Repeater.
5. Move to the next section to select the fields in the list. Only selected fields will be accessible from the Personalization Dialog:
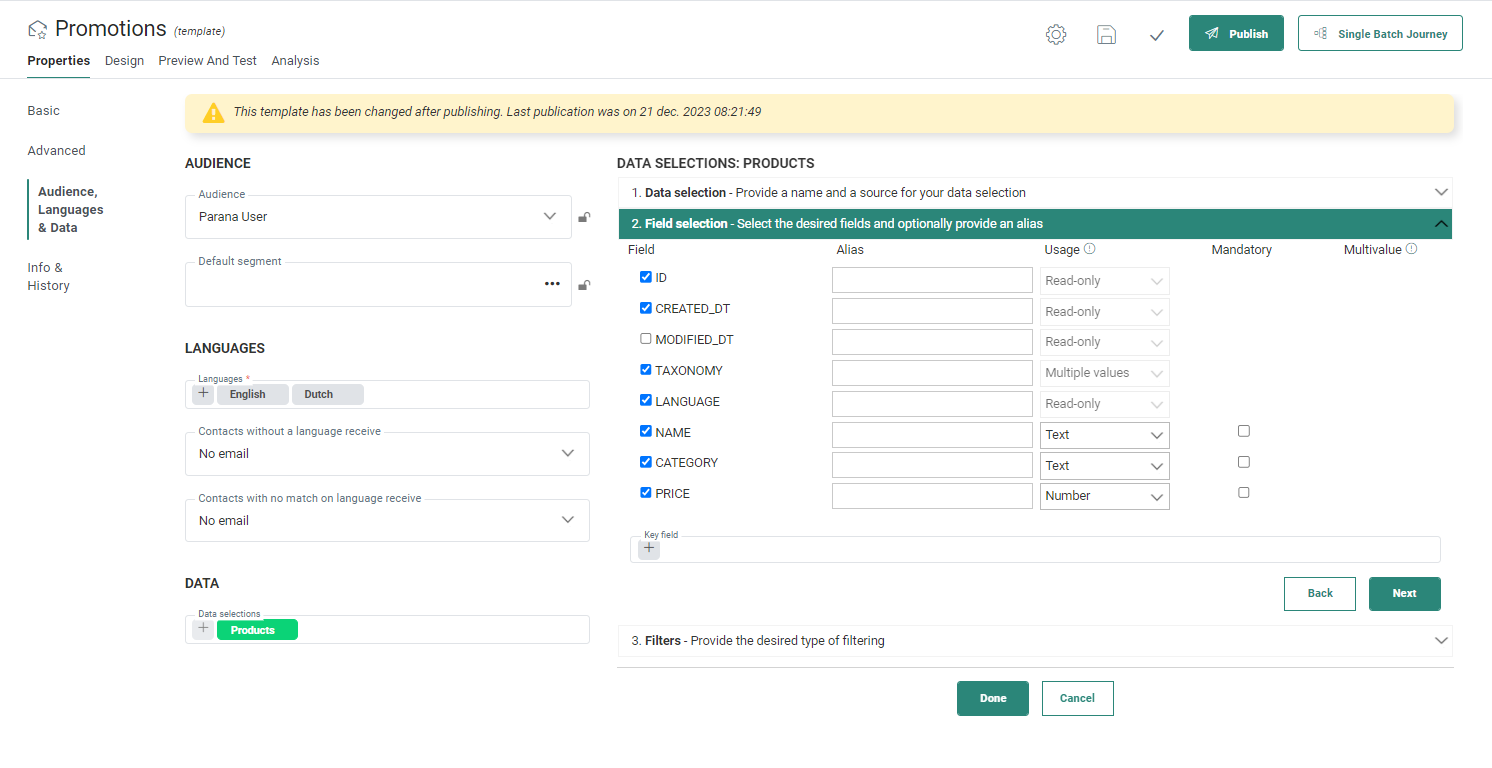
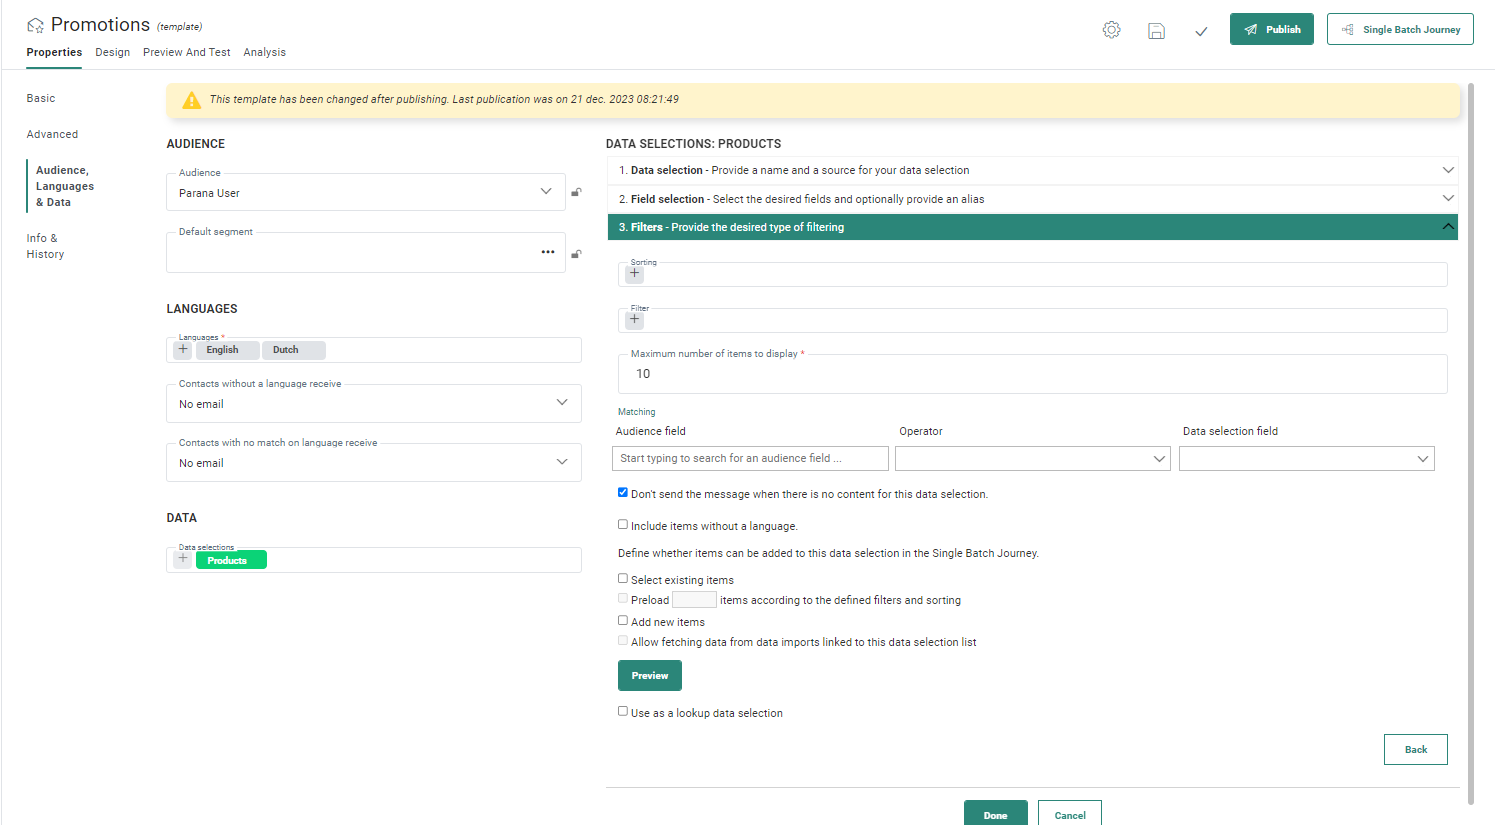
6. Last, in the Filters section, limit the number of records returned to 3 as we only want 3 records to be displayed in the message.
7. Save the data selection. It will now be available for selection from the Repeater Component.
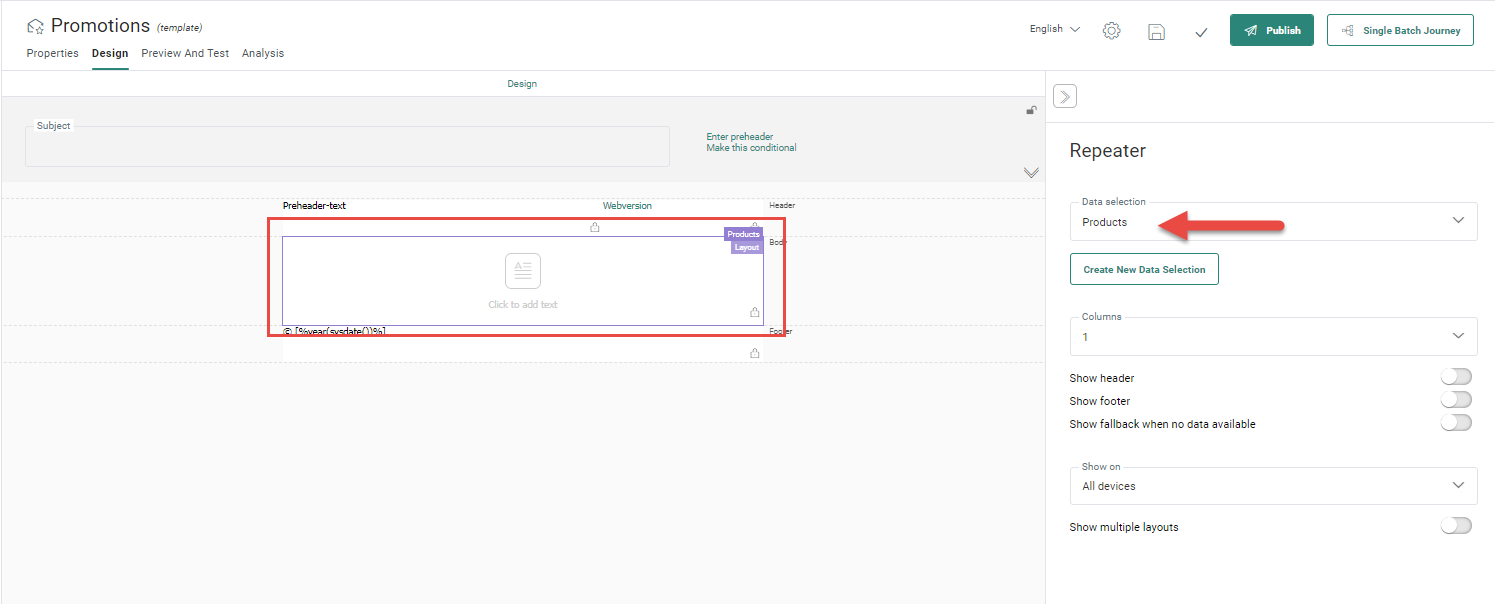
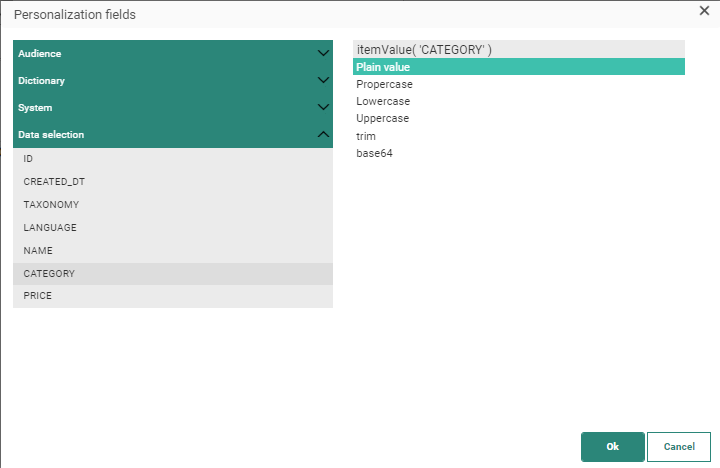
All fields selected when configuring the data selection are available to personalize the Repeater Component:
Use case 2:
As in the previous use case, Parana Products is a Data Selection List containing all products in the product catalog, with information on prices, language, names, brand, description, images, unit costs, etc. The records in this list will be used to personalize a message and display a top 3 of items corresponding to the preferences of the contact. To achieve this, records from the catalog need to be filtered to only return those corresponding to the preferences.
This use case builds on the foundations of the previous exercise. Here, you need to define a mapping between the items in the catalog and the ones listed in the preferences of the contact.
These preferences are stored in a dedicated field in the main Audience List, called FAV_PRODUCTS.

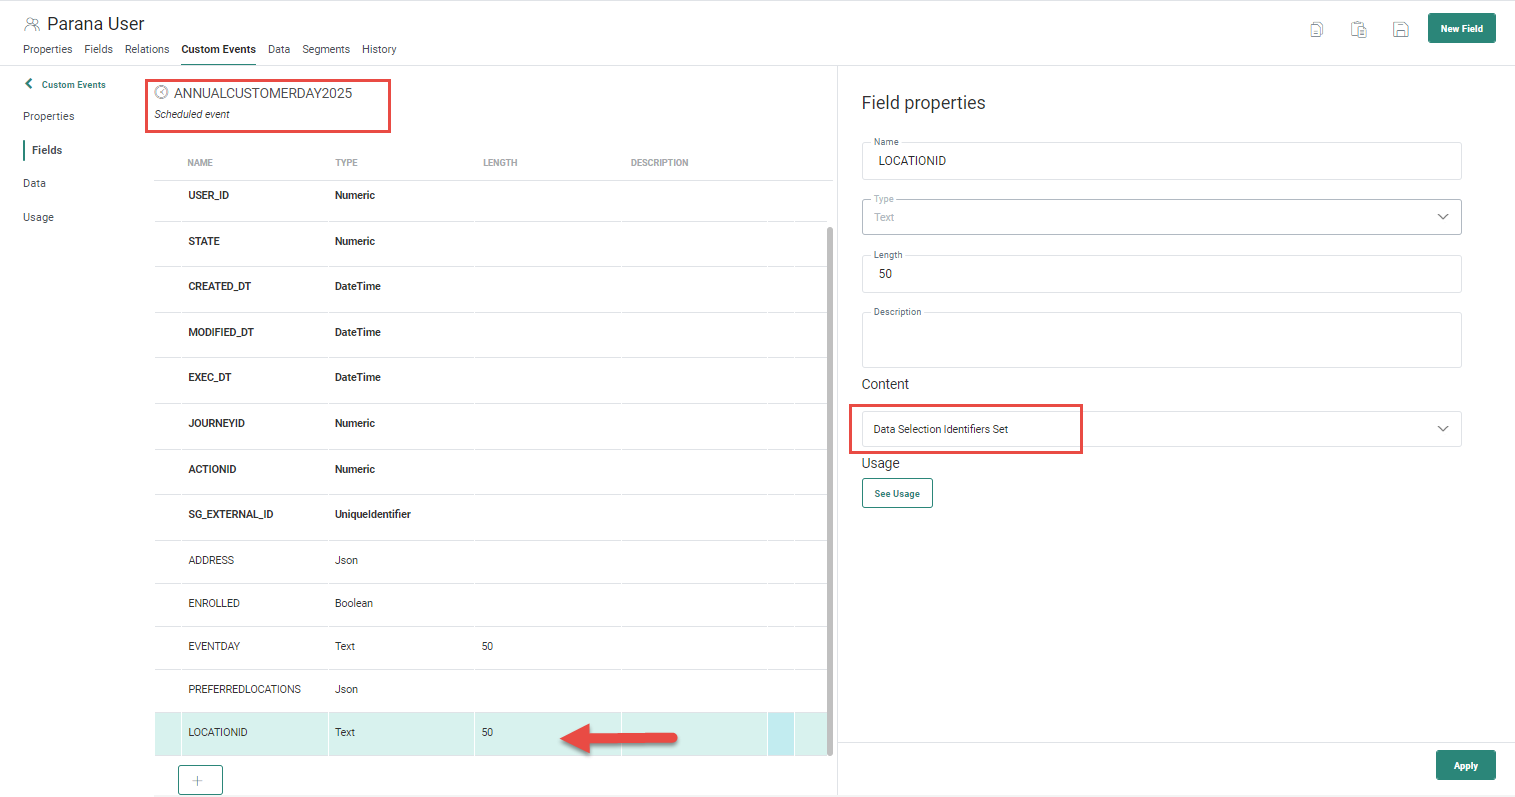
To be able to use the information in this field to perform a lookup in the catalog, the field needs to be defined as a Data Selection Identifier Set, which means that information in here can be used as a set of IDs to identify the records in the Product List.
The data in this field looks like the following:
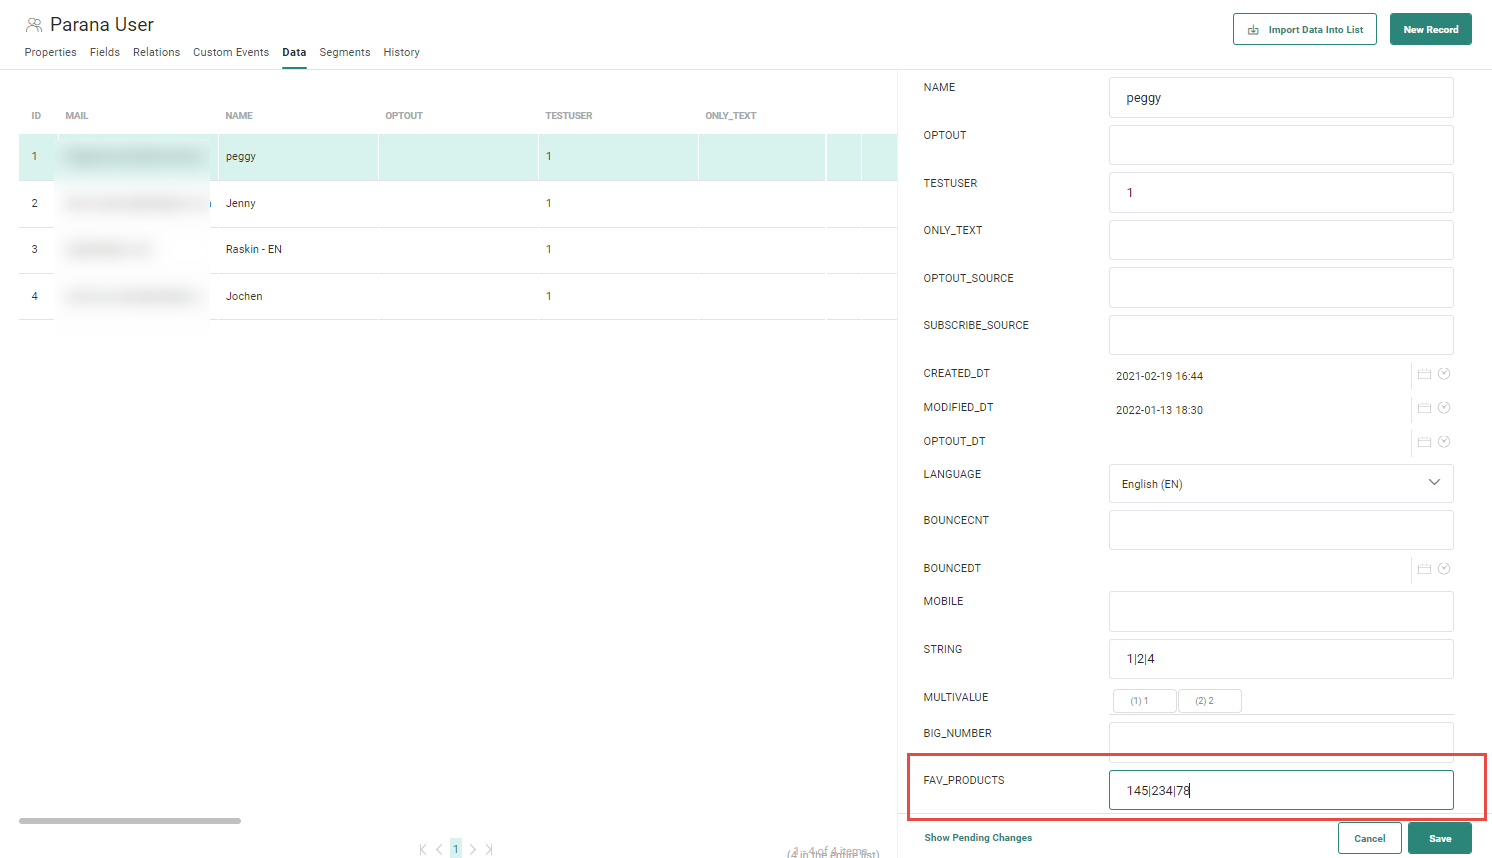
The IDs of the favorite items must be separated by pipe, comma or semicolon. This way, this field can be used in the filter of the data selection as follows:
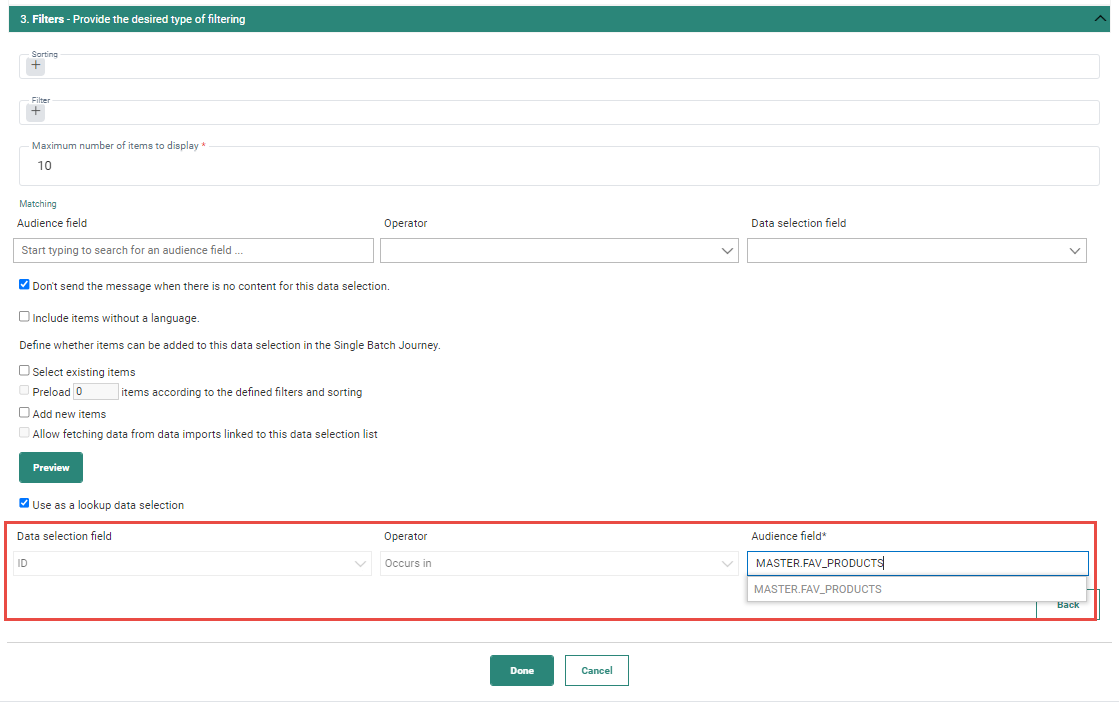
In the section 'Use as a lookup data selection', the field containing the unique product ID is already filled out. This ID will then be checked for its presence in the field with the favorite products. Only items in the catalog that correspond to this criteria will be returned.
Note: The data selection field is filled out automatically based on your list configuration. The field that has been configured as lookup field in the Product List, will be used to perform the lookup on. In our example this is the field PRODUCTID.
Arrays in Custom Events JSON fields
Custom Events are stored in a list that's 1:N linked to an Audience List. New records are added continuously to a Custom Events List as the result of an action (eg. the contact purchases an item, enrolls for an event, etc) and are then used to drive journeys for contacts in your audience based on these events. The data in a Custom Events List can be used to personalize communication.
Use case:
During a conference, visitors are asked if they would like to participate in the annual customer event and what day of the weekend and location has their preference. Multiple locations can be given with an order of preference. This information is stored in a Custom Events List and is used to send out an immediate invitation.
The Custom Events list ANNUALCUSTOMERDAY looks like the following:
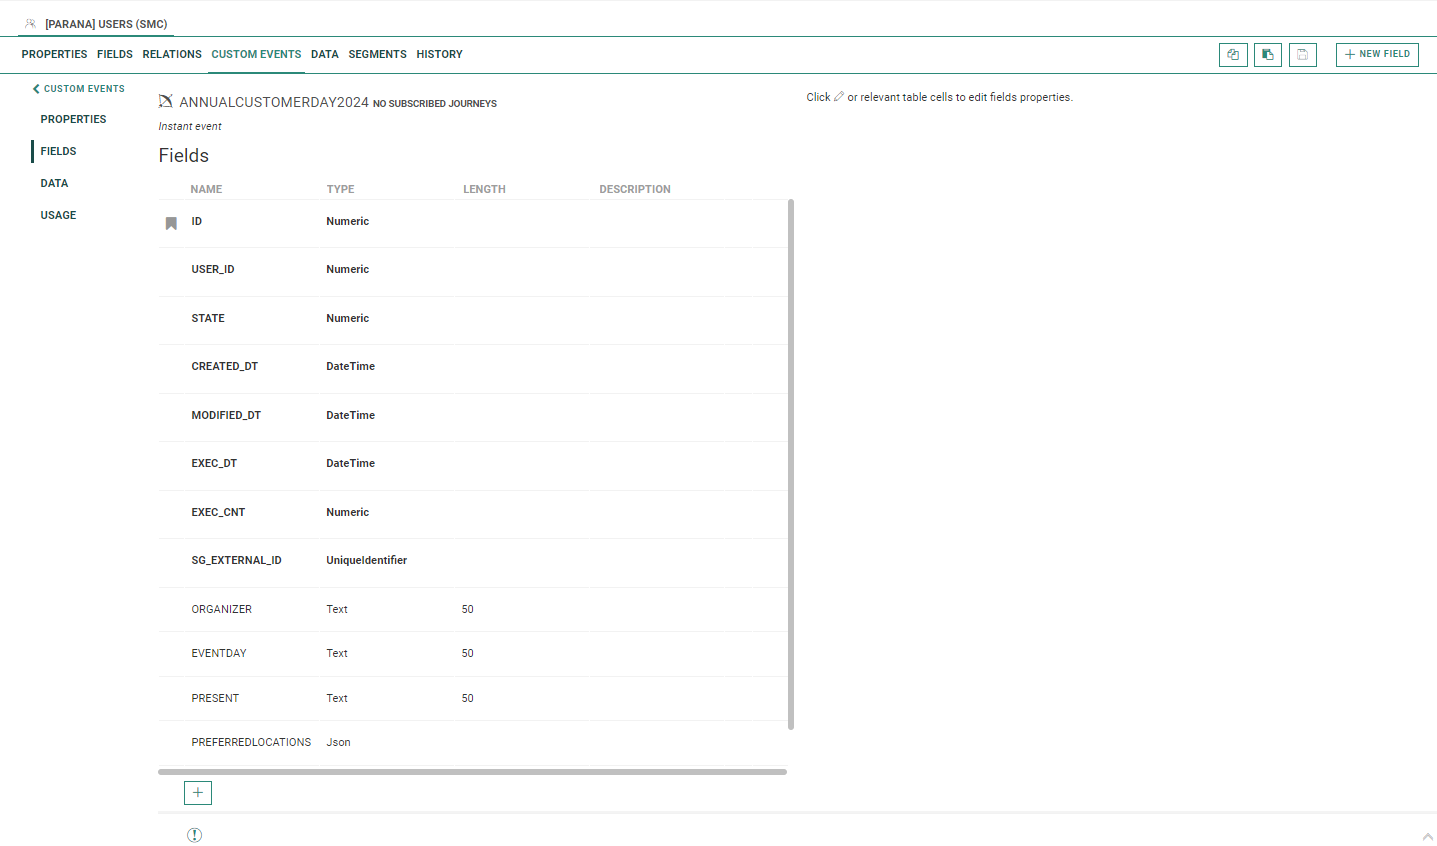
It's linked to the Audience List Parana Users storing all the contacts. The Custom Events List stores for each contact or visitor of the conference their preferred event day and preferred locations. The PreferredLocations field is of type JSON and is configured as follows:
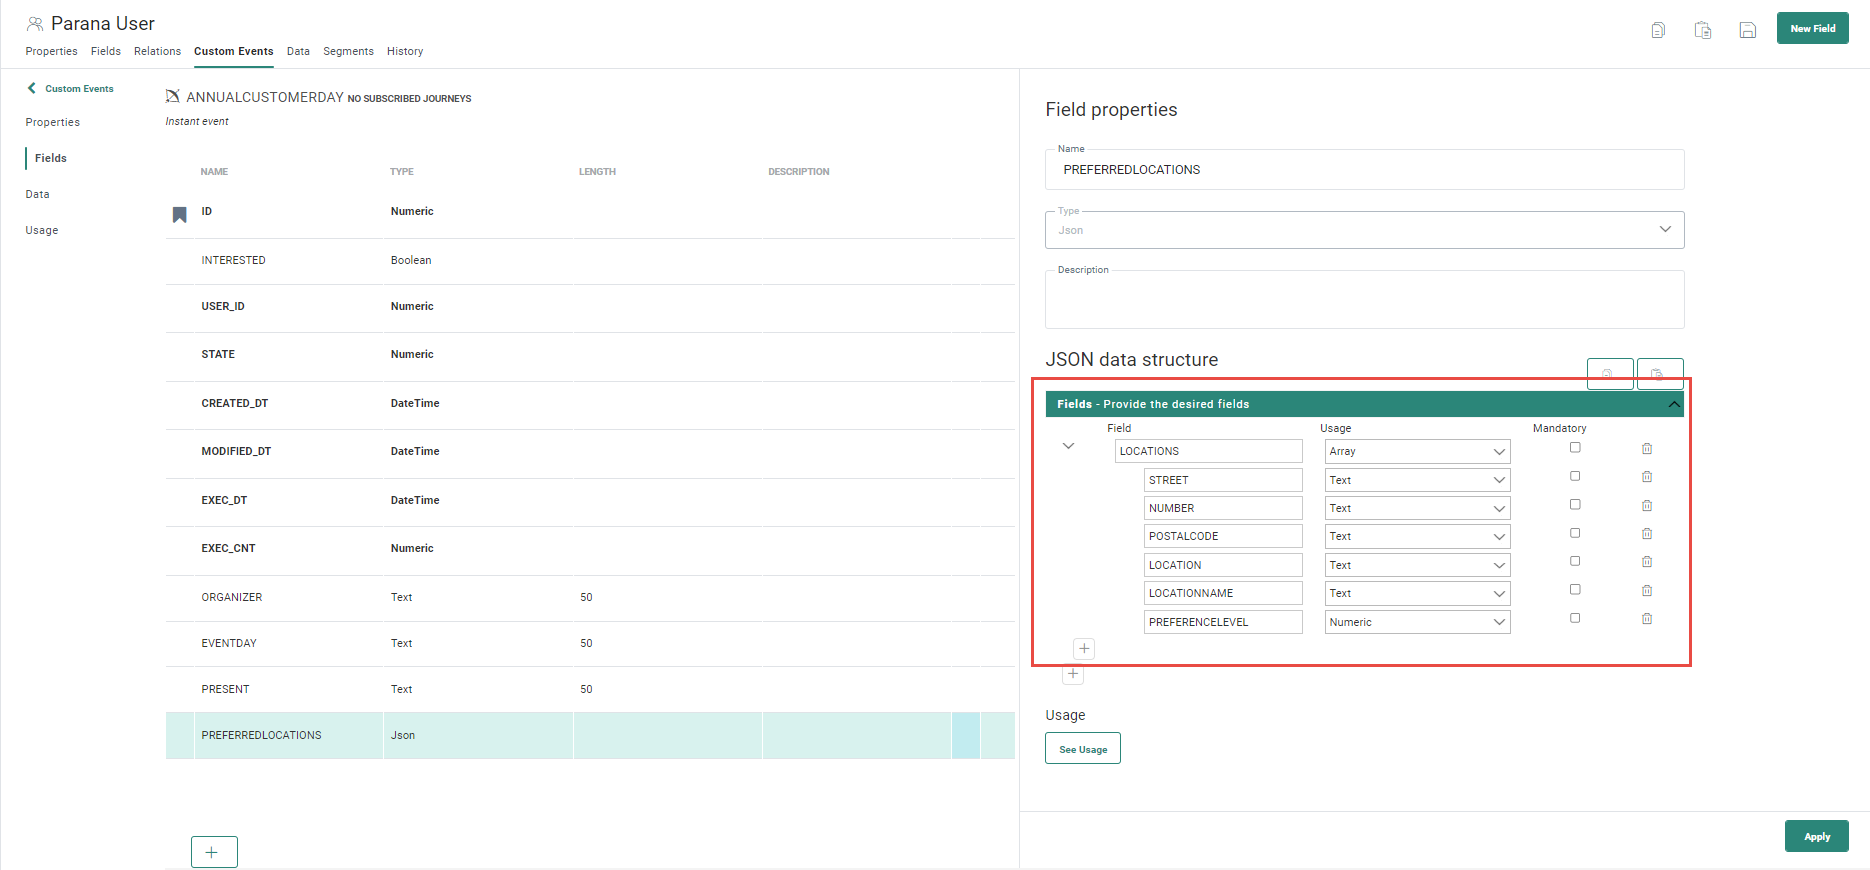
Each visitor's preferred locations are stored in an array called Locations, with their address info, location name and preference level. By using an array there can be multiple preferred locations per visitor.
Important note: Fields in the JSON are case sensitive and need to be added in uppercase only. Ensure the data that is sent applies the same uppercase as the data structure definition of the JSON in the Custom Event List.
The following is an example of a data record where this JSON field is filled out with two possible locations:
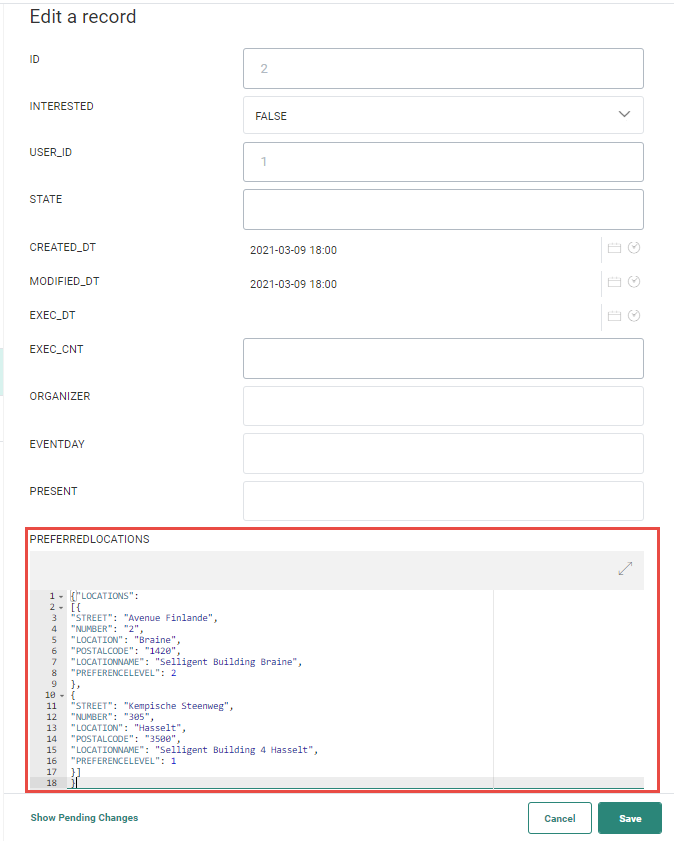
{"LOCATIONS":
[{
    "STREET": "Avenue Finlande",
    "NUMBER": "2",
    "LOCATION": "Braine",
    "POSTALCODE": "1420",
    "LOCATIONNAME": "Selligent Building Braine",
    "PREFERENCELEVEL": 2
 },
 {
    "STREET": "Kempische Steenweg",
    "NUMBER": "305",
    "LOCATION": "Hasselt",
    "POSTALCODE": "3500",
    "LOCATIONNAME": "Selligent Building 4 Hasselt",
    "PREFERENCELEVEL": 1
 }]
}
When creating a message, use the information in the Custom Events List and especially the preferred locations stored in the array to personalize the Repeater.
To do so, perform the following steps :
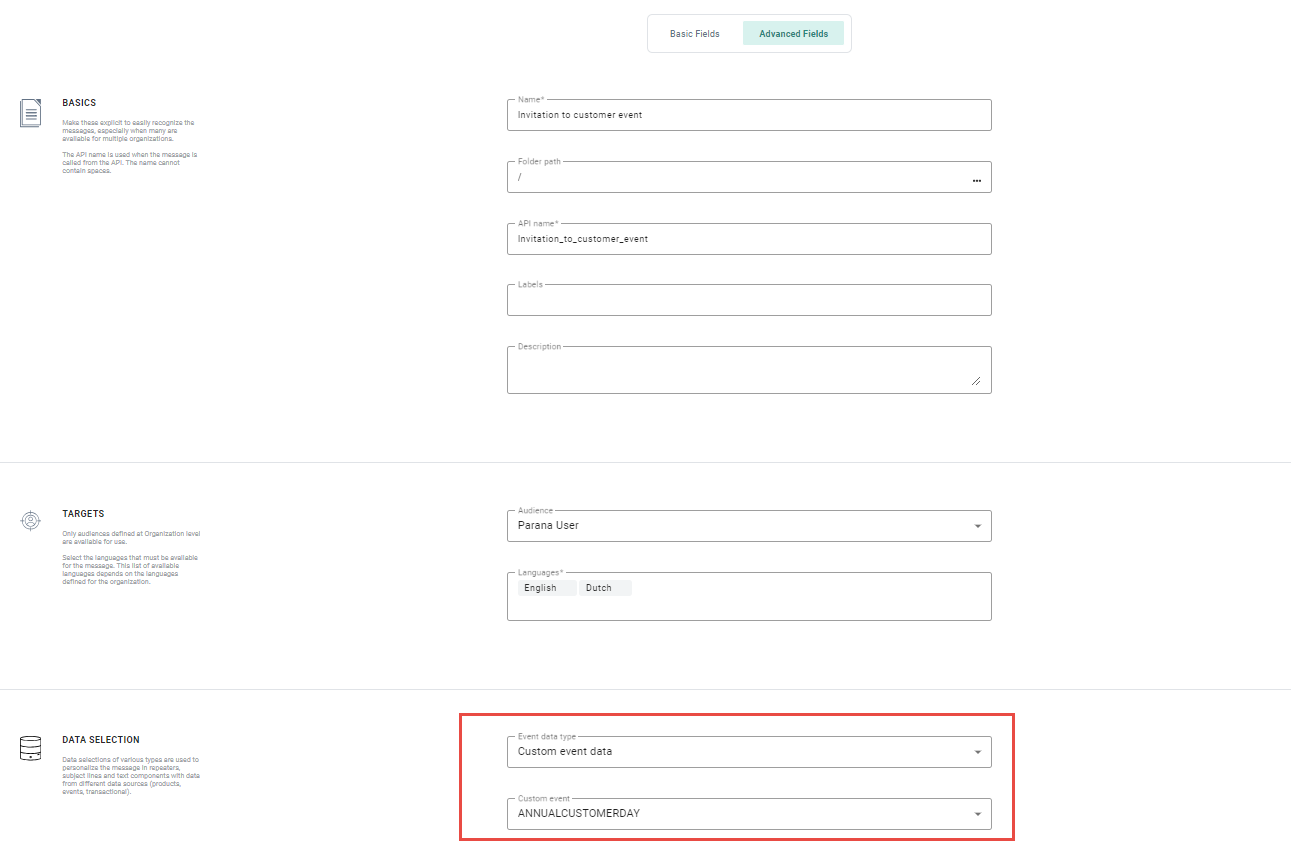
1. Create a message for the audience Parana Users and select custom event data as type and the Custom Events List ANNUALCUSTOMERDAY:
By selecting the Custom Events List, the data in the list is available for personalization in the message. However, if you want to use the Preferred location information in a repeater, we need to define the data selection first.
2. In the properties of the message, go to Audience, Languages & Data and add a new data selection. (Verify that the Custom Events Lists is correctly selected as well. This is already filled out when defined during the creation of the message.)
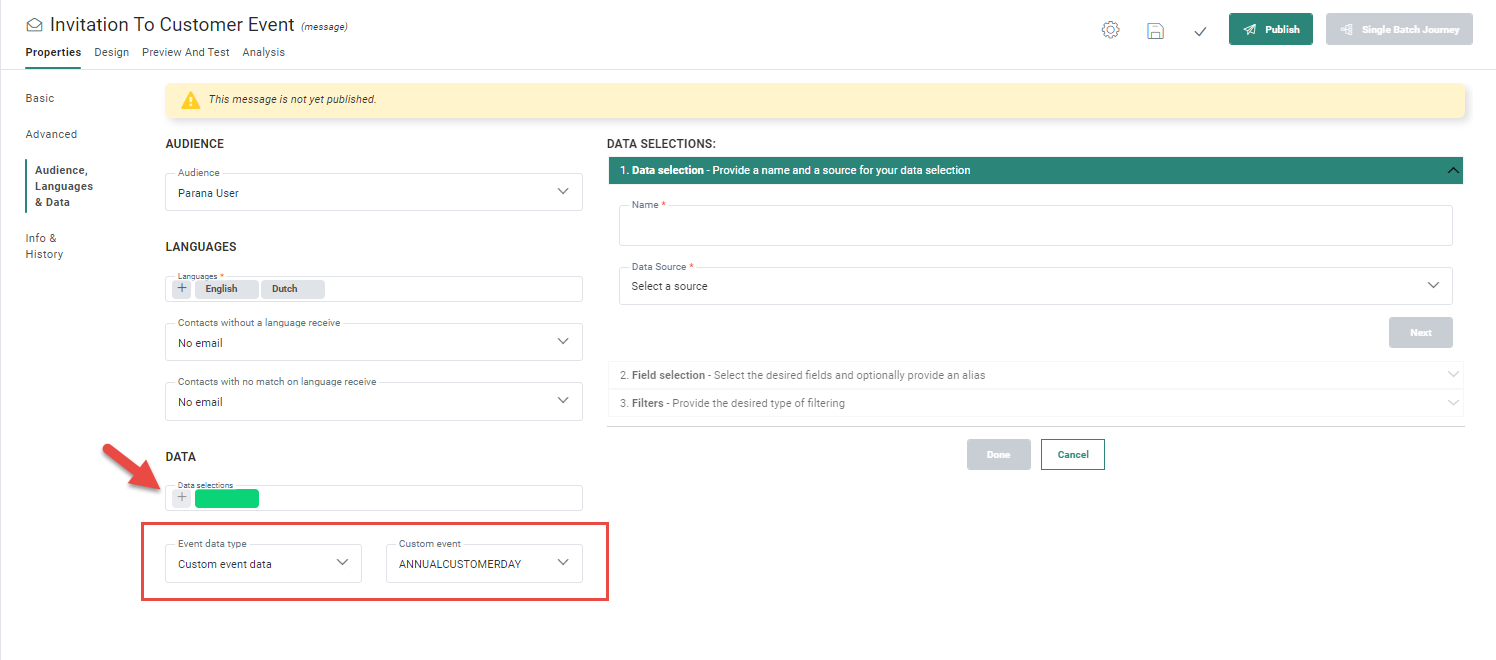
3. In the data selection configuration panel, click the source field. In this example, use the data in the JSON array as a source. This field is referenced by the name of the JSON field in the Custom Events List, followed by the name of the array.
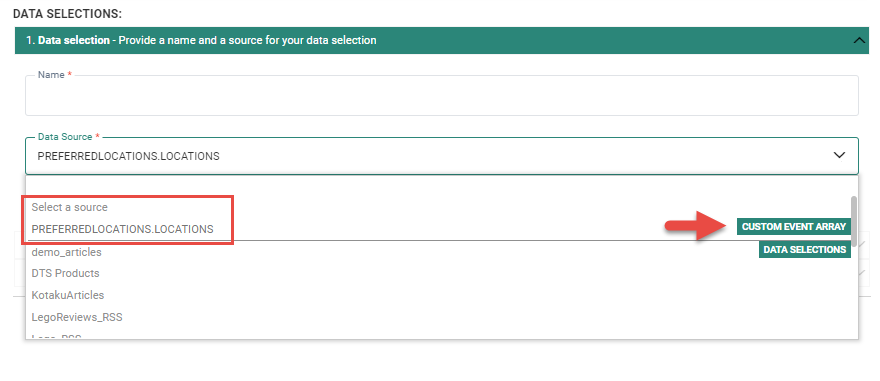
4. Once this field is selected as a source, give it a name and move on to the Fields selection:
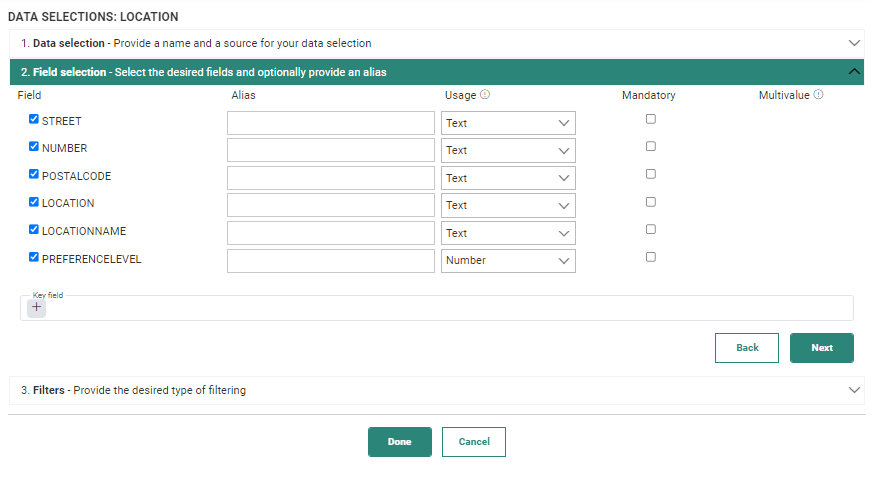
5. Select all the fields you want to use in the message and move on to the Filters section.
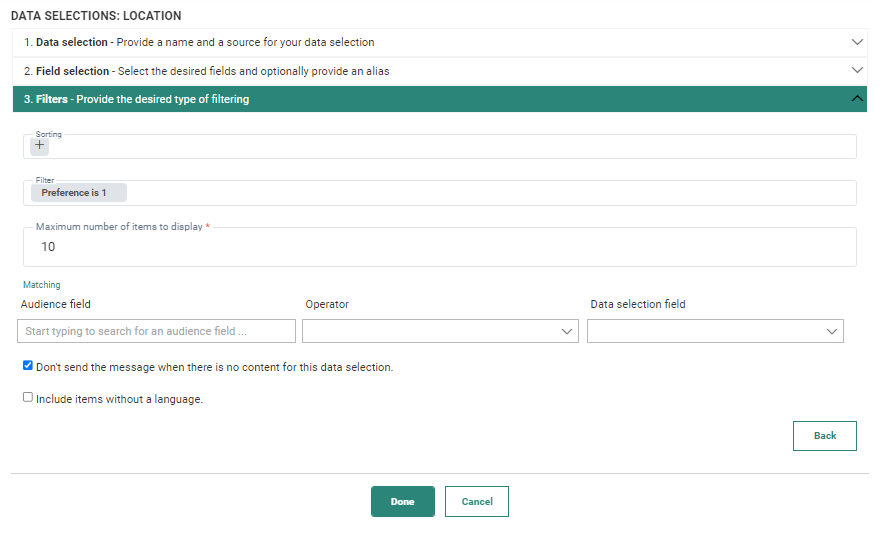
Here, you can filter the data to only return the location with preference level 1. If you want, you can show all other locations in a different section of the message.
6. Save this data selection and then the message. The data selection can now be used in a Repeater. This allows you to display the preferred location, regardless of how many there are.
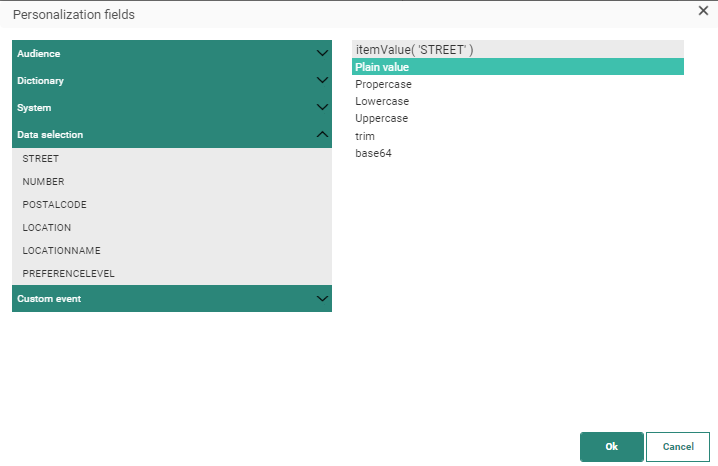
Fields from this data selection can now be selected to personalize the repeater:
Journey Data
What is Journey Data? It is data that is stored in a list which is 1:N linked to the Audience List. To be able to use this data for personalization, it needs to be configured as such in a Custom Journey.
Note: This is only available for repeaters in email messages used in Custom journeys. It cannot be applied to templates.
Use case:
A retail company is selling whiskey and at regular times organizes tasting evenings that whiskey lovers can join. All the tasting participations are stored in a 1:N linked list Appointments.
Our customers are stored in an Audience List 'Whiskey enthusiasts'.
A Monthly email is sent to all customers with an overview of the upcoming tasting sessions they are enrolled in.
The Appointments List stores details on the date and time of the tasting, distiller, how many people will be present, the location and the status of a customer’s appointment. The list contains past as well as future appointments. Because this information is stored in a 1:N list, you need to use the Journey Data functionality and filter out the appointments that are in the past.
Because this is a recurring email, create a Custom Journey with a Recurring Batch Component. Configure this component to be executed on the first day of every month and make the Journey Data available to personalize any content used in the journey.
1. Start with creating a Custom Journey for our Whiskey enthusiasts audience.
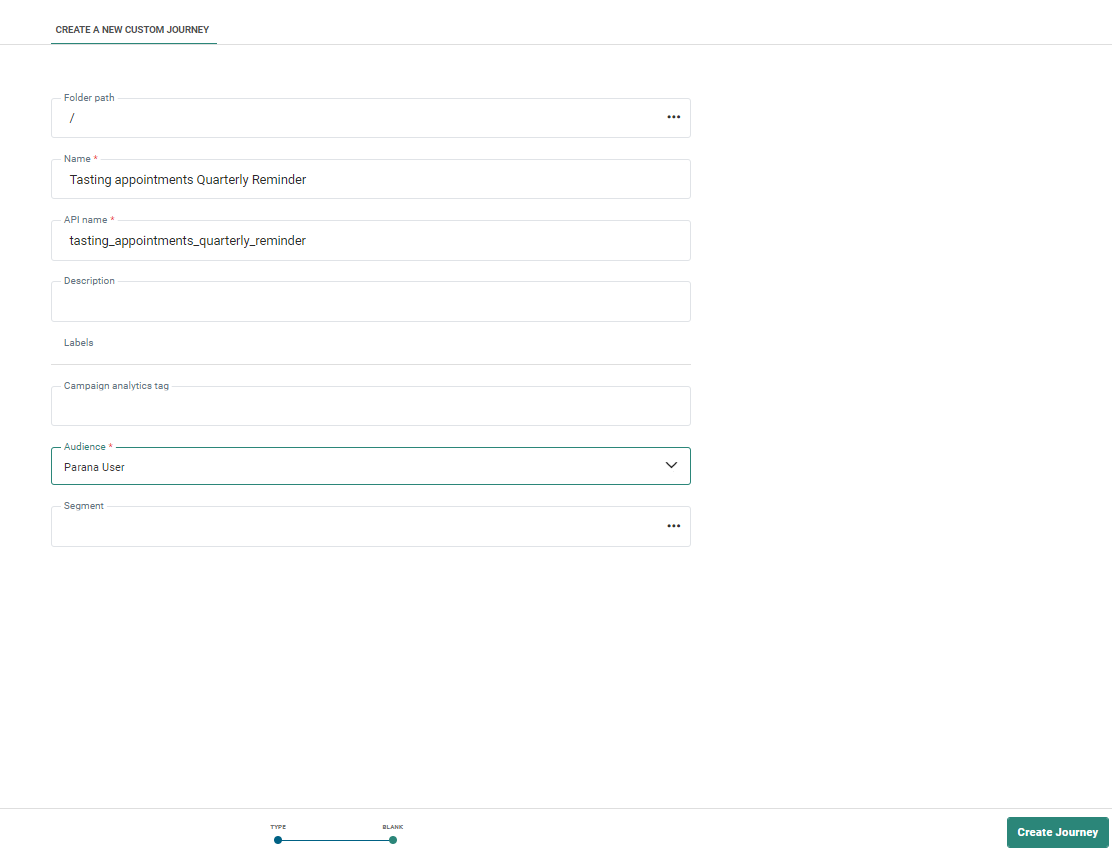
2. Add a Recurring Batch Component, configure it for monthly execution and configure the Data properties as follows:
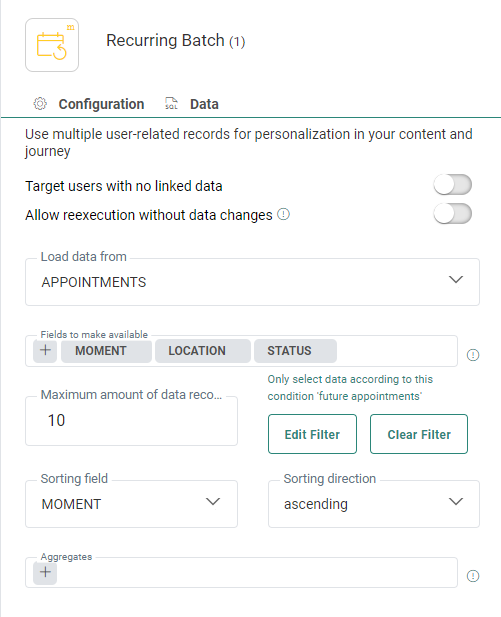
- Select Appointments as the 1:N linked list from the ‘Load data from’ field.
- Select all the fields in the Appointments list that need to be available to customize the message.
- You can limit the number of records returned; set this to 10. Only the top 10 appointments are returned in this case.
- Create a filter to filter out the appointments in the past.
- All appointments returned are listed, from the most recent one to the one the furthest in the future.
3. Next, add a message to the journey, link it to the Recurring Batch Component and then right-click the message and select ‘Create new email’ (you can also use an existing email that you customize with the journey data)

4. Fill out the properties of the email
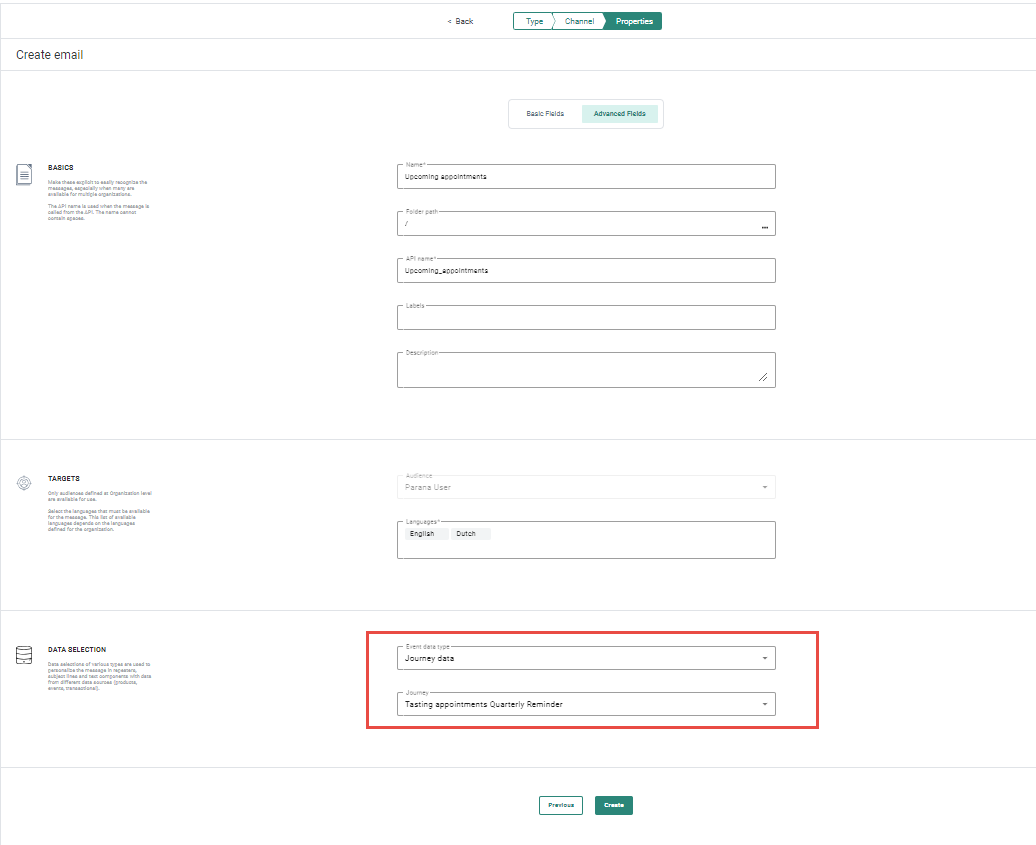
Because the email is created directly from the journey, the Audience List is already pre-filled, as well as the Journey Data option and Journey name. This information is important to be able to use this data to personalize the email.
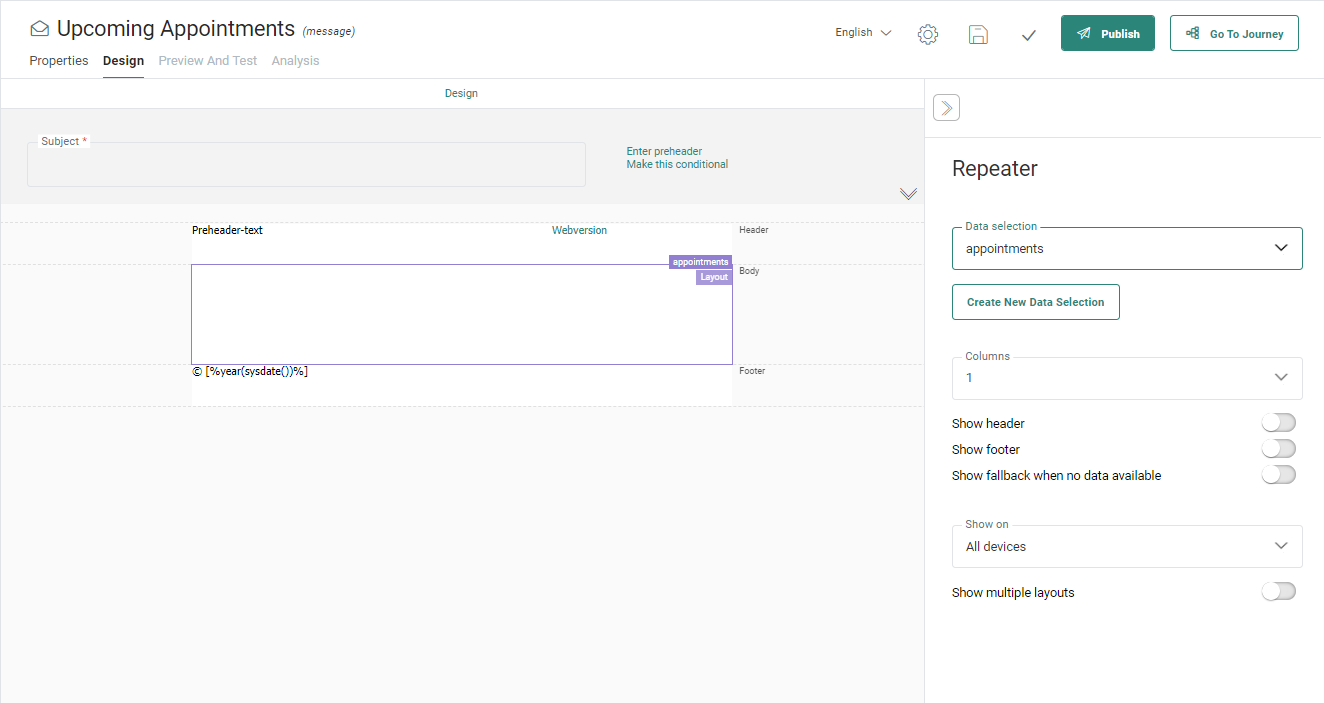
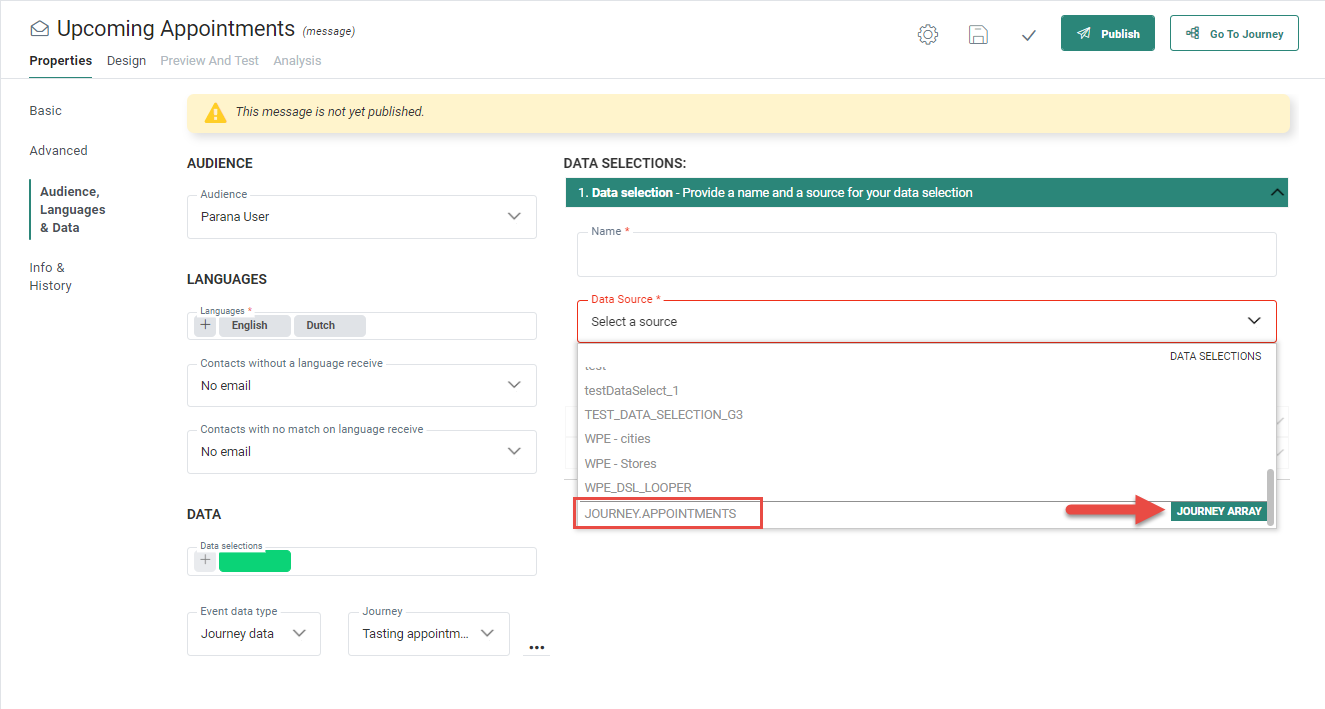
5. Once the message is created, go to the properties of the message, and create a data selection. Note that the Journey data type and Journey name are already filled out:
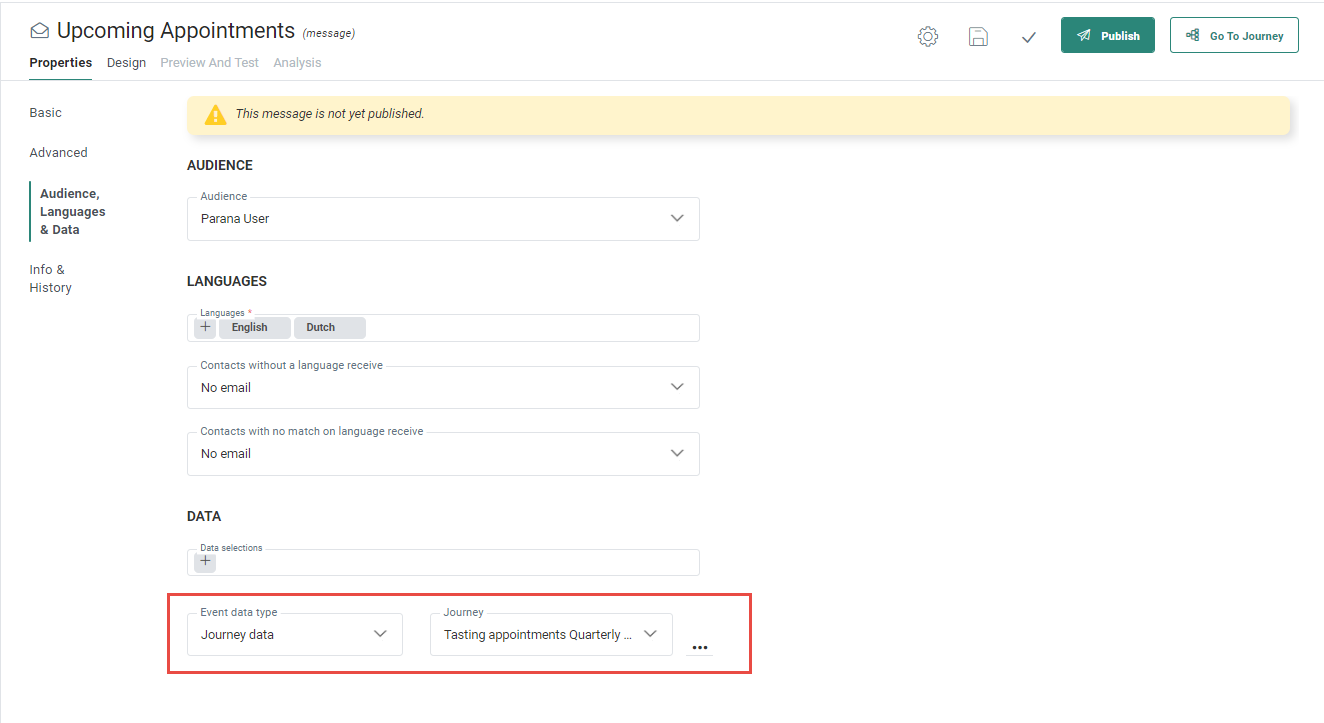
6. As a source, select the Journey data and give it a name. Remember this journey data contains all the tasting appointments for the contact.
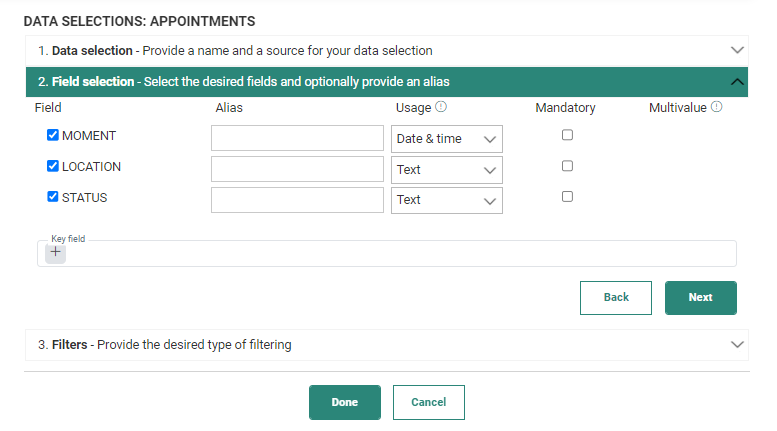
7. In Fields selection, select all the fields to make them available to customize.
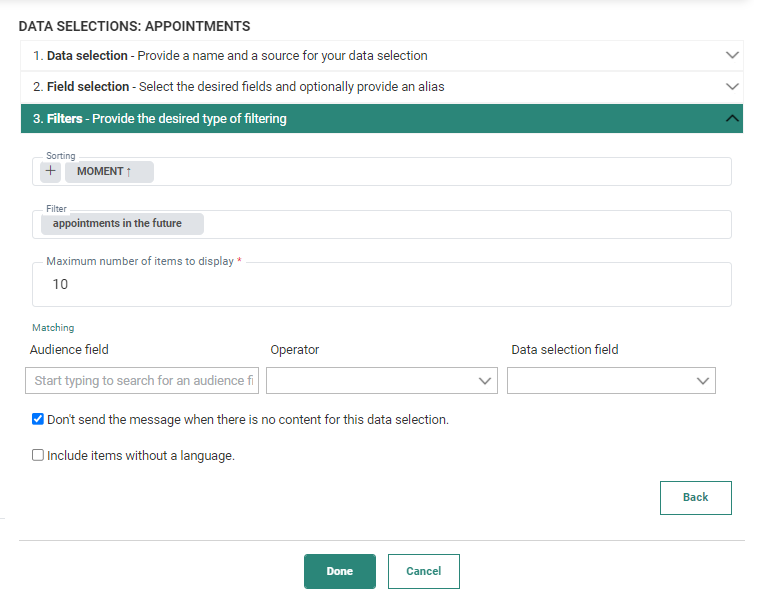
8. In the Filters section, sort the records by appointment date ascending and filter them to only include appointments after the current date (to exclude older appointments).
9. In the message you can now add a repeater and use this data selection to personalize the content.