An Import can be created in two ways:
- From the fly-out menu available from the Data Exchange entry in the left navigation bar. Click New and select the Data import from the drop-down.
- On the Imports/Exports Start page, select New > Data Import. A wizard guides you through the creation and configuration process.
Create a scheduled Data Import
- Set the properties
- Set scheduling and notification options
- Notifications
- Set the scheduler (Optional)
Create a scheduled Data Import
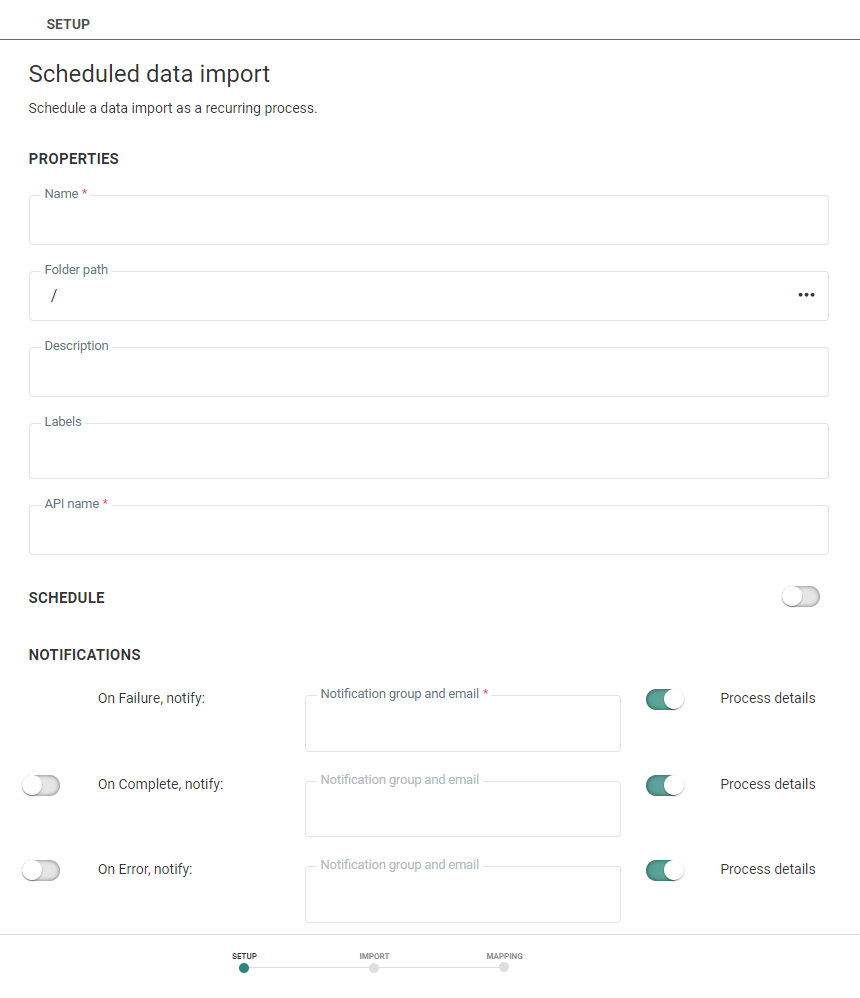
Set the properties
Set the Folder path for the Data Import. This is the location in the folder structure where the Data Import is stored.
Set a Name and Description for this Data Import.
Set the API-Name for the Data Import. This name is used when the import is executed via the API. By default the API name is filled out with the name given to the Data Import.
Set the asset labels. Select one or more labels from the drop-down. (These labels are configured in the Admin configuration.) Users with the proper Access permissions can also create new labels here by typing the new label value in the field.
Set scheduling and notification options
The Schedule section defines the validity period of the Data Import as well as the run frequency.
If the Data Import needs to be scheduled, toggle the option on and define the schedule.

Start and End date — You can set a start date and/or end date for the Data Import. For example, your import can start now but needs to run indefinitely.
Periodicity — Indicate when the Data Import should run:
- Daily — Select the times of day when the import should run. You can select more than one.
- Weekly — Select the day of the week on which the import should run. The import can run more than once a week. You can also set the start time.
- Monthly — Select the days of the month on which the import should run. You can also select the time of day when the import should start.
- Periodically — Set the recurrence of the import , expressed in minutes. For example, the import runs every 10 minutes.
Note: The scheduled time will be executed based on the server's timezone. The currently configured server's timezone is mentioned next to the info icon.
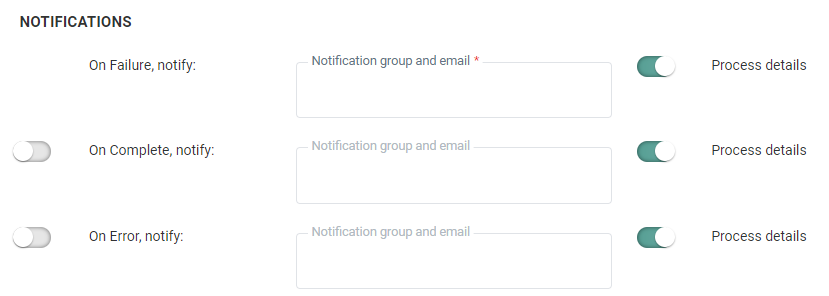
Notifications
A message can be sent either when the import is completed successfully, is completed with errors (import was completed but one or more errors occurred), or has failed. The details of the process can be included in the message. Additionally, the instance on which the problem occurred is included in the subject of the message.
To activate the option, simply flag the check box and enter one or more email addresses. (Multiple email addresses are separated by a semi-colon). You can also select a notification group. Notification groups are created in the Admin Configuration.
Note: Notification emails for when the import fails is mandatory. The other notifications are optional.
When you have finished, press Next.
Set the scheduler (Optional)
Note: The Scheduler section is only visible if there are schedulers configured on your environment. By default, there is 1 scheduler in which case this section is not shown as this default scheduler is used. If there is more than 1 scheduler configured, you will have access to the Scheduler section.
When multiple tasks, imports or exports are running it might be a good idea to use a different scheduler to make sure that long running tasks do not interfere with smaller tasks. Selecting a scheduler is optional and if you keep the default one all tasks/exports/imports will still run but if there is a bigger task, the smaller one will be executed only when the bigger one has finished.

You can choose between 3 different schedulers: the default one, custom scheduler 1 and custom scheduler 2. By selecting different schedulers for your tasks, they will be executed in parallel, without interfering with one another. So if you have long running tasks it might be a good idea to run these on a different scheduler.
Set the Import Options
Select the list
List — From the drop-down, select the list into which the records should be imported. This can be an Audience List, Data List, Option List, Data Selection List or Custom Events.
To import into a Custom Events List, you first need to select the Audience List. A toggle allows activating the import into Custom Events. All Custom Events linked to the selected Audience List are listed in the drop-down below the toggle: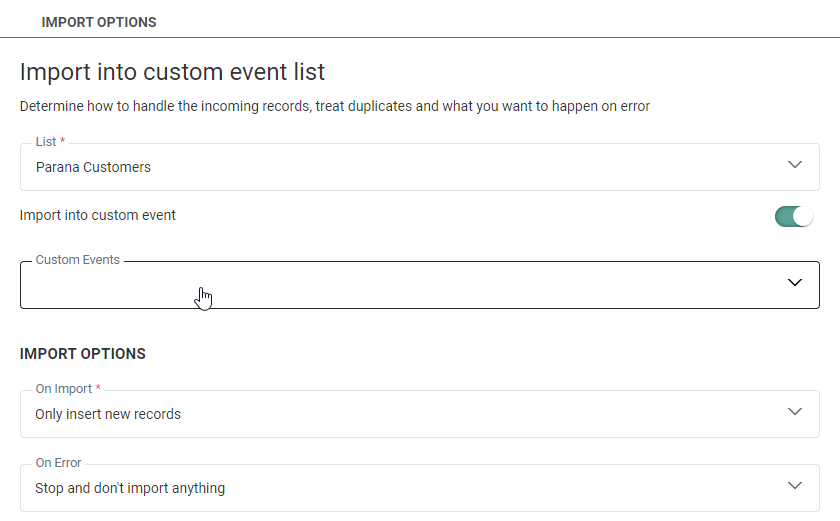
Note: When changing the list after the field mapping has been defined, a notification is displayed indicating that all column mappings will be lost if you continue. You can undo the change by clicking the corresponding undo link and reset the audience to the previous selected one.
Define the Import options
When importing into a list or segment that contains already records, you must define what needs to happen on import.
On Import
- Insert new records and update existing records (only for import into lists, not segments). For import into Custom Events, only new records can be added, no update of existing records.
- Only insert new records — Existing records are not updated, only new records are created.
- Only update existing records — No new records are inserted (only for import in lists, not segments).
- Delete existing records — Only when a match is found with a record on the list, the record is deleted. No other records are updated or inserted.
Note: The option 'Delete existing records' cannot be used in combination with an import into a 1:1 linked list or when transforming values through inverse lookup.
On Duplicate Data (only for lists, not segments or Custom Events)
- import first match — If duplicate records are found, the first record that matches an existing record is imported. Any subsequent record that matches that existing record will not be imported.
- import last match — If duplicate records are found, the last record that matches an existing record is imported.
On Error — Defines the behavior of the import process when an erroneous record is found. Options are:
- Stop and don't import anything — When an issue occurs in a file, this option aborts processing of the current file and generates a notification to the OnFailure address. Previous files may still have been imported successfully during this job.
- Continue the import — Ignores the erroneous record and continues processing, eventually generating a notification to the OnComplete address if set in the notifications.
Examples of errors:
- Insufficient number of columns (expected 5, found 3)
- Data too long for the list data type (55 characters for a text field of 50 characters)
- Mismatched data types (text when number is expected)
- Nonsensical data (ex. 1975-13-37)
Note: If an empty file is encountered, the Data Import routine will abort, event if 'Continue the import' is selected.
Example:
A.csv (10 good records)
B.csv (10 good records)
C.csv (10 records of which record 5 and 7 are broken)
D.csv (10 good records)
If the option 'Stop and don't import anything' is on, 20 records from files A and B will be processed. The first 4 records from file C will not be processed and file D will not be processed either.
If the option 'Continue the import' is on, all records in all files will be processed except the 2 broken records in file C.
Technical note: Because files are processed in lexical order (eg. 1, 10, 100, 2, 33, 4, 500 ), if the order in which the files are processed is important, it is recommended to use a date or sequence number in the file name. Also, when processing order is important, it is also recommended to not use the option "Continue the import".
Define the Source
Medium — The list of possible medium types comprises Repository, Authorized URL, Public URL, Azure Blob Storage, Amazon S3 Storage, Google Cloud Storage, FTP, SFTP, FTPS. The parameters to enter depend on the selected medium type. The user can select a subfolder to store the file. The file type is ; separated by default.
- Repository — The server on which the process runs contains a local file system that already contains two folders: Data In and Campaign Data. You can select a subfolder to retrieve the import file from.
- Public URL – Provide the URL. Accessible without login and password and supports HTTP or HTTPS
- Authorized URL – Provide the URL and username and password to connect to it. Only supports HTTPS.
- Azure Blob Storage — Provide the connection string (you can toggle the visibility of the string on and off by clicking on the eye icon) and container, and an optional subfolder. (*)
- Amazon S3 Storage — Provide the access key id and secret access key (you can toggle the visibility of both strings on and off by clicking on the eye icon), bucket name, region endpoint code, and an optional subfolder. (*)
- Google Cloud Storage — Provide the type, project id, private key id and private key (you can toggle the visibility of both strings on and off by clicking on the eye icon), client email, client id, auth URI, token URI, authprovider X509 certificate URL, client x509 certificate URL, bucket name, and an optional subfolder. (*)
* Note: Details on how to setup cloud storage configurations, can be found here.
- Pre-defined — When selecting this option the 'Predefined Transport Medium' field is displayed from where you can select a medium from a list of predefined mediums. These mediums are configured already in the Admin configuration and linked to your organization. When selecting one all corresponding settings are used.
- FTPS, FTPS implicit, SFTP — Provide the name of the server and the username and password to connect to the server. A subfolder on the server can be selected. By default, a subfolder is entered.
Note: When a data import has been executed, the file will be removed from the FTP automatically.
File filter — By default, this is set to *. You can use this field to filter the files on the selected medium to only those that meet this filter criteria (e.g. *.txt)
Define the File Options

You can choose between:
- Delimited — Delimited files are files that use comma, semi-colon, pipe or tab as a delimiter for the columns.
- Excel (XLS) — An Excel file with or without row headers can be used as import file. XLS and XLSX can be used here.
- RSS — The root node of the RSS file needs to be provided.
Delimited
Click the pencil icon to access the File Options Dialog.
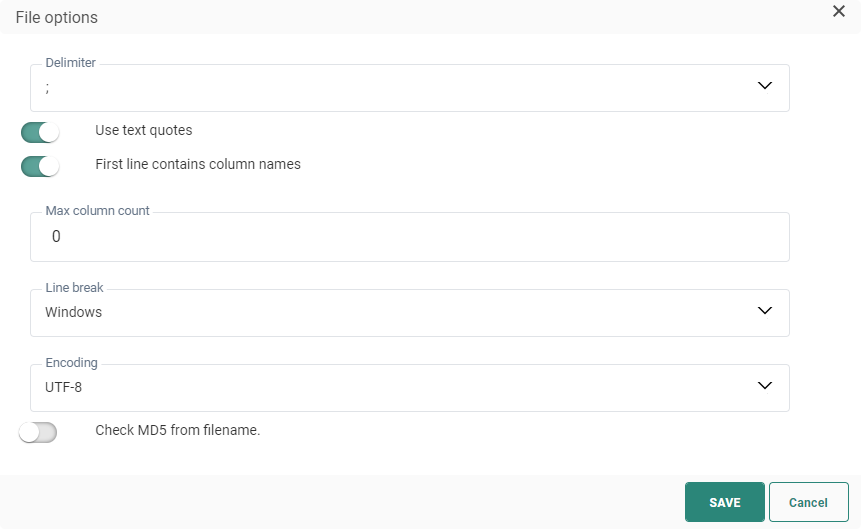
- The file delimiter can be set to colon, semi colon, tab or pipe delimited. By default the delimiter is set to ;
- It is possible to wrap text with text quotes. Toggle the option on if you want this. If this is the case, all the alphanumeric data is included in the quotes and ensures that a field containing the delimiter char will not be interpreted as an extra column. Note however that line feeds are not supported;
- You can also set the first row as the one containing the column names. This option is selected by default.
- Set the type of encoding to apply to the file. Click the drop-down list to access an extensive list of encoding mechanisms.
- Max column count — The maximum number of columns allowed in the file.
- Line break — Set the Line break either to Windows or Unix. Windows uses carriage return and line feed ("\r\n") as a line ending, where Unix uses just line feed ("\n").
- Encoding — Set the type of encoding to apply to the file. Click the drop-down list to access an extensive list of encoding mechanisms.
- Check MD5 from filename — This option is used to double check the content of the file. This MD5 key is added to the file name and created based on the content of the file. When the option is activated, the MD5 key is checked against the content of the file and enables the detection of changes in the file.
Excel (XLS)
Click the pencil icon to access the File Options Dialog.
Sheet name — The name of the sheet in the xls file that is subject of the import. When there are multiple worksheets, only the named worksheet is processed, all other worksheets are ignored. In case there are multiple worksheets to process, they have to be tackled as individual XLSX files as only one worksheet can be imported at a time.
First line contains column names — Select the option if the top row in your sheet contains the column names.
Rows to skip — Indicate the number of rows in the file that should be excluded.
Encoding — Set the type of encoding to apply to the file. From the drop-down you have access to an extensive list of encoding mechanisms.
In addition Check MD5 from filename is used to double check the content of the file. This MD5 key is added to the file name and created based on the content of the file. When the option is activated, the MD5 key is checked against the content of the file and enables the detection of changes in the file.
RSS
Click the pencil icon to access the File Options Dialog:
-
Root node (optional) — The root node of which all child nodes are retrieved. If the root node is not configured, the default Xpath in which data is expected is the Channel node. If the root node is configured, you can use that name.
Note: All <item> elements and their content inside the root node (eg. <channel>) can be imported.
If other elements appear directly under the root element (on the same level as <item> elements), those will not be imported.
Example 1 — When we don't configure a root node, the 'channel' node from this RSS file will be used as root by default (the item and its details will be imported) :
<?xml version="1.0" ?>
<rss version="2.0">
    <channel>
        <item>
            <title>News of today</title>
            <link>https://www.xul.fr/en-xml-rss.html</link>
            <description>RSS item 1</description>
            <name>Siyashree</name>
        </item>
    </channel>
</rss>Example 2 — We configure a 'customrss' element as root node. It will be used as root in the following RSS file (the item and its details will be imported) :
<?xml version="1.0" ?>
<rss version="2.0">
    <customrss>
        <item>
            <title>News of today</title>
            <link>https://www.xul.fr/en-xml-rss.html</link>
            <description>RSS item 1</description>
            <name>Siyashree</name>
        </item>
    </customrss>
</rss>-
Encoding — Set the type of encoding to apply to the file. Click the drop-down list to access an extensive list of encoding mechanisms.
-
Check MD5 from filename — This option is used to double check the content of the file. This MD5 key is added to the file name and created based on the content of the file. When the option is activated, the MD5 key is checked against the content of the file and enables the detection of changes in the file.
Note: When using RSS files, Media RSS* is supported by default.
* What is Media RSS? It's an RSS extension that adds several enhancements to RSS enclosures, and is used for syndicating multimedia files in RSS feeds. It was originally designed by Yahoo! and the Media RSS community in 2004, but in 2009 its development was moved to the RSS Advisory Board.
Please consult https://www.rssboard.org/media-rss for more info.
Example of an RSS file containing media content :
<?xml version="1.0" ?>
<rss version="2.0">
    <channel>
        <item>
          <title>The latest video from an artist</title>
          <link>http://www.foo.com/item1.htm</link>
          <media:content url="http://www.foo.com/movie.mov" fileSize="12216320" type="video/quicktime" expression="full">
            <media:player url="http://www.foo.com/player?id=1111" height="200" width="400" />
            <media:hash algo="md5">dfdec888b72151965a34b4b59031290a</media:hash>
            <media:credit role="producer">producer's name</media:credit>
            <media:credit role="artist">artist's name</media:credit>
            <media:category scheme="http://blah.com/scheme">
              music/artistname/album/song
            </media:category>
            <media:text type="plain">
              Some text
            </media:text>
            <media:rating>nonadult</media:rating>
            <dcterms:valid>
              start=2002-10-13T09:00+01:00;
              end=2002-10-17T17:00+01:00;
              scheme=W3C-DTF
            </dcterms:valid>
          </media:content>
        </item>
    </channel>
</rss>
Define the Field Matching
Define the matching between the fields in the import file and the fields in the Engage list.
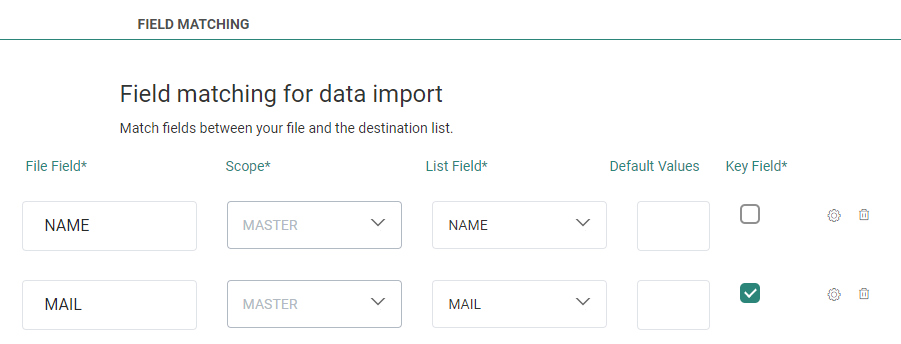
File field — Enter the name of the field in the import file.
Scope — This column is only available when performing an import into an Audience List. It allows for import into 1:1 linked lists for the selected audience. Select the 1:1 linked list into which the data from the source file needs to be imported.
Note: When the option 'Delete existing records' is selected in the import properties, it is not possible to perform an import into a 1:1 linked list.
Also, when an import is performed into a 1:1 linked list, this information is available from the Usage overview of the linked list. It is not possible to delete this linked list.
List Field — Select a field in the target list from the drop-down.
Note: When importing into a Custom Events List, it is not possible to import values into the State field. This is a system field and cannot be used during the Data Import.
Default value — The default value attributed to the Engage list field. This default value is used when there is no value in the source field, or when the source field used in the mapping does not exist.
Key field — Check the option of the selected field is used as a key field. This option is not available when importing into a 1:1 linked list.
Note: When the ID field in the target list is used as the key field, records can only be updated. No inserts will be done.
The Gear icon allows defining additional options for the selected field mapping, transforming data in the source file by using a reverse lookup in an Engage list. This reverse lookup feature can be used for
- fields linked to Option Lists where the source file value is replaced with the corresponding code in the Engage Option list. This feature is available for imports into any list type, except for Option Lists.
Example, replace the value 'Man' for the Gender in the source file with code '100' when importing records and replace 'Female' with code 101. - fields in Audience Lists, Data Selection Lists, Custom Events Lists and Data Lists where field values are replaced with the primary key in the lookup list. Depending on the type of Engage list the import is done for, different lookups are available:
- Import into Option List: No reverse lookup is available
- Import into Data List, Audience List, Custom Events List: Lookup in Option List, Audience List and Data Selection List is available.
- Import into Data Selection list: Lookup of Option List values is available
Note: When the option 'Delete existing records' is selected in the import properties, it is not possible to perform an inverse lookup. No transformation can be done.
Example 1: Replacing file values with Option List code
When importing a file with contacts into an Audience List in which the field 'Gender' is linked to an Option List, it is possible to replace this imported gender value with the corresponding code stored in the Engage Option List.
We are using the Audience List 'Parana Customers Import', where the Gender field is linked to the Option List 'Gender_OptionList'.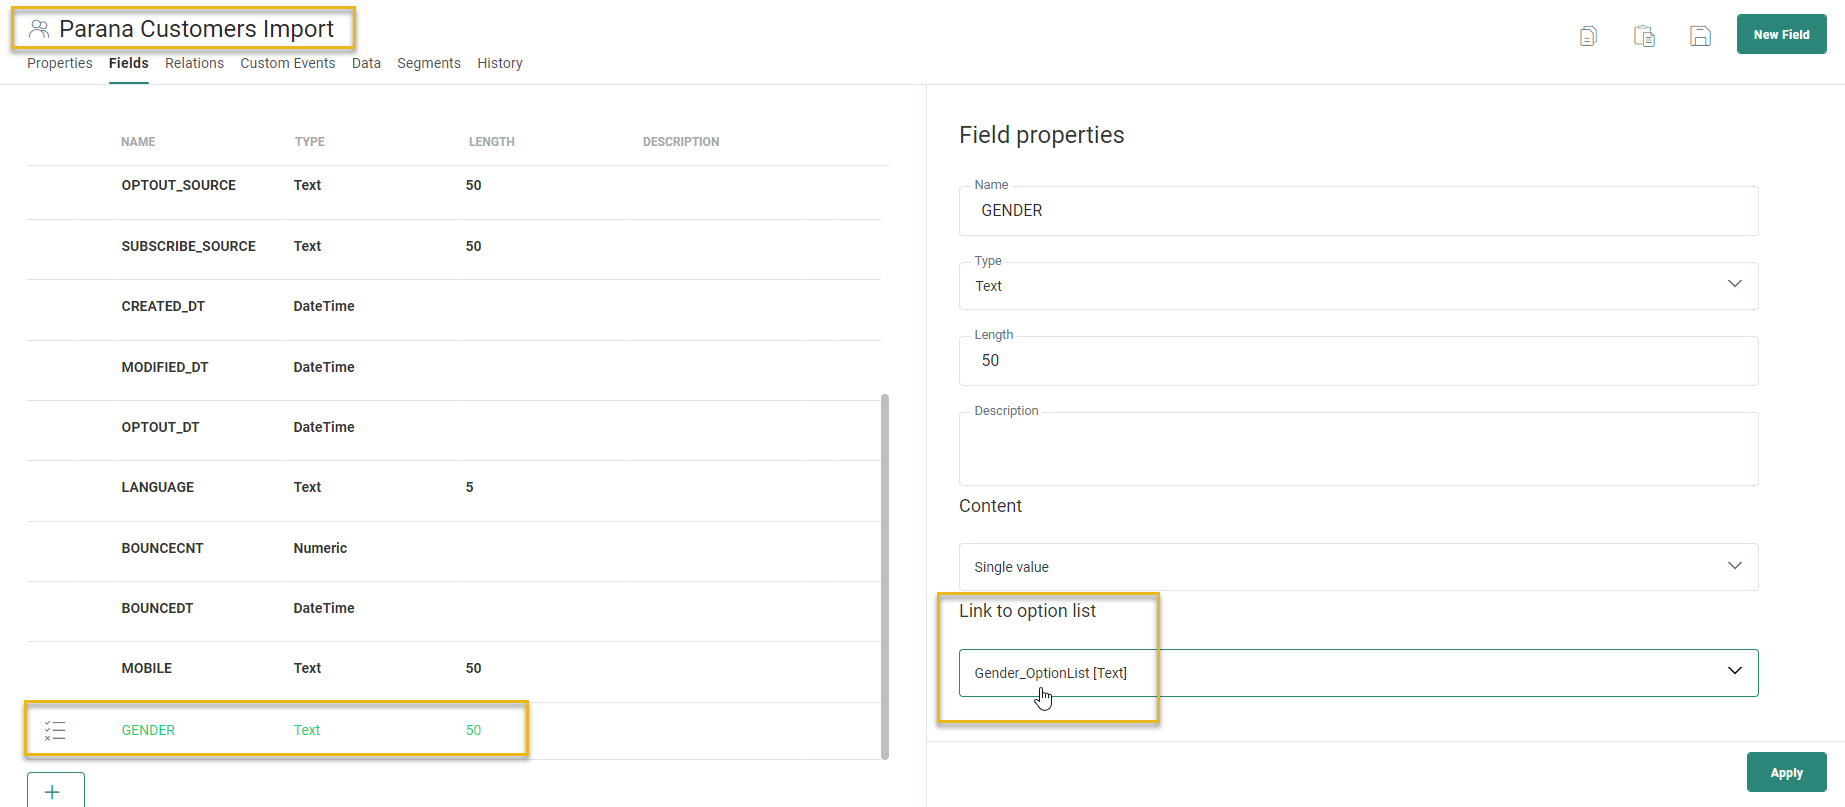
The Option List contains the following data: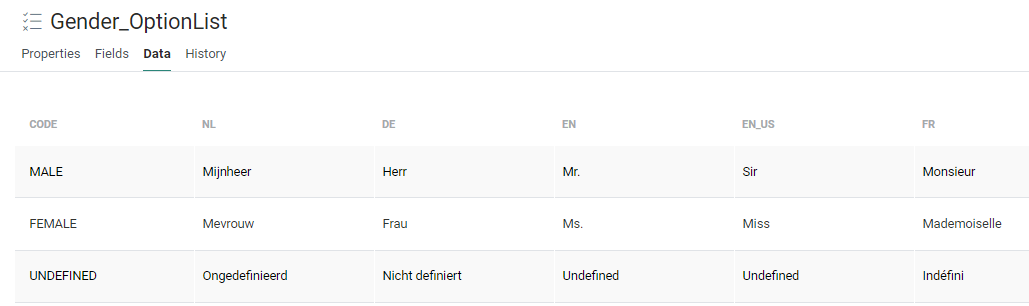
On the Mapping page, perform a lookup in the Option List to retrieve the code.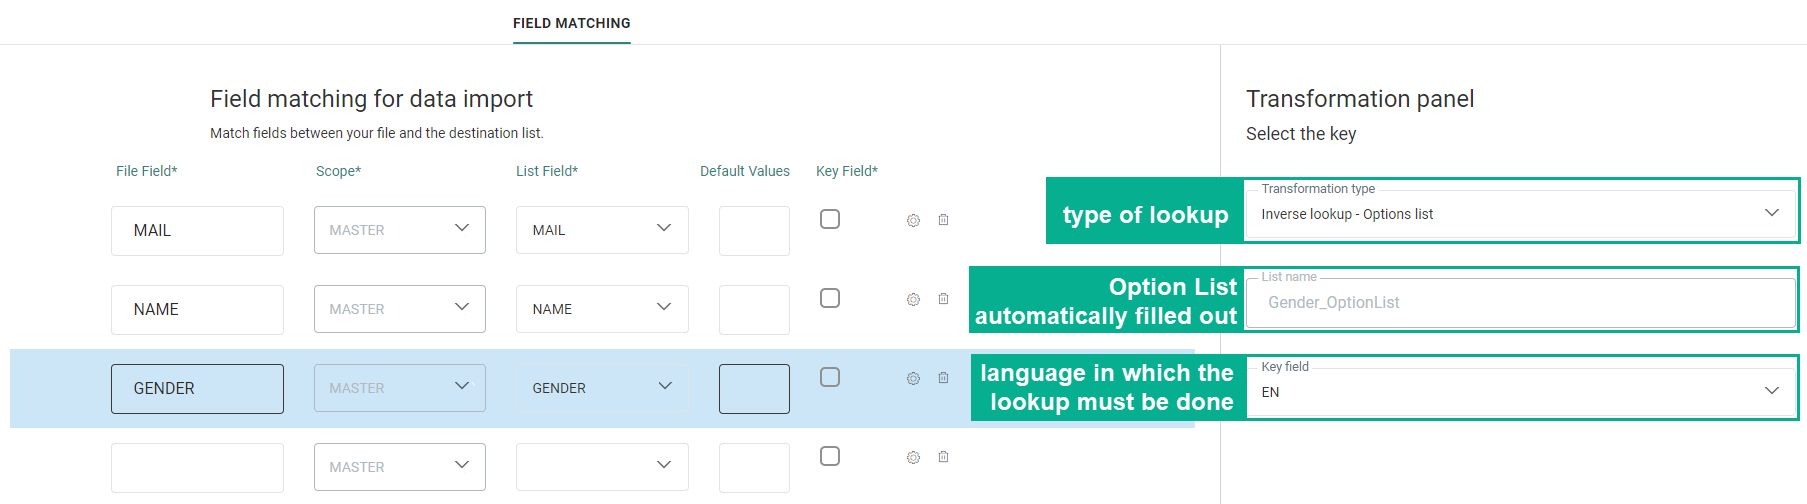 ,
,
Click the Gear icon for the Gender field mapping and select ‘Inverse lookup – Option List’. Automatically the Engage Option List is filled out. This is possible because in the Engage Audience List, the field ‘Gender’ is linked to the Option List ‘Gender_OptionList’. Last, select a language from the drop-down field to ensure the matching is based on the right language.
Note: This implies that the information in the source file is always available in 1 language.
As a result, a lookup is done in the Engage Option List to match the value in the file field with a value in a specific language in the Option List and then return and store the corresponding code instead of the original value.
Example 2: Replacing external IDs with Engage primary keys.
Performing an import into the Audience List 'CONTACTPROFILE' and replace the external identifier K_USERID with the unique identifier stored in the Audience List 'CONTACTS_LIST'.
To do this, we need to perform an inverse lookup in an Audience List. The configuration is as follows: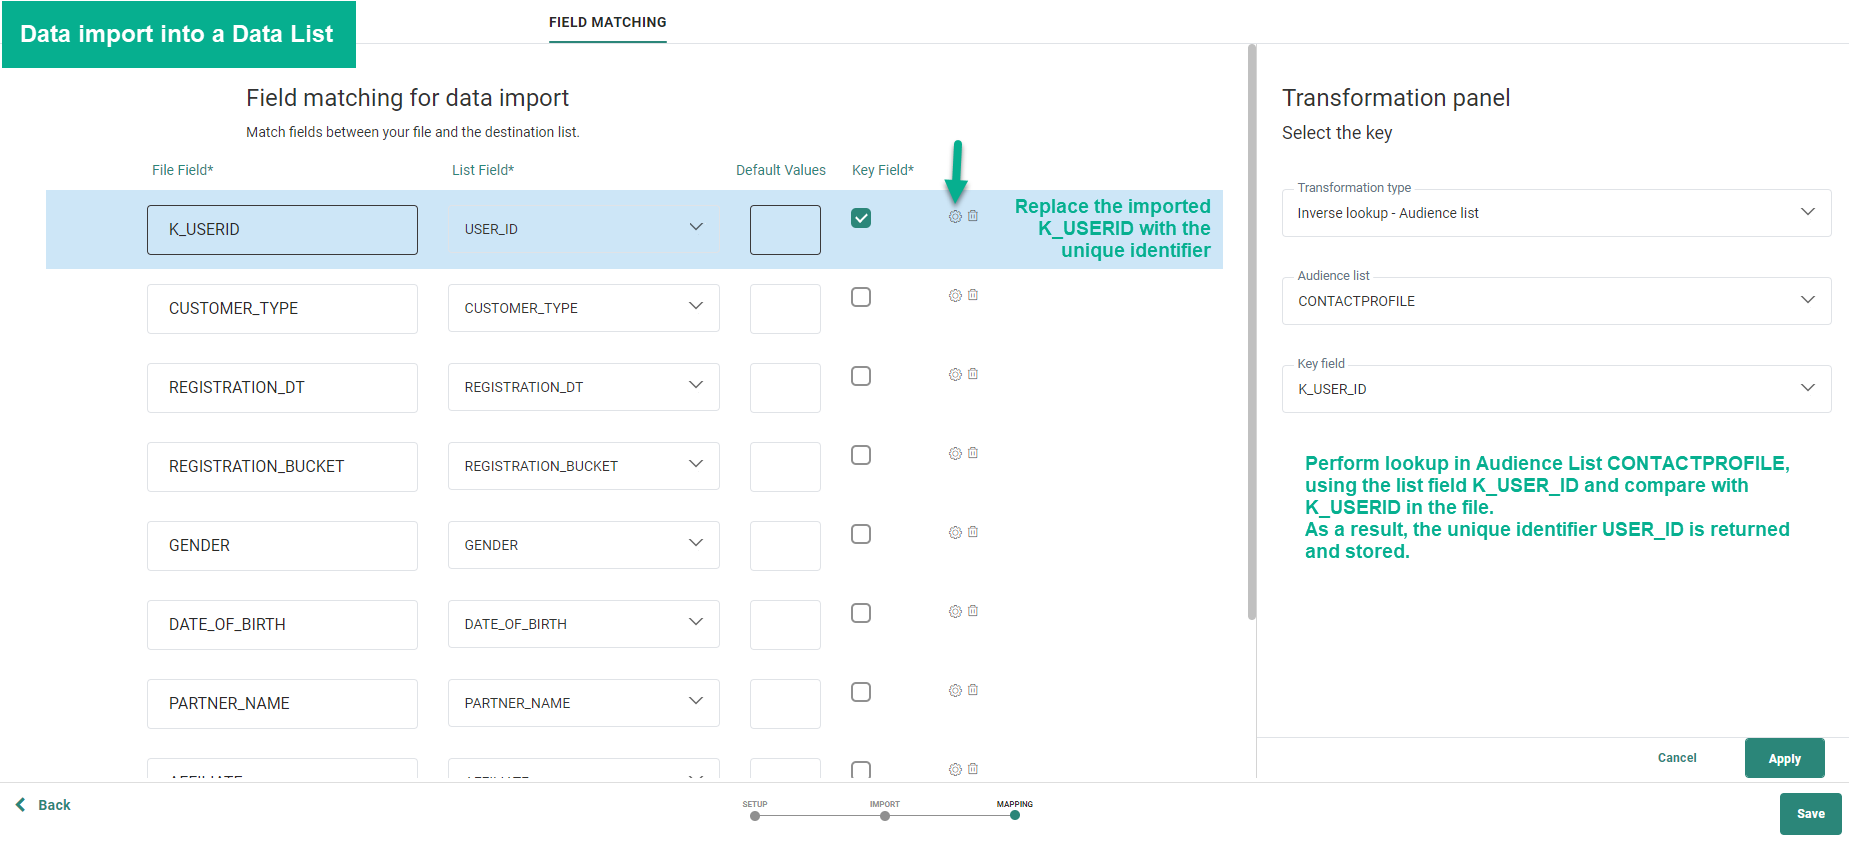
Based on the matching between the file field K_USERID and the Audience List field 'K_USER_ID', the unique identifier USERID can be retrieved to replace the external ID and store it in the CONTACTPROFILE Audience List at the moment of import into the list.
Add as many fields as required. Whenever a matching is defined, automatically a new line is added to the Matching table.
Note: When performing an inverse lookup in a Data Selection List to transform the incoming file data into an Engage value, it is possible to set the file field as optional for validation. With this option set, even when no lookup value is found for the field value, the record will still be updated and only the update of the field is skipped. If the field is set as mandatory and no lookup value is found, the update of the entire record will be skipped.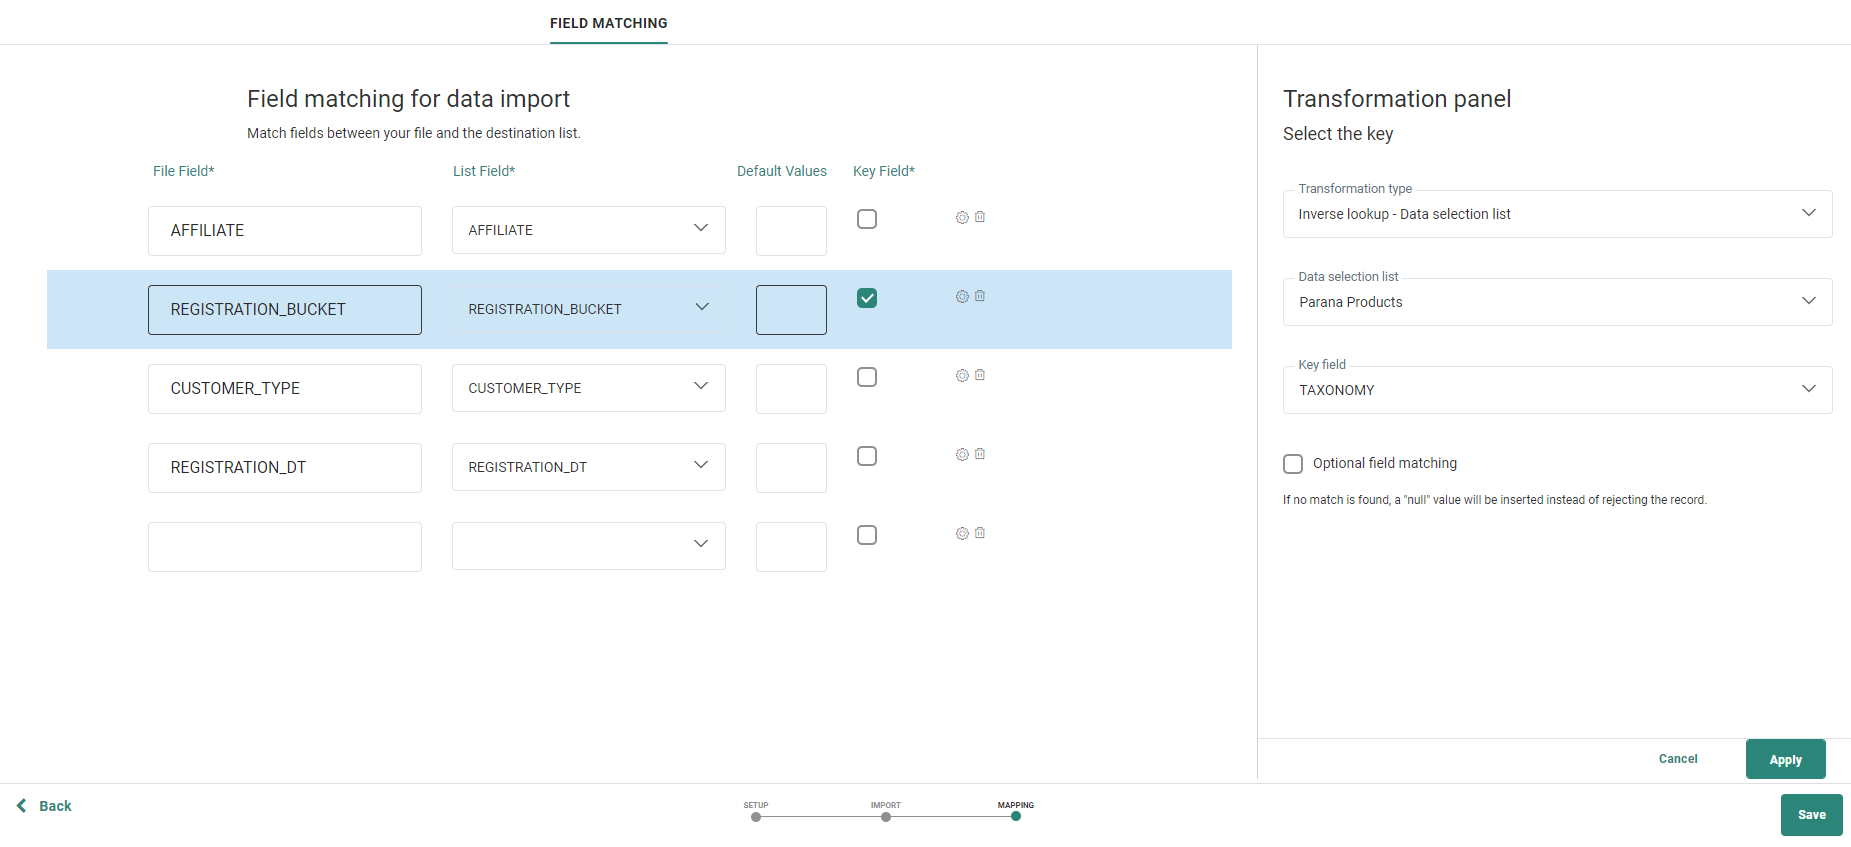
When done, click Save. The Data Import is added to the Start page.
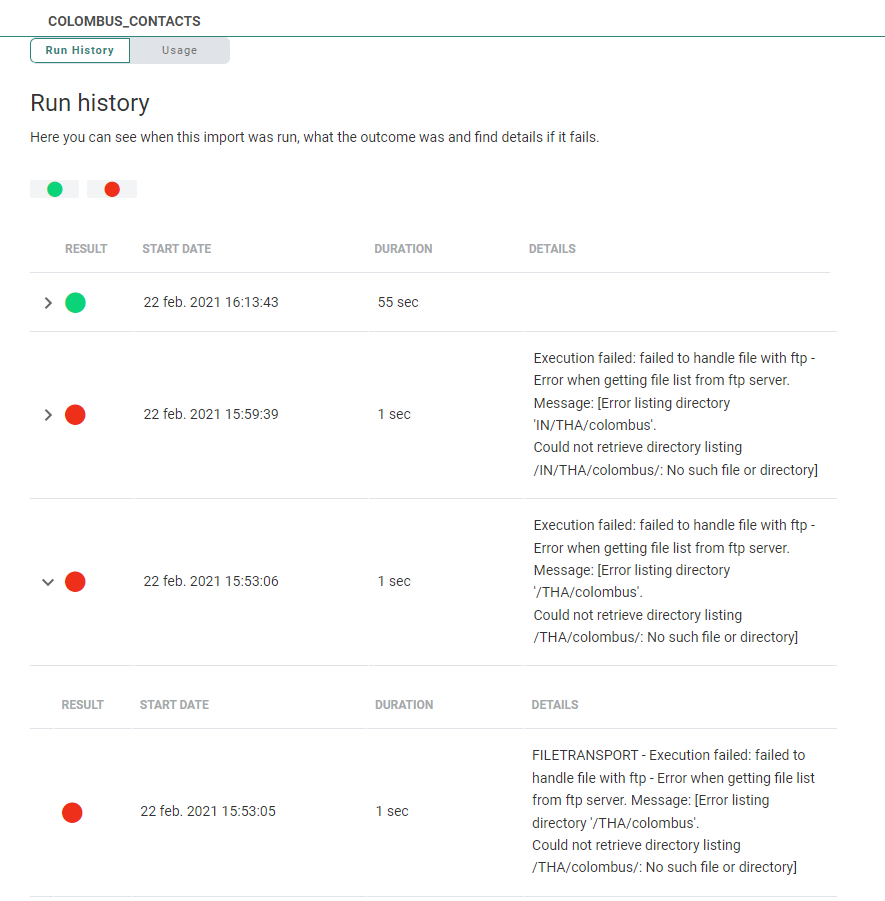
History
Once the import is configured, a History tab provides details on the execution of the import, the duration, start date and details if an error occurred. This information is available from the Run history.
The Usage tab gives information on where the data import is being used.
