An SQL Task is the execution of one or more registered Stored Procedures. These procedures contain logic that must be executed on the Marigold Engage database. These procedures are created in the Admin Configuration. (Check out this topic).
With SQL Tasks, you can perform automated calculations on the database, aggregate data, or enrich data in the database.
Example: Calculate purchase metrics based on information in the ORDERS and ORDERLINE tables that do not contain aggregate data.
Note: Stored Procedures created directly within SQLServer are not available for use in tasks.
An SQL Task can be created in two ways:
- From the fly-out menu available from the Data Exchange entry in the left navigation bar. Click + New and select the type of task from the drop-down list.
- In the Start page, select + New > SQL task. A wizard guides you through the creation and configuration process.

Note: The steps overview can be used to go straight to a specific step when editing a task.
When creating a new SQL Task, execute the following steps
1. Set the general properties of the task
2. Define the Stored Procedures
Set the General properties
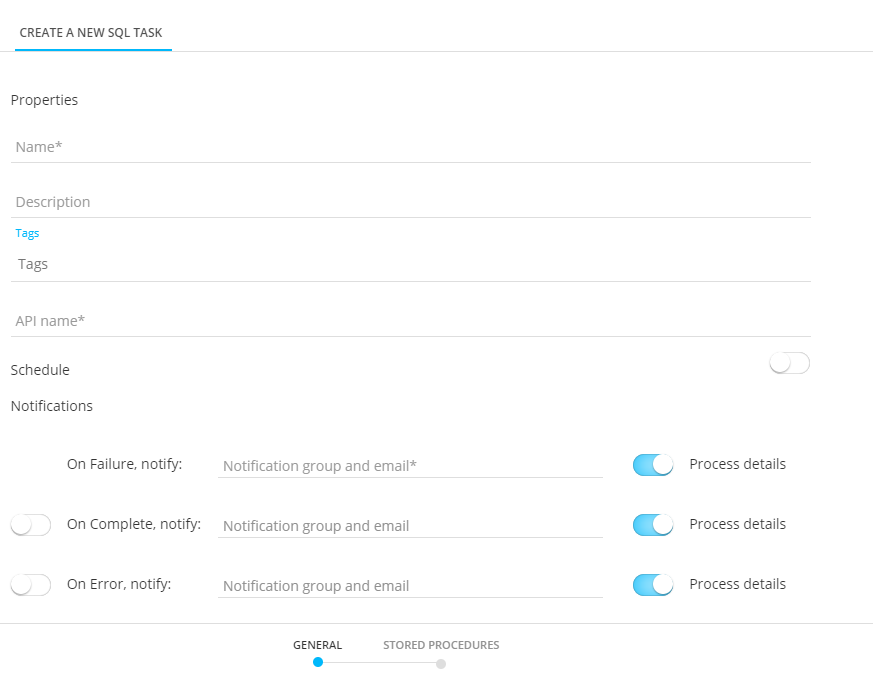
Properties
- Folder Path — This is the location in the folder structure where the task is stored.
- Name and Description — Make sure to make it as explicit as possible to easily recognize the task in the Start page.
- Asset label — The label(s) assigned to this asset. Select one or more labels from the drop-down. (These labels are configured in the Admin configuration.) Users with the proper Access permissions can also create new labels here by typing the new label value in the field.
- API-Name — This name is used when the task is executed via the API. By default the API name is filled out with the name given to the task.
Schedule
The schedule switch indicates whether this task should have its own scheduling. This is unnecessary if this task will be part of a batch execution of tasks (batch job) – it inherits the scheduling of the parent batch job in that case.
The Schedule section defines the validity period of the task as well as the execution occurrence.
If the task needs to be scheduled, toggle the option on and define the schedule .

Start and End date — You can set a start date and/or end date for the task. For example, your task can start now but needs to run indefinitely.
Periodicity — Indicate when the task should run:
-
Daily — Select the hours of the day on which the task should run. You can select more than one.
-
Weekly — Select the day of the week on which the task should run. The task can run more than once a week. You can also set the start time.
-
Monthly — Select the days of the month on which the task should run. You can also select the time of the day at which the task should start.
-
Periodically — Set the recurrence of the task, expressed in minutes. For example, the task runs every 10 minutes.
Note: The scheduled time will be executed based on the server's timezone. The currently configured server's timezone is mentioned next to the info icon.
Trigger a Journey after the task has run
This option allows you, if you wish, to trigger the execution of a Transactional Journey after the task has run successfully. This implies that the journey will not be executed if the task fails and the user is informed if this occurs.
Destination Journey — Select a destination journey from the drop-down list. Only Transactional Journeys can be selected.
Trigger a Custom Event after the task has run
This option allows you to trigger the execution of an event-driven journey. For example, after importing data via a task into the Custom Events List in the database, you need to explicitly trigger the journey that uses that Custom Events List to ensure the records are processed.
First you need to select the Audience List and then a linked Custom Events List. The selected Custom Events Lists can only be used in one journey at a time and will automatically trigger that journey.

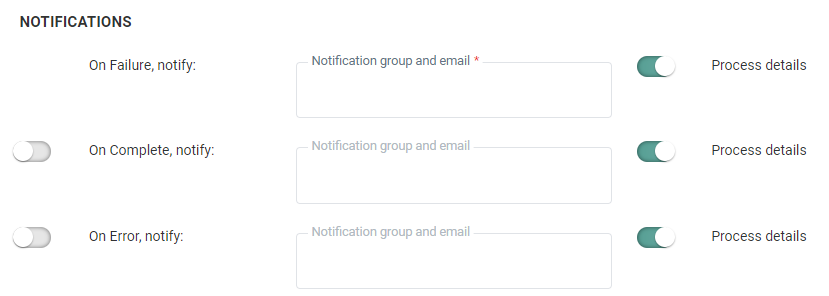
Notifications
A message can be sent either
- * OnFailure — When the process fails. At least one email address is mandatory
- OnComplete — When the task is completed successfully,
- OnError — Completed with errors (job was completed but one or more tasks generated errors/exceptions)
- On No file — When no file could be found
The details of the process can be included in the message. Additionally, the instance on which the problem occurred is included in the subject of the message.
To activate the option, simply flag the check box and enter one or more email addresses. (Multiple email addresses are separated by a semi colon). You can also select a notification group. These notification groups are created in the Admin Configuration.
Note: Notification emails for when the task fails is mandatory. The other notifications are optional.
Set the scheduler (optional)
Note: The Scheduler section is only visible if there are schedulers configured on your environment. By default, there is 1 scheduler in which case this section is not shown as this default scheduler is used. If there is more than 1 scheduler configured, you will have access to the Scheduler section.
When multiple tasks, imports or exports are running it might be a good idea to use a different scheduler to make sure that long running tasks do not interfere with smaller tasks. Selecting a scheduler is optional and if you keep the default one all tasks/exports/imports will still run but if there is a bigger task, the smaller one will be executed only when the bigger one has finished.

You can choose between 3 different schedulers: the default one, custom scheduler 1 and custom scheduler 2. By selecting different schedulers for your tasks, they will be executed in parallel, without interfering with one another. So if you have long running tasks it might be a good idea to run these on a different scheduler.
When done, press Next.
Define the Stored Procedures
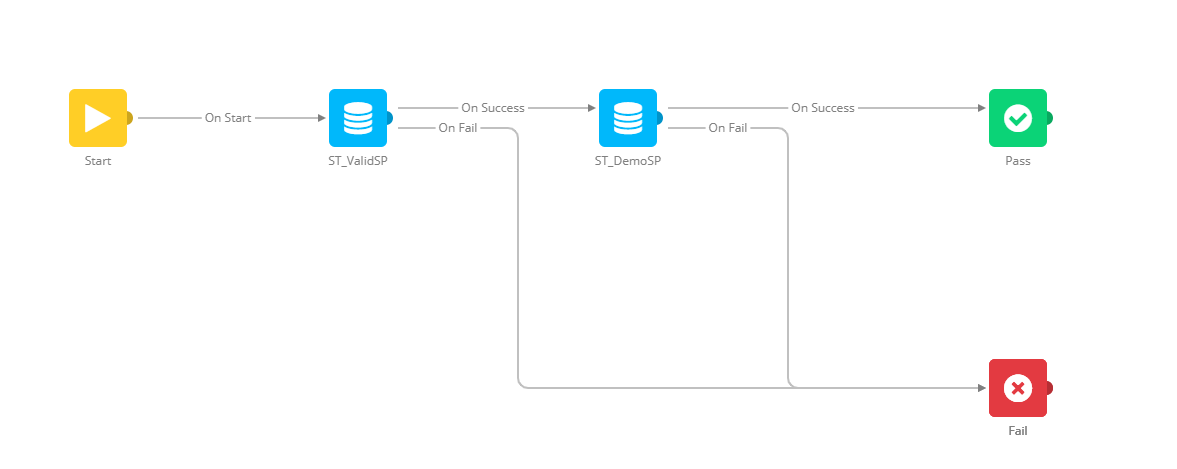
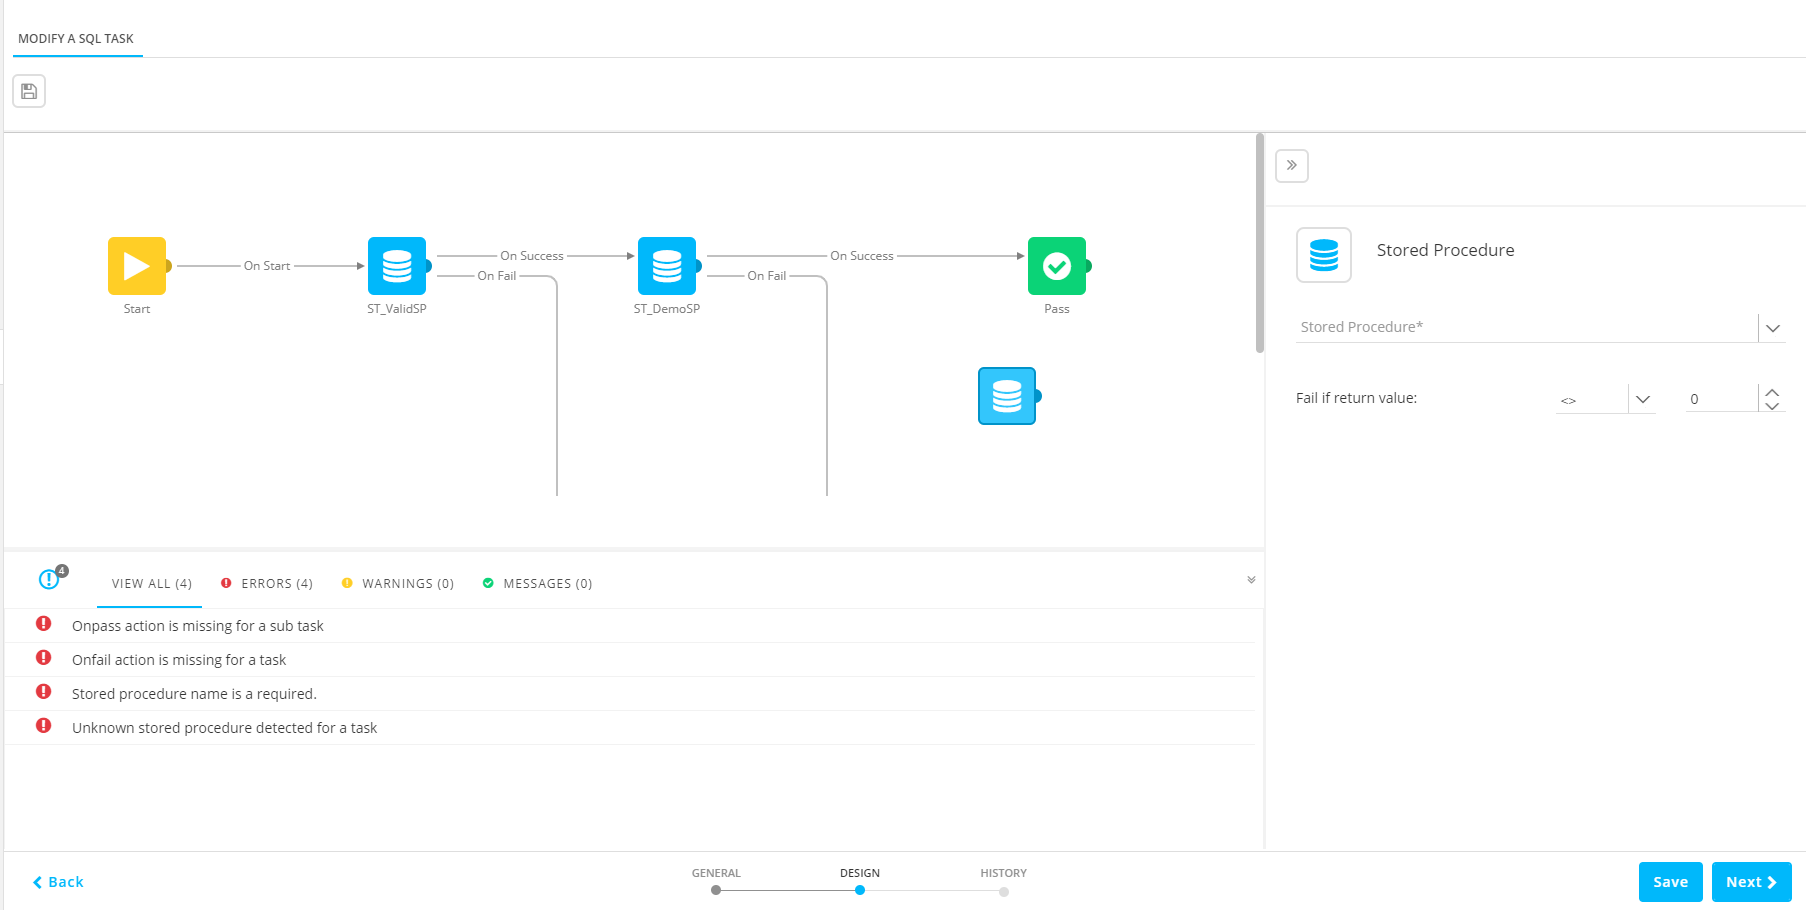
On this graphical interface, one or more Stored Procedures are selected for execution within this task. The order of the procedures in the flow is the order in which they are executed.
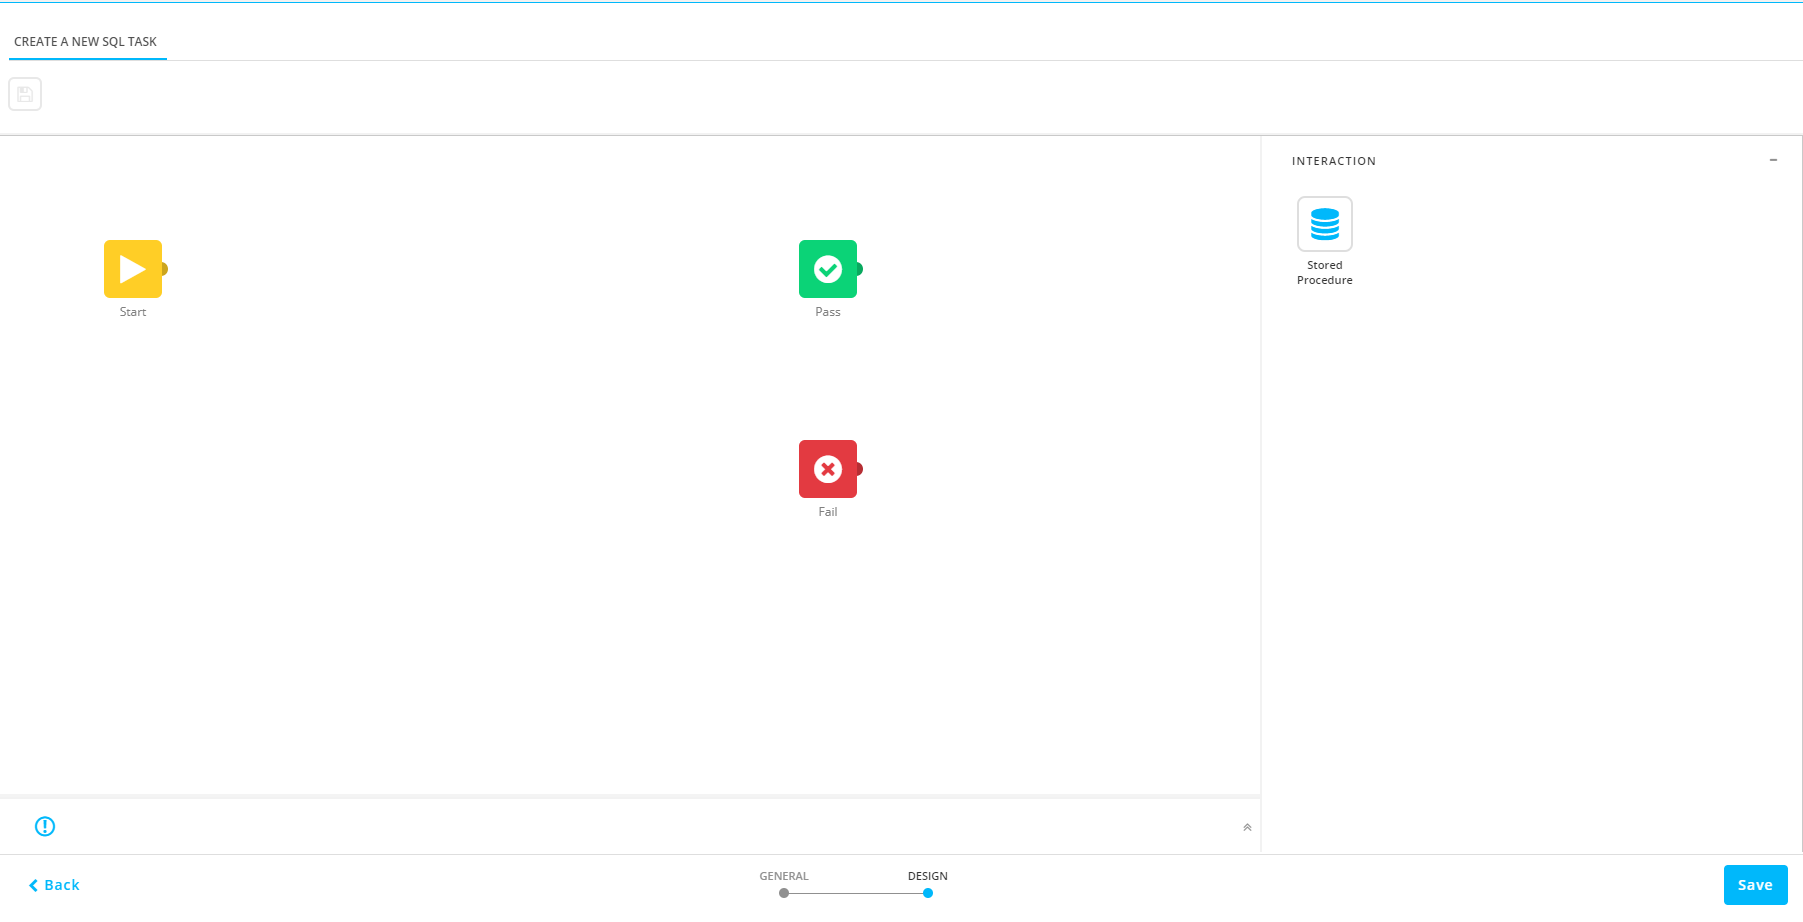
1. Drag the Stored Procedure Component onto the design canvas.
2. Double click the component to access the properties for the Stored Procedure:
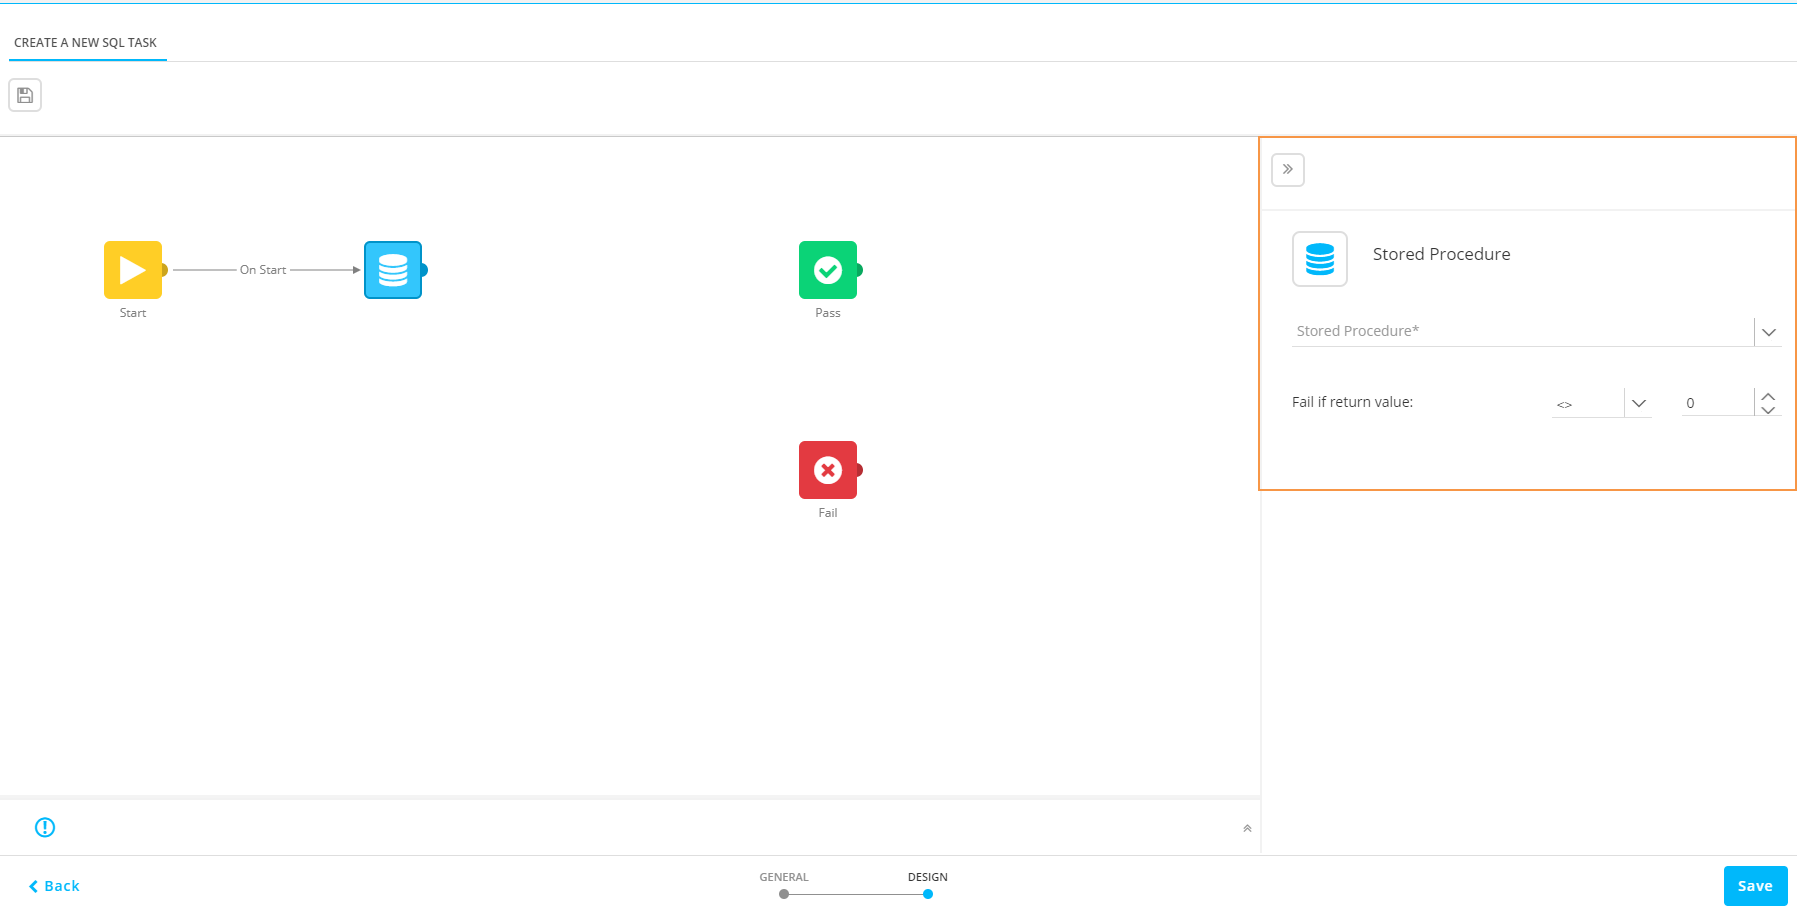
3. Select a Stored Procedure from the drop-down list. The following can be defined.
Fail constraint — Use the return value of the Stored Procedure to define whether it failed or not.
-
When no explicit return value is defined inside the Stored Procedure's design, value 0 is returned by default when it's successful. Other values imply a failure.
In this case you'd like to set the fail constraint to : Fail if return value <> 0.
-
When the Stored Procedure's design contains one or more custom return values, the values that are returned in case of success and failure depend on that design.
In that case you decide what you consider as a fail constraint.Example 1:
The Stored Procedure that is used, defines that value 10 is returned after execution of certain SQL statements, and value 12 is returned after execution of another set of SQL statements.
You consider the part that defines the return value to be 12, to be the only successful part. In other cases, it should be considered as a failure.
In this case, you set the fail constraint to : Fail if return value <> 12.Example 2:
The Stored Procedure that's used, defines return values 1, 10, 50, 51, 52, 53, 54, 55, 56, 60.
You consider the return values 1, 10 and 50 as 'success' values. The others would indicate that something's wrong, and are thus considered as failures.
In this case, you can set the fail constraint to : Fail if return value >= 51.
Parameters — Some Stored Procedures require parameters. When this is the case, an additional section is available where these parameters can be defined.

4. Add as many Stored Procedures to the task as required and configure each Stored Procedure as explained above.
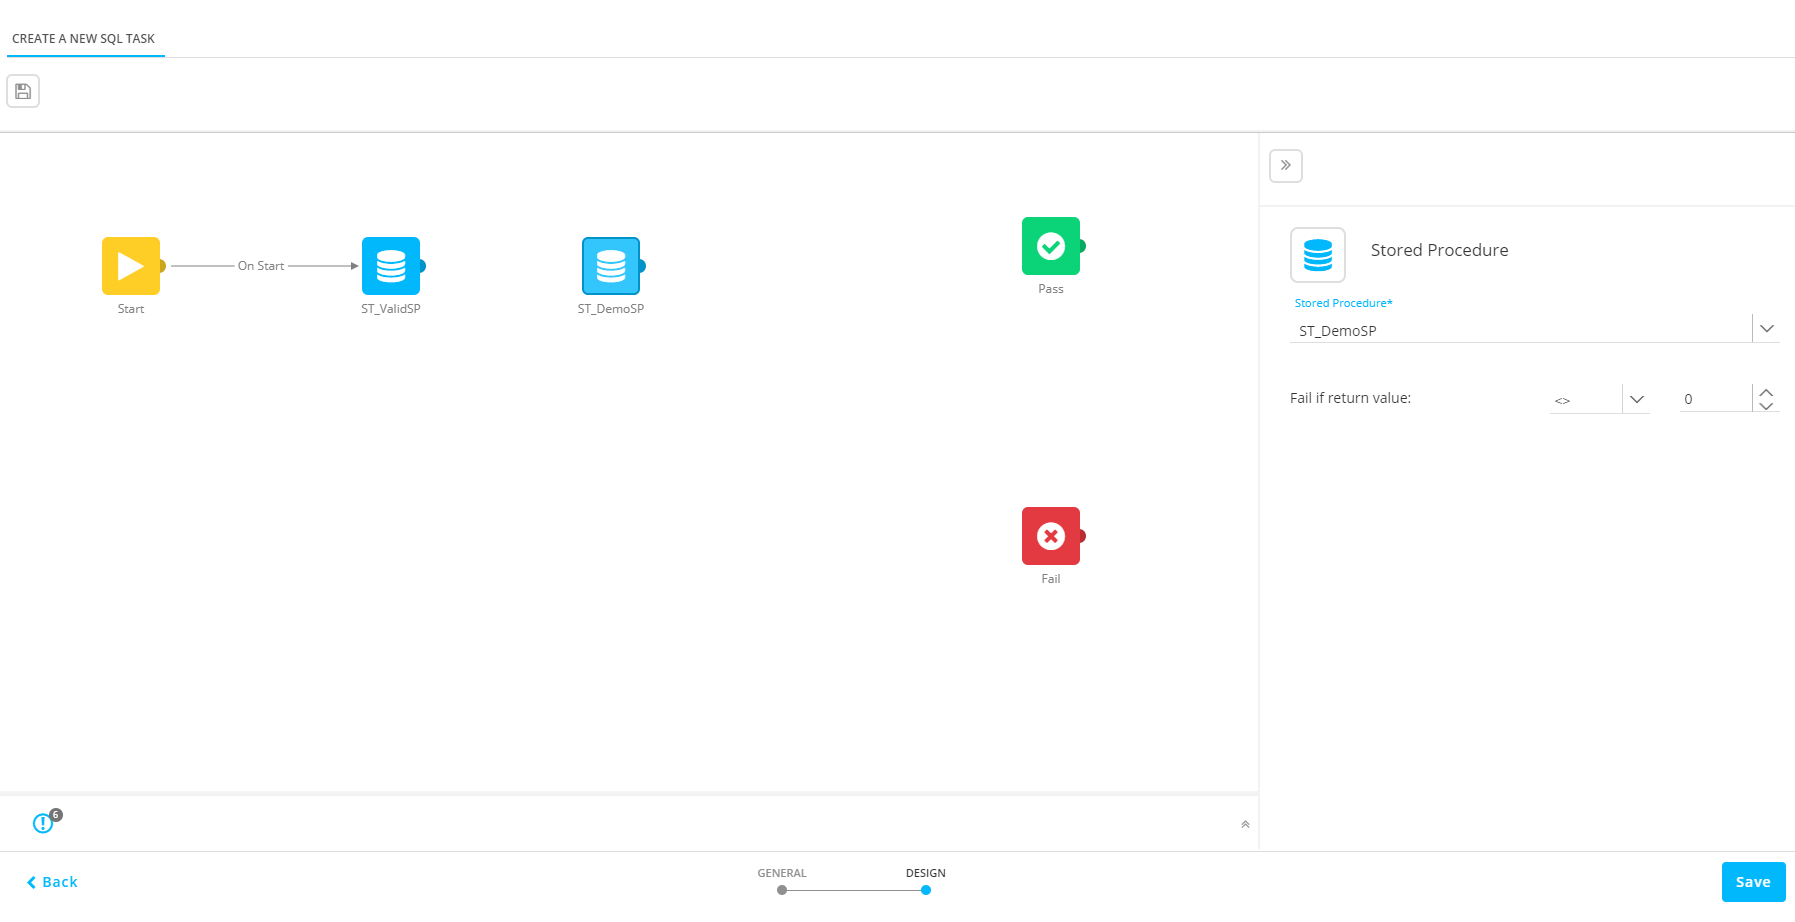
Note: The default Pass and Fail Components indicate when the SQL Task succeeds or fails and are the end point for this flow.
5. Each Stored Procedure provides one of two outcomes:
On Success — Route to take should the Stored Procedure not return a fail value.
On failure — Route to take if the Stored Procedures’ return value matches the failed constraint (e.g.: return value <> 0).
These branches should be connected to either:
- Pass — Connecting to this component suggests that the whole task has executed successfully and no further processing takes place.
- Another Stored Procedure — Further processing may take place following the 'OnFailure' or 'OnSuccess' branches of the prior one.
- Fail — Connecting to this component suggests that the whole task has failed and no further processing takes place
Note: The default Pass and Fail Components should be considered the end points for the whole flow. Processing will eventually reach one of these states.
Note: If the task is set as Pass when a procedure succeeds, the remainder of the procedures within the same task are not executed. The task is considered as done. If the procedure is set as Fail, the SQL Task is terminated reporting a failure.
To define the order in which the procedures are executed and what should happen next, connect the different Stored Procedures with the right next step.
6. When done defining the flow of the SQL Task, press Save. A validation of the SQL Task is performed and errors, warnings and messages are listed:
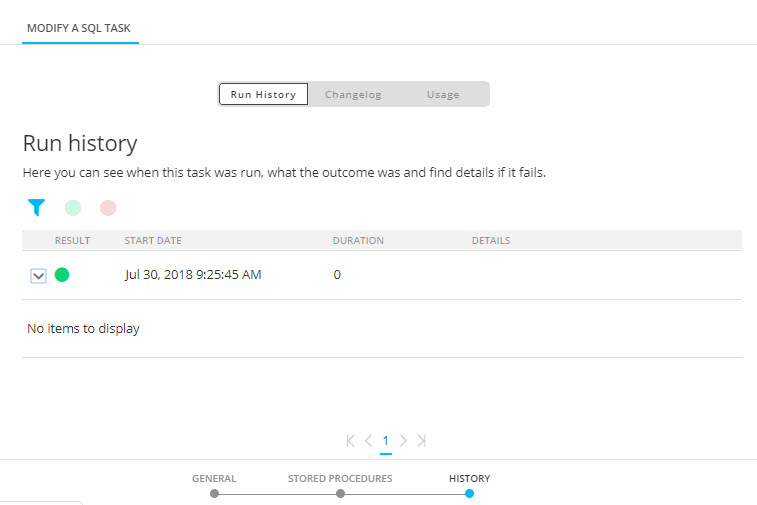
History
The History provides the user with information on
- when this task was changed (updated, deleted) and by whom. This information is available from the Changelog tab.
- when the task was executed and the status of that execution. This information can be found on the Run history tab. If the task comprises subtasks, the execution history of these tasks can be consulted as well.
- where the task is used. This information can be found on the Usage tab.
Use the filter icons at the top to filter the Run history.
When done selecting and defining the Stored Procedures for this task, you can Save the task. After saving the task, it will be available from the Tasks Start page where it can be activated. You can also enable it straight away when creating the task by clicking Save and Enable .
