![]()
From a journey, Engage contacts can be sent to a Meta Custom Audience to target them on Facebook or Instagram with ads.
Technical note:
The use of the Meta Custom Audience Component is based on the definition of an endpoint on organization level. Without this endpoint, the Meta Custom Audience Component cannot be used. Check out this topic for more details.
Moreover, the Meta user and the Engage contact are matched up based on the hashed (SHA-256) email address.
Note: The use of Meta Audience needs to be activated by Marigold on request.
Technical note:
Meta made a change that now requires a Meta Business Manager account in order to use Meta Custom Audiences. Visit https://business.facebook.com to create an account.
You'll also need to setup a first ad with your account and make a first payment, otherwise Meta Custom Audience usage is not enabled.
These contacts can be added from a Custom Journey. For example, contacts can be added to a journey as the result of a click in an email, or feedback provided by the contact. Contacts can also be removed from the audience as the result of a purchase or after a waiting period of three days, for example.
Note: Adding contacts to the Meta Custom Audience can take up to one hour.
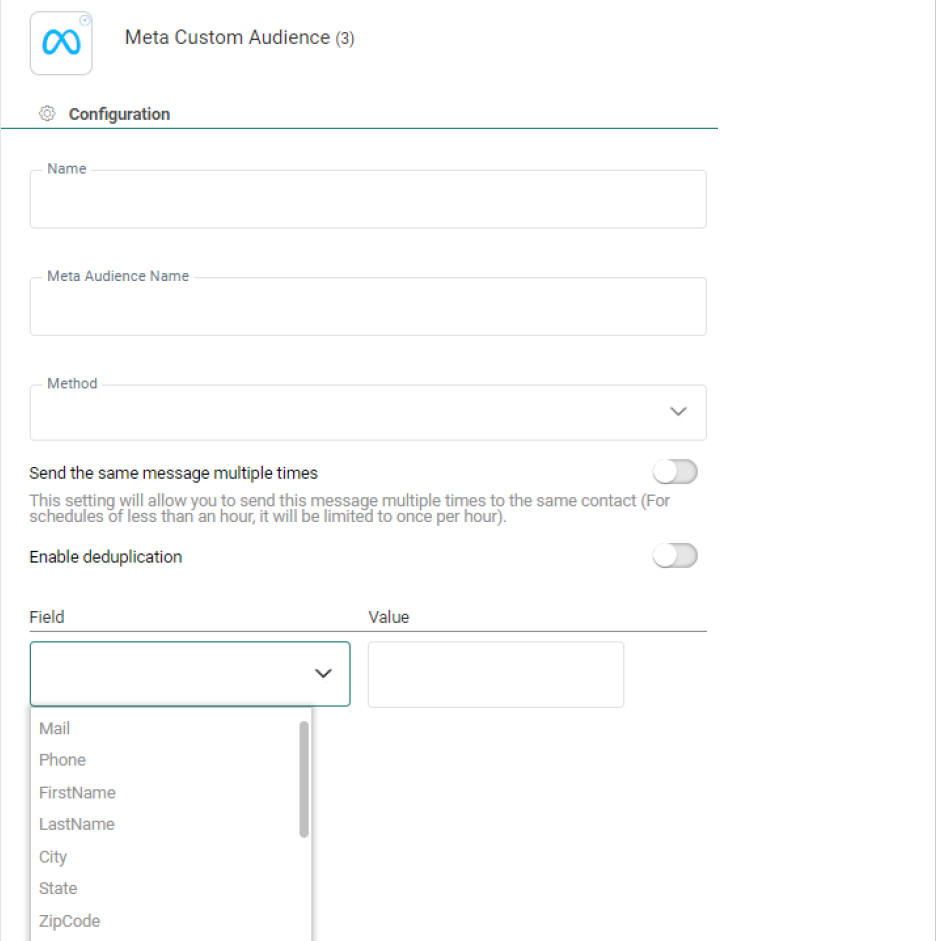
Properties
Name — The name of the Meta Custom Audience Component. This is used to reference the component on the Design canvas. Make sure to use a clear name.
Note: The name should be limited to a maximum of 50 characters.
Meta Audience Name — This is the name of the Meta Custom Audience and can be retrieved from Meta.
Method — Two options are presented here. You can add contacts to the Meta Custom Audience or delete them.
Note: Meta does not permit to delete users from audiences with less than 1000 contacts.
Enable deduplication — If there are duplicate contacts in the journey's audience, you can use Deduplication to select a unique contact based on a field or a combination of fields. This avoids sending the contact to Meta more than once.
You can define the following settings:
- Unique key — You can define the field in the audience that should be used to perform deduplication. This can be a combination of fields as well, for example the Name and Email for a contact can be used to detect duplicates.
-
Prioritization — Here you define what field in the audience should be used to define the record that has priority over the others in case duplicate records are found. For example, you can use the last update date as a prioritization rule.
-
Sorting — Choose from ascending or descending to define the record that should be kept.
Fields
The following fields are available to target the Meta contact. One field or a combination of fields can be used to do the matching.
Mail — Email address associated with the target Meta user.
Phone — Phone number associated with the target Meta user.
FirstName — First name associated with the target Meta user.
LastName — Last name associated with the target Meta user.
City — City associated with the target Meta user.
State — State associated with the target Meta user.
ZipCode — Zip code associated with the target Meta user.
Country — Country associated with the target Meta user.
DateOfBirthDay — Numerical value of the day of birth associated with the target Meta user.
DateOfBirthMonth — Numerical value of the month of birth associated with the target Meta user.
DateOfBirthYear — Numerical value of the year of birth associated with the target Meta user.
Gender — Gender associated with the target Meta user.
PageUiD — Page user ID associated with the target Meta user. (*)
AppUiD — Application user ID associated with the target Meta user. (*)
(*) Both the Page ID and App ID need to be configured in the Channel Endpoint configuration in Admin Configuration before using them in the Meta Custom Audience Component in your journeys.
Note: Field values can be entered manually, but also by inserting personalization fields. To use a personalization field value, navigate to a field with the mouse cursor (or via keyboard 'tab'); the personalization icon then becomes visible and can be clicked to show the Personalization Dialog .
Technical note: Check out the Troubleshooting section (only for technical admins and developers)
Note: Please also check the following Meta documentation for more info about the Custom Audiences integration at Meta side, troubleshooting and more :
- Meta for Developers - Guides : Custom Audiences
- Meta for Business - Business Help Center : About Custom Audiences from Customer Lists
- Meta for Developers - Tools : Access Token Debugger
