You can create a list from different locations:
- from the Lists fly-out menu, through the New button and selecting List from the wizard.
- from the Lists start page, through the New button in the toolbar and then selecting List from the wizard.
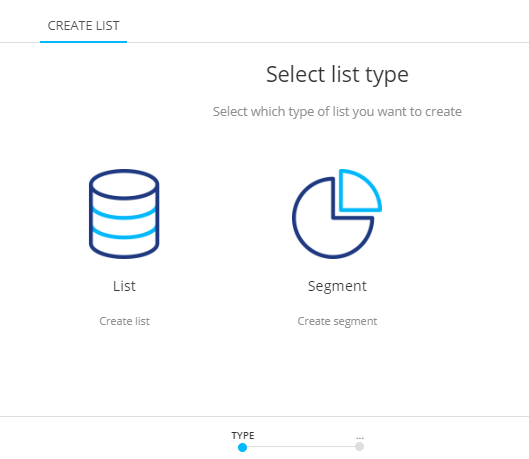
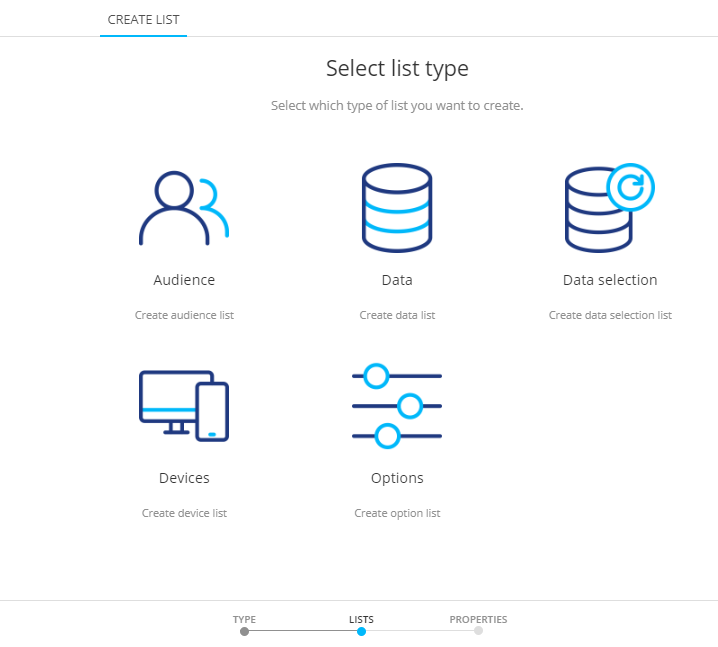
On the next screen, select the type of list:
A wizard guides you through the creation process. The steps in the process are displayed at the bottom.

In this topic:
- Create the List
- Define the Fields in the List
- Create Relations
- Custom Events
- Manage Data in the List
- Filtering Data
- Create Segments
- List History
- List Sharing
- List Usage
Create the List
Note: When editing a list, clicking a step takes you directly to the corresponding configuration.
1. Start by selecting the type of list you want to create.
2. Next, fill out the properties:
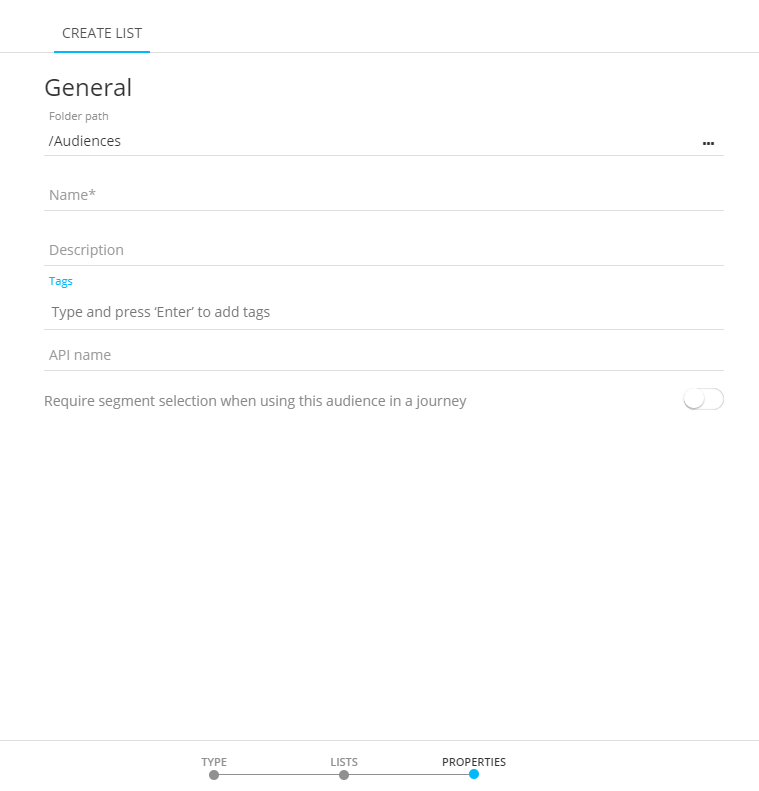
- Folder path — The location in the folder structure where the list is stored.
- Name and Description — Provide a clear name for the list and optionally a description. The name will be used in journeys and messages and should be explanatory.
- Asset label — The label(s) assigned to this asset. Select one or more labels from the drop-down. (These labels are configured in the Admin configuration.) Users with the proper Access permissions can also create new labels here by typing the new label value in the Label field.
- API Name — The name of the list as it will be used by the API methods. (Only alphanumeric characters and underscores are allowed). By default the API name is filled out with the name given to the list.
- Require segment selection when using the audience in a journey — Check this option to make the segment selection mandatory when the list is used in a journey. This ensures that messages are not sent to the whole audience but just a selection of contacts. The journey cannot be launched as long as no segment has been selected.
3. When done, press Create List. You are taken to the Fields configuration pane of the created list.
On the top left, you have access to the different list configuration screens, such as the list properties, defining fields, relations, adding data, creating segments and the history of the list.
At the top right, action buttons are available. The buttons depend on the currently selected configuration pane.
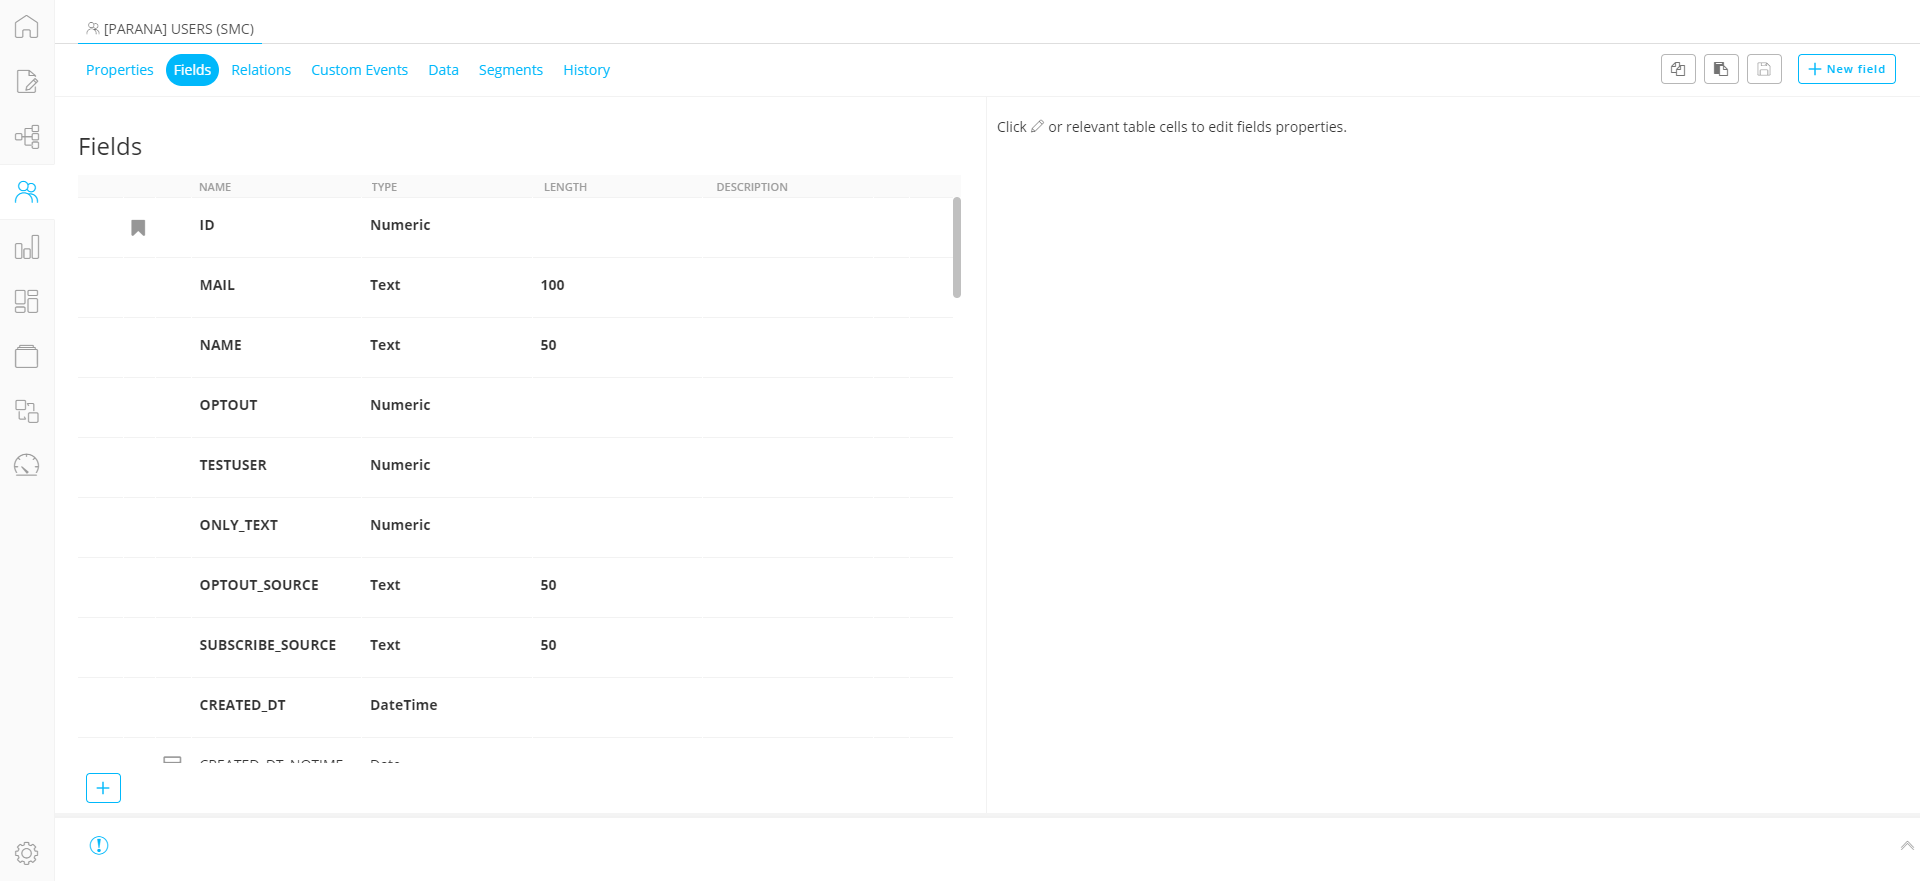
Note: On the Fields overview, fields with a filtered index in the database are indicated with a specific icon: . Only some of the properties of fields with an index can be edited. The name and length can't be modified.
This type of field can't be deleted either.
Define the Fields in the List
The Fields tab lets you define, edit or delete the custom fields in the list.
All System fields are displayed in bold and cannot be deleted. You can only edit the description of a system field.
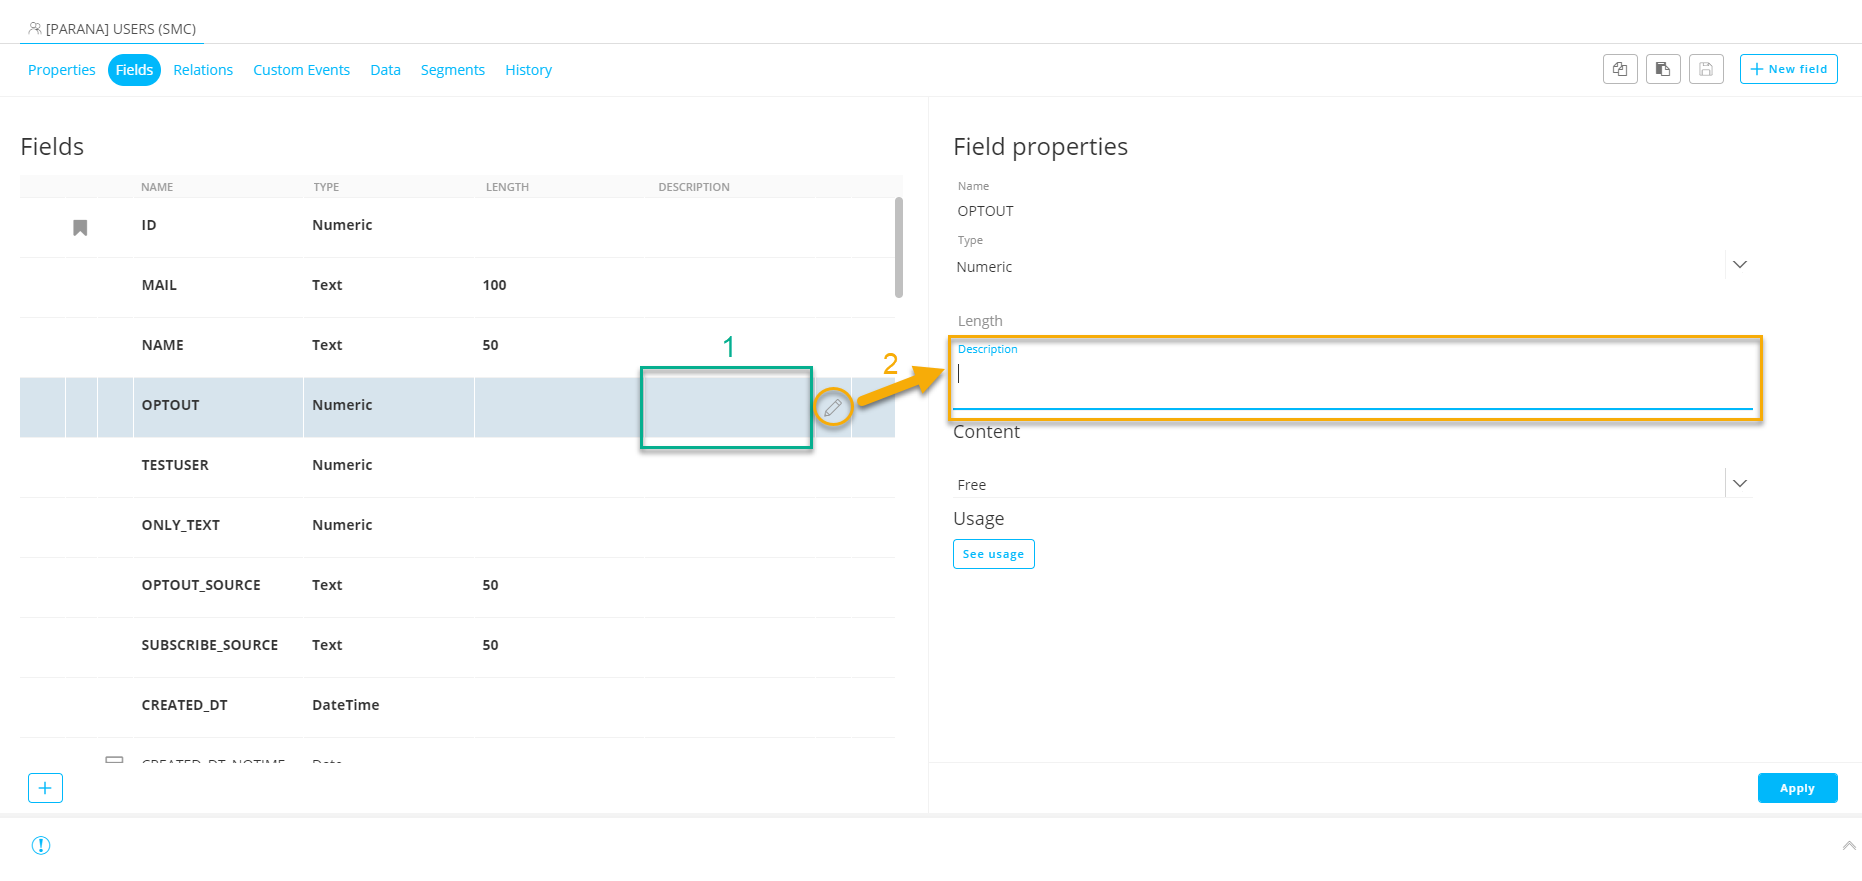
You can do this by editing the description directly in the grid (1) or by clicking the pencil icon ![]() (which only appears when you hover over a field) and change the description in the properties on the right (2).
(which only appears when you hover over a field) and change the description in the properties on the right (2).
From the Action buttons on the top right you can:
-
save - all changes to the list structure (new fields, amendments to fields) are now persisted.
-
copy - this copies the list's structure as a series of field definitions to the clipboard. This can then be used to recreate a list matching the same structure. Note that the format can be pasted into a spreadsheet (Excel, Google Sheets, etc) for further manipulation and structure management.
- paste fields - this allows a data structure to be pasted into a dialogue box which is then used to manipulate this list.
- Fields with the same name will have their description updated.
- New fields are added at the bottom and
- System fields will remain unchanged
Note: When creating a list, always start with the definition of the fields in the list.
An overview of all standard fields in the list is provided. Depending on the type of list, different standard fields are available. The list of standard fields can be completed with custom fields. (For more details on these different types check out the following topics: Audience List, Data List, Data Selection List, Option List, Device List)
Note: A list of supported data types can be found here.
Add custom fields
1. To add custom fields to the list, click + in the grid to add an additional line. You can also use the + New Field button in the toolbar at the top.
2. Enter the field name, and choose the type and length. Add a description when required.
Note: Field names can't be equal to reserved words such as System, Update, Delete and so on. You can find a complete list of reserved words here.
For the type you can choose from Text, Numeric, DateTime, Boolean, Long, Float, Date, Longtext.
Note: Fields in Custom Events list can be defined as JSON. A max of 5 fields can be of type JSON. For each field, the JSON structure needs to be defined, including the Name, Usage and Mandatory parameters. Note that the structure of a JSON field can be copied/pasted into another JSON field: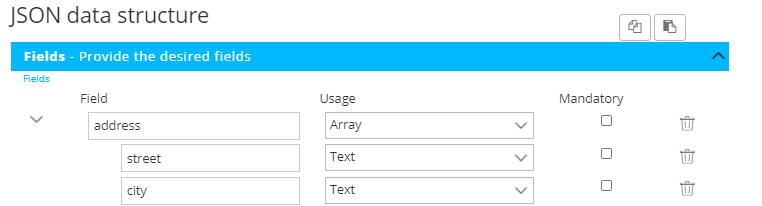
To obtain the data in a JSON field, use the following syntax :
[% jsonValue(field, JSON key) %]
where:
* field = an expression returning the JSON field, e.g.: eventValue('FAVORITESHOPS')
* JSON key = the path to navigate to the specific key in the JSON (array). Use "." as a separator and "[x]" as (zero-based) index operator.
Example:
A Custom Events field called FAVORITESHOPS contains the JSON structure as displayed above.
- To obtain the 'city' from the first element in the ADDRESS array, use:[% jsonValue(eventValue('FAVORITESHOPS'), 'ADDRESS[0].CITY') %]
- To obtain the 'city' from the second element in the ADDRESS array, use: [% jsonValue(eventValue('FAVORITESHOPS'), 'ADDRESS[1].CITY') %]
Tip: Use the tab to jump from one entry field to the next
3. Add as many fields as required and when done press the Save button  in the toolbar.
Note: The order of the fields in the list can be changed by dragging and dropping a field to a new position. A change in the order of the fields will also be reflected when creating a filter or a segment, in the Constraint Editor, or when creating a relation with the list.
Field properties
To edit a field in the list, click the pencil icon ![]() (which only appears when you hover over a field) . A Field properties panel is displayed on the right.
(which only appears when you hover over a field) . A Field properties panel is displayed on the right.
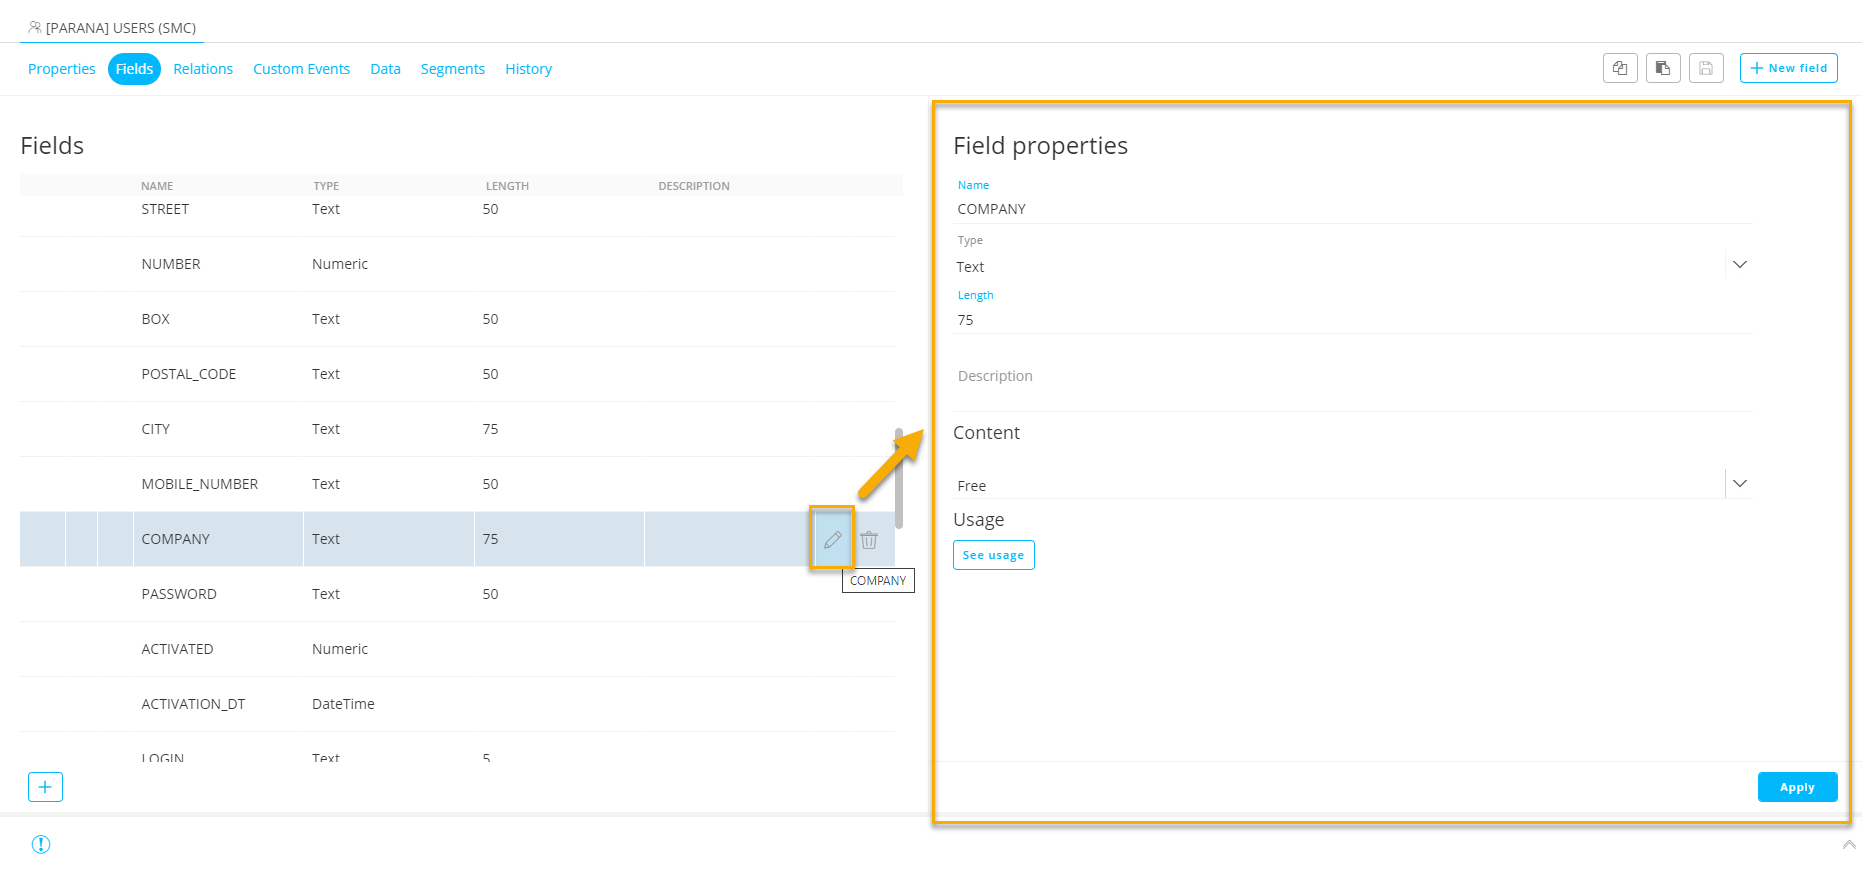
Note: The length of custom fields and system fields can be adapted. A maximum of 4000 characters is allowed.
You can define the 'content type' of a field (how the field is filled out) :
- Free — The field may hold any value, subject to data type and sensibility restrictions.
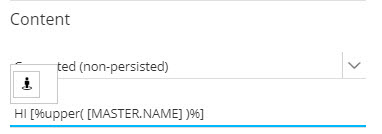
- Computed (non-persisted) — A non-persisted computed field is a "fake" column in which the field value is not stored but calculated at moment of retrieval (i.e.: evaluated as late as possible). You can use the Personalization Dialog to create the computed field.
Note: A field type can only be set as computed upon creation. Once field changes to the list have been saved, that field type cannot be altered; that field itself must be removed and recreated.
- Computed (persisted) — The value is calculated during data changes and stored in the table (i.e.: evaluated as early as possible). Due to the additional performance overhead required by non-persisted, this approach is preferred.
Note: Computed fields are available for all data types.
Simple expressions can be used (for example IF/EQ : [%IF(EQ('record1', [MASTER.NAME]), 'parana', 'BAR')%]).
A list of all supported functions that can be used within Engage expressions for computed fields can be found here.
Note: Editing computed fields is restricted. When a computed field is used in a Data Import configuration, in a Journey Data Component or in a CRM Sync, changes to the field are restricted. For example in the Data Component the computed fields will not be available for selection.
Technical note:
Where are computed fields supported?
There are different locations:
List type level:
| Supported | Not supported |
| Audience List | Option List |
| Data List | |
| Data Selection List | |
| Device List | |
| Custom Events List |
Field type level:
| Supported | Not supported |
| Boolean | JSON (only for Custom events) |
| Numeric | |
| Long | |
| Float | |
| Date | |
| Datetime | |
| Text | |
| Longtext |
Feature level
| Supported | Not supported |
| List - Segmentation | List relations |
| List Export: Audience filter | List import |
| List Export: File mapping | List CRM sync |
| Content personalization | Journeys Data Component: field to be updated |
| Content DSL matching | Journeys Event Data Component: field to be updated |
| Journeys Audience filter | Custom Channel |
| Journeys Control Group: sorting field | |
| Journeys Control Group: grouping field (numeric only) | |
| Journeys Control Group: priority field | |
| Journeys Rule based split | |
| Journeys Sample: sorting field | |
| Journeys Custom Channel personalization | |
| Journeys Custom Component personalization | |
| Journeys Data Component personalization | |
| Journeys Event Data Component personalization | |
| Journeys Lookup Component | |
| Journeys Validation Component |
Note: A field can only be set as computed during the creation of a new field. When editing an existing field (after the list has been saved), this is no longer allowed.
- Single Value — The user can select a single value from a drop-down list. When this option is selected, an option list must be linked to the field.

- Multiple Value — The user can choose one or more values from a drop-down list. The values are separated by a comma. When this option is selected, an Option List must be linked to the field.
Note: A [Text] Option List can only be used in a Text field.
A [Numeric] Option List can be used in Text and Numeric fields.
However, if the list field is of type 'Text' and only allows a single value, and the Option List is [Numeric], this will impact performance.
Example: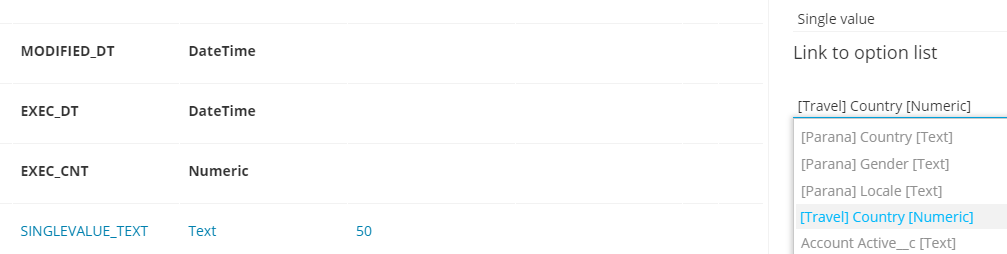
When an Option List is linked to a field in the list, this will be indicated with a dedicated icon in the Fields overview of the list:

- Data Selection Identifier Set — This option is available for Audience Lists and 1:1 linked lists such as Data Lists and Device Lists. It can also be used for fields in a Custom Events List linked to the Audience List. If a field is set as such, it can be used in non-transactional messages as a lookup field.
When a field is set with this type, the values in the field must be separated by comma, pipe or semi colons. These values are lookup identifiers that can be used when using a data source in repeaters in your messages or as a personalization field. This will allow you to retrieve specific items from a data source by comparing the lookup IDs of those items with the IDs in this specific field.
Example: I have an Audience List 'AUDIENCE' with one field LOOKUPIDS containing the preferences of the contact. This field 'LOOKUPIDS' is set as 'Data Selection Identifier Set' and allows me to filter items from the datasource based on the information in this field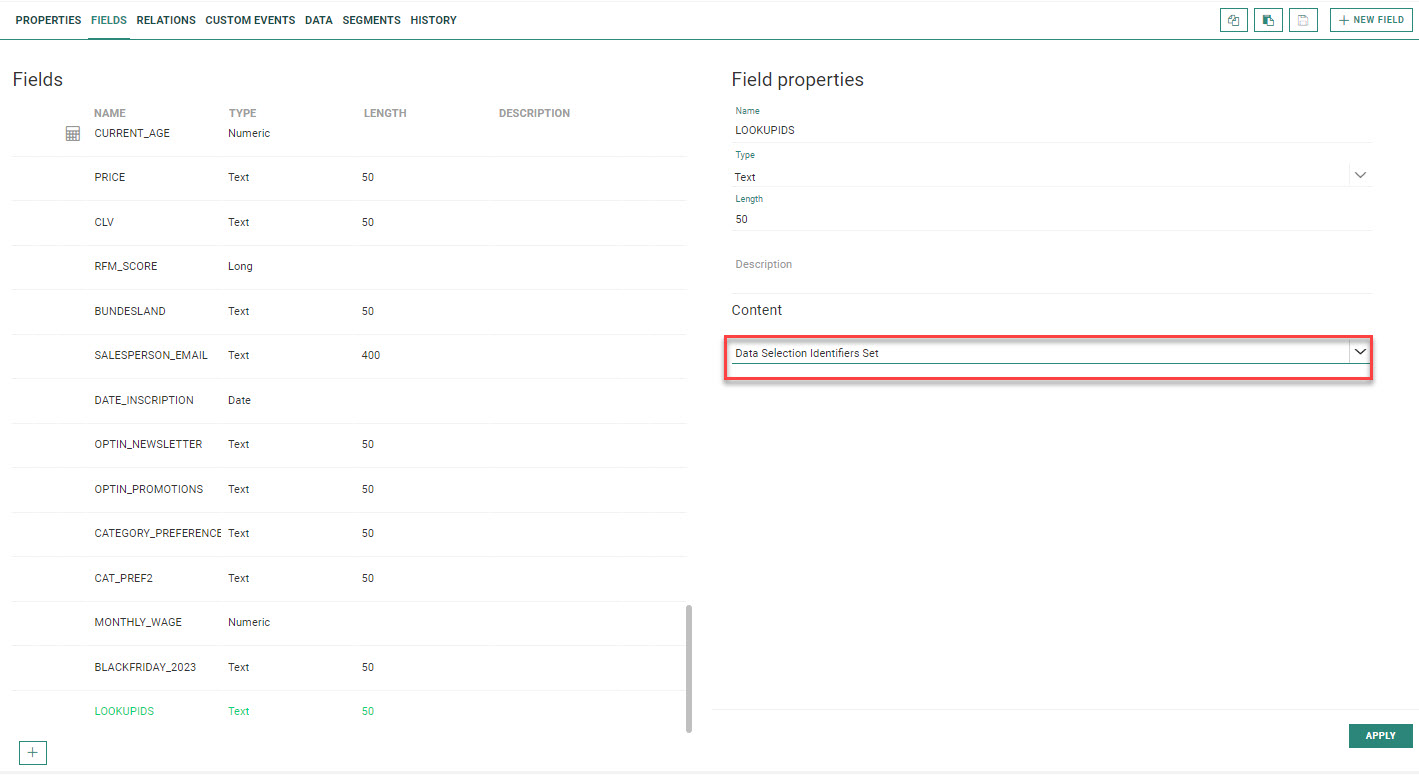
This field will for example contain the following IDs for user x: 1|2|4. 
When a message is created for this audience, you can create a data selection for the message that will only retrieve the items from the data source for which the lookup field ID corresponds to the IDs in the LOOKUPIDS field of the Audience List.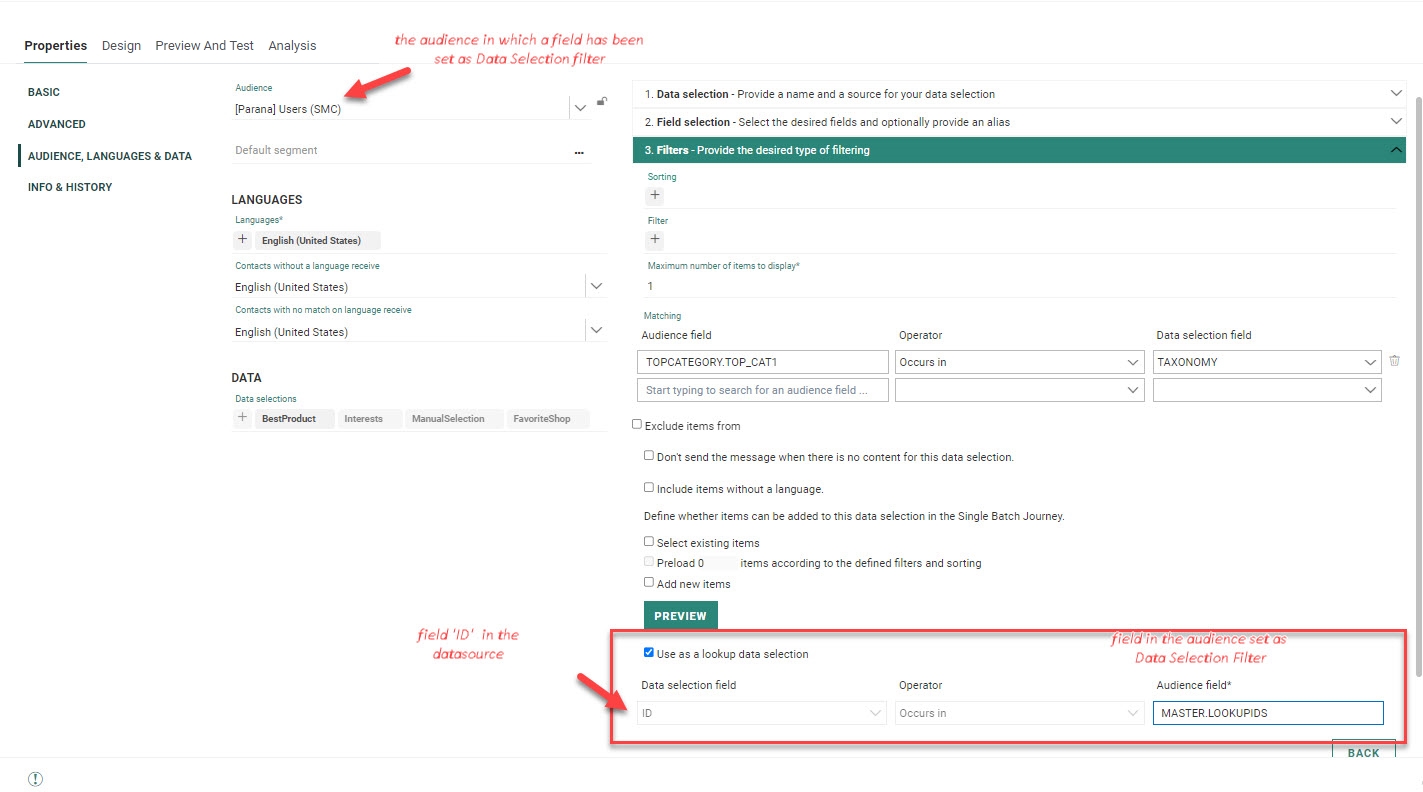
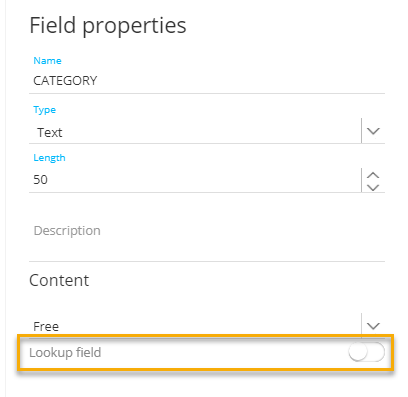
For fields in a Data Selection List, an additional option is available to indicate whether the field is a 'lookup field'.
Define if the field is used as the lookup field for an item in the list. The selected field must be a unique identifier and is used in an API call to trigger a transactional message with items that already exist in a data selection. When the message is triggered, only the unique identifier of the items is passed on and the actual item information is retrieved from the data selection.
Moreover, when a field in the Data Selection List is set as 'lookup field', it can be used in non-transactional messages too, to look for records in the Data Selection List that correspond to preferences stored for the contact. (see above example on the Data Selection Identifier Set).
Note: The field selected as the lookup field will be marked with a magnifying glass in the fields overview of the corresponding Data Selection List.
Warning: Once a field is set as a lookup field, this action can't be undone! The toggle will become deactivated.
So please make sure you are certain, before setting a field as a lookup field.
In case you do need to make a change to this please contact Marigold to perform the necessary updates in the database.
Note: You can remove custom fields from the list. Select the field in the table and click the Delete icon .
.
The fields will be removed from the list when the changes are saved.
Standard fields cannot be removed.
If the field is used in a recurring export or import, the field can't be deleted. A 'Usage' dialog gives details on where the field is being used.
Moreover, in the Field properties the 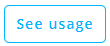 button gives access to an overview of where the selected field is being used.
Note: Validation messages indicate possible issues when creating list fields and relations, such as duplicate table fields. Clicking the validation message takes you to the corresponding field.
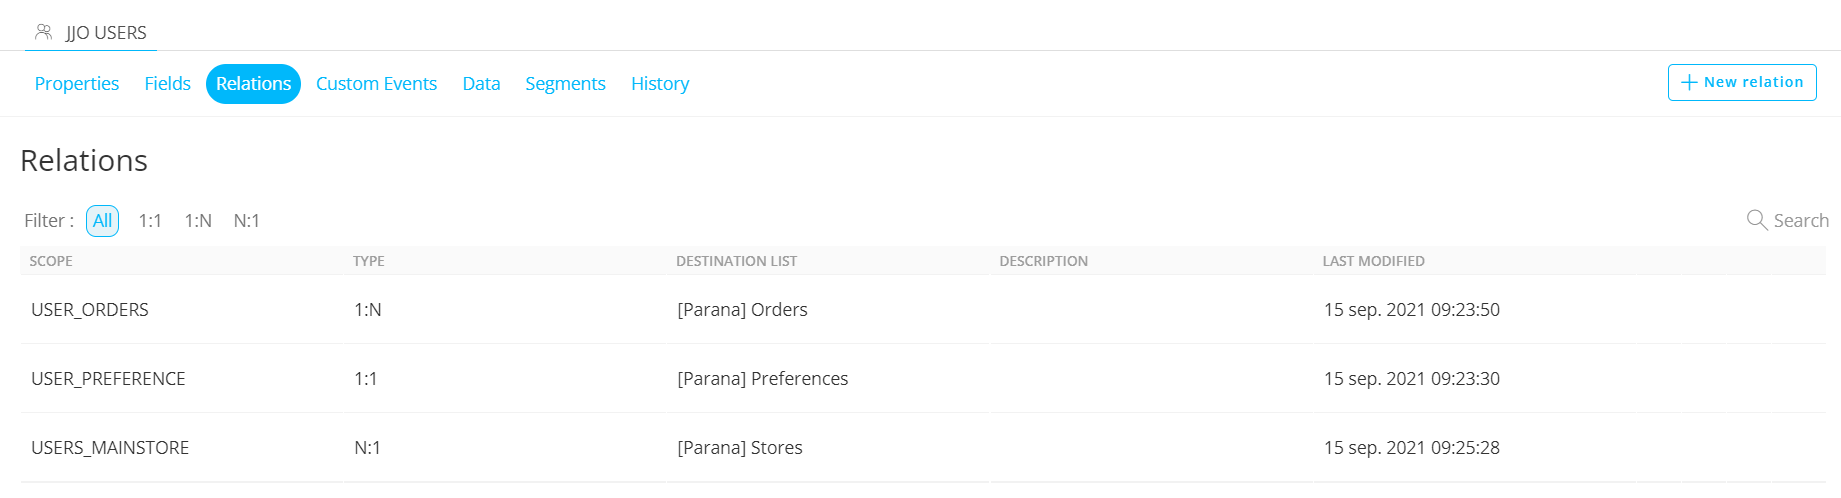
Create Relations
The Relation tab lets you define a relation between this list and another list. For more information on defining relations, check out this topic.
Custom Events
In case of an Audience List, an extra tab named Custom Events is shown. Event data from Custom Events can be acted upon through event-driven journeys.
This data is most relevant at the time the event occurs, and is only relevant to the contact itself.
Example: Running activity data of a user shows that the user has just reached a milestone of 100 miles.
The event is triggered and the user receives a message to congratulate them and offers a coupon of a sports shop.
For more information on how to manage Custom Events, please consult the dedicated topic here.
Manage Data in the List
The next step is the Data. Existing records are displayed in a table and new ones can be added. Data is displayed by 20 items per page. Buttons let you navigate from one page to the next.
You can add records manually or by importing them from a file. Check out this topic for more details on record creation.
Important note: If you do not see the Data tab when accessing a list, you probably have the 'Hide Personal data' claim activated. Check with your administrator if this doesn't seem correct to you.
Filtering Data
1. Searching for specific records in the list can be done through the panel at the right, used to filter the data displayed.
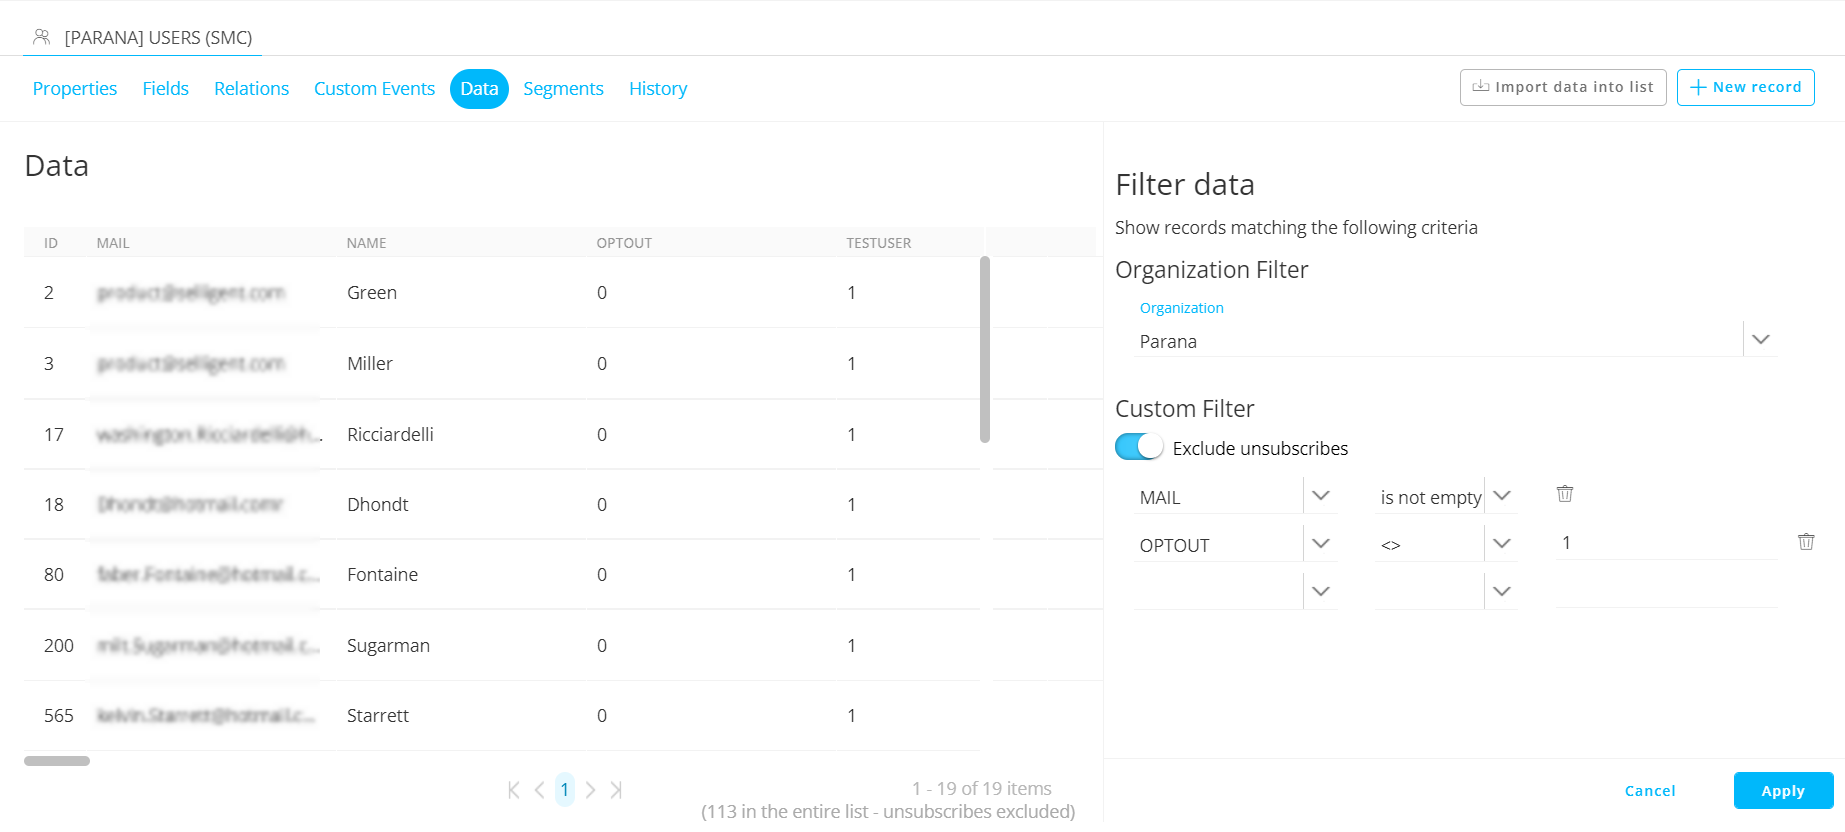
2. To define a custom filter, select the field to filter on, then select the operator for the field (operators depend on the type of field) and enter the value for the field.
3. To add additional fields, select the next one and perform the same operations as for the first field.
Note: The AND operator is applied when more than one field is selected.
4. Click Apply. The filter is now applied on all the data and will remain selected when navigating from one page to another.
Note: The option 'Exclude unsubscribes' will allow you to exclude unsubscribed contacts from the result.
When you have the permission to share lists, you can share a list with other organizations and this way make it available for those organizations as well. The list is managed once but used in several organizations. In that case there's an additional organization filter available on the Data tab to limit the records in the shared list for the selected organization.
For more info on list sharing, see the section below.
Create Segments
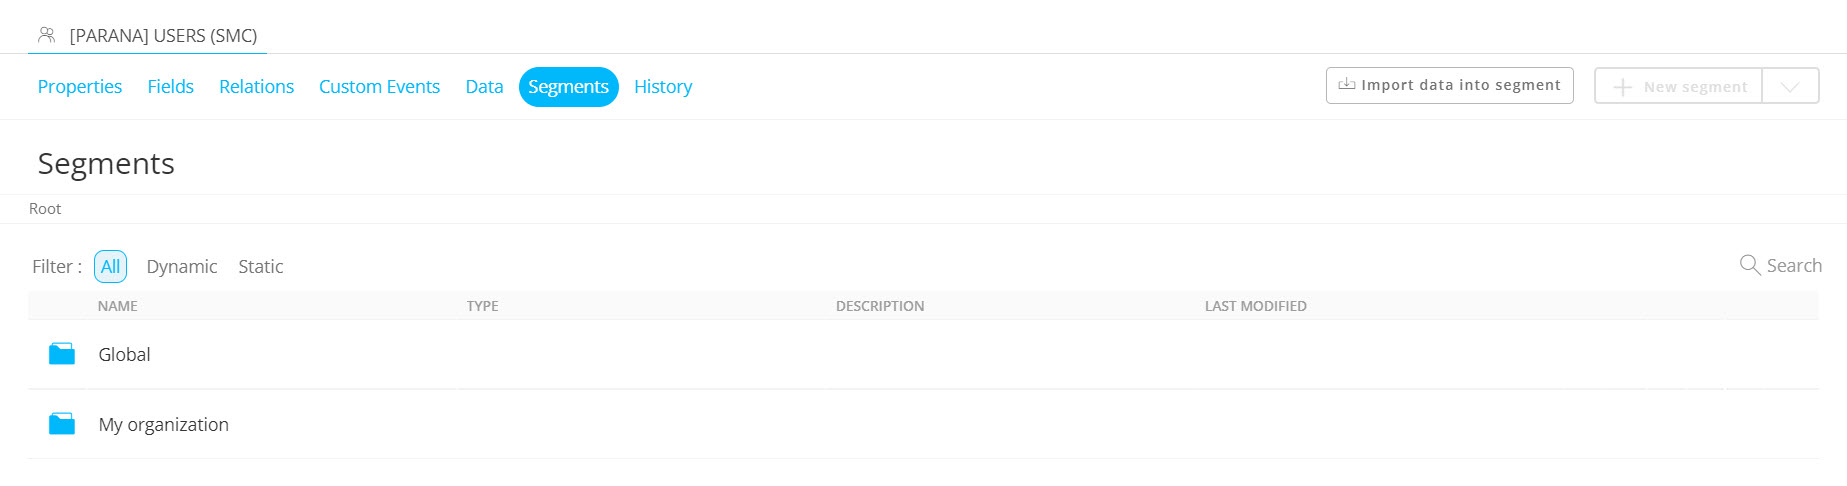
All existing segments are listed under the 'Global' and 'My organization' folders.
You can create as many sub-folders as required in these main folders, but you can never create segments or folders in the root. Folders and segments stored in the Global folder will be shared with other organizations when the list is shared. Folders and segments in the 'My organization' folder are proper to the current organization and will never be shared.
To create a segment, click the + New Segment button in the toolbar. You can choose between Dynamic segments and Static segments. Or, select the type of segment directly from the drop-down list linked to the button.
Or, Import data to add data to an existing segment.
List History
The History tab gives information on how many records were inserted, updated, deleted and by whom and when.
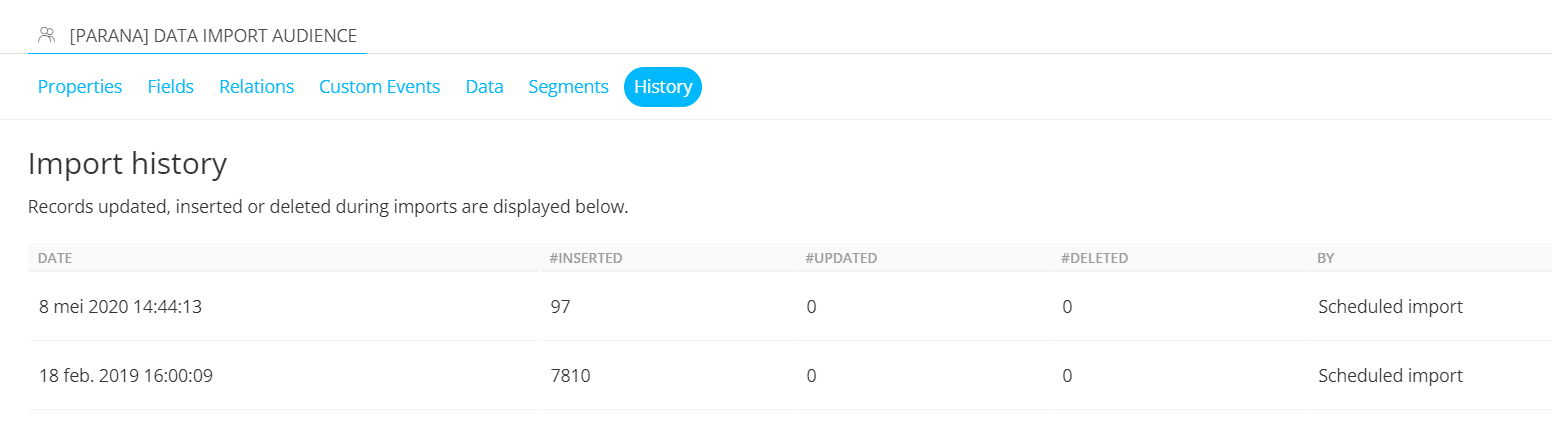
This overview also includes imports with transformations on imported data.
Configure Properties of the List
Once the list is created you can still change some properties of the list on the Properties tab.

The Properties tab provides access to
- List general properties — The properties configured during the creation, such as name, description, tags, labels, organizations, API name can be edited.
In the Advanced settings you can also find the name of the actual table created in the database.
In addition, a Tag list can be linked to the audience. This allows marketers to tag links in content and track the interest of the recipients of the message. (More info on Interest Tags can be found here)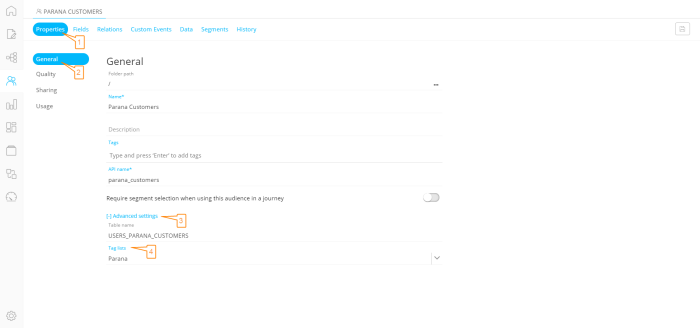
Note: Only one Tag list can be linked to the Audience list.
Important note: When the Audience list is shared across organizations, the Tag list must be shared with those organizations as well in order to see the tags when using the Audience list in content.
- List quality configuration — This provides access to the configuration options for the audience list quality. More information can be found here.
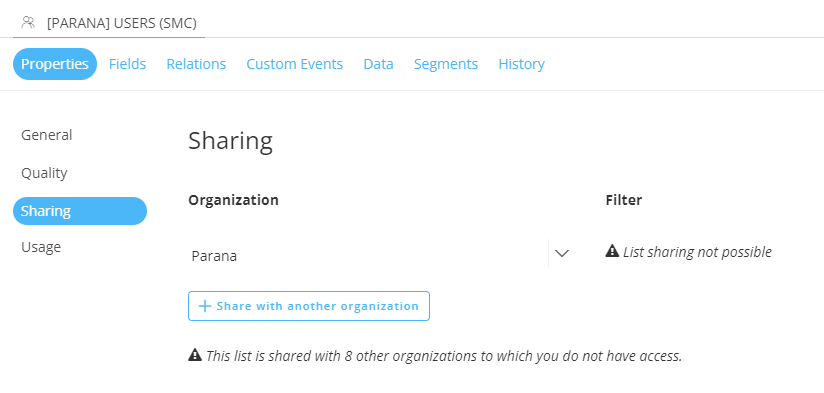
- List sharing — Lets you share the list with one or more organizations to which you have access. By default the list is only shared within the current organization.
- List usage — Provides details on how and where the list is used.

List Sharing
When you have the permission to share lists, you can share a list with other organizations and this way make it available for those organizations as well. The list is managed once but used in several organizations.
In addition, a filter can be defined on the list when sharing, limiting the records in the shared list for the selected organization. The filter can be different per organization. When viewing the data of the shared list in one of the organizations it is shared with, only records answering the defined filter criteria are shown. Moreover, the filter is taken into account when executing a journey using that list.
Note: When trying to add records to the shared list on which a filter has been defined, you will not be able to edit the fields on which the filter is based. This means that it is not possible to create records in the list that do not comply with the imposed filter.
You can only select organizations you have access to and if a list is assigned to organizations you don't have access to, you won't be able to remove them from the 'Sharing' section.
Note: List sharing requires a specific permission, defined in the Admin Configuration.
1. By default, the current organization is already listed. To add additional organizations, use the button + Share with another organization
Note: If the list is shared with organizations you do not have access to, you are informed of that.
2. An additional input field is added where you can select an organization from the drop-down. Only organizations you have access to are listed. Select the one you want to add.

3. To the right, a Set a filter link is added where you can define the filter to be applied on the list when it is used in the selected organization.

4. Use the link Set a filter to access the Custom Filter dialog.
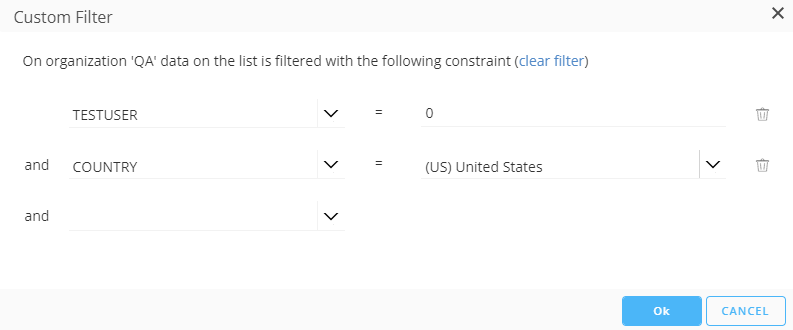
Note: By setting a filter, the records in the shared list are limited to the ones answering the filter criteria and only these records are displayed on the Data tab of the shared list in the selected organization.
5. When done defining the filter, click OK.
Important note: When fields in the shared list are linked to an Option List, you must ensure that the Option List also exists in the organization the list is shared with!
If additional organizations need to be added, repeat the same steps and set a filter if needed.
Once the list is saved, it will also appear in the other selected organizations.
Note: When sharing lists, the segments and folders that are in the Global folder will be shared with the other organizations as well. Segments and folders in the My organization folder are never shared. This means that every organization the list is shared with, can create segments proper to their own organization and have their own folder structure within the 'My organization' folder.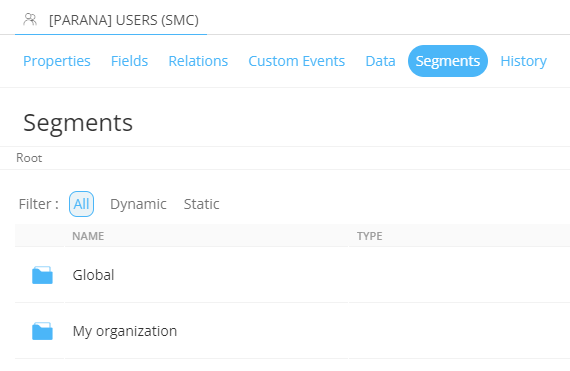
Note: Custom Events linked to the shared Audience List will also be visible for the other organizations.
Example:
Organization A has a list Customers, with two segments.
Segment 1 is stored in the Global folder, and segment 2 is stored in the My organization folder.
When the list is shared with Organization B, only segment 1 in the Global folder will be visible in Organization B.
Example : How to share lists between organizations
List Usage
Once a list is created, the list usage is available from the Properties tab of the list.
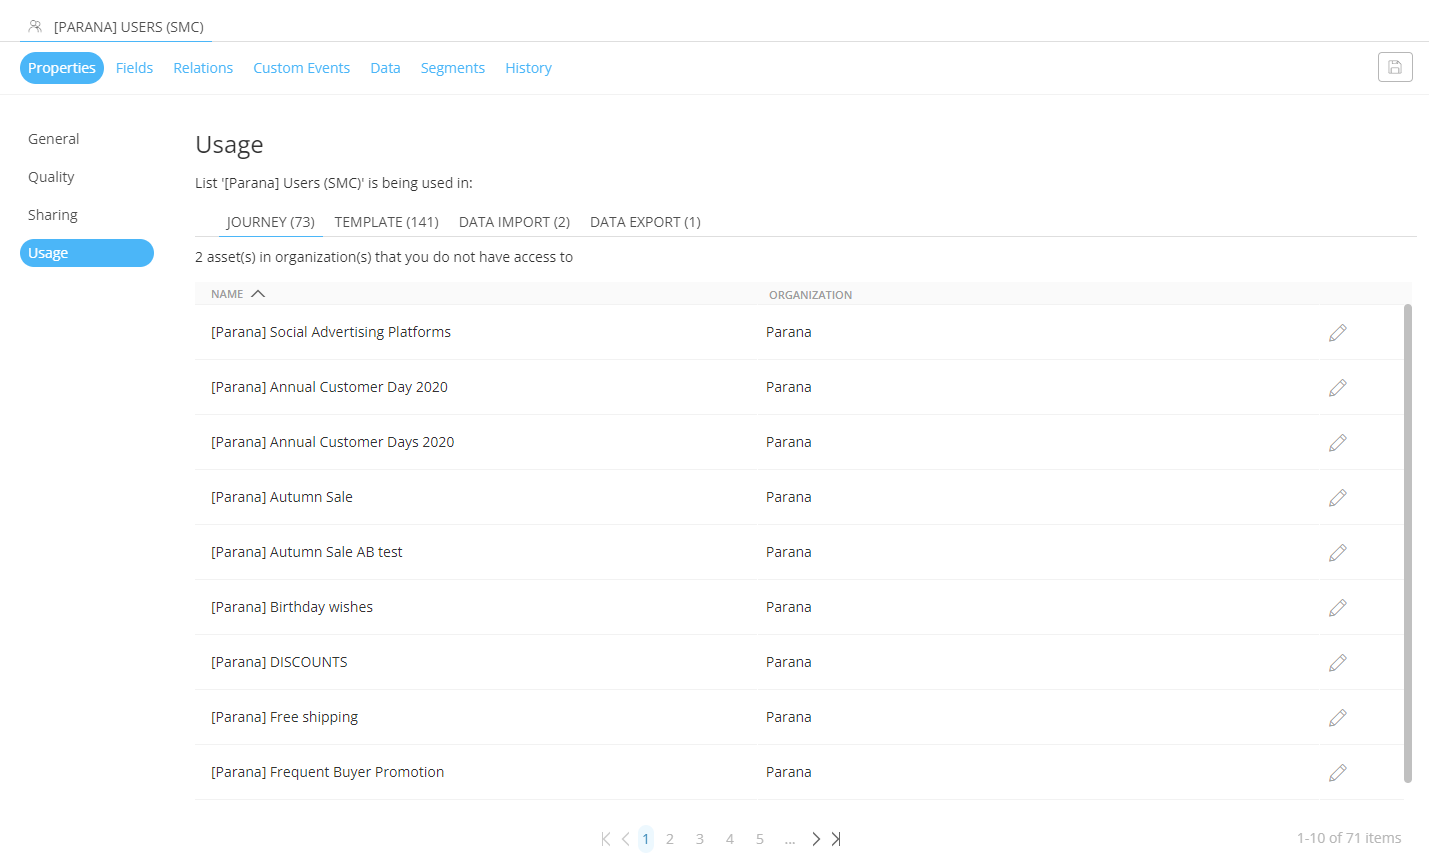
Here, you can find details for each usage type split over different tabs.
Lists can be used in:
- data sources created from a data selection
- relations
- fields (in case of an option list or computed fields)
- custom events (in case of an option list)
- content
- CRM data syncs
- data imports
- tracker scripts
- recurring exports
- journeys
