Define Offer Actions
Offer actions are defined in the Offer properties, from the section 'What? define your actions'.
To create a new action, click the  button. The following properties need to be set:
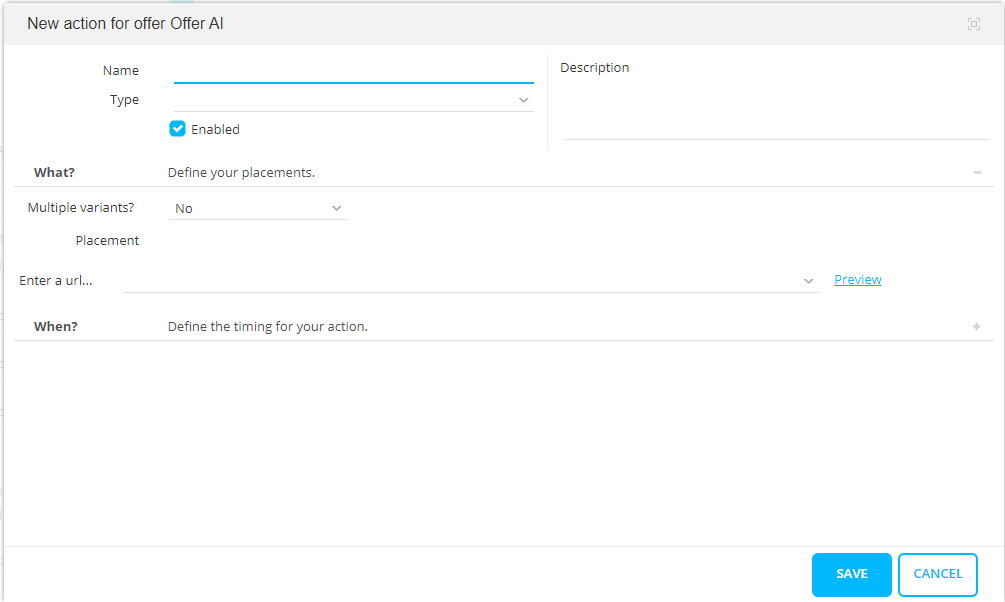
General
- Name and description.
- Type — The available types depends on the different types of placements, defined on the universe. The selected type has an impact on the remainder of the configuration fields.
Note: A placement can only be used once in the same offer (except for css, script and redirect). I.e. 2 different offer content items, cannot be shown in the same placement. If you already have an action using a placement, you’ll see an error if you use that placement again in a second action.
- Enabled — Activate the action by ticking the option
What? Define your placements.
An action may have multiple variants: a rotator or ABn test. The type of placement is selected from the field 'Multiplevariants?'.
- No — Only one single content is displayed
-
- Show all options before moving to the next offer — If ticked, show all options at least once. If a visitor is subject to multiple offers at the same moment for the same placement and the option is ticked for the first offer all options from the first offer are shown before moving to the next offer. If the option is not checked, only option 1 from the first offer will be shown and on the next hit on that placement, he will see option 1 for offer 2. After, if the second offer does not have the option checked, the visitor gets to see the second option of offer 1 and so on.
- Ratio — The weight of the item in the rotator. If an image rotator has 3 images, and 1 image has a ratio of 3, this image will be shown 3 times more than the other 2 images.
Note: This overrides the option 'Keep firing this offer during
the visit' in the Offer settings/ When.
Which offer comes first is determined by the position of the offer in
the overview.
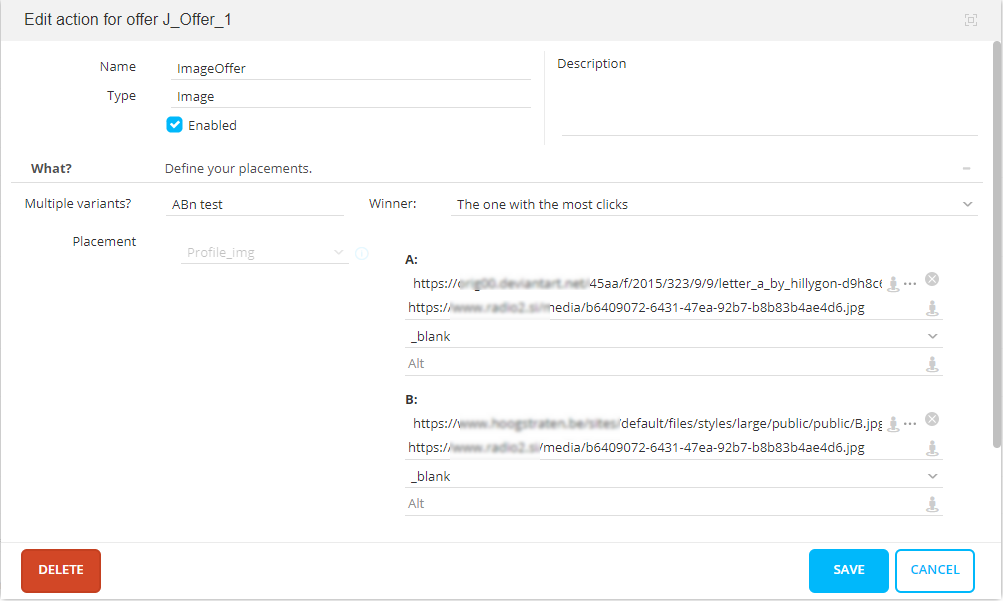
- ABn test — Different content is tested and the best version is used. Visitors get to see a random version until the winning version is selected. From then on, only the winning version is shown.
An ABn test can contain multiple versions (A, B, etc) with or without content (for example: to test if a group of persons who see a banner buy more than a group who see no banner). If no content is selected for a version nothing happens. For example, if the empty content is set to replace a header, the original header simply remains.
- Choose a winner — The winner of the ABn test can be selected automatically or manually.
- Automatically — The winner is based on the most conversions or the number of clicks on the item. The winner is chosen automatically when there is a statistically significant difference* between the items (currently there needs to be a difference of at least 5% between versions).
- Manually — Select the option 'Choose winner manually' from the drop-down list. After running the offer, a second field is displayed allowing you to select the winning version manually.

Once a winner is selected, you can no longer change this.
- Choose a winner — The winner of the ABn test can be selected automatically or manually.
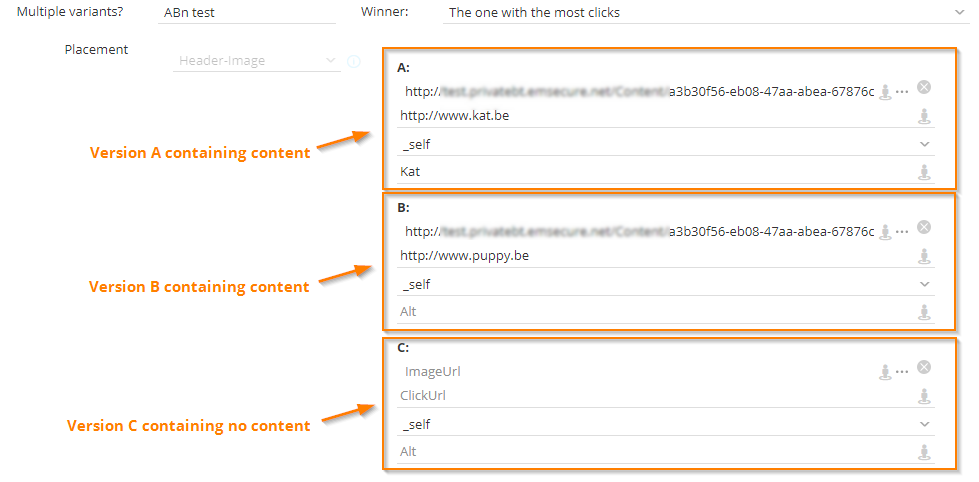

Example of an ABn test with 2 versions and the winner criteria set to 'the one with the most clicks':
Technical note:
The
‘statistical significant difference’ is a statistical calculation that
calculates if the result (number of clicks or conversions between the
different version) is based on coincidence or not. If you only have 2
clicks on an item, the chance that the clicks are coincidental is high.
The more clicks you have on an item, the chance becomes lower. For more
info see Wikipedia: “Multivariate
testing in marketing” or “F-test”.
Preview displays the result of the action in the webpage.
From the 'Placement' field select the placement where the content should be placed. Note that only placements of the selected action type are listed in the drop down. (Example: if the type of action is set to image, only placements of type image are listed.)
When, for the selected placement, the option 'Can be used within an iframe' is activated in the definition of the placement, an extra option is available when content is selected for that placement: Do not use an iframe. If you activate the option for the selected content, it will be displayed without an iframe straight in the website's HTML. (The option is never available for image type placements as they are never displayed in an iframe.)
Note: There are some risks involved when choosing to not use an iframe; When content is no longer encapsulated it can 'bleed' into the website.
* The offer CSS might interfere with the website CSS
* Offer FORM submit cause a full page redirect which may cause cross-site domain issues
Note: It is possible
to configure multiple placements within one action. This does not apply
to CSS, script and redirect.
If the same placement is selected twice within one single action, a red
border is displayed around it, to indicate duplicate selection.
Next, select the content types
- CSS — CSS code. A text field pops up in which the css must be entered manually
- Images — The URL of the image, the click URL and Alternate text
- Script: javascript code
- Redirect — The URL to be redirected to or CRM. The contentID is automatically added to the URL allowing tracking clicks on the offer with the TrackClick function.
- Popup — html CRM
- Popin
- HTML
For the latter three types (popup, popin, HTML) the options available to fill it with content are the same
- URL — The content in the URL of a specific page is shown in the offer placement
- HTML — HTML content is shown in the offer placement and an HTML editor is available to enter the code
- CRM — A CRM journey is selected from where the content of a page is shown in the offer placement
Technical note:
Tracking calls can now also be used via HTML attributes in HTML placements.
This functionality is described here.
Note: Campaign/Engage pages are tracked, and views and clicks are registered. When these pages are used on websites with high traffic, this might generate a lot of tracking data in Campaign/Engage. This data is not always useful as in many cases is about anonymous users. If tracking is not required, it can be disabled in the properties of the journey used for the offer.
The following is only supported for HTML type.
- Smart Content: A recommendation Smart Content is selected to display the content. These recommendation Smart Content blocks are created in Recommendations and made available for use in Site to present the user with recommended content based on specific algorithms.
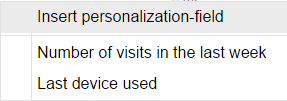
Now, instead of entering fixed values in these fields, it is possible to use personalization fields based on data available in Site. These personalization fields are available for types Redirect, images, CSS, Script, popin and popup. Popup messages and HTML content can be completely personalized, images dynamically selected, scripting variables can be set automatically, etc... ,all possible with personalization fields. To do so a personalisation button is added. A dialog is displayed providing access to all available profile data.
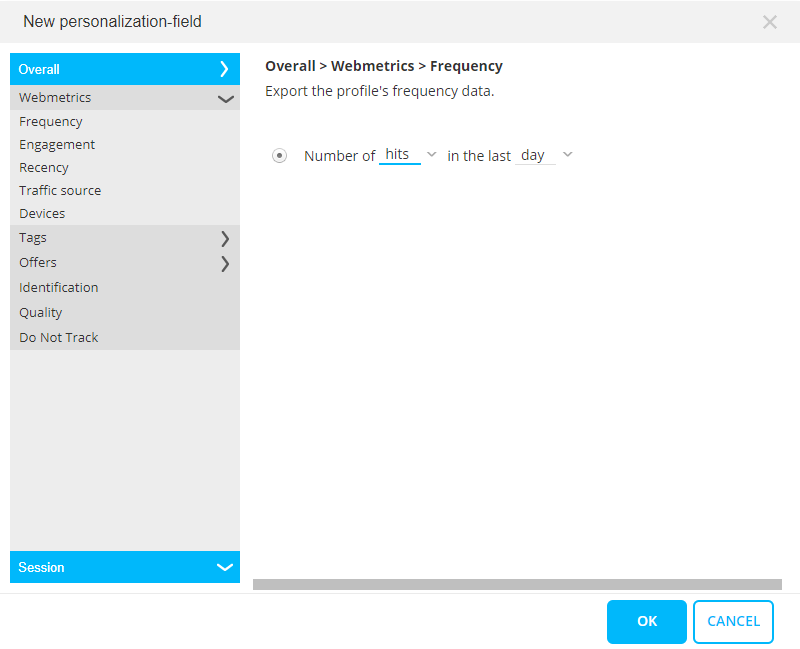
Following data can be used:
-
- Webmetrics
-
- Frequency — The number of hits/visits in the last day/week/month
- Engagement — Average or total time/pages/visits per visit/day/week/month
- Recency — The first or last hit
- Traffic source — The number of times a visitor comes via a specific channel or the most important or last used traffic source
- Devices — The number of times a specific device is used, what is the most important device, the last one used or the number of different devices
- Tags — The score, absolute score or scoreband for a tag
- Offers — Data on the profile's interaction with an offer
- Identification — The profile's identification data; the CRM id, if the profile is CRM identified and when, if it's a quality profile
- Do not track — The do not track setting of the profile
- CRM — The value of a CRM field and if it contains data.
Note: The personalization field is added as such which
implies that for instance when using such a field to fill out a variable
in a script, that you have to make sure to enter quotes where required.
E.g. var Txt1=' '
'
Example: Use the
last device used by the visitor to display an image corresponding to that
device. The image name is filled out automatically with the name of the
last device used. Of course the image must exist on the location indicated
and an extension should be added
The result is as follows: http://www.selligent.com/images/ PC.png
For ease of use, all personalization fields used in the different offers, will be available throughout the session in the popup menu at right click on one of the placement fields.
Personalization fields can also be copied and pasted for re-use elsewhere.
Note: The types popin, popup, redirect and HTML can all have an additional option:CRM. This option is only available if integration is set up between this universe and Engage. Here you can select the Engage Journey and Input component.

The list contains the names of the targeting journeys combined with the name of the input component(s). Only journeys linked to the current universe are listed here. (How to design a targeting Journey is explained in this topic)
If the Journey input component has custom input parameters, you can pass Site values to the Journey. Two values are always passed on by default and are therefore not listed here, the offer’s public name (for Journey parameter OFFER) and the action name (for Journey parameter ACTION).
Use the ... button to the right of the field to define the values to pass on to the parameters of the Journey. (E.g. the number of visits, the Site category the visitor consulted last; whatever is available as information in Site).
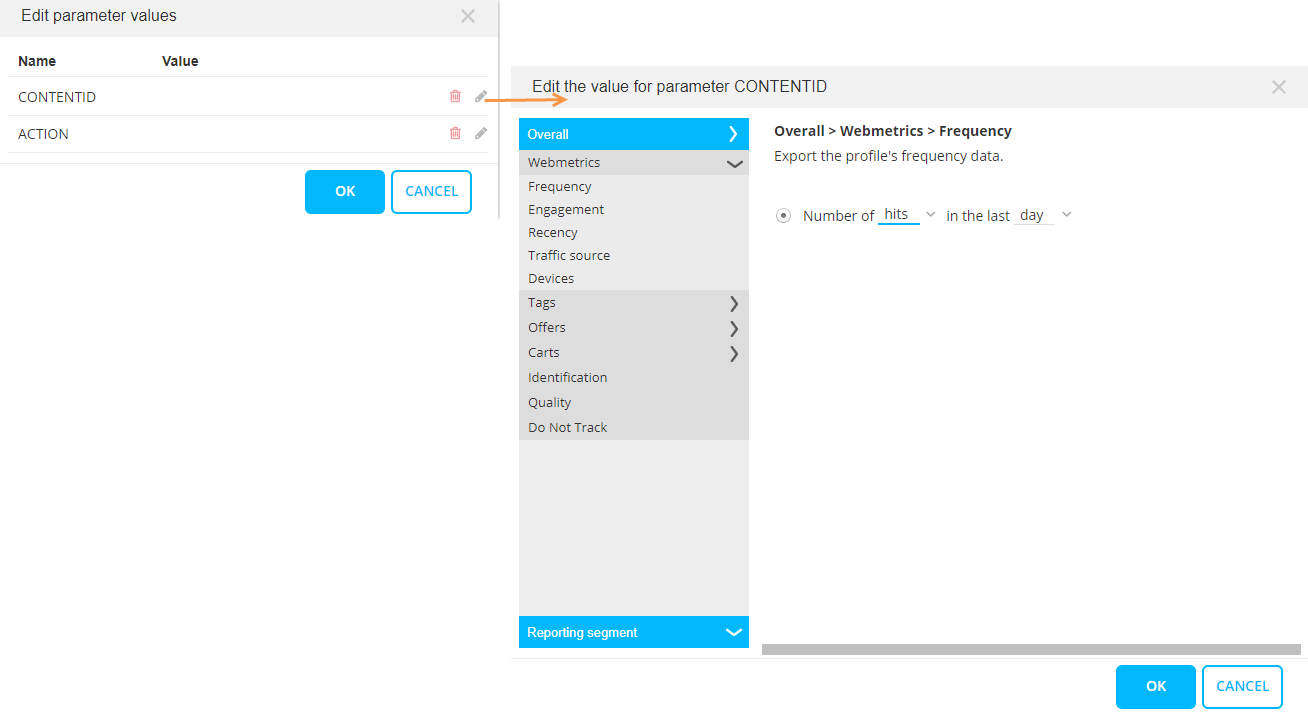
Click the ‘Edit’ icon to the right of the custom parameter to select the value. A dialog is displayed where a choice can be made between profile data (hits, visits, visit durations…), tag values (Site tag values) and offer data (if the visitor is in an offer or not, and when he was in or out of the offer). Identification data, Do not Track option and Reporting segments can equally be used to set the values for the parameters.
Note: If the visitor is a known Engage visitor
(CRM identified), you can personalize the Journey page with his profile
data (firstname, name…). If not, but he is Custom identified, you can
pass his custom id (Profile data –> Custom id) to the Journey and use
a lookup component in the Journey to switch to his Engage
profile and then personalize.
The ‘Custom id’ is passed in the JavaScript tracking call (customIdentifier),
for instance, the visitor logged in on your website and you pass
his unique customer id.
Technical note:
For type Popup or Popin you can select a Engage Journey (CRM) or url as placement. Because both types
are opened in a new window (Popup) or an iframe (Popin) the following
script must be included in the Journey page or url page:
- The default tracking script (see Universe
settings)
- To measure the click, behind the default tracking script: BT.trackClick(object);
- If you need to measure the page as an offer activity or conversion with
setting "via API" (see Define offers,
Why?): BT.trackActivity(offerPublicName, activityName)
For more information on these functions, check the Site API manual.
When? Define the timing for your action
- Show after/ Hide after:set the time (in minutes or seconds) after which the action is shown/hidden
Note: This option is only available for action of type Popup and Popin
- Redirect:redirect the visitor to another page
Note: This option is only available for action of type Redirect.
- Execute after:set the time (in minutes or seconds) after which the script is executed
Note: This option is only available for action of type Script
- Only shown when — If checked, a condition is verified before the action is executed.

The condition can be based on- Page title — The page's html title-tag value (e.g. <title>Purchase confirmed</title>)
- Page url — A page url, for instance from the order confirmation page
- Meta tag — A html meta-tag value (e.g. <metaname="purchased" content="1">)
- CRM (Journey) page tag — The page tag of a Journey page in Engage
- Site tag — A Sitetag value (e.g. Category="Fashion)
Multiple conditions can be defined. If one of them is true, the action will be shown. - Show max 1 per x — Limit the action in time or on a page
- Show max 1 in total — Show the action only once per visitor
The above settings can only be more strict than the settings defined for the Offer. E.g. If the Offer can only be shown max 1 time per day, it makes no sense to define an action in that offer that can be shown once per hour.
Example:
In our offer OfferBannerLoyaltyProgram, we want to show a specific banner promoting the Loyalty card. To do so, we will add an image to the top banner of our website.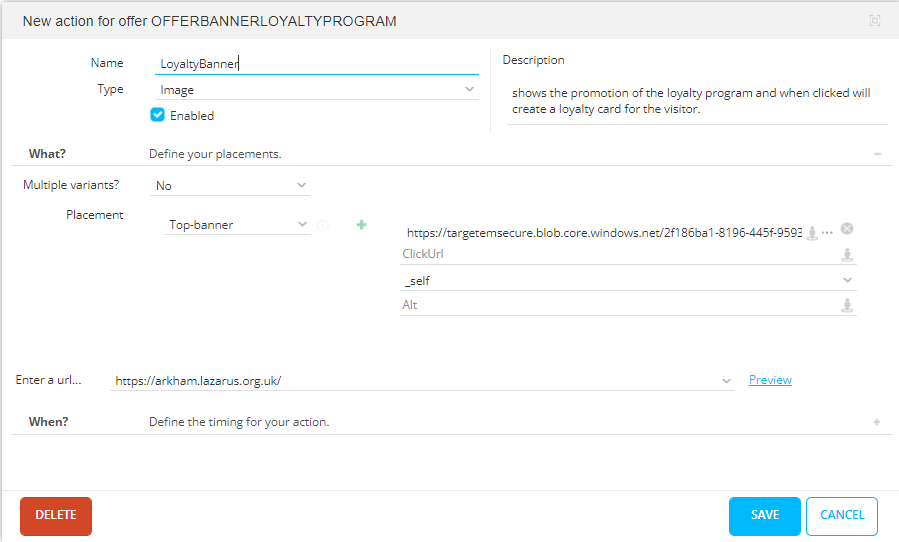
Once the action is saved, you can preview the result on the website
To make the image clickable, you can add a ClickURL redirecting the visitor to a different page.
When done, go back to the offer properties page. The action is now listed:
