PGP in Marigold Engage
Overview
Marigold Engage supports PGP file encryption / decryption for datafiles transferred to and from the platform. The encryption of your datafiles themselves adds an additional layer of security on top of the transport security that SFTP or FTPS adds.
How does it work
To send an encrypted file from an external location to the Marigold Engage platform.
- Encrypt the file using the Public Key that was provided by Marigold.
- Upload the file to the Marigold Engage (S)FTP(S) server.
- Configure an Import task to import this file in the Marigold Engage platform.
- In the Source options of this task, enable the ‘Include Unzip and Decrypt’option
- In the next step, fill in the ‘recipient’ and ‘passphrase’ fields with the values that are linked to your Marigold Engage PGP key to decrypt the file.
To send an encrypted file from the Marigold Engage platform to an external location.
- Send the Public Key part of your PGP key to Marigold Engage. You can attach this key to a support ticket. A Support Engineer will make sure that this key gets configured properly in the platform.
- If you have not yet created your own PGP key, please refer to chapter “How to create a PGP key” in this document.
- Never send the Private Key part of this PGP key to a third party! Marigold Engage will also never ask you to send this part of the key to any of its employees.
- Configure a Data Export task to export this file to an external location.
- In the Source options of this task, enable the ‘Include Zip and Encrypt’ option.
- In the next step, fill in the ‘recipient’ field that is linked to your PGP key to encrypt the file.
How to create a PGP key
Download your favorite PGP key management tool here: https://gnupg.org/download/index.html.
Once downloaded, place the binaries in the C:\PGP folder to follow below example steps.
- Open a Command Prompt window
- Generate a signing key with command: gpg.exe --homedir “C:\PGP\PGPDB” --gen-key
- Choose option: (5) RSA (Sign only)
- Keysize: 4096
- Key expiration: 0 (key does not expire)
- Is this correct? Y
- Userid:
- Real Name: <YourCompanyName>
- Email address (recipient): <UniqueAddressPerPgpKey>
- Comment: 4096bit PHP key for <YourCompanyName>
- Confirm with: o (Okay)
- Enter secure passphrase: <YourSecurePassphrase>
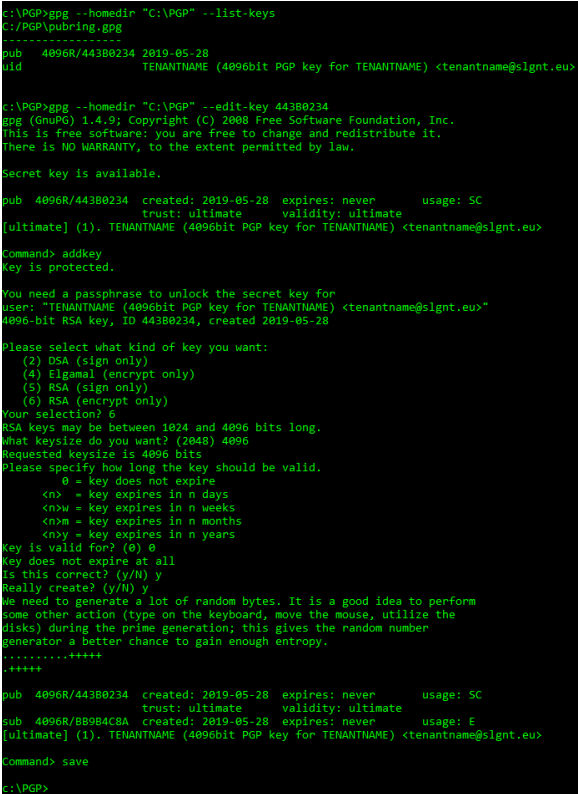
- Take note of the ID of the signing key that was created. We’ll need it in the next step. Retrieve this ID with command: gpg.exe --homedir “C:\PGP\PGPDB” –list-keys
- Generate an encryption key with command: gpg.exe --homedir “C:\PGP\PGPDB” --edit-key <ID>
- Enter passphrase: <YourSecurePassphrase>
- Command> addkey
- Choose option: (6) RSA (encrypt only)
- Keysize: 4096
- Key expiration: 0 (key does not expire)
- Is this correct? Y
- Really create? Y
- Command> save
- Export the public key of the PGP key that was created from the PGP keyring with command: gpg.exe --homedir “C:\PGP\PGPDB” --export -a <UniqueAddressPerPgpKey> | Out-File -FilePath “C:\PGP\MyPublicKey.asc”
Examples: