Salesforce Lightning Setup
Choose between an automatic installation or a manual installation. It’s clear that one or both steps is redundant depending on the choice made.
Automatic Installation From Package
Installing the Salesforce Package
A predefined package is available to create a default integration with Engage in the existing Salesforce environment.
1. First, open the following url in the browser:
https://login.salesforce.com/packaging/installPackage.apexp?p0=04t0f000000Teiq
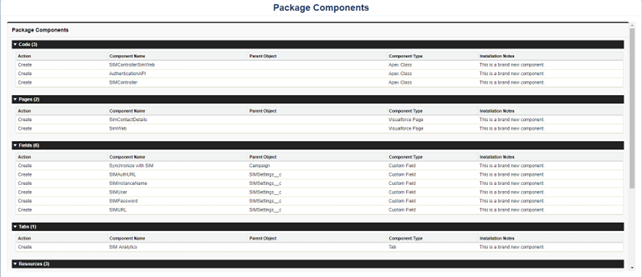
The package content is as follows:
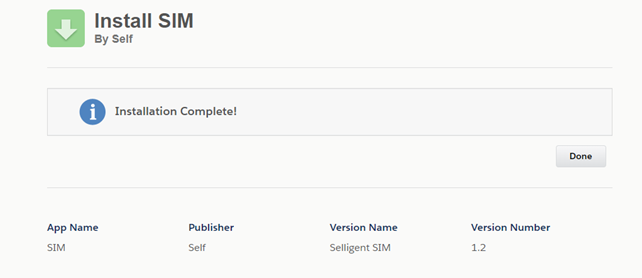
2. Click Install at the top of the screen. This installs all components in the Salesforce environment.
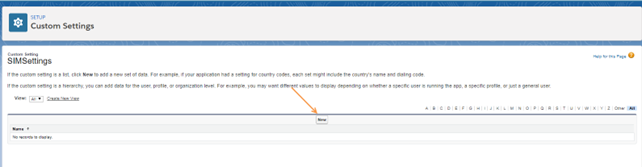
Create a Custom Engage(Selligent) Setting
1. In Salesforce Lightning, from the menu bar at the top navigate to Setup.
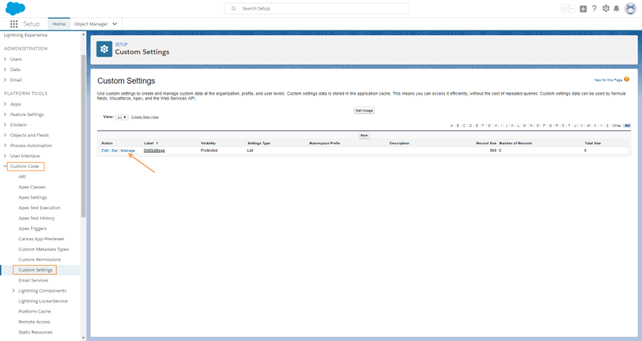
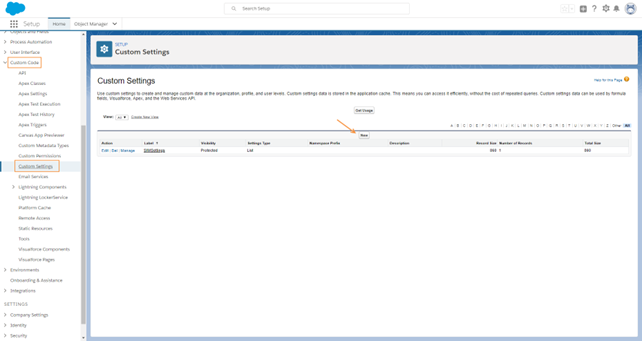
2. In the navigator on the left, select Platform tools/Custom code/Custom settings.
3. Click the Manage link next to the SIMSettings custom setting.
4. Next, create one record with Engage(Selligent) Login/Url data. To do so, click New from within the SIMSettings.
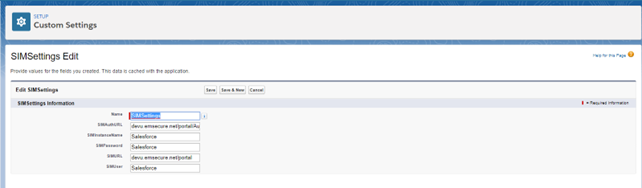
5. A window is displayed in which the following parameters are to be set:
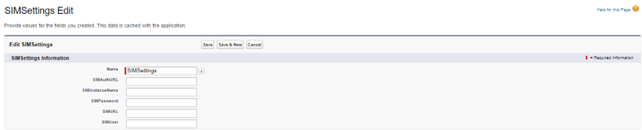
Technical Note:
The SIMUser and SIMPassword fields correspond to those for the user created when setting up the Engage environment.
ex SalesForce + your password
The urls corresponds to the installation of Engage.
ex URL; http://formations.emsecure.net/portal
AUTHURL: http://formations.emsecure.net/automation/Authentication.asmx
The Instancename entered here must correspond to the name of the instance created in Engage in one of the following steps. Remember it to reuse it later.
ex SF
6. Press Save.
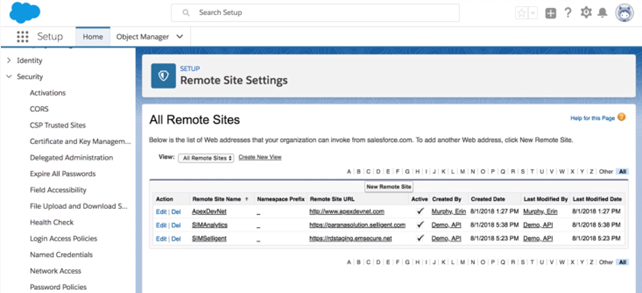
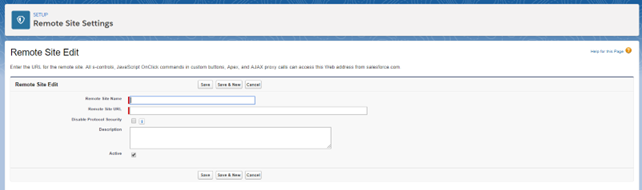
Create a Remote Site Setting
To load Engage in Salesforce, the Engage Reporting web address invoked by Salesforce is added.
1. In the Administration setup got to Settings/Security/Remote site settings:

2. Click New remote Site. The following is displayed:
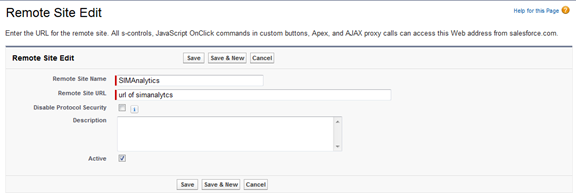
3. Enter a name for the site and the URL of your Campaign environment. Don’t use spaces in the remote site name.
4. Press Save.
Add the Engage Reporting Tab
The entire Engage reports with customized styling can be added to the Salesforce installation. This ensures full integration of Engage Reporting in Salesforce.
All pages and components required are already installed through the package. A custom Salesforce tab pointing to Engage Reporting pages is the only thing that needs to be added.
1. Go to Administration setup/Platform tools/User Interface/ Tabs. The following is displayed:
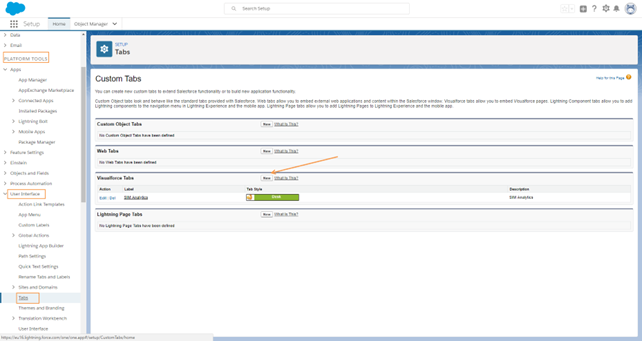
2. Press New within the section Visualforce Tabs.
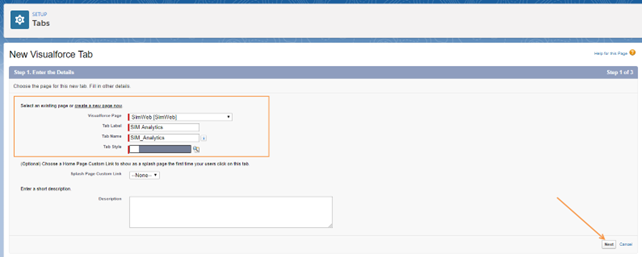
3. Set the following properties
-
Tab Label: SIM Reporting
-
Tab Name: SIM_Analytics
4. Select SIMWeb from the Visualforce Page drop-down list.
5. Select a Tab style.
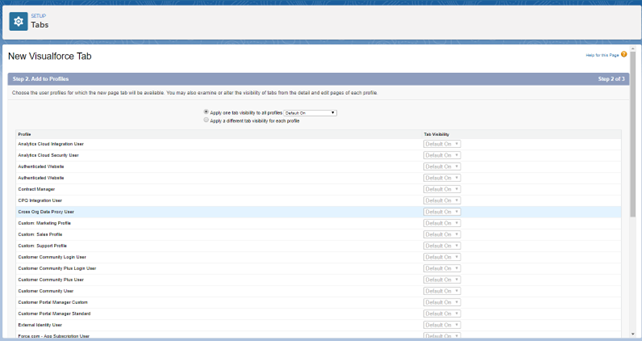
6. Press Next at the bottom of the above page. The following is displayed:
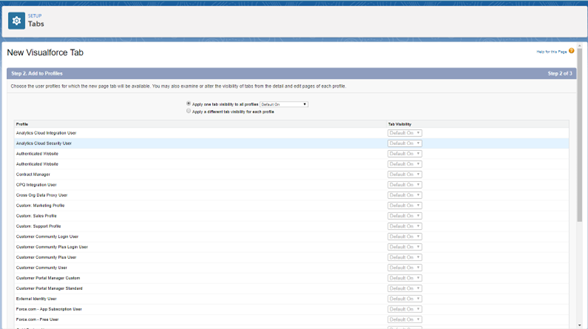
7. On this page, leave the options as they are. Press Next:
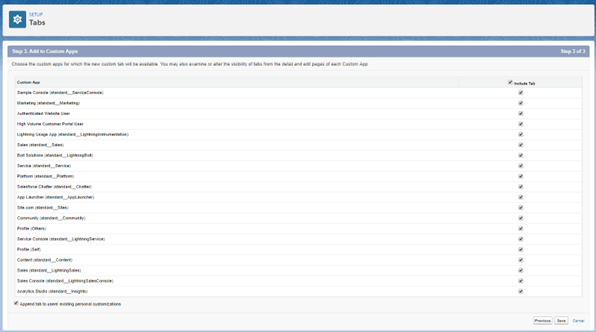
8. On the last screen, press Save.
When these steps are complete you will have a new Tab on every screen which allows you to access the Engage reporting directly from within SalesForce.
Setting up the Integration Manually
Setting up the integration between the CRM environment and the Engage application is done through the execution of the steps described below. Some of these steps are executed on the CRM server others directly within the Engage environment.
Creating a Custom Setting
This step is executed in the CRM application.
1. In Salesforce, from the menu bar at the top navigate to Setup and then in the navigator on the left go to Platform tools/Custom code/Custom Setting and hit the New button.
2. Set the Label and Object Name to SIMSettings. Leave the default properties.
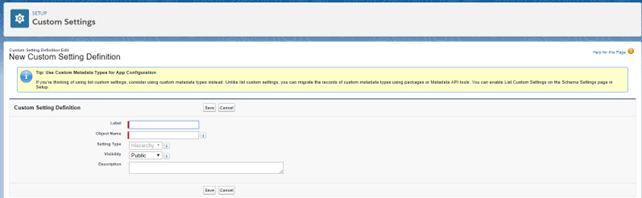
3. Press Save.
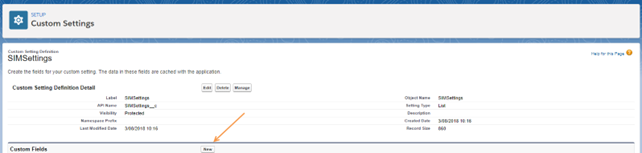
4. Next, Double click the SIMSettings and add the following custom fields by pressing ‘New’ in the Custom fields section.
A wizard guides you through the different steps for the creation of these fields.
| Field Label | Field Name | Type/Length |
| SIMAuthURL | simauthurl_c | nvarchar(255) |
| SIMURL | simurl_c | nvarchar(255) |
| SIMUser | simuser_c |
nvarchar(100) |
| SIMPassword | simpassword_c |
nvarchar(100) |
| SIMInstanceName | siminstancename_c |
nvarchar(255) |
Example:
- Select first the type of field.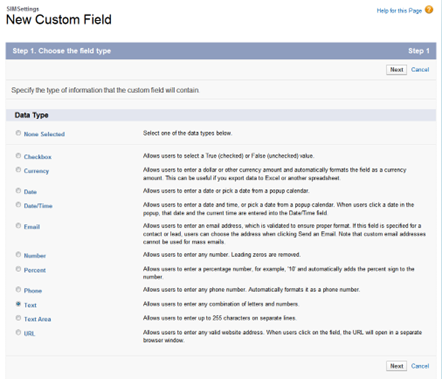
- When done, press Next: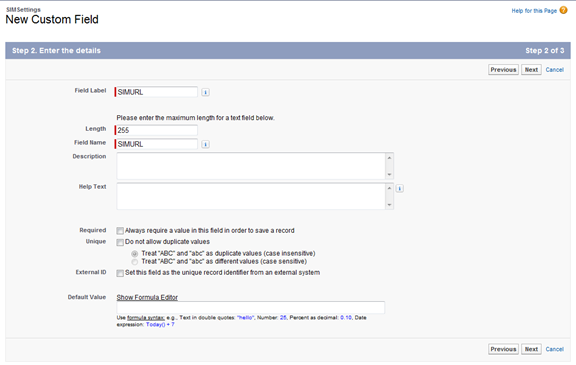
- Define the label, Field name and length of the field. Note that the Field name is the same as the label. Salesforce adds ‘_ c’ to the field name once created. Press Next.
- On the last screen, verify the information entered and press Save. The result looks as follows: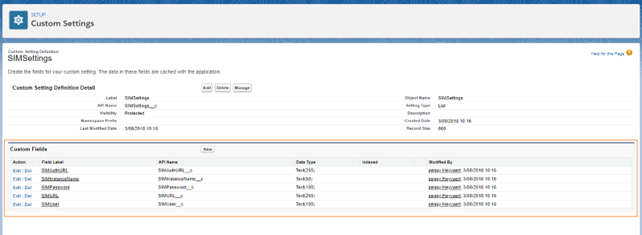
5. Next, create one record with Engage (Selligent) Login/Url data. To do so, press the button Manage from within the SIMSettings.
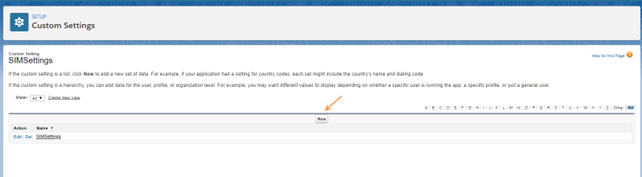
6. On the above screen, press New. A window is displayed in which the following parameters are to be set:
Technical note: The SIMUser and SIMPassword fields correspond to those created in step 1 where a Engage user has been configured.
The urls corresponds to the installation of Engage .
The Instancename entered here must correspond to the name of the instance created in Engage in one of the following steps. Remember it to reuse it later.
7. Press Save.
Create Remote Site Setting
1. In this step the Engage Reporting url is added to the remote site settings. To do so go to Administration setup/Settings/Security /Remote site settings:
2. Press the button New Remote Site. The following is displayed:
3. Enter a name for this site and the URL of Engage Reporting. Note not to use spaces in the remote site name.
4. Press Save.
Configuring the Contact Page
1. Create a new Apex-page. Therefore, go to Platform Tools/Custom code/Apex classes.
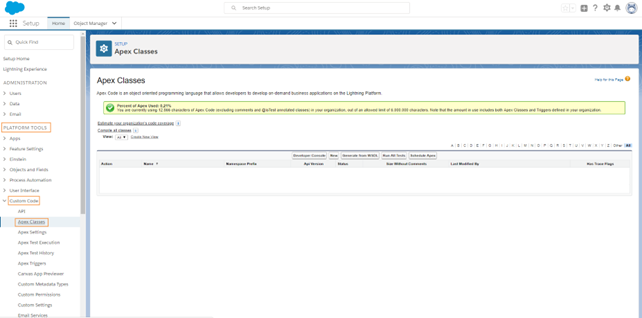
2. Press New.
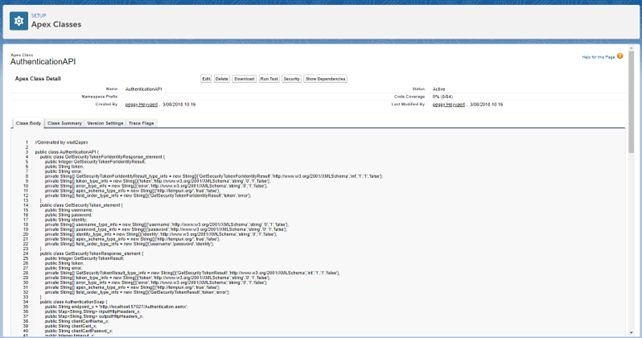
3. Create an AuthenticationAPI apex class by pasting the following code in the body (This code can also be found in the file AuthenticationAPI.txt.):
public class AuthenticationAPI {
    public class GetSecurityTokenForIdentityResponse_element {
        public Integer GetSecurityTokenForIdentityResult;
        public String token;
        public String error;
        private String[] GetSecurityTokenForIdentityResult_type_info = new String[]{'GetSecurityTokenForIdentityResult','http://www.w3.org/2001/XMLSchema','int','1','1','false'};
        private String[] token_type_info = new String[]{'token','http://www.w3.org/2001/XMLSchema','string','0','1','false'};
        private String[] error_type_info = new String[]{'error','http://www.w3.org/2001/XMLSchema','string','0','1','false'};
        private String[] apex_schema_type_info = new String[]{'http://tempuri.org/','true','false'};
        private String[] field_order_type_info = new String[]{'GetSecurityTokenForIdentityResult','token','error'};
    }
    public class GetSecurityToken_element {
        public String username;
        public String password;
        public String identity;
        private String[] username_type_info = new String[]{'username','http://www.w3.org/2001/XMLSchema','string','0','1','false'};
        private String[] password_type_info = new String[]{'password','http://www.w3.org/2001/XMLSchema','string','0','1','false'};
        private String[] identity_type_info = new String[]{'identity','http://www.w3.org/2001/XMLSchema','string','0','1','false'};
        private String[] apex_schema_type_info = new String[]{'http://tempuri.org/','true','false'};
        private String[] field_order_type_info = new String[]{'username','password','identity'};
    }
    public class GetSecurityTokenResponse_element {
        public Integer GetSecurityTokenResult;
        public String token;
        public String error;
        private String[] GetSecurityTokenResult_type_info = new String[]{'GetSecurityTokenResult','http://www.w3.org/2001/XMLSchema','int','1','1','false'};
        private String[] token_type_info = new String[]{'token','http://www.w3.org/2001/XMLSchema','string','0','1','false'};
        private String[] error_type_info = new String[]{'error','http://www.w3.org/2001/XMLSchema','string','0','1','false'};
        private String[] apex_schema_type_info = new String[]{'http://tempuri.org/','true','false'};
        private String[] field_order_type_info = new String[]{'GetSecurityTokenResult','token','error'};
    }
    public class AuthenticationSoap {
        public String endpoint_x = 'http://localhost:57027/Authentication.asmx';
        public Map<String,String> inputHttpHeaders_x;
        public Map<String,String> outputHttpHeaders_x;
        public String clientCertName_x;
        public String clientCert_x;
        public String clientCertPasswd_x;
        public Integer timeout_x;
        private String[] ns_map_type_info = new String[]{'http://tempuri.org/', 'AuthenticationAPI'};
        public AuthenticationAPI.GetSecurityTokenForIdentityResponse_element GetSecurityTokenForIdentity(String username,String password,String identity) {
            AuthenticationAPI.GetSecurityTokenForIdentity_element request_x = new AuthenticationAPI.GetSecurityTokenForIdentity_element();
            AuthenticationAPI.GetSecurityTokenForIdentityResponse_element response_x;
            request_x.username = username;
            request_x.password = password;
            request_x.identity = identity;
            Map<String, AuthenticationAPI.GetSecurityTokenForIdentityResponse_element> response_map_x = new Map<String, AuthenticationAPI.GetSecurityTokenForIdentityResponse_element>();
            response_map_x.put('response_x', response_x);
            WebServiceCallout.invoke(
              this,
              request_x,
              response_map_x,
              new String[]{endpoint_x,
              'http://tempuri.org/GetSecurityTokenForIdentity',
              'http://tempuri.org/',
              'GetSecurityTokenForIdentity',
              'http://tempuri.org/',
              'GetSecurityTokenForIdentityResponse',
              'AuthenticationAPI.GetSecurityTokenForIdentityResponse_element'}
            );
            response_x = response_map_x.get('response_x');
            return response_x;
        }
        public AuthenticationAPI.GetSecurityTokenResponse_element GetSecurityToken(String username,String password,String identity) {
            AuthenticationAPI.GetSecurityToken_element request_x = new AuthenticationAPI.GetSecurityToken_element();
            AuthenticationAPI.GetSecurityTokenResponse_element response_x;
            request_x.username = username;
            request_x.password = password;
            request_x.identity = identity;
            Map<String, AuthenticationAPI.GetSecurityTokenResponse_element> response_map_x = new Map<String, AuthenticationAPI.GetSecurityTokenResponse_element>();
            response_map_x.put('response_x', response_x);
            WebServiceCallout.invoke(
              this,
              request_x,
              response_map_x,
              new String[]{endpoint_x,
              'http://tempuri.org/GetSecurityToken',
              'http://tempuri.org/',
              'GetSecurityToken',
              'http://tempuri.org/',
              'GetSecurityTokenResponse',
              'AuthenticationAPI.GetSecurityTokenResponse_element'}
            );
           response_x = response_map_x.get('response_x');
            return response_x;
        }
    }
    public class GetSecurityTokenForIdentity_element {
        public String username;
        public String password;
        public String identity;
        private String[] username_type_info = new String[]{'username','http://www.w3.org/2001/XMLSchema','string','0','1','false'};
        private String[] password_type_info = new String[]{'password','http://www.w3.org/2001/XMLSchema','string','0','1','false'};
        private String[] identity_type_info = new String[]{'identity','http://www.w3.org/2001/XMLSchema','string','0','1','false'};
        private String[] apex_schema_type_info = new String[]{'http://tempuri.org/','true','false'};
        private String[] field_order_type_info = new String[]{'username','password','identity'};
    }
}
4. Press Save.
5. Next, create another apex class by clicking New and pasting the following code in the body (This code can also be found in the file SIMController.txt.):
public with sharing class SIMController
{
    private ApexPages.StandardController controller;
    private String url;
    private SIMSettings__c m_Settings = SIMSettings__c.getInstance('SIMSettings');
    public SIMController(ApexPages.StandardController pController)
    {
      this.controller = pController;
    }
    public String getUrl()
    {
        this.url = m_Settings.SIMURL__c + '/proxy.aspx?objecttype=CRMREQUEST&tablename=' +
                   this.controller.getRecord().getsObjectType().getDescribe().getName() + '&recordid=' +
                   controller.getRecord().get('Id');
        if(m_Settings.SIMInstanceName__c != null)
        {
            this.url += '&instancename=' + m_Settings.SIMInstanceName__c;
        }
        String lang = UserInfo.getLanguage();
        lang = lang.subString(0, 2);
        this.url += '&LANG=' + lang;
        Cookie simactive = ApexPages.currentPage().getCookies().get('simactive');
        if(simactive != null)
        {
            String ckval = simactive.getValue();
            List<String> lstCkval = ckval.split('|', 2);
            if(lstCkval.Size() == 2)
            {
                if(lstCkval[0] != UserInfo.GetSessionId() ||
                   lstCkval[1] != ApexPages.currentPage().getParameters().get('id'))
                {
                    simactive = null;
                }
            }
            else
                simactive = null;
        }
        if(simactive == null)
        {
            // Call URL for token… (webservice op basis van url/login/pwd
            string username = m_Settings.SIMUser__c;
            string pwd = m_Settings.SIMPassword__c;
            AuthenticationAPI.AuthenticationSoap ss = new AuthenticationAPI.AuthenticationSoap();
            ss.endpoint_x = m_Settings.SIMAuthURL__c;
            AuthenticationAPI.GetSecurityTokenResponse_element res =
                                      ss.GetSecurityToken(username, pwd, UserInfo.getUserName());
            if(0 == res.GetSecurityTokenResult)
            {
                this.url += '&token=' + res.token;
                simactive = new Cookie('simactive',UserInfo.GetSessionId() + '|' +
                            ApexPages.currentPage().getParameters().get('id'),null,-1,false);
              ApexPages.currentPage().setCookies(new Cookie[]{simactive});
            }
            else
            {
                System.debug(Logginglevel.ERROR, res.error);
            }
        }
        return this.url;
    }
    public String getSimUrl()
    {
      return m_Settings.SIMURL__c;
    }
    }
6. Press Save. This new class will be saved with name ‘SIMController’.
7. Next, create a third Apex class by pressing New and pasting the following code in the body (This code can also be found in the file SIMControllerSimWeb.txt):
public with sharing class SIMControllerSimWeb
{
    private ApexPages.StandardController controller;
    private String url;
    private SIMSettings__c m_Settings = SIMSettings__c.getInstance('SIMSettings');

    public SIMControllerSimWeb(ApexPages.StandardController pController)
    {
      this.controller = pController;
    }

    public String getUrl()
    {
        this.url = m_Settings.SIMURL__c + '/proxy.aspx?objecttype=CRMSIMWEBLOGINREQUEST';

        string username = m_Settings.SIMUser__c;
        string pwd = m_Settings.SIMPassword__c;

        // Call URL for token…
        // .. webservice
        AuthenticationAPI.AuthenticationSoap ss = new AuthenticationAPI.AuthenticationSoap();
        ss.endpoint_x = m_Settings.SIMAuthURL__c;
        AuthenticationAPI.GetSecurityTokenForIdentityResponse_element res =
                      ss.GetSecurityTokenForIdentity(username, pwd, UserInfo.getUserName());
        if(0 == res.GetSecurityTokenForIdentityResult)
        {
           this.url += '&token=' + res.token;
        }
        else
        {
           System.debug(Logginglevel.ERROR, res.error);
        }

        System.debug(this.url);
        return this.url;
    }

    public String getSimUrl()
    {
      return m_Settings.SIMURL__c;
    }
}
8. Press Save. The class is saved with name SimControllerSimWeb.
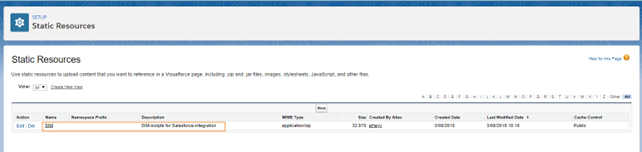
9. The next step consists of the upload of static resources. To do so, go to Platform Tools/Custom code/Static resources.
10. Press New.
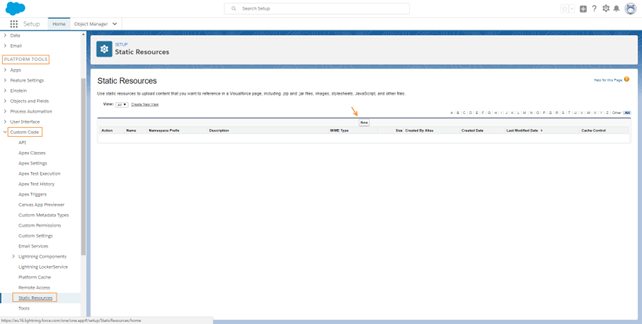
11. Upload the file SIM.zip.
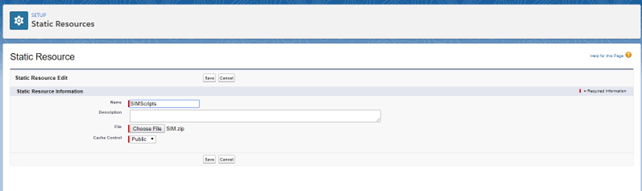
12. Make sure to set the cache control to Public
The zip file contains a folder ‘js’. In this folder there are 2 files:
-
Sim4Salesforce.js
-
Jquery-1.6.min.js
Note: The latest production version of this library can be downloaded from the jQuery website at http://docs.jquery.com/Downloading_jQuery.
Making Engage Reporting Available in CRM
1. Go to Platform tools/Custom code/Visualforce Pages/New.
2. Set the following properties for the new page:
-
Label: SimWeb
-
Name: SimWeb
3. Paste the following code within the Visualforce Markup section
<apex:page standardController=”Contact” extensions=”SIMControllerSimWeb”>
<apex:includeScript value=”{!URLFOR($Resource.SIMScripts, ‘/js/jquery-1.6.min.js’)}”  />
 <apex:pageBlock >
<iframe id=”SimWebFrame” scrolling=”no” height=”40px” width=”100%” frameborder=”0”></iframe>
</apex:pageBlock>
<script type=”text/javascript”>
    var j$ = jQuery.noConflict();
    j$(“#SimWebFrame”).attr(“src”, “{!url}&crmglobal=s4ce&domain=” + encodeURIComponent(location.protocol + ‘//’ + location.hostname));
        j$(‘.zen-tabMenu’).find(‘.zen-active’).removeClass(‘zen-active primaryPalette’);
    j$(“a[title=’Selligent Reporting Tab’]”).parents(“li”»).addClass(“currentTab primaryPalette”);
</script>
</apex:page>
4. Press Save.
5. Next, go to Platform Tools/User Interface/Tabs.
The following is displayed :
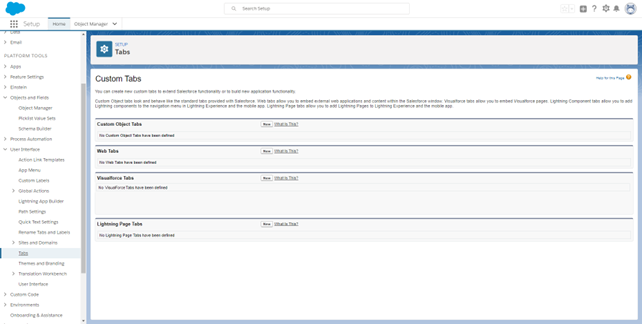
6. Within the section Visualforce Tabs press New:
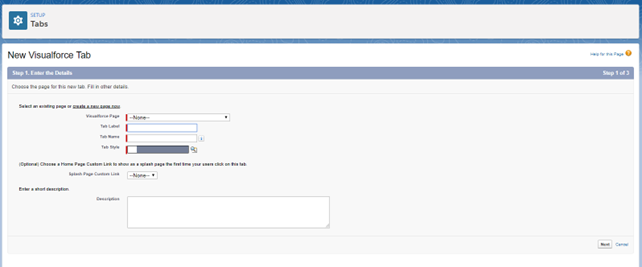
7. Set the following properties:
-
Tab Label: Engage Reporting
-
Tab Name: SIM_Analytics
8. Select SIMWeb from the Visualforce Page drop-down list.
9. Select a Tab style.
10. Press Next at the bottom of the above page. The following is displayed:
11. On this page, leave the options as they are. Press Next:

12. On the last screen, press Save.
