What's New in Selligent MC
Release 2020 Nungu
Watch the release video to get a global overview of what is new in the Nungu release.

Admin Configuration
Folder Rights
Folders and subfolders are used to group assets like content, journeys and lists and provide a clean and understandable structure for marketers to store assets.
Folder rights is a feature that needs to be activated explicitly for your environment.
In this release, users can be given access to specific folders and subfolders. For the user to benefit from these folder rights a permission needs to be set:
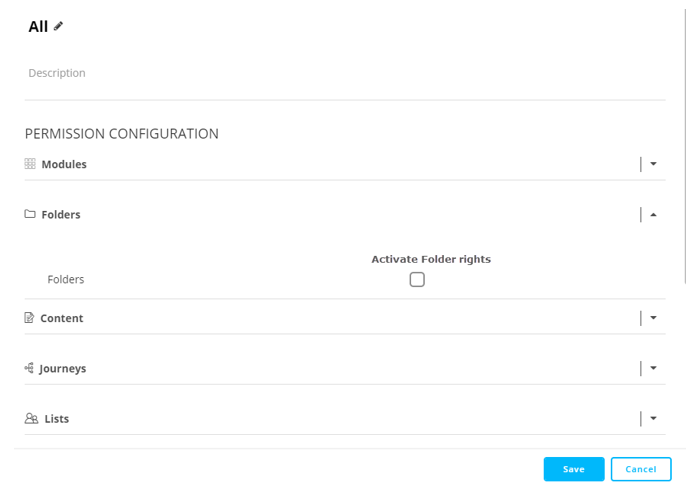
The following rules apply when assigning folder rights:
- When selecting a folder, all subfolders are automatically selected. You can then unselect subfolders one by one to give access to only some of the subfolders
- When selecting a subfolder, all parent folders are selected automatically. These folders cannot be unselected.
- When unselecting a parent folder, all subfolders are automatically unselected. You can't have access to a subfolder if you don't have access to the parent folder.
- If the folder rights feature has not been activated for your environment, all groups will have access to all folders. (This is the default behavior in all previous releases.)
- If the folder rights feature has been activated for your environment, but the 'Activate Folder Rights' permission has not been set for a group, that group will continue to have access to all folders.
- If the folder rights feature has been activated for your environment, and the 'Activate Folder Rights' permission has been set on a group, that group will by default only have access to the root folder until specific folders have been selected. Having access to a folder gives the user access to all assets in that folder.
Configuration of folder rights for a group is done from the Admin Configuration, through Access Management.

Select Groups in the second level navigation to display the overview of all groups and then select an existing group for which to configure the Folder rights. You can also create a new group.
When a group is selected, the right sliding panel provides a Folder rights tab where you can configure access to folders and subfolders for the selected organization. If the Folder rights permission is not active for a given organization, the user is informed and can activate this permission directly from this panel.
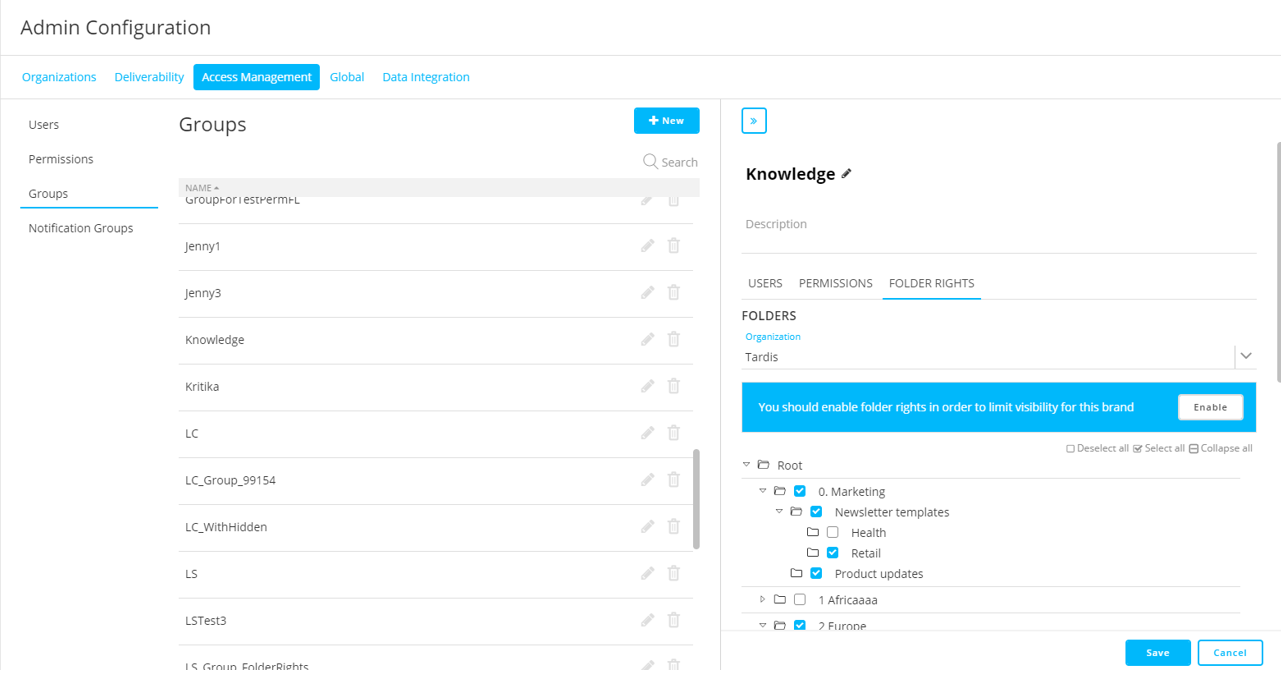
Click the Enable button in this message to activate the permission. A pop-up describes the impact that activating this permission will have, including which permission set the folder rights permission will be activated for. By default, when multiple permission sets exist for the group, the Folder rights permission is set for the one that is linked to the current organization and is linked to the fewest number of other organizations:
![]()
If this is not the desired behavior, you can cancel the activation of the permission and adjust the setting manually in the preferred permission set.
A preview of the Folder rights is available from the User’s profile. Go to Users in the Access Management section and select the user and then folder rights from the top menu.

Setting folder rights has the following impacts on the SMC application.
- Users cannot create assets in folders they do not have access to. These folders are hidden.
- When accessing journeys or content that use assets in folders they do not have access to, the user is informed and will be unable to open the journey or content. For example, accessing a journey using an audience list in a folder to which they have no access.
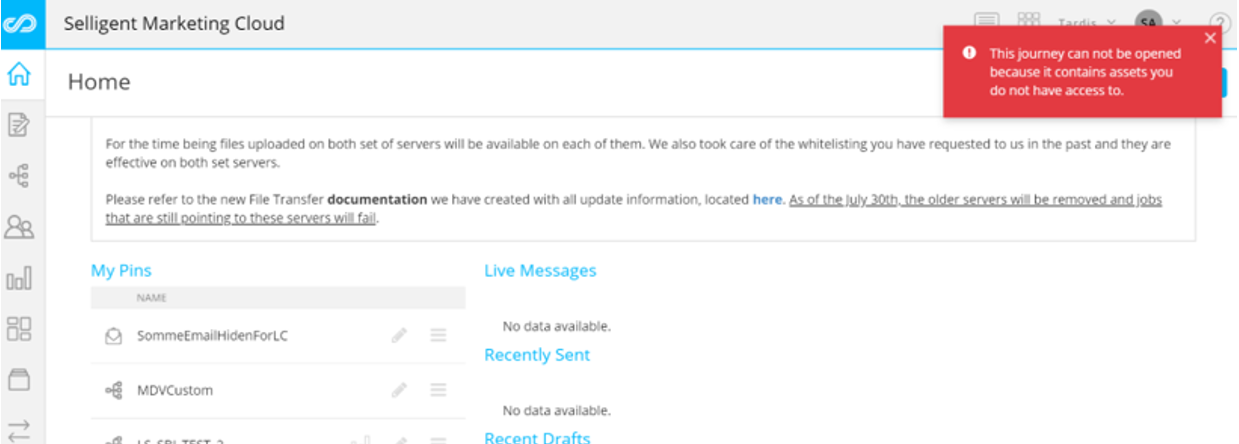
- Also, when creating a journey and selecting a content using assets in a folder with no access, a warning message is displayed, and the content cannot be selected.

- The List Usage dialog provides insight into the journeys and content which use that list. If a user does not have access to the folders in which these journeys or content reside, they will not be listed in the overview. However, the number on the top menu, which indicates the total number of times the list is used in journeys or content, does not take into account folder rights. For example, in the screenshot below, the top menu lists a total of 120 journeys that use this list; but the count of visible journeys in the overview is only 118, and a message indicates that two are hidden.
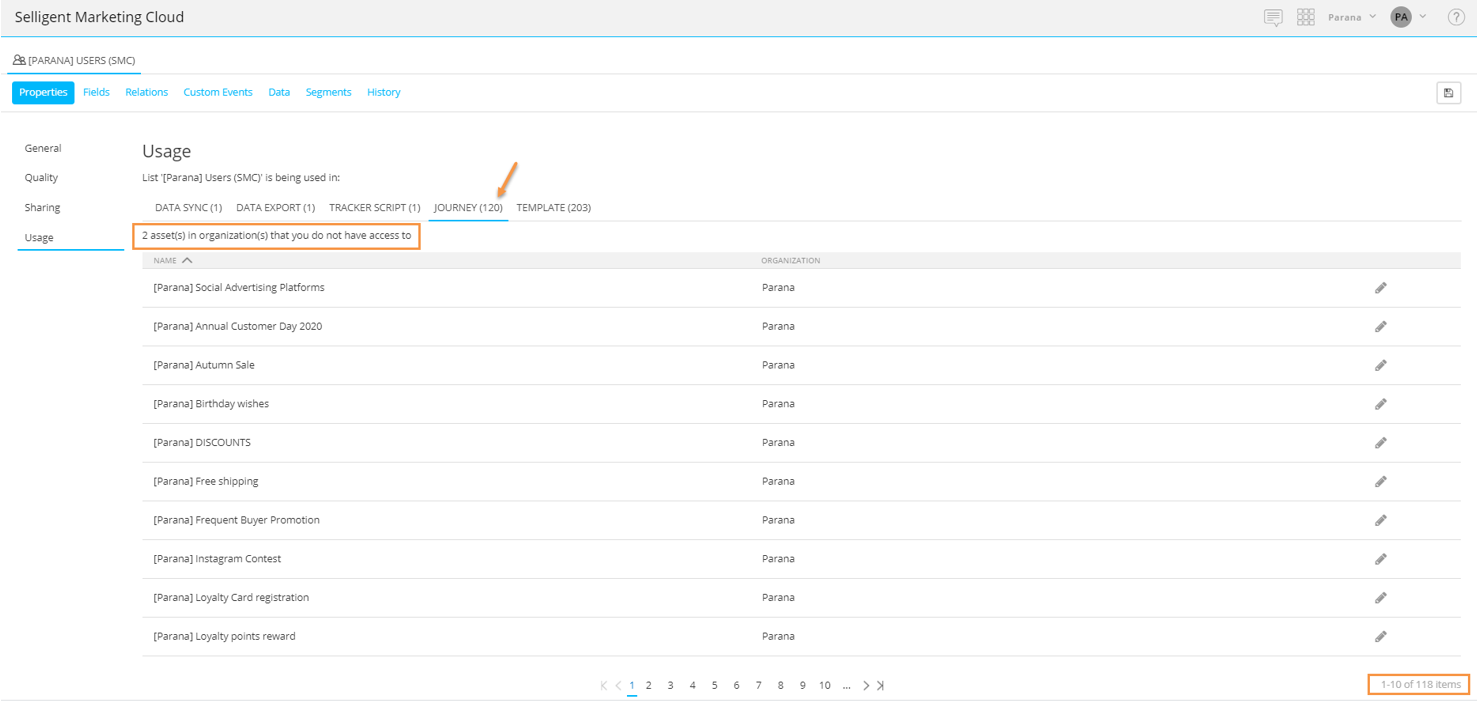
The same applies to the Usage dialogs for Custom Components and Content Blocks. Only assets in folders the user has access to will be listed here.
- When new folders are created, the user and as a result the group, will automatically be given access to this folder. If the user is a member of several groups for the same organization, all these groups will have access to the new folder.
- Fly-out menus, overview pages and selectors only give access to assets in folders the user can access.
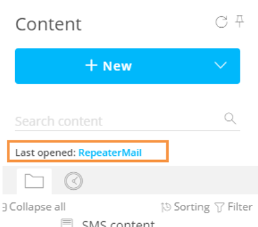
- Recent assets (lists, content, journeys) in the fly-out menu, residing in a folder which the user does not have access to, can’t be clicked. The link is disabled for these assets.
In addition, in the Reports section, you only have access to reports on journeys and their messages that are in folders you have access to.
- For reports on transactional messages only the messages you have access to are visible from the overview, limiting the reporting to only those.
- For reports on Custom Journeys, Recurring Batch Journeys, scheduled messages, Live messages and Recently sent, all assets are shown in the overview; but when you don’t have access to these assets a tooltip is displayed and you will not be able to access the reports.

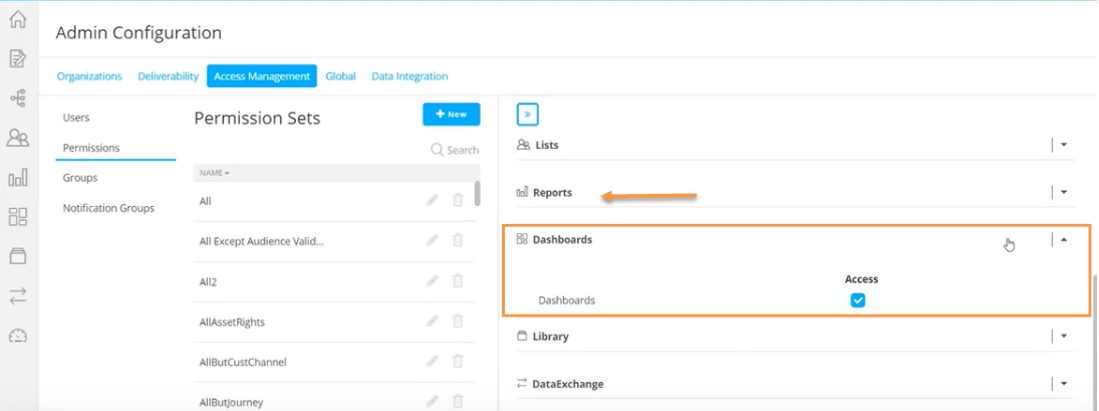
New Permissions for Reporting and Dashboards
Dedicated permissions have been created for Reporting and Dashboards. They are available as 2 distinct permissions when defining a permission set. These settings can be found in the Admin Configuration Access management section
Journeys
Enhancement to canceling a Journey
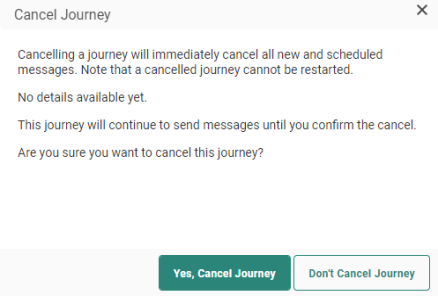
When canceling a journey, the marketer wants to have a view on how many of the emails were already processed. This information is now available from a Cancel Journey dialog displayed after canceling the journey. (canceling of journeys was introduced in the Maypop release.)
There are 3 different situations:
• No processing data is available yet: You can choose to cancel the journey anyway or keep the journey running.
• Some messages have been processed already: A progress bar gives a visual representation of the number of messages that have been sent. You can choose to cancel or keep the journey running.
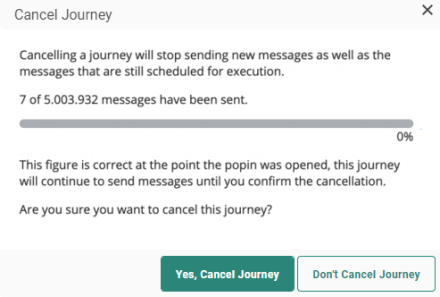
Important to note is that this is a count of the messages sent at the time the Cancel button was pressed. While the dialog is displayed, messages continue to be processed in the background. For small audiences, this may result in all messages being sent before the Cancellation command can be confirmed
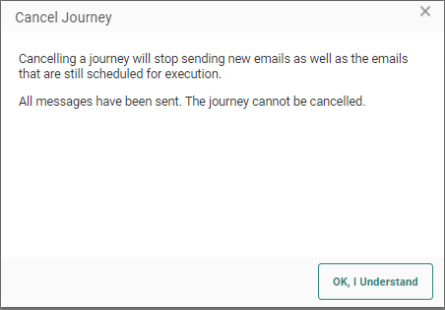
• All messages have been processed: In this case, canceling is no longer possible, and the user is informed.
Pausing Journeys
Pausing of journeys was previously available only for Custom Journeys but is now available as an option for Single Batch, Recurring Batch and AB Journeys. When pausing the journey, links in emails and pages will remain available. Only the sending of messages is paused. While a journey is paused, changes can be made, saved, validated and published. The Journey can then be resumed, and newly processed messages will contain the changed content.
Example:
A Recurring Batch Journey is launched every Saturday. However, when only one email per day is allowed and another journey needs to be executed once on that Saturday, it is now possible to pause this recurring journey for a few days and then resume it again.
The toolbar shows an additional Pause button once the journey has been launched.

Custom AB Journeys
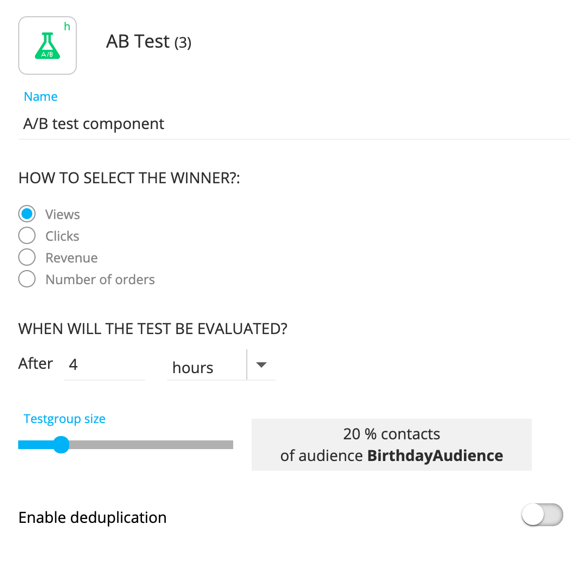
 An AB Journey allows testing different versions (max 7) of a message by sending them to a percentage of the audience so that the version with the best result can be sent automatically to the remaining audience. AB testing can be used for email messages and mobile messages. Not for SMS.
AB Journeys were previously a standalone Journey type, able to be created only through a wizard interface. New for the Nungu release is the possibility to create a Custom Journey with an AB Component, allowing the marketer more options after the test results are handled.
AB testing is a feature that is behind a feature toggle and needs to be activated explicitly for your environment
Example: Two promotional test emails are sent to 20% o the audience. In both cases, when users click the link in the test email, they are redirected to the promotional page.
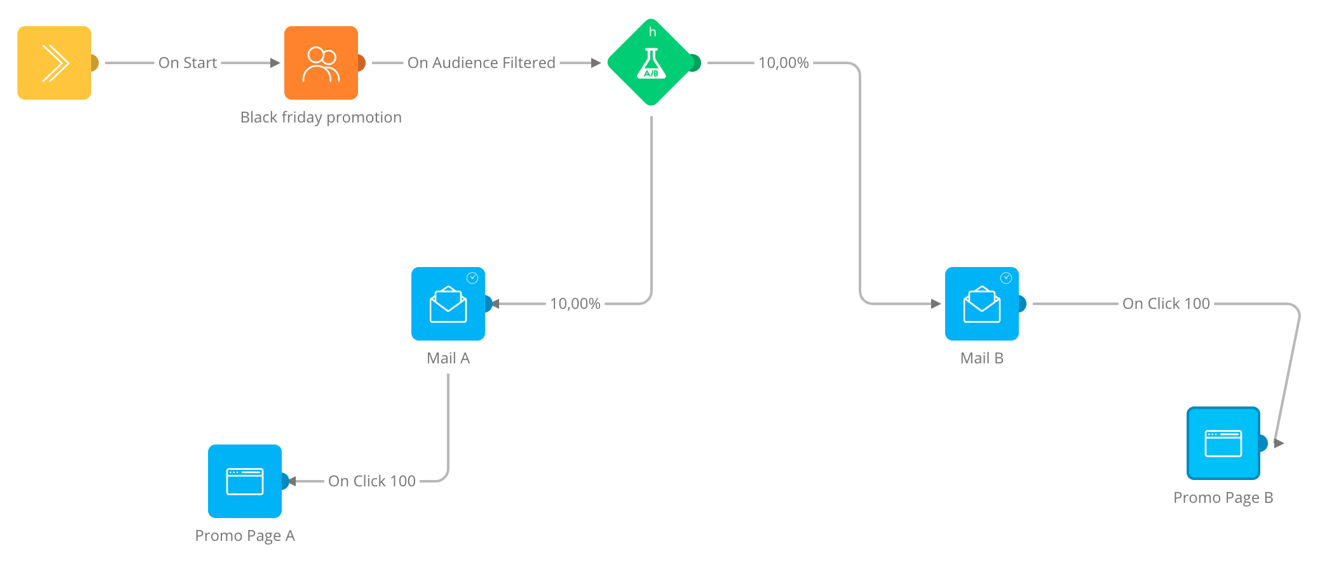
The functionality of the new AB Component has the same capabilities as the existing AB Journey wizard, including the definition of the percentage of the test group size, interval between the test and the selection of a winner, and the criteria to determine the winning version. Compared messages must still be of the same message type.
The winner is indicated with a green dot on the journey canvas.

Content
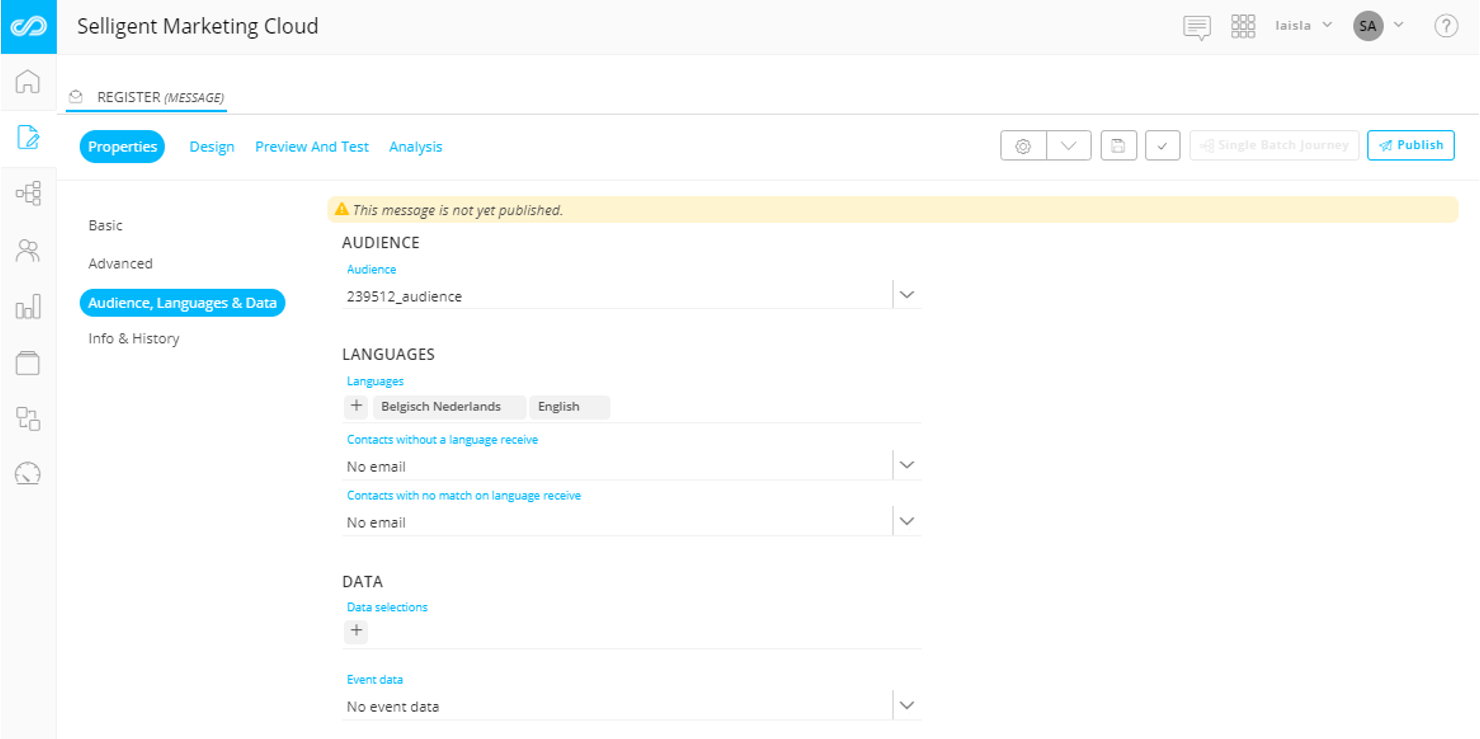
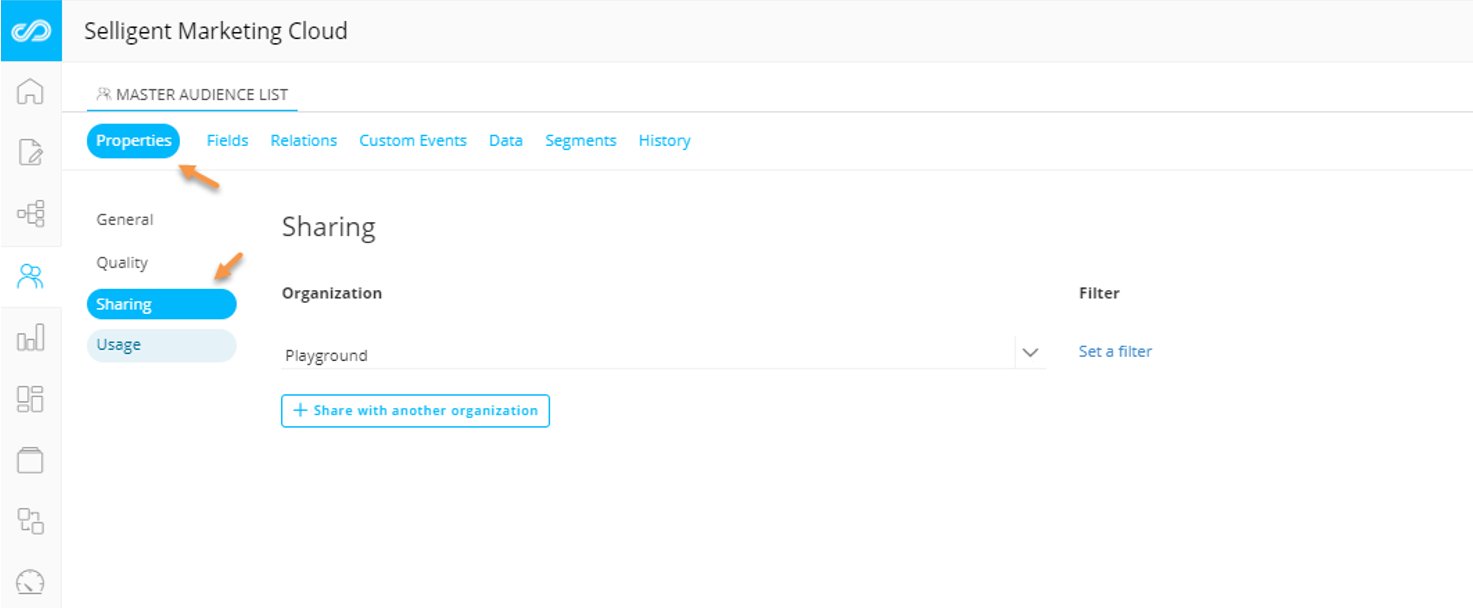
New Properties panel for Content
In the Properties for a message a third level navigation has been added and the properties are now split over multiple pages. All related properties are grouped into entries making updates more intuitive.
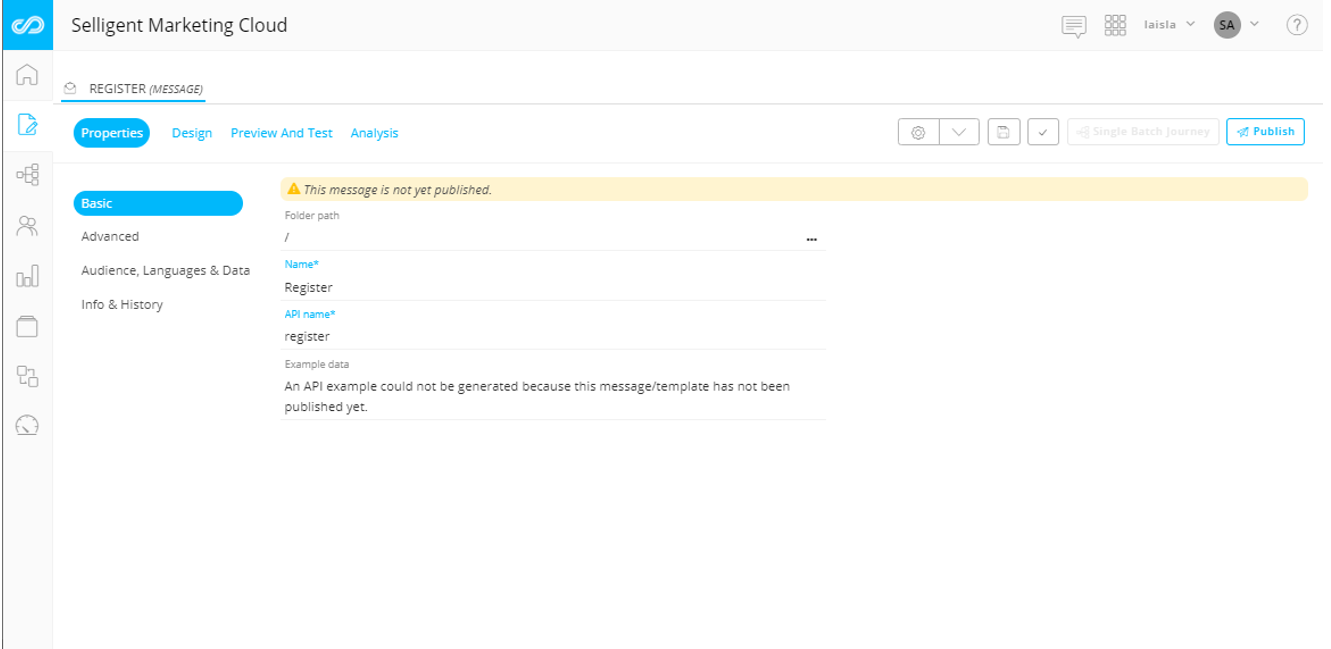
The properties are now grouped by Basic properties, Advanced, Audience, Data and Language related properties and Info and History properties:
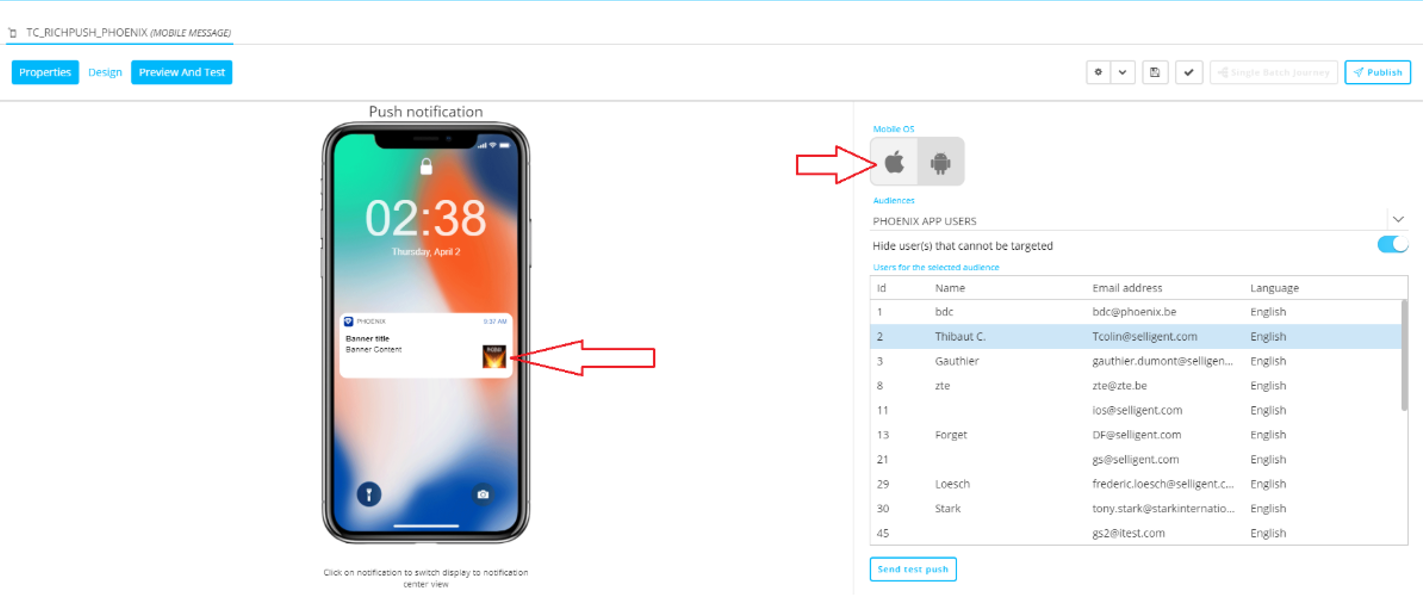
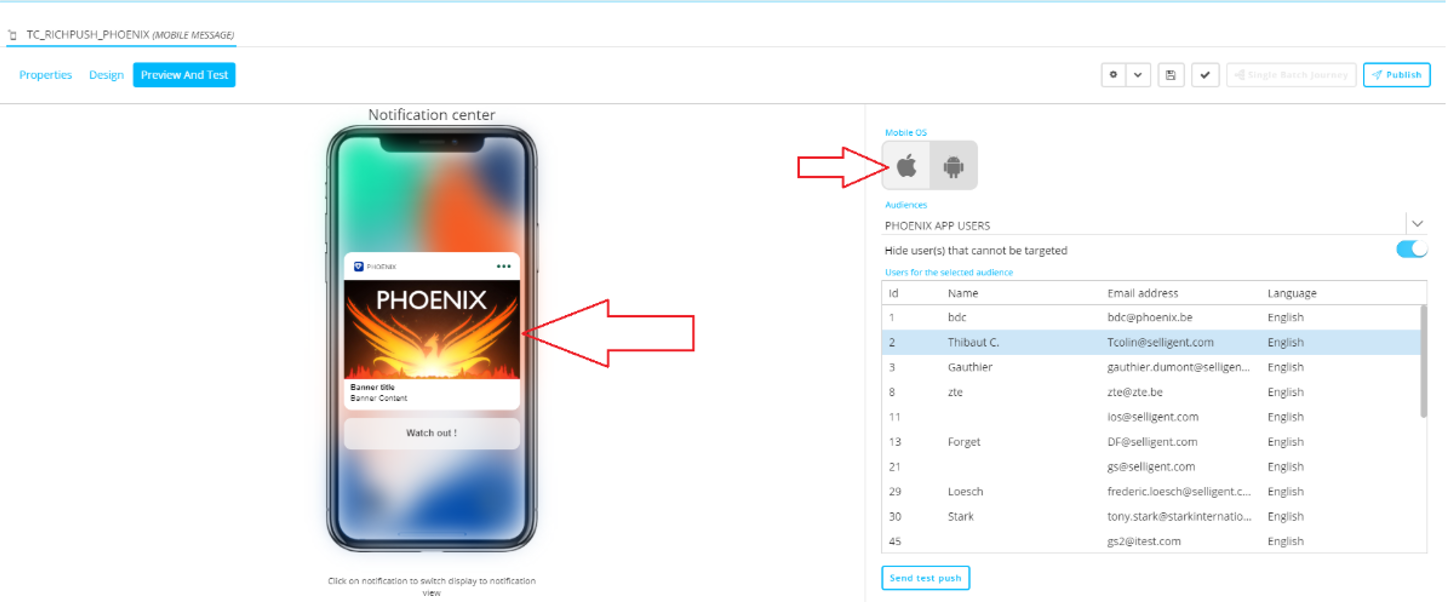
Rich Mobile Push
Previously, Mobile Push notifications could contain only text. New for the Nungu release is the ability to include images.
Important Note: This feature is included in a new version of the SDK and requires the app to be upgraded to this last version.
When designing the Push notification, you can toggle the option to include rich content. Images can then be selected from the library or Live Content, or you can use a Smart Content image.

When a Push notification with image appears on the device, this is what it looks like.
In the Notification center, the result is as follows.
Smart Content Enhancements
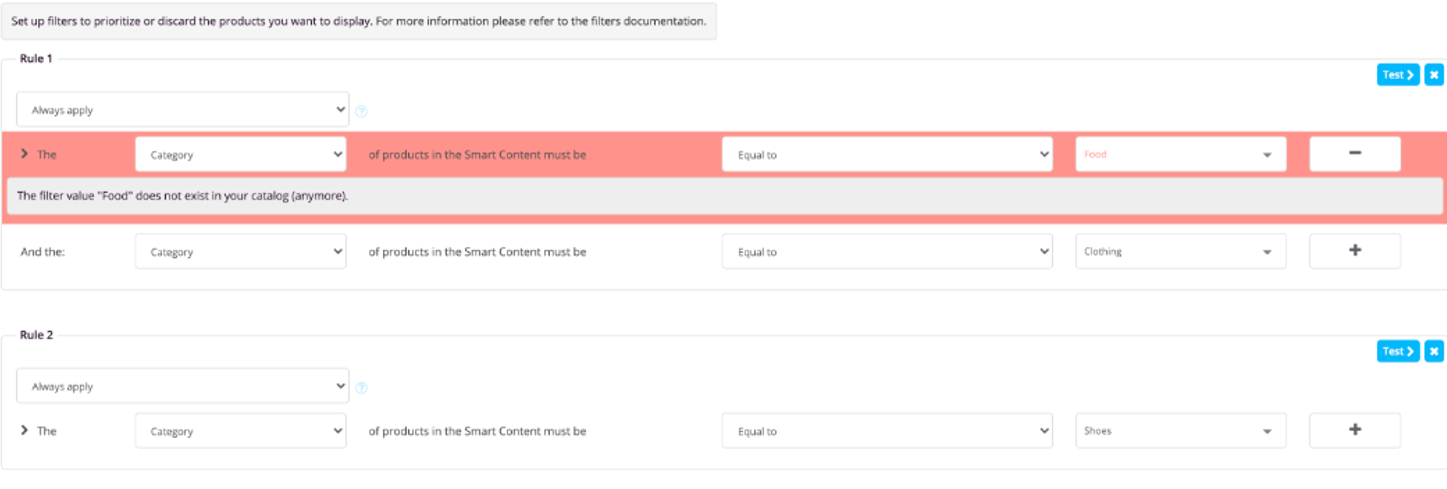
Improved warnings
When changes are made in the Cortex catalog, this can have an impact on the filters configured in Cortex. Now, this is clearly visible from the interface, alerting the user when the filter is broken. The Filter rule is displayed with red borders and the value causing the problem is also displayed in red.
Example: In the filter below, the category value no longer exists in the catalog and is therefore displayed in red.
Changes introduced for Smart Content image size
When defining Smart Content, you were previously required to set the width and height of the image. Now, the width is the only required value. The height is an optional field and can have any value expressed in pixels.
Previously

After
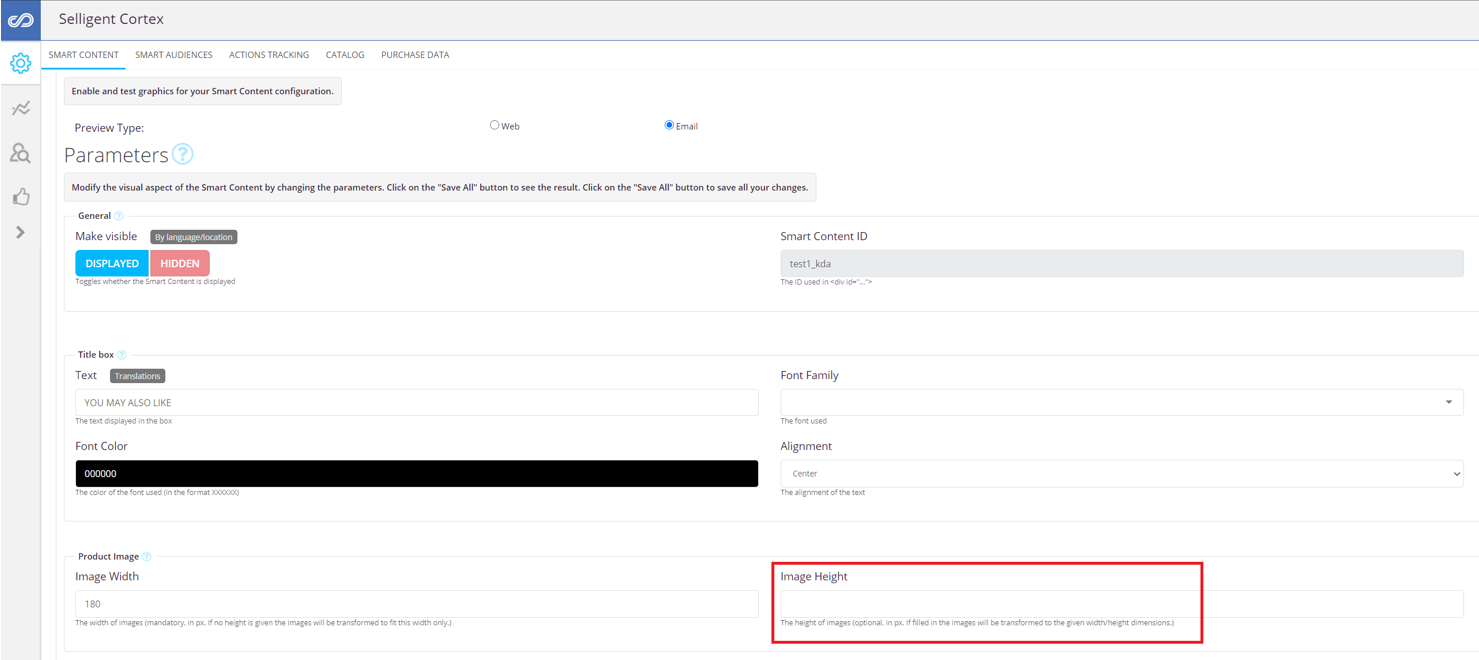
The final image dimensions depend on the dimensions of the original image.
- If only a width is entered and the height is left blank, the image will be resized proportionally to match the desired width.
- If both a width and a height are entered, the image will be resized proportionally against whichever dimension was the longest in the original image. For example, if “100” was entered for both dimensions in the parameters, and the original image was 400 wide by 260 high, the resized image would be 100 wide x 65 high.
Previously

Now
Data Management
Smart Audiences
Smart Audiences are audiences which are built dynamically to ensure that a specific message is only sent to the audience that is most likely to engage with the message. They help you to increase the performance of your campaigns and reduce customer fatigue, and eventually, churn.
Smart Audiences created in Cortex are now also available as static segments in SMC. The segment is linked to the Audience list that is configured in the Site Universe settings for the integration between Site and SMC.
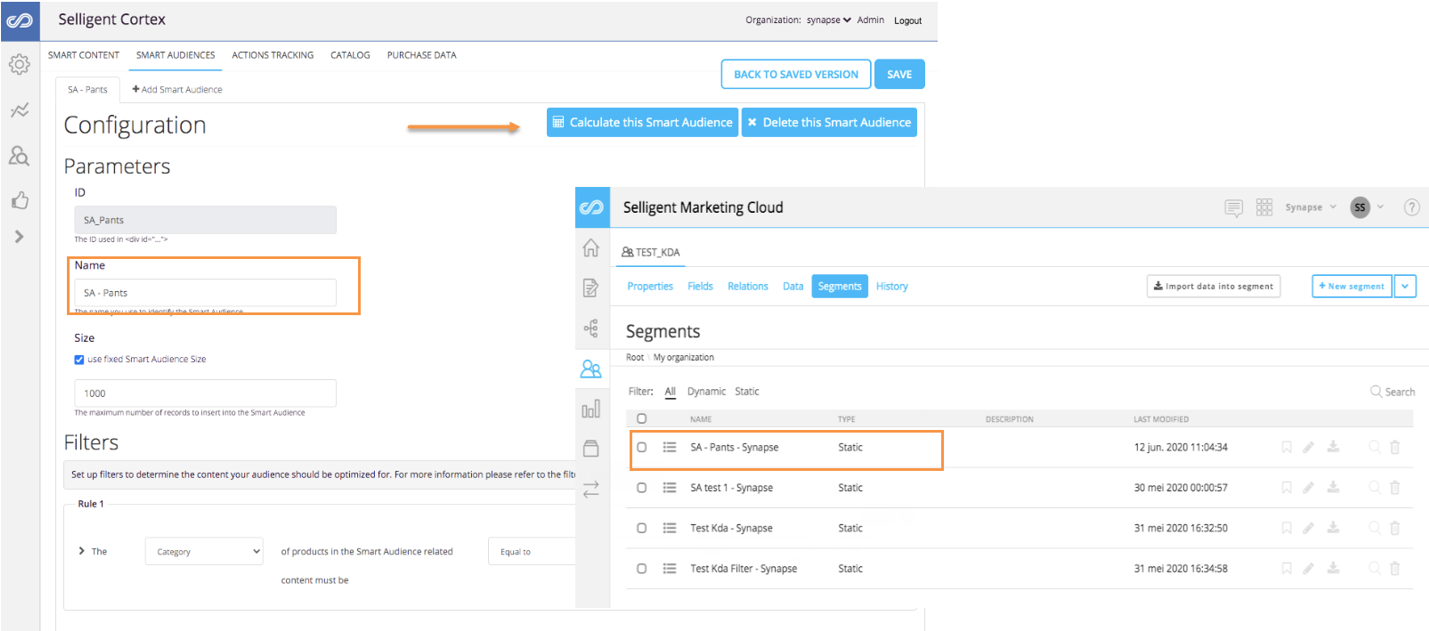
The static segment is created with the same name as the Smart Audience, appended with the organization name.
Fly-out Menu Enhancements
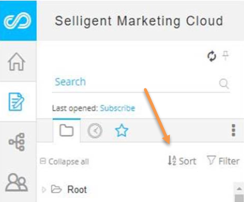
Sorting in fly-out
Folder fly-out menus were previously sorted by last modified date and were not able to be sorted via other methods. You can now find specific assets or folders quicker thanks to the following improvements:
- Sorting by date
- Sorting by alphabetical order
Click the Sort icon to access the different options and select one. The sorting option which was selected is saved from one session to another and visible from the fly-out menu.
Enhanced filtering
The Filter icon now gives access to a drop-down to change the Filter options.
The listed options depend on the current context. You can choose between displaying all assets, all assets in the current context (eg: All content) or a specific type of asset (eg: Templates)
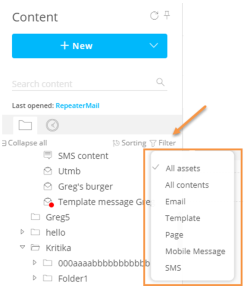
New icons for folders
In the fly-out menu a distinction is made between folders with assets and empty folders. Empty folders are now preceded by the open folder icon:
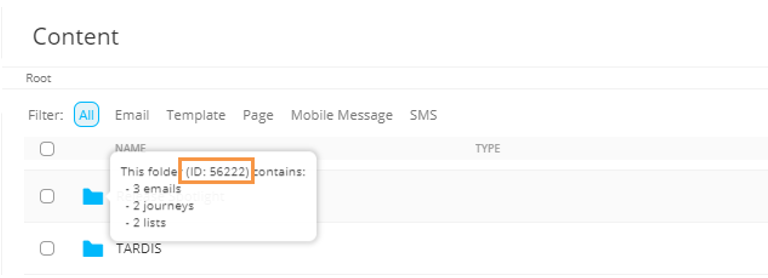
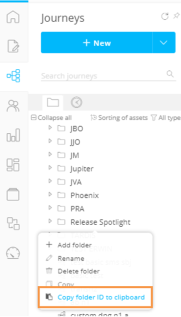
Retrieving the Folder ID
It is now also possible to retrieve the Folder ID from the overview or from the fly-out menu. The Folder ID is required for API functions that require folders to be specified.
Hovering a folder icon in any of the overviews (content, lists, journeys), displays a tooltip with the content of the folder and the Folder ID. Clicking on the Folder ID will copy the ID to the clipboard.
In the fly-out menu, there is now an additional option in the menu that appears when you right-click a folder.
Segment Builder Enhancements
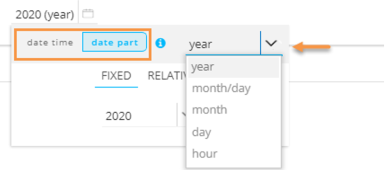
Enhancements have been introduced when using a date in a constraint.
Previously there was a drop-down field to select standard dates, or a specific date part (Year, month/day, month, day, hour):
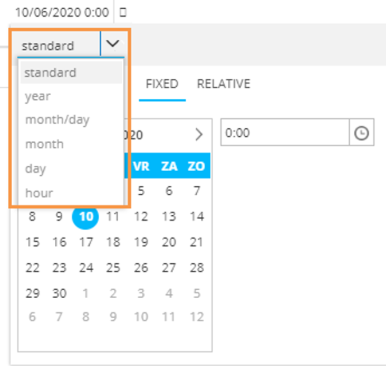
This has now been split up in the following 2 tabs: Date time and Date part. Choosing ‘date time’ presents the calendar picker as before. When choosing ‘date part’ a drop-down field lets you select which date part to use.
When a date part has been selected, the dialog previously looked like this:
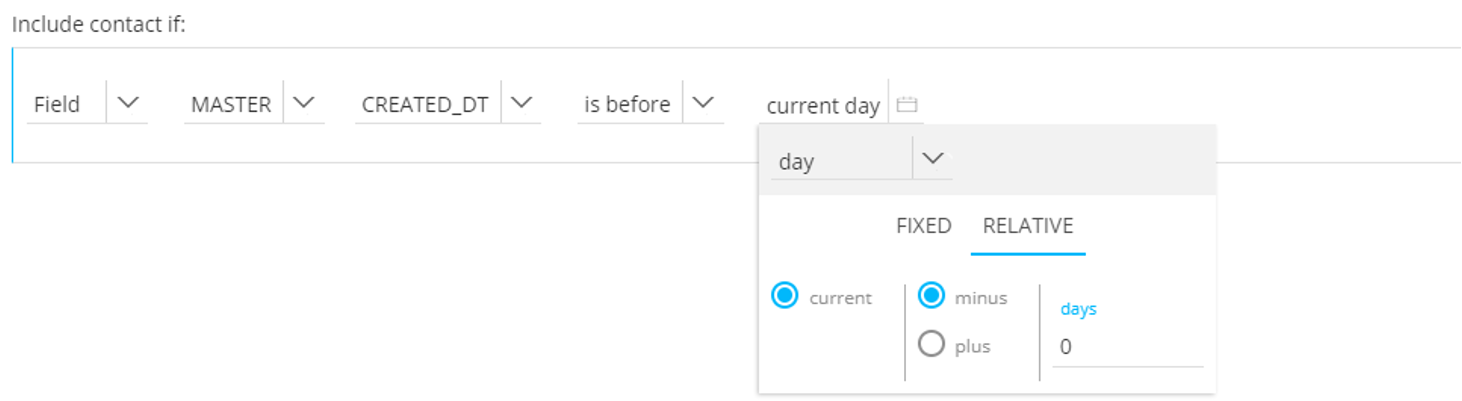
This has now been replaced with the following:
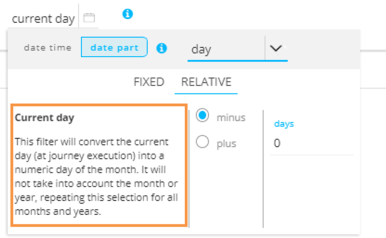
On the left, additional information is provided on what this setting or value does in relation to the selected date part.
Once the settings are configured, an info tooltip at the top provides an explanation of the result of the configured filter.

Data Sync Enhancement
When trying to synchronize data with an SMC list that has a linked list that is not shared with the current organization, the user is not able to select fields from that linked list to include in the synchronization process. In Nungu release, a message is now displayed informing users of the reason why they can’t select the non-shared linked list.
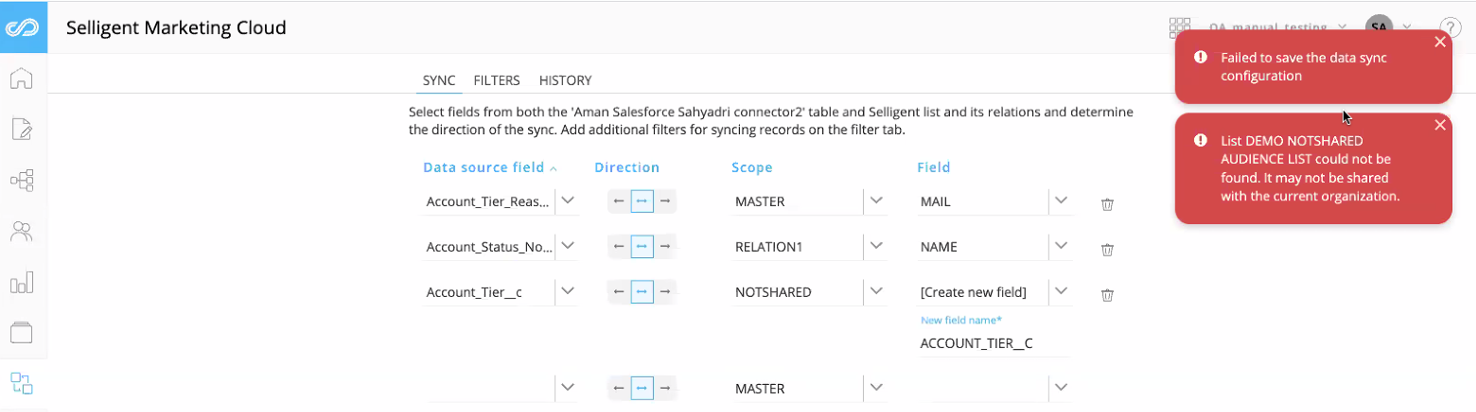
Moreover, the History page of a data sync now clearly indicates with an arrow the direction in which the data sync was performed.
UX
Multiple small changes have been made throughout the SMC UI.
Lighter icons in first level navigation
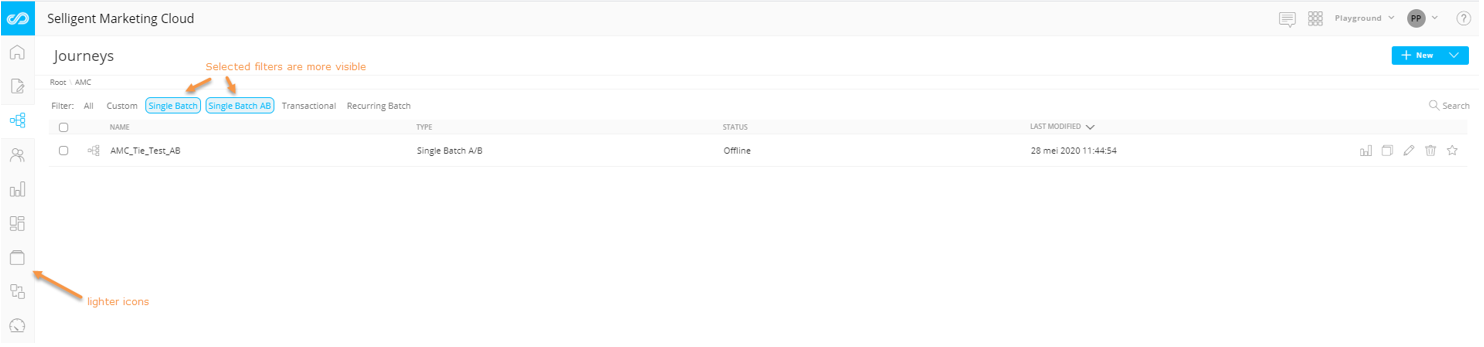
Selected elements are more pronounced, such as the filter buttons in the above screenshot. This is also the case for second and third level navigation:
Action buttons in the toolbar are highlighted more clearly on hover:

API
Several new methods have been added to the API:
- Use the Folder location for single Batch journeys
- Use the Folder location for Content/Email
- Retrieve the folder ID
- Retrieve all dictionaries
- Retrieve a dictionary
- Create a dictionary
- Update a dictionary
- Delete a dictionary
- Retrieve all labels in a dictionary
- Delete a label from the dictionary
- Create a label in the dictionary
Others
Facebook API Update
The Facebook Custom Audience integration is based on the use of the Facebook API. The Nungu release updates the Facebook API to the latest version 7.0 and is required for all users using this Audience integration. The previous version of the API will be deprecated in August 2020.
List Unsubscribe Enhancements
List Unsubscribe is a link automatically added to messages that allows the recipient to optout for all communications over all channels, usually by clicking a button in the interface of their mail client.
Only unsubscribe on POST
In messages with the List Unsubscribe header, users are occasionally wrongly unsubscribed because of spam detection tools testing the links in messages looking for malicious domains. These tests are usually GET requests and should not lead to an unsubscribe of the user. To avoid this, the backend functions have been changed to only accept POST requests, which will restrict unsubscribe actions to valid user clicks.
Possibility to activate/de-activate the List Unsubscribe
It is now also possible to de-activate the List unsubscribe function. When it is de-activated, no List Unsubscribe header is added to the message, allowing you to control the unsubscribe process more finely via in-body links and messaging that directs users to unsubscribe journeys.
Activating/de-activating the link is done in the Advanced properties of the template/message.

Possibility to use a custom journey after a List Unsubscribe
If you wish to keep the List Unsubscribe header active, but still have more control over the user experience, it is now possible to override the standard behavior of the List Unsubscribe and redirect the user to an existing Custom Journey where the List Unsubscribe will be managed.
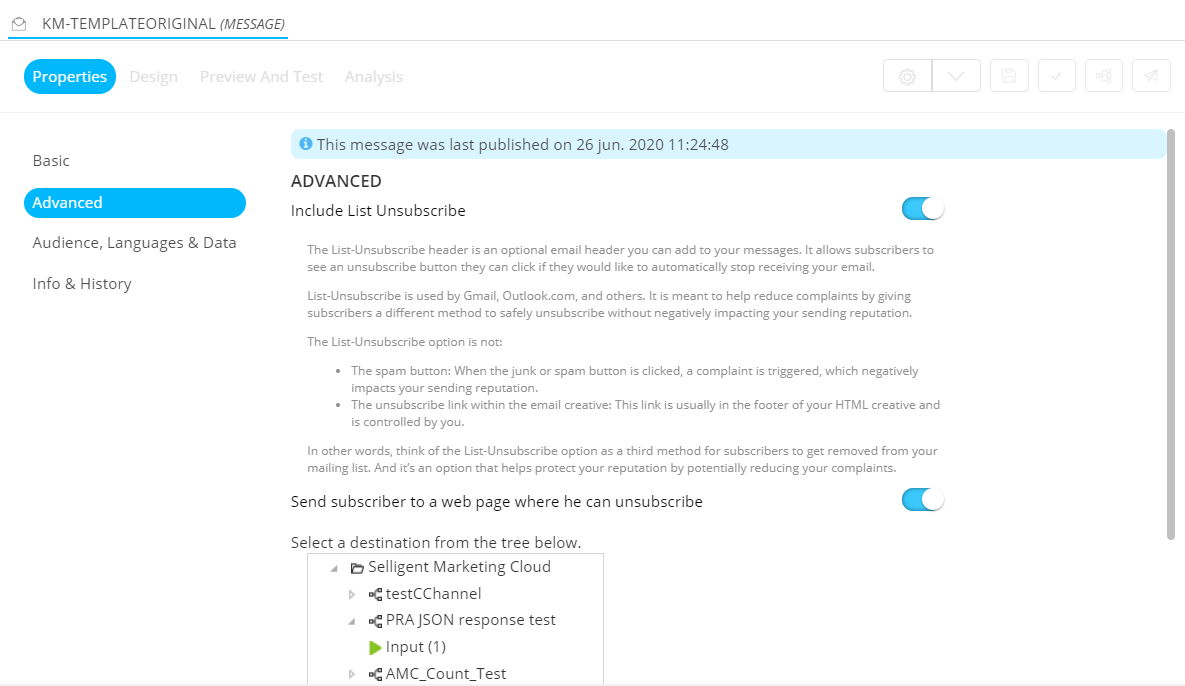
This is done by selecting a Custom Journey with Input Component from the Journey selector.
NOTE: When List Unsubscribe is activated and is clicked by the recipient of the email, it will automatically set the OPTOUT field in de audience list to 9. Meaning, a full optout for all channels and all emails. A typical example of a Custom journey is to reset this OPTOUT field to 0 and manage the optout for a specific newsletter in a dedicated list. This way, this user will only be opted out for a specific newsletter and still receive other communications.
Documentation
A whole series of new learning materials are now available from within the online help.
- The Campaign Basics I and Campaign Basics II self-paced training courses, and Campaign Advanced instructor-led demos have been revised and updated. The Campaign Basics Series courses are introductory in nature and provide a basic understanding of the functionality to users new to the application. The Campaign Advanced demo videos go deeper into specific areas like: viral and product components, action lists, SQL containers, and detailed use cases around templates and forms.
- Lab materials have been provided for Campaign Basics I and II courses so that you can follow along in your own environment.
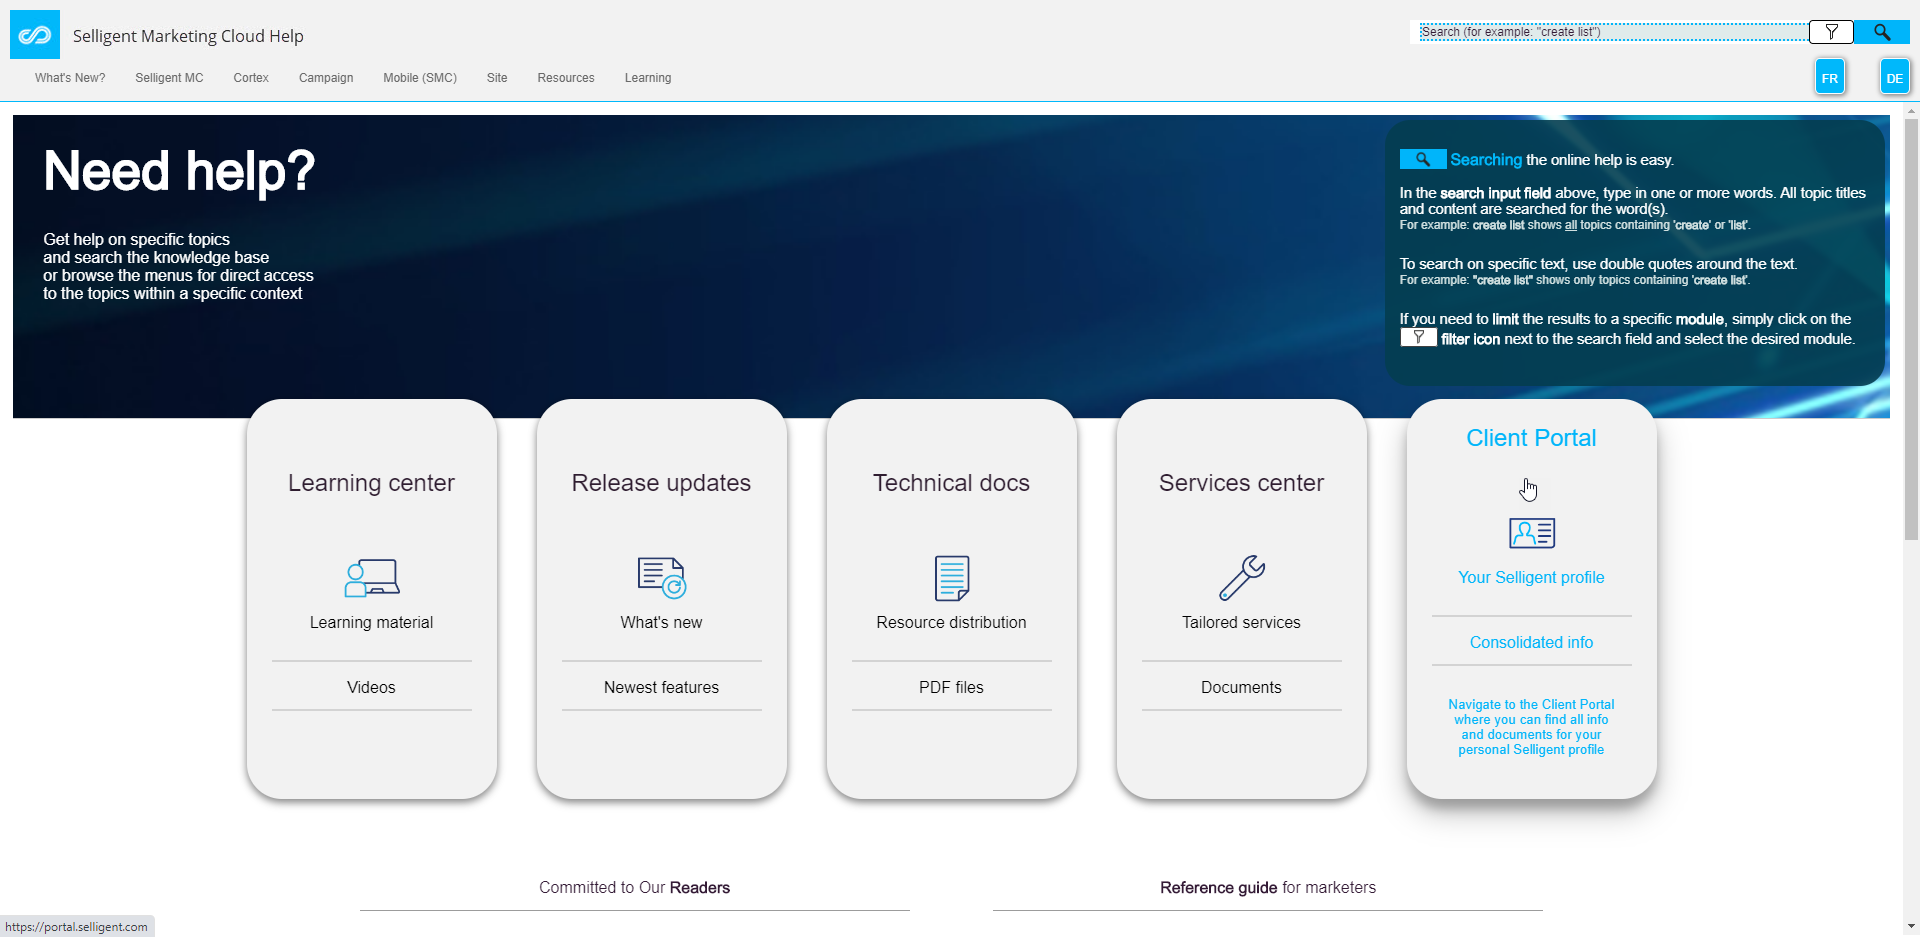
All of this material is available in the Customer Portal and the Online Help Learning Center.

You can now also access to the Client Portal from within the online help:
Corrections
- Saving segments now works correctly
- Improved linktracker loading performance
- 'Nr. of emails viewed' are no longer shown twice in timeplot reporting
- distribution type is now displayed as ‘mobile push’ instead of ‘mobile message'
- [REPORTING][PORTAL] Unsubscribe count is now shown correctly on the heatmap
- Now an error message is shown when saving of a datasync fails
- It is no longer possible to share the same dictionary name & api name with an organization where it already exists
- Creating an import through API now generates the correct task XML
- It is now possible to add a visibility constraint when the configured Custom Event list on the mail contains a datetime field
- Data of DATE field is now filled out in the UI
- Long maildomain names are now correctly wrapped and can be selected from simple combo box list
- Pages with content types application/JSON no longer render unsafe inputs as HTML
- MTA now correctly parses labels for SMC Mobile messages
- When calculating the cadence plan, the Deduplication priority field is now correctly
- TranslateValue function now correctly translates Option List values for mobile messages
- The label for the import data into segment is now correctly displayed.
- In the API, the Lists end point now shows the ID in the right order (at the top)
- The Take Offline button is now also visible when a journey is published
- The datetime displayed in the grey box when a journey is launched, is now in the timezone of the user
- Heatmap data now correctly loaded for SBJ with templates
- It is now possible to retrieve user defined datetime fields with the data/search call
- Content preview now visible on first page when opening a Recurring Batch journey
- Variables in Content Blocks are now correctly listed in the global Variables tab
- It is now possible to edit the email from the Single Batch journey
- Forgot password link no longer allows to enumerate existing user account names
- It is now possible to open or create a segment in ‘My Organization’
- Updating a Custom channel now correctly keeps the dynamic fields
