Splitting the email in Content sections
Cut & paste
To split the email in different Content sections, we are going to cut/paste from the source code into the different sections. The email is structured like this:
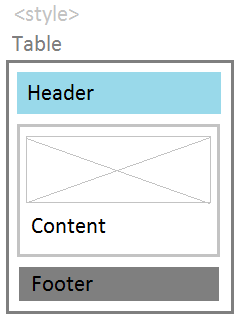
- CSS styling to make the email responsive
- A table around everything with one cell:
<table bgcolor="#F5F5F5" border="0" cellpadding="0" cellspacing="0" width="100%">
<tbody
<tr>
<td align="center">
EVERYTHING ELSE: HEADER, CONTENT AND FOOTER
</td>
</tr>
</tbody>
</table> - The header, middle content part, and a footer
We will create separate sections for:
- CSS styling
- Start of the surrounding table cell:
<table bgcolor="#F5F5F5" border="0" cellpadding="0" cellspacing="0" width="100%">
<tbody
<tr>
<td align="center"> - Header
- Content part: the visual and text
- Footer
- End of the surrounding table cell:
</td>
</tr>
</tbody>
</table>
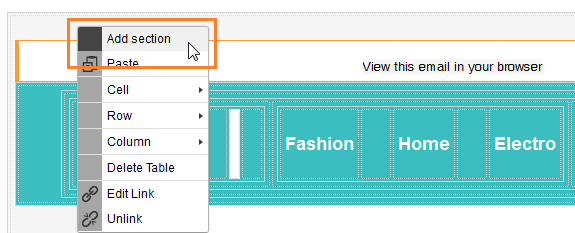
1. Make sure the email is in 'Edit' mode. In the 'Design' tab, right-click anywhere, click 'Add section' to create the first section. Actually, the body of the email is divided in two sections, all the content will be in the first section, and a new, empty section is created below it.
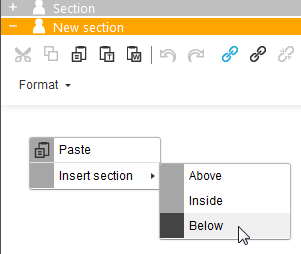
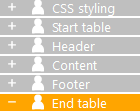
2. Right-click somewhere in the second, empty section and select 'Insert section > below' to create a third section. Keep adding sections, we need 6 sections in total
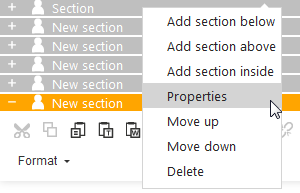
3. Right-click the first section, select 'Properties' and rename is to "CSS styling". Do the same for the other sections. The names are:
- CSS styling
- Start table
- Header
- Content
- Footer
- End table
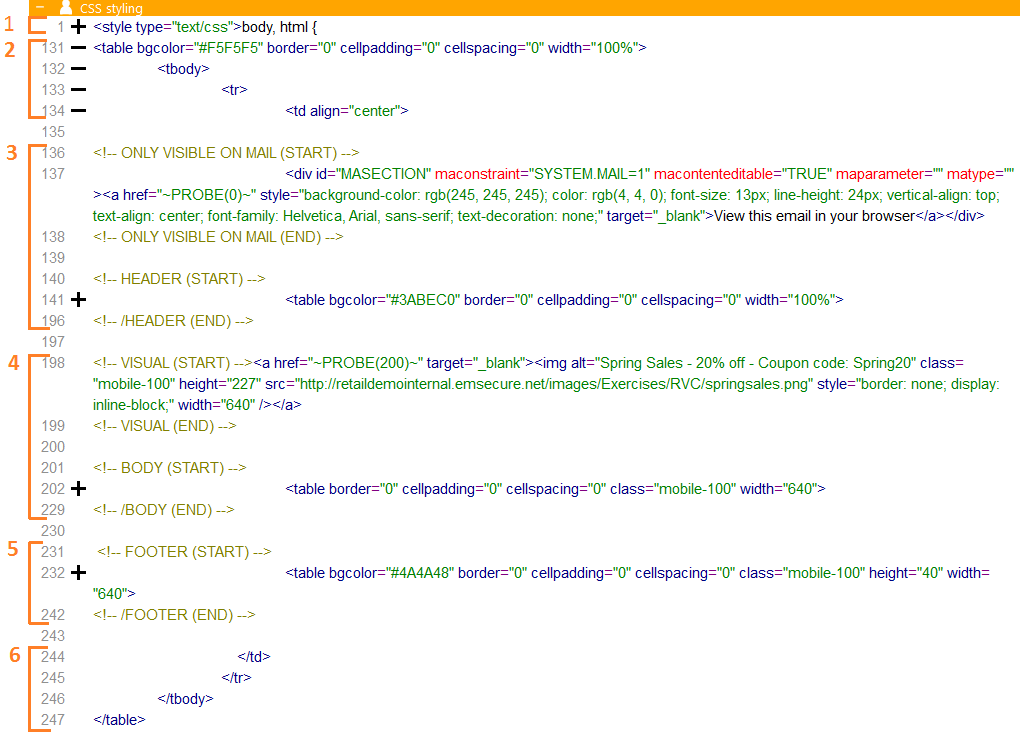
4. Now comes the tricky bit. Everything is still in the first "CSS styling" section, we need to cut/paste everything except the styling in the other sections. Select the first section and open the 'Source' tab.
The images below has the tables collapsed, so you can easily see what you should cut/paste. Basically it is from comment line until comment line. Use the line numbers as guide.
This is the content per section:
- Section 2, Start table: Cut/paste, after the </style> closing tag, until just before the comment line: <!-- ONLY VISIBLE ON MAIL (START) -->

- Section 3, Header: Cut/paste, from the comment line: <!-- ONLY VISIBLE ON MAIL (START) -->, until the comment line: <!-- /HEADER (END) -->

- Section 4, Content: Cut/paste, from the comment line: <!-- VISUAL (START) -->, until the comment line: <!-- /BODY (END) -->

- Section 5, Footer: Cut/paste, from the comment line: <!-- FOOTER (START) -->, until the comment line: <!-- /FOOTER (END) -->

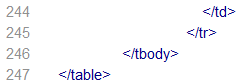
- Section 6, End table: Cut/paste the last 4 lines, after the comment line: <!-- /FOOTER (END) --> until the end
- Section 1, CSS styling should now only hold the <style type="text/css">...</style> tag

5. Save your email.
The result
If we want to duplicate this email for other yearly promotions, we only need to focus on the content part, the rest will remain the same. But it is more than just structuring the email. Presume the entire middle part should be different for another target group. We can now easily add a second 'middle' part and put constraints on both sections to show the content to one group or the other, while the other sections remain the same for both groups.
If you click the 'Constraint-icon ![]() at the beginning of each
section, the constraint
editor pops up.
at the beginning of each
section, the constraint
editor pops up.
Back to 'Example: A basic email, step by step'
