Create a web sensor
The websensor holds the information of what should be tracked on the website. The reason why we create a websensor is because it automatically generates the code that needs to be placed on the tracked website pages.
To create a Web sensor, select the 'Web Sensors' entry in the Selligent Configuration tool. Then, create a new one using the 'New Websensor' button in the toolbar.
On the 'General' tab of the 'Web sensors properties' window, define the name, the description and the preferred list for this sensor.

Note: you can either select 'Generic' or 'Shopping' as type of tracker. A generic sensor allows defining all parameters yourself. A shopping web sensor provides a predefined number of parameters such as quantity, price, payment_type etc. The advantage of using the shop tracker lies in the reporting: structured reports can be provided thanks to the predefined parameters.
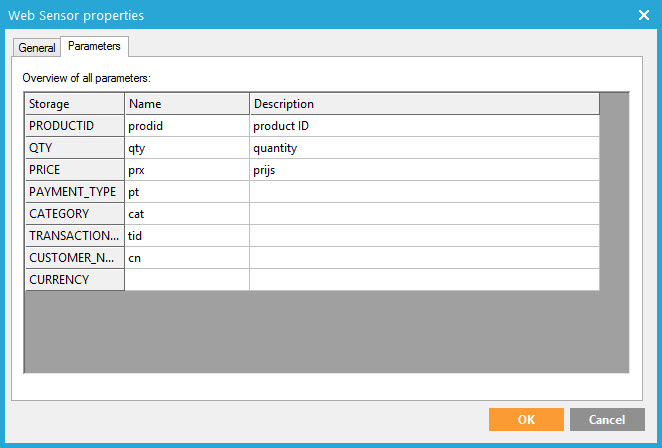
In the 'Parameters' tab, define the values that will be captured by the sensor.
For a shopping tracker the default parameters look like following:
Validate the configuration and click the 'Code example' button in the toolbar in order to get the JavaScript code that has to be placed on the external website pages.
In case of
the shoptracker, following code is returned:
<SCRIPT
SRC="http://filip.local/optiext/webtracker.dll"></SCRIPT>
<SCRIPT>
ma_track('aOcGfliaI','Value
for Product ID','Value for Quantity','Value for Price','Value for Type','Value
for Category','Value for Transaction','Value for Customer');
</SCRIPT>
Where
- Value for Product ID (optional)=> free text value; example 158A452
- Value for quantity (optional)=> integer; example 57
- Value for price (mandatory)=> real number value for price in euros. The separator is a comma; example 4,20. Note that this value must be the total price over all products!
- Value for Type (optional)=> free text ; example MASTERCARD
- Value for Category (optional)=> free text ; example: Business
- Value for Transaction (optional)=> free text ; example: 455441-hgfir
- Value for Customer (optional)= >free text ; example: 4455875ADGEE
- Value for currency (optional)=>free text (GBP, EUR, USD or CAD)
It’s advised to create a different web sensor for each webshop. In a websensor parameters are custom defined and can therefore be different from one webshop to another.
Adding JavaScript code to external page
All landing pages must be tagged with the JavaScript code that is generated by the websensor. Note that there are two possible methods.
- Method 1 first loads the JavaScript library and calls the ma_track() function after.
- Method 2 is optimized and loads the JavaScript library asynchronously after the global variables are filled with trackdata.
Note: Both methods are supported but CANNOT be combined.
Without parameters:
Method1:
<SCRIPT SRC="http://domain_name/optiext/webtracker.dll"></SCRIPT>
<SCRIPT>ma_track();</SCRIPT>
Method 2:
<SCRIPT>
var
trackdata = trackdata || [];
(function
(d, s, id) {
var
js, sjs = d.getElementsByTagName(s)[0];
if
(d.getElementById(id)) return;
js
= d.createElement(s); js.id = id;
js.src
= "//demo.emsecure.net/optiext/webtracker.dll";
sjs.parentNode.insertBefore(js,
sjs);
}(document,
'script', 'webtracker'));
</SCRIPT>
Parameters from the “ma_track” call have been removed because the cookie won’t be written if they were specified.
All pages that need to be tracked must contain the full JavaScript code (don’t forget to replace the parameters in the function call):
With parameters:
Method1:
<SCRIPT SRC="http://demo.emsecure.net/optiext/webtracker.dll"></SCRIPT>
<SCRIPT>
ma_track('aOcqflias','Value for CUSTOMERNUMBER','Value for SHOPPINGBASKET','Value
for TOTALSALE');
</SCRIPT>
Method2:
<SCRIPT>
var trackdata = trackdata || [];
trackdata.push('aOcqflias');
trackdata.push('Value for CUSTOMERNUMBER');
trackdata.push('Value for SHOPPINGBASKET');
trackdata.push('Value for TOTALSALE');
(function
(d, s, id) {
var
js, sjs = d.getElementsByTagName(s)[0];
if (d.getElementById(id)) return;
js = d.createElement(s); js.id
= id;
js.src = "//demo.emsecure.net/optiext/webtracker.dll";
sjs.parentNode.insertBefore(js,
sjs);
}(document, 'script', 'webtracker'));
</SCRIPT>
Remark:
When parameters are sent, thanks to the JavaScript, all values are considered
as text. This means that when for instance a price value of 25,00 is communicated,
the system will convert this according to the regional settings. If regional
settings define a comma to separate thousands and a dot to indicate decimals,
the 25,00 value will be converted into 2500.
To avoid wrong conversion, data should transferred in a format according
to the database regional settings.
Note that it is possible to add a callback function once the webtracker script is loaded. To be able to use this callback function the following global function name must be used: webtrackerCallback
Example:
Function webtrackerCallback()
{
//some javascript code that will be processes when the webtracker is loaded
}
This function can be placed anywhere.
Activate tracking
Create a new tracker using the 'Trackers' part of the Configuration .
In the 'Tracker Domain Properties'window, specify which domain will be tracked. There can be more than one domain tracked:
![]()
All sensors pointing to this domain will now contain the “m_i” parameter.
Leave the option 'Selligent webtracker’ selected.
Move the parameters generated by the tracker to the front:when selected, parameters are placed at the beginning of the Querystring. When using a tracker, Selligent parameters are by default added at the end of the url. But sometimes, this results in very long urls and no all CMS systems support very long urls. With this option we ensure that the Selligent parameter is always included in the url.
Verifying configuration
- Check if the m_i parameter is passed to the destination URL when clicking the email
- If redirect is used on the website, check that the m_i parameter is passed to the final landing page
- Check if the script that writes the cookie is on every page of the website
- Check if the cookie is being written
- Check if the webtracker.dll is installed on the Selligent Environment.
-
Check if Selligent Editor tags the URL of the tracked domain as a “Webtracker” sensor”:
![]()
- Check if the external pages have the correct JavaScript code by checking their source code.
- Clean cookies of the browser, send a test mail and test the entire journey. Afterwards, check if an entry into the “Webtrack” table has been inserted.
- Note also that the landing page must be on the same domain as the order confirmation page else the cookie won't be able to be read.
If all those checks are valid, the Selligent Web tracking configuration is completed.
