Page Component
A Page component is a Selligent web page created in the Design Editor. A Page can be personalized, have segments displayed for a contact, or it can be shown to anonymous contacts without personalization and segments. There is no limit on the number of Page components that can be included in a journey. The Page can be used as an entry point for anonymous web contacts.
Page-specific functionality
Right-clicking a Page component displays a pop-up menu:

Preview
The journey is displayed in 'Test' mode and a preview of the Page is displayed. In the upper right side of the window, under the 'Preview' tab in the List drop-down menu, you can select an Audience list.
The User field allows selecting a specific test contact in the list. The content of the page is adapted to display information on the selected contact and to apply the personalization and content segmentation that applies to the profile of the contact. Remember that the content of the page may be different depending on the profile of the contact.
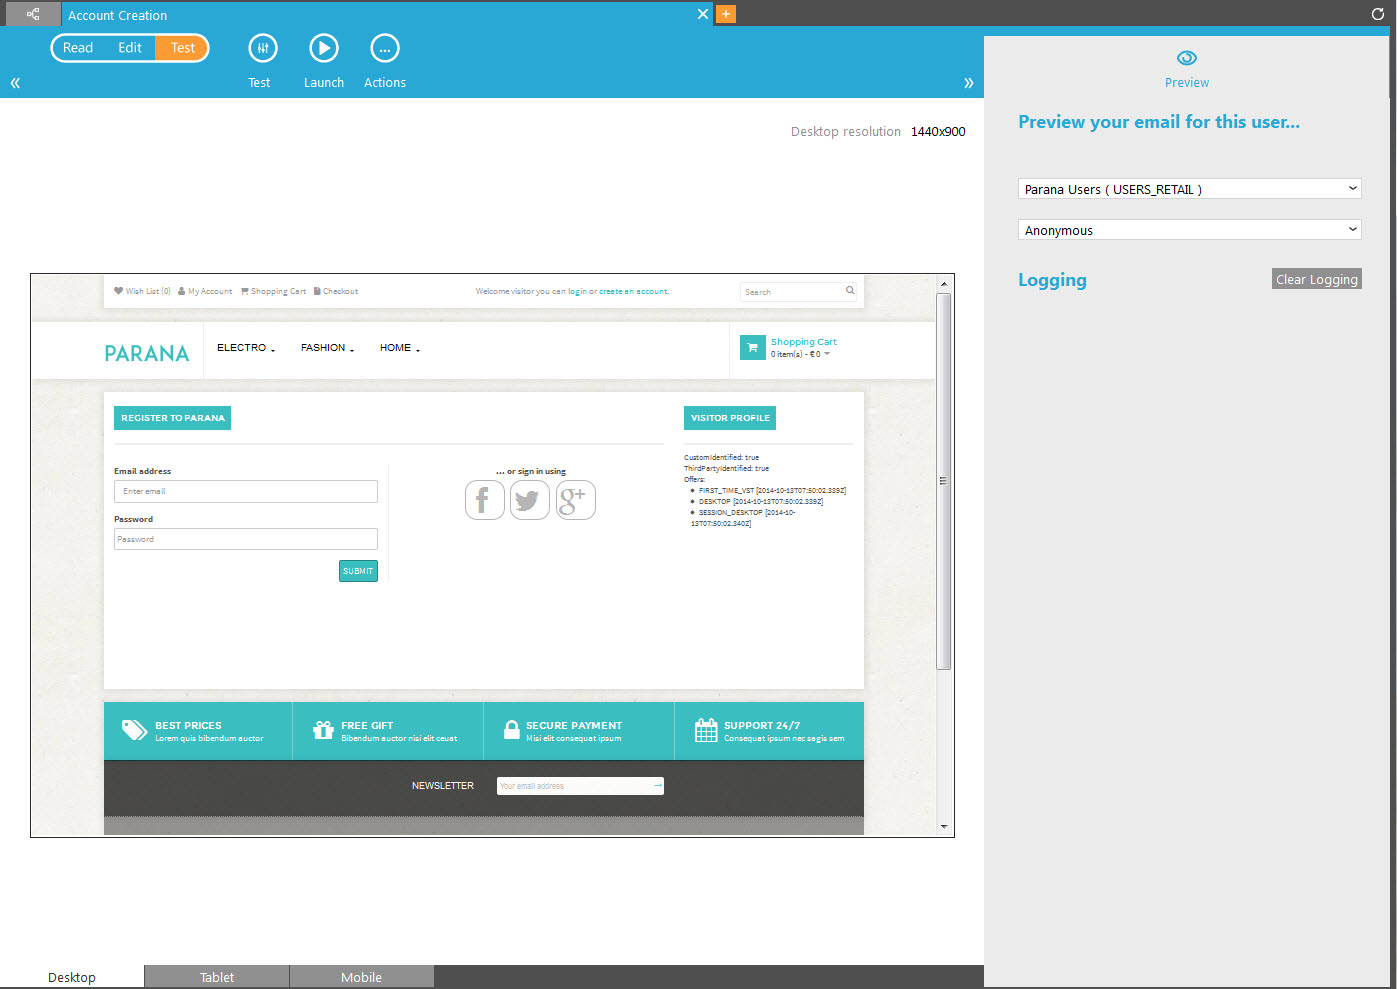
Note that fields regarding multi-variate testing (MVT) are only displayed when the page contains an MVT component added in the Editor. In the preview, it is possible to select the MVT variant. The button 'Show details'/'Hide details' allows accessing the possible values for each one of the MVT components in the page and selecting the combination of values that should be applied to the preview.
Events
Within the Page component, three types of events can be triggered and activate a contact’s progression (the path that contacts follow in the journey).
- View — The contact views the message. Followed by a Report component to show the contacts who viewed the page
- Click — The contact clicks a sensor (a Selligent measurable hyperlink) in the message. Followed by many components to continue the journey, another Page, Data component, etc.
- NotClicked — The contact does not click a sensor (a Selligent measurable hyperlink) in the message within a certain timeframe (set a delay). Followed by a Report component to show the contacts who did not click within that timeframe.
Properties
The Properties of the web Page component are accessible via double-clicking it, or right-clicking the component and selecting ‘Properties’ from the pop-up menu.
General properties
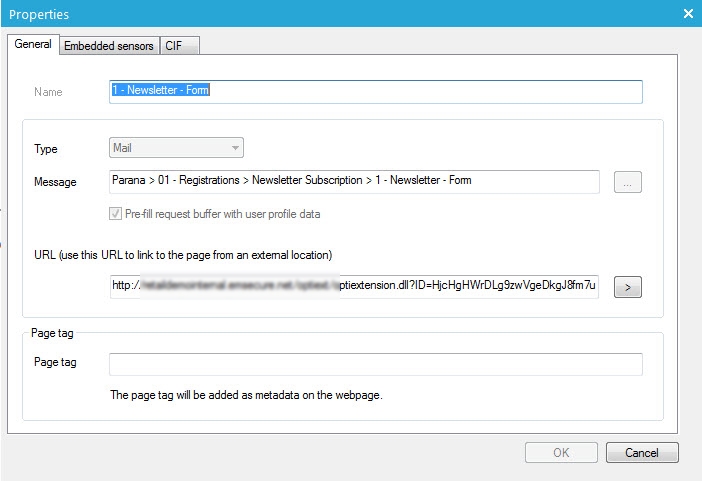
1. Enter a Name for the Page component. The name will be shown below the component on the canvas.
2. In the Type field, select the type of message you are sending.
3. Next to the Message field, click the Browse button (...) to select the Page that must be linked to this component. If this message is different from the component's name, it will be visible below the component on the canvas.
4. You can check the option ‘Pre-fill request buffer with contact profile date’ if you want the contact's data (personalization and segments) displayed when viewing the page.
Technical note:
With this option checked, when the contact views the page, the contact's
dynamic data will be filled in with the values from the database for that
specific profile (e.g. ~FIRSTNAME~ will be replaced by the value of the
FIRSTNAME field in the Audience list).
The pre-fill buffer option is also Form-related. After a Form is submitted,
you can use a Data component to validate the form's submitted values.
If validation fails, you can go back to the Form ('Failed' event of the
Data component), displaying error messages (using ~DATA_ERROR~ on the
page in the Editor). When 'Pre-fill buffer' is checked, the form input
fields display the original submitted values. If unchecked, the form input
fields will be empty (no submitted values where stored in the buffer).
4. Specify the URL for an anonymous version of the web page that will display without any contact profile data, as viewed with an anonymous profile. That's why it's also referred to as 'Anonymous URL'. This URL can be used as a hyperlink on a website that directs to the Selligent page.
Note: This URL should not be distributed without careful consideration. Before using the URL as a hyperlink, check if the page in the journey requires a contact profile or not. If not, such as with an empty form or an unpersonalized page, you can distribute it.
Click the [>] button to view the page in a web browser.
5. Optionally specify a Page tag value for the system variable MESSAGE.TAG. It can be used in the Page to segment the audience. The Page tag is also used when defining web trackers. Web trackers provide standard ways for adding tracking parameters to a sensor for tracking tools such as Google Analytics, Xiti, Nedstat and Omniture.
Note: If the pages were created prior to creating the journey, insert them from the tree view by drag and drop. The page is already selected under 'Message' and the checkbox ‘Pre-fill request buffer with contact profile data’ does not need to be checked manually.
Example: This
example presumes that the contact has landed on the 'Participate' web
page form by clicking a link in an email. The form is designed for known
contacts, not anonymous profiles. The form will be pre-filled with the
contact's data where possible. After submission by the contact, the 'Participate'
form is validated and the form data is stored. If validation fails, the
form is shown again, pre-filled with the earlier submitted values, and
displaying error messages (using ~DATA_ERROR~ on the page in the Editor).
If the validation is OK and the data is stored, the contact sees the 'Participate
thank you' page. An email is also sent to the contact confirming the contact's
participation.
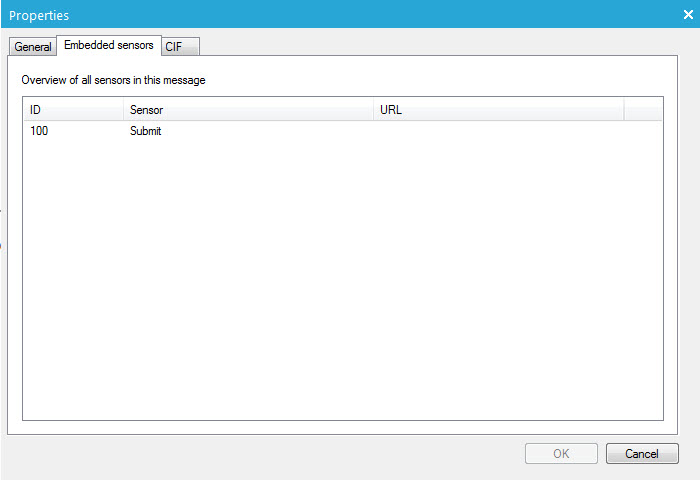
Embedded sensors
The 'Embedded sensors' tab gives an overview of all sensors that are included in the message.
CIF
CIF stands for 'Custom Integration Features'. It replaces the message linked to the Email or Page component used in the journey with any other message from the tree view. The 'Message template field' retrieves the ID of the message itself (not the component's ID) from a field in the Audience list. Check this example for a better understanding of CIF.
Technical Note: An Audience list field is required to store the message ID for each contact in the journey's target audience. You can see the message ID when you hover the message tab in the Editor (tab bar at the top of the screen).
Example:
A contact receives a weekly newsletter and wishes to forward this to a
friend. The newsletter has a forward button. Each time the contact clicks
the button, that newsletter he received should be sent to the friend.
When the contact clicks the button, he sees a form to fill in the
friends email address. The newsletter's message ID is stored on the friend's
profile, along with their email address, in a separate friend's audience
list. In a data driven (scheduled) journey, the friend's audience list
is used and CIF retrieves the message ID from the friend's profile. This
way, the friend will get the same newsletter the original contact was
viewing. The email used for the Email component in the journey can even
be an empty email, it will be replaced with the newsletter.
Note: The personalization and segments of the newsletter can be a problem. This is usually created matching your main contact audience, and not the friend (empty) profiles.
To be able to do this, you need to activate the option ‘Enable CIF’.
The ‘Message template’ field allows retrieving the message ID stored in an audience list field.
From the ‘Result Field’, select the field in the Audience list where the ID of the sent email can be stored (a different field than the one for the message ID).
Best version
The ‘Best version’ tab is only displayed when the message contains a Multivariate (MVT) component that was added to the message in the Editor. The MVT component allows adding MVT text, images, or article containers to a message and allows testing of each possible combination. In the ‘Best version’ tab, you can override the settings set on the message in the Editor:
- Automatically select a winner at a specific date and time.
- Automatically select a winner after a certain time has elapsed since the start of the test.
- The winner is selected when a specific number of clicks is reached.
It is possible to select multiple options. The one that is completed first is used to determine the winner.
Additionally, it is possible to ensure that there is a significant difference between the winner and the runner up. The 'statistical significance' allows setting that percentage.
The option 'Number of emails sent for each combination' (default 200) allows defining how many emails must be sent before a winner can be selected. For a large audience, the default setting of 200 emails might be too little, you can change it here.
Technical Note: The ‘statistical significant difference’ is a statistical calculation that calculates if the result (number of clicks between the different versions) is based on coincidence or not. If you only have two clicks on an item, the chance that the clicks are coincidental is high. The more clicks you have on an item, the more the chance becomes lower. For more info see Wikipedia: “Multivariate testing in marketing” or “F-test”.
See here for more information on multivariate testing and an example of a Multivariate journey
