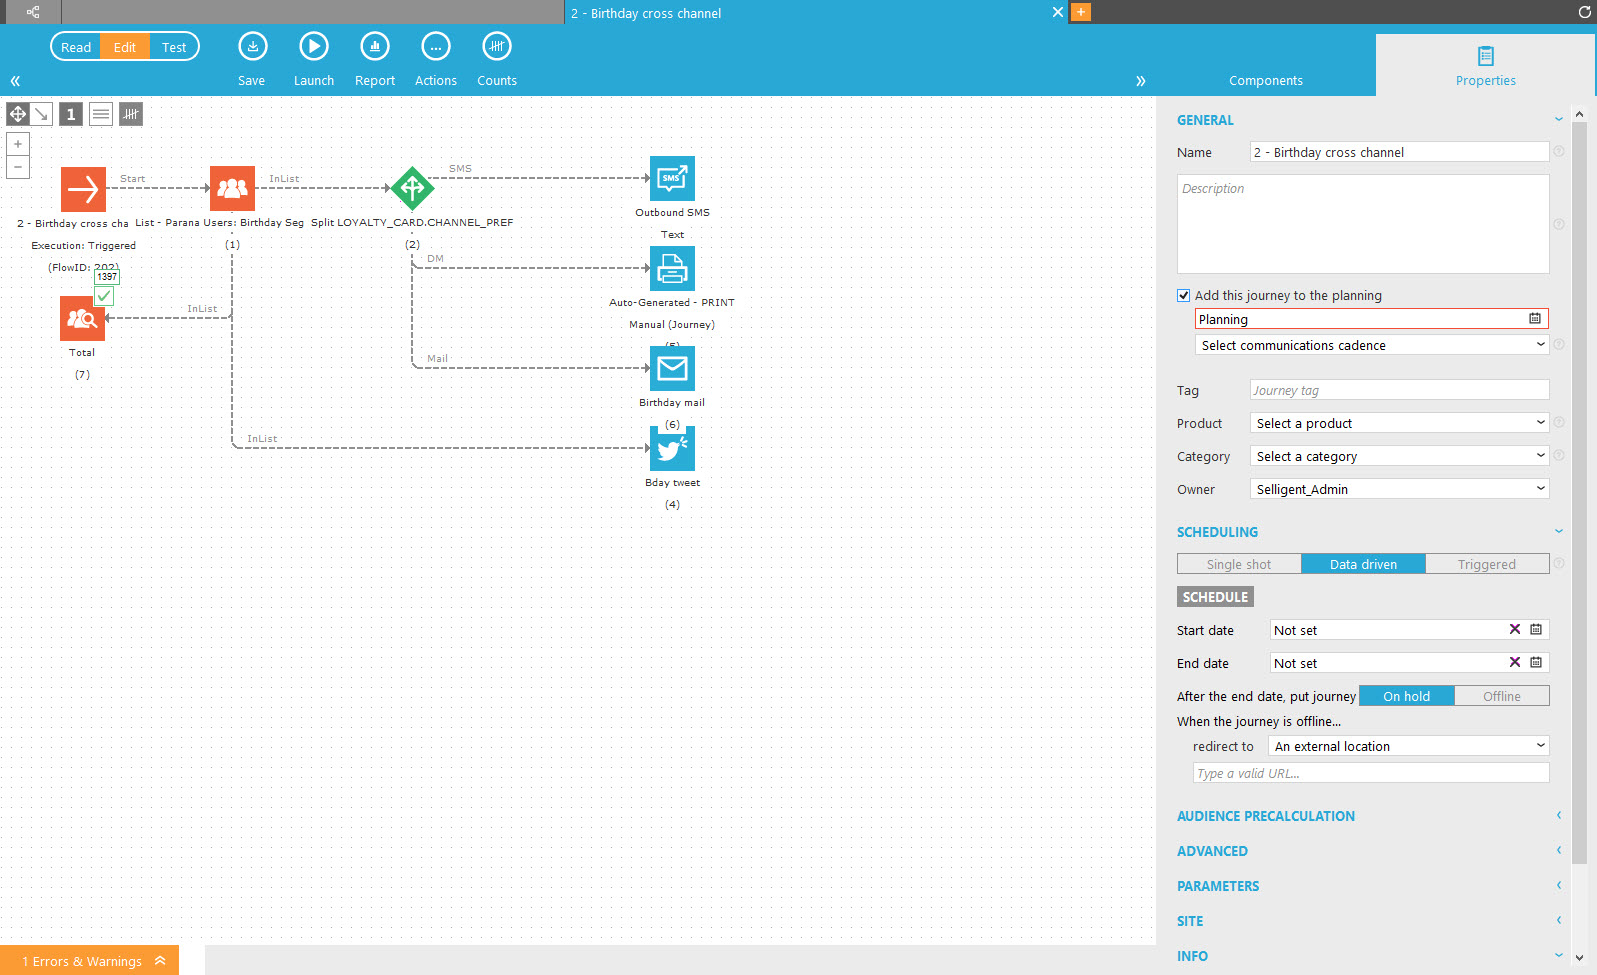
Start Component & Journey properties
The Start component is automatically inserted when a journey is created. Only one Start component can be used in a journey. Double-clicking the Start component, or right-clicking and selecting 'Properties', opens the journey Properties panel on the right.
Events
The Start component has only one event: 'On start'. This is triggered when the journey is set to 'Launched' and when the start date of the journey has been reached. When this event is triggered the journey is launched.
Properties
NOTE: The properties of the Start component are in fact the properties of the current journey.
General properties
On the General properties tab, specify the following parameters:
Name — Enter a name the journey that will appear in the journey navigator tree.
Description — Optionally enter a journey description.
In addition, journeys can be linked to a specific category
and product. This information
is used for reporting purposes. The journey category is also the value
for system variable CAMPAIGN.CATEGORY. It can be used in the journeys
components, including emails and pages.
Selligent also provides a planning tool for journeys and a communications cadence tool to limit the number of communications to the customer based on a set of rules. Any journey can be included in this planning tool and assigned a communications cadence plan.
Scheduling
Schedule the execution of the journey and define the start and end date
of the journey. If no scheduling is defined the journey is executed the
moment it is launched. This is the same as a single shot journey without
a start date.
There are three ways of scheduling the execution:
Single shot
A single
shot journey is automatically put on hold after one execution. Newsletters
and other mailings that are sent once to all contacts are typical examples
of a single shot journey.
For a single shot journey flag the corresponding option and set a start
date.
When the start date is reached, the journey is executed. If no start
date is set, the journey is executed immediately when launched.
By default the campaign agent checks for new active journeys every 10 minutes.
NOTE: Emails are sent only once to the same contact. If you would reactivate the journey again, the contacts that already received the email, will not receive it a second time. The opt-out value for the contact is also taken into account. If the contact is opted out (OPTOUT field > 0) the contact will not receive the email, even if he is in the target selection of the journey .
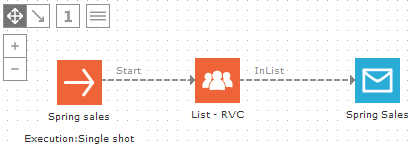
A typical example of a single shot email journey, with an Audience and an Email component:
Data driven
A data driven journey is executed at a certain time interval. The execution can be scheduled once a week, daily, hourly or following a custom setting. By default the journey is executed every ten minutes. Each execution interval the target audience is checked based on the filter criteria (with the Filter Designer) defined in the audience list segment or in the Audience component properties. So each interval the target audience can be different. Contacts that are in target at that moment, but already had the message sent, will not it be targeted again. Only new contacts at that execution interval will have the message sent.
Press the 'Schedule' button to define the time interval.
Example: A scheduled journey sending a welcome message to new contacts every ten minutes. Every ten minutes the target is checked for new contacts, who did not receive the message. Everyone who already received the message will not be included in the target. This journey does not have a start and end date and runs forever, starting immediately when launched.
Example: A segment 'Birthday' contains contacts in the Audience list that have their birthday today. The segment is selected as an audience in the journey. Only contacts that fall in the segment at the execution interval will get a birthday message. So every day, contacts are added to and removed from that segment. Selligent detects them and sends them the message. This means this journey works for one year. Next year, when it is the contacts' birthday again, they will not receive the message again, because they already received it the previous year. Each year, the journey has to be duplicated. Alternatively, you can create a triggered journey or a BPM journey.
NOTE: The opt-out
value for the contact is also taken into account. If the contact is opted
out (OPTOUT field > 0), they will not receive the email, even if they
are in the target selection of the journey.
Data driven journeys, in combination with action lists, can send the same
message multiple times to the same contact. See action
lists and the Basket
abandon example.
Triggered
A ‘Triggered’ journey is executed on a predefined moment in time. The execution is not limited to a fixed interval (e.g. every two days, twice a week, etc) but can be irregular and at any given moment in time (such as 18/10/2014 at 10:00, 23/10 at 17h). There is no limit to the number of triggers that can be defined.
The same message can be sent multiple times to the same contact, something that is not possible with a single shot or data driven journey.
Example:
Below is an example of an event for which you have to send out the same
reminder message once a week, for three weeks, to the contacts in the
audience. This means that contacts will get the same message week after
week as long as the journey is active. Since the journey only needs three
triggers, they can easily be defined in the journey properties.
Emails can be sent multiple times to the same contact. When the journey
is set to 'Triggered', in the properties of the Email component, check
'Allow this email to be sent multiple times to the same contact'. The
Email component icon will change.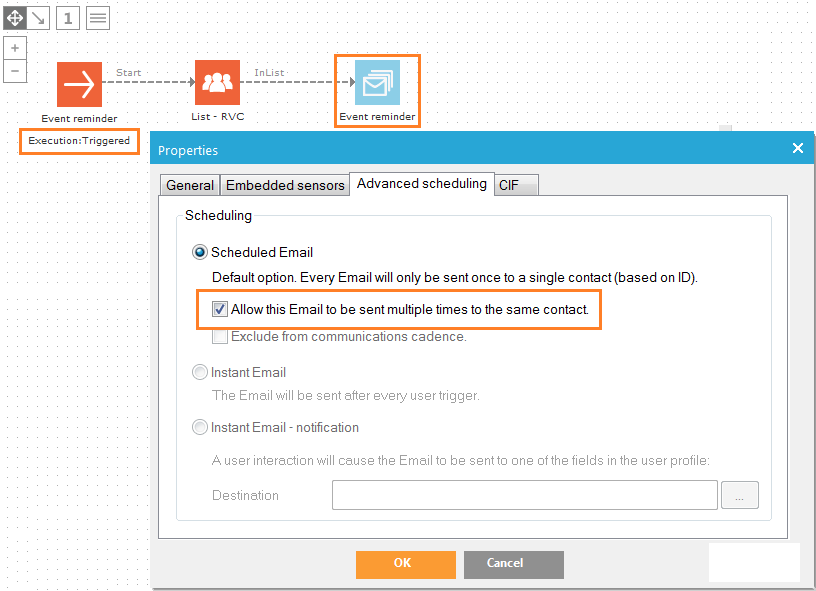
The opt-out value is taken into account. If the contact is opted out (OPTOUT
field > 0) the contact will not receive the email, even if they are
in the target selection of the journey .
Triggers can be defined manually, but an SQL statement can be created as well to generate triggers.
Defining triggers manually
To manually define a trigger, select the option 'Triggered' and press the 'Schedule' button. The ‘journey triggers’ page is displayed:
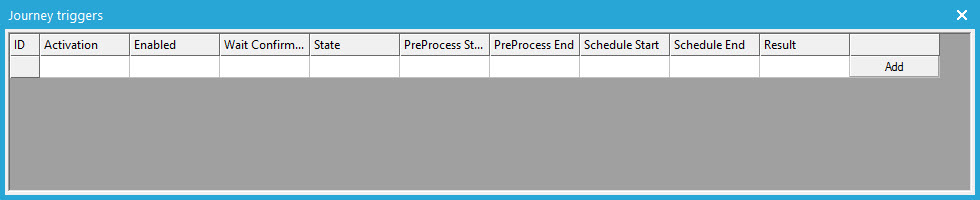
The table displays an overview of the triggers that have been defined for the current journey. Press the 'Add' button to create new triggers:
On the 'Properties' tab following options are defined:
- Activation date and time — The date and time on which the journey must be executed
- Enabled — Several triggers can be defined for one and the same journey. These do not all have to be enabled at once. The option ‘enabled’ allows activating or deactivating triggers.
- Confirmation required before mails are sent — It is possible to request a confirmation before mails are send out. This option can be used when the journey is still in testing phase.
Example: If the message must be sent every Monday morning at 8 am, triggers need to be created with the date and time of every Monday on which the message is sent out.
Using an SQL statement to create triggers
Creating triggers one by one can be time consuming. If you require a lot of triggers, setting them manually is a tedious task. The triggers can be created directly in the back-end. This is best done by someone with experience in SQL scripting, contact your database responsible or IT integrator. Most likely an SQL script will be used to generate them. This script can then be executed in the Configuration/Advanced scripting section of Selligent Campaign.
Technical note:
The table storing the triggers is 'CAMPAIGNTRIGGERFLAGS'. Fields
that need to be set are CAMPAIGNID (=journey id), START_DT (=start date),
ENABLED (=1 if enabled), REQCONFIRM (=1 if require confirmation, confirmation
must be handled manually, no automated way is defined in Selligent Campaign
for confirmation before sending)
Start and end date
For each scheduling, A start
and end date can be defined.
The journey is active within this indicated period of time.
Once an end-date has been defined the options 'Offline' and 'Hold' at the
bottom are enabled. This changes the status
of the journey when the end date has been reached.
When a journey is put offline a redirect can be defined. Selligent allows three distinct types of redirects:
- Redirect to an external location: this corresponds to a website The exact URL of this site is entered.
- Redirect to an alternative micro-web. In
this case the contact is redirected to a Selligent page. This page
is not integrated in a journey.
Press the […] button to access the dialog from which a page can be selected. The tree view displayed in this dialog is the same as in the Selligent Editor. - Use an alternative page from a different journey. In this case a redirect is done to a page in another journey.Press the […] button to access the dialog from which a journey page can be selected.
Audience precalculation
For some customers, it is beneficial to pre-calculate the audience for an action in a journey well before the actual go-live, or when there’s less load on the campaign agent. The actual journey execution will use the pre-calculated audience when it’s available to save time. The option is by default disabled.
When this option is activated, the user can choose the moment in time at which this pre-calculation will take place:
- Time before execution expressed in minuted (30 minutes before launch)
- At a fixed time (for example, on 30/9/2016 at 09:00:00)
- When a job finishes (this can be any type of job)
- When a job is successful (this can be any type of job)
The user is alerted in the newsfeed when the pre-calculation starts. The results are equally communicated through the newsfeed:
Example:
Advanced
You can also configure the following advanced options:
Load shared variables — This option must be checked if one or more shared variables need to be used in a journey. Shared variables are global variables, set as system, list, journey, cookie or memory variable. They are not loaded in memory by default, check this option in order to load them in the journey. Shared variables are created with the Shared Storage component.
Disable tracking for this journey — This option is used to disable adding tracking parameters to each sensor redirect URL. With Tracking (under Connectors in the Settings) you can add Google Analytics, NedStat, Xiti, Selligent Site, Selligent Webtrack or custom parameters in a standardized way to each sensor redirect URL beginning with a certain domain name. This setting disables this for sensors used in messages of the journey.
Do not block requests coming from journeys that work on another Audience list — This option is used to disable the error prompt when linking two journeys based on different lists. Selligent performs an automatic check on the data structure of each list linked, and when their structures are not the same (different fields, etc.) an error message is triggered. When you link from a journey to another journey (via a sensor or Redirect component) and use a different audience list in the second journey, the contact is not the same (different contact ids, list ids, etc.) For security reasons, by default this is not allowed. Only check this option if you really need it to continue to the second journey, possible with a contact profile unknown in the journey audience.
Example: This option can be used when creating a unique optout journey for several audience lists and redirecting all other journeys each with its own audience list, to it. The correct contact is loaded in the destination journey (such as with a Lookup component) and therefore no data loss is encountered.
Do not log interactions to the database (Flags) — Every interaction (views, clicks, etc.) with a page or email in a journey is stored in the database. In some cases, this is not required and to avoid overloading the database with useless information, this option is provided.
Alternative content renderer — Allows you to indicate if a content renderer must be used or not within the journey. Normally Selligent's optiextension URL (http://DOMAINNAME/optiext/optiextension.dll?ID=%s , where the %s value will be replaced with the Selligent ID) is used to render all journey URLs. If set, all journeys (based on this list) use the defined URL instead of the optiextension URL. For more details on content rendering, contact Selligent Support.
Technical Note: The content of the content renderer page is merged with the content of the Selligent page. The existing website will fetch the content of the Selligent page from the Selligent web server, integrate body and head parts inside the message and send the merged result back to the contact's browser as one HTML page. There is no indication that the content comes from a non website page. To be able to do this, the hashed code, which was transferred with the HTTP request, is used to retrieve all the content and parameters.
When no content renderer is used, the page is displayed exactly as in the Selligent application (when previewing the page).
Site
When Integration with Selligent Site is configured, an additional section Site allows indicating how the journey should be used. There is a choice between Siteing, Retargeting/Conversion and Offer journey.
- Siteing — Use journey pages to populate placements in Site
- Retargeting/conversion — Send a follow-up message after conversion or a retarget message after non-conversion
- Offer — Contacts in the journey are added to the Site Offer audience
- On universe — Sets the Site universe in which the journey should be available.
For more information, check the Site documentation and Site online help available within the Site module.
Info
Provides details on when the journey was created, last modified and by whom. The location of the journey in the tree structure is given as well.
