Viral Component
These friend records can be created on the contact's audience list or a
separate 'friends' audience list. The latter is preferred not to 'pollute'
the contact's audience list with friends that are not real contacts yet.
As long as the friend has not opted in yet, you can not communicate with
him, apart from sending an invitation email (check your local legislation
for his). Each friend's invitation email can also be sent with the Viral
component.
The Viral component works in combination with the Viral Parent component (but is not mandatory). With the Viral Parent component you can switch back to the inviter, rewarding him and sending him an email notifying him his friend has accepted his invitation. That is why a Viral Parent component will always follow the Viral component in the same journey.
NOTE: One Viral component can be used for invitingmanyfriends.
Example: Here,
the contact below can three friends in the "Invite friends"
form. The Viral component will validate and store the data entered for
each friend. If successful, the contact will see the "Invitations
sent" page. The Viral component's 'Friend' trigger will switch to
the friend's profile and sent the invitation email. The Viral component
does this for each invited friend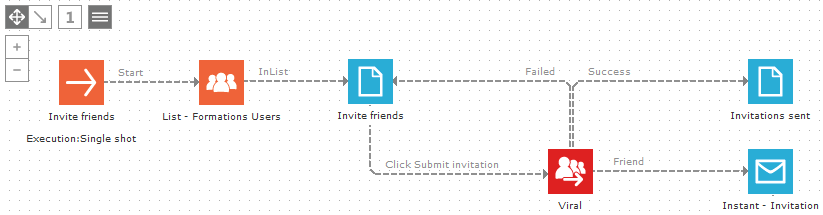
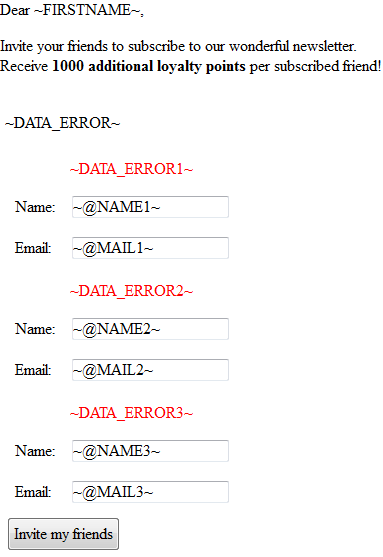
Before discussing the Viral component: the invitation form
The Viral component loops through
each set of friend data (name1, email1 - name2, email2 - etc.), validates
and creates a record for each friend. In the invitation form, you should
use an iteration number for each set of friend data. E.g. for a name and
email input field, to invite 3 friends in the form this would be:
<input name="NAME1"
type="text " value="~@NAME1~"
/> + <input name="MAIL1"
type="text " value="~@MAIL1~"
/>
<input name="NAME2"
type="text " value="~@NAME2~"
/> + <input name="MAIL2"
type="text " value="~@MAIL2~"
/>
<input name="NAME3"
type="text " value="~@NAME3~"
/> + <input name="MAIL3"
type="text " value="~@MAIL3~"
/>
In the Editor, open the text box properties to change
the input field name and value attributes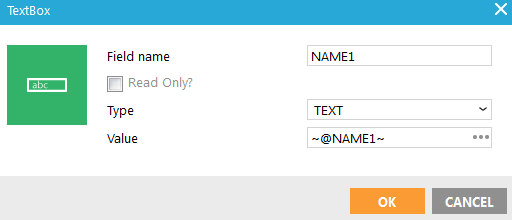
The Viral component also provides validation for each friend data set.
Just like a Data component, if validation fails, you can send the contact
back to the form ('Failed' trigger) and show the error messages. To show
the individual error messages for each friend, ~DATA_ERROR~ should
also have an iteration number:
~DATA_ERROR1~, ~DATA_ERROR2~, ~DATA_ERROR3~,
etc.
You can still use the general ~DATA_ERROR~ to display the general validation
errors: if the contact filled out the same friend twice, or if he did
not invite enough friends (at least 1).
The Viral component attributes
Events
The Viral component generates three events:
- Success: triggered when the complete process of data validation was successful and the friends have been stored. This trigger will continue the journey for the inviter, not the friend.
- Failed: The data did not validate or is not stored correctly. Validation and storage are defined in the Viral component properties. This trigger will continue the journey for the inviter, not the friend.
- Friend: This event will switch to the friend's profile. Everything behind this trigger is done on the friend's profile: data storage, lookup, etc. But also sending the friend an instant email, like an invitation email.
Properties
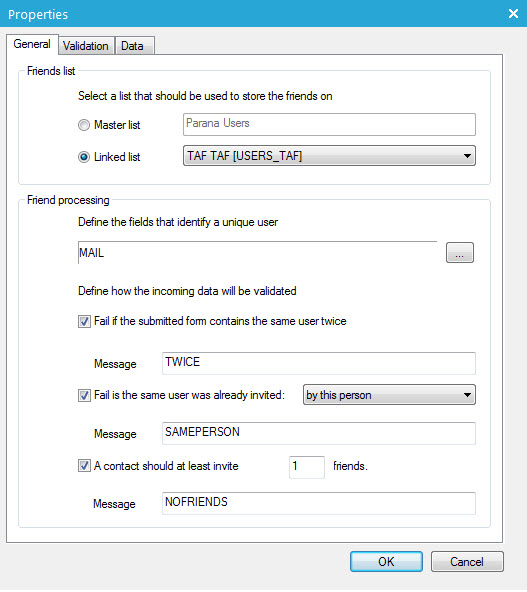
1. Select the (master) Audience list or a 1-on-many linked 'friends' audience list that must be updated with the friend information.
The latter is preferred
not to 'pollute' the contact's audience list with friends that are not
real contacts yet.
To select the 'friends' audience list from the 'Linked list' drop-down,
it must be linked 1-on-many to the contact audience list (master). See
List relations for more information
on linking lists.
2. Next, select a field or a combination of fields in the selected list that must be used to identify the friend as being unique. Use the ... button on the right to access the list of available fields.
Usually the identifying field is MAIL. Most of the time
you want unique email addresses in the 'friends' audience list.
If you select a combination, both values must apply, e.g. MAIL and NAME:
info@somedomain.com + John, is not the same as info@somedomain.com + Alan
3. Next, define the error messages that must be displayed when the following situation occurs:
- Fail if the submitted invitation form contains the same contact
twice. Identifying the friend is done by the fields selected in the
second step (see above).
The error message is displayed in the general DATA_ERROR. - Fail if the same contact was already invited. I.e. stored in the
list. Identifying the friend is done by the fields selected in the
second step (see above). A choice can be made between:
- ‘by this person’ : the friend is stored in the list and it was done by this contact (based on the matching fields in the list relation, e.g. ID on PARENTID)
- ‘by anybody’ : the friend is stored in the list.
The error message is displayed in the specific friend's DATA_ERROR. E.g. ~DATA_ERROR1~, ~DATA_ERROR2~, ~DATA_ERROR3~, etc. - A contact should at least invite 'n' friends in the form. E.g. at
least 1.
The error message is displayed in the general DATA_ERROR.
4. The ‘Validation’ tab allows checking the posted data submitted by the contact. The iteration number should be replaced by an 'i' (lower case)
For example, the validation below checks if the contact
filled in everything for each friend (and the email address has the correct
syntax) or nothing. The validation on the 'General' tab already makes
sure the contact fills in at least 1 friend. In this example the form
only passes 2 posted values for each friend: @MAIL1,2,3
and @NAME1,2,3. The iteration
number is replaced by 'i'. Thus @MAILi
and @NAMEi.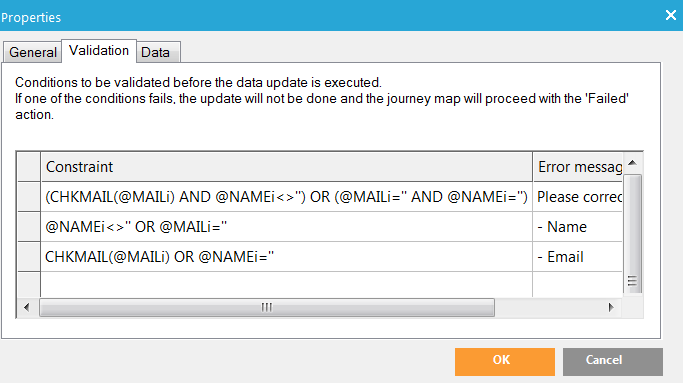
Note: TheFriend processing on the General tab allows you to determine how many friend invites are minimum required and how to handle already existing entries. The constraints on the Validation tab determine if the added friends are considered valid or not (it checks the actual entry content).
5. On the ‘Data’ tab, enter
the values to be stored in, either the contact Audience list (master),
or the 1-on-many linked 'friends' audience list, depending on the choice
on the 'General' tab'.
- The yellow field(s) indicates that this is the identifying field(s),
as selected on the 'General' tab'. A
value for this field(s) must be provided.
- The greyed out field indicates that this is the matching field
of the list relation between the contact Audience list (master) and
the 1-on-many linked 'friends' audience list. Below, ID on FROM_USER_ID.
See List relations
for more information on linking lists.
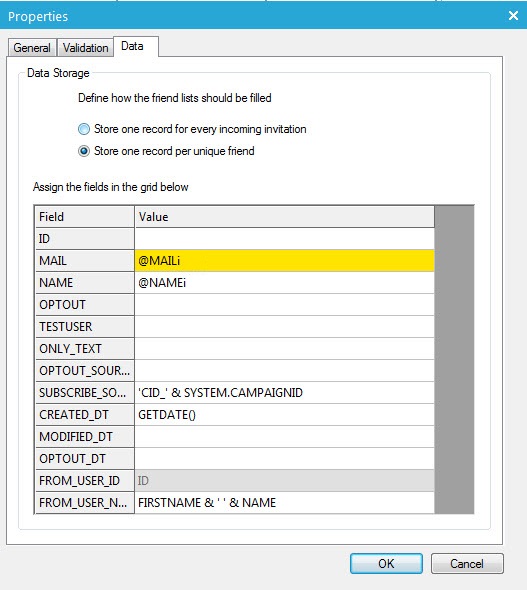
- Store one record for every incoming invitation. The friend can be stored multiple times in the selected list. This is preferred if you use a 1-on-many linked audience list to store the friends. After all, the same friend can be invited by different contacts.
- Store one record per unique friend: Identifying the friend is done by the fields selected in the second step (see above). If a friend record already exists in the same form, the existing information is left as it is. (no record created or updated)
After discussing the Viral component: the invitation email
The 'Friend' trigger of the Viral component will switch to the friend's profile. Everything behind this trigger is done on the friend's profile, including sending him the invitation email. The Viral component will do this for each friend. So when you use personalization fields in the email, like ~NAME~, it is the name of the friend stored in the list. To use the inviter's (contact) personalization fields use the scope VIRAL_PARENT, e.g. ~VIRAL_PARENT.FIRSTNAME~
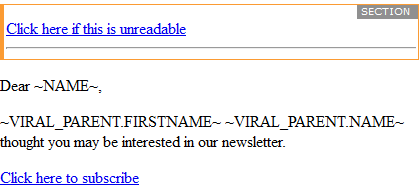
The email should be an instantemail.
Technical note:
The Viral Parent component has a 'Parent' event which switches back to
the inviter (parent). Back on the inviter's profile, you can use the scope
VIRAL_FRIEND to use the friend's
personalization fields, e.g. ~VIRAL_FRIEND.NAME~
