Smart Audiences are audiences that are built dynamically and that ensure that a specific message is only sent to the audience with the highest performance and that is most likely to engage with the message. It can help you to increase your campaign performances and to reduce customer fatigue and eventually churn.
Important: The 'Smart Audiences' feature is available for Marigold Engage users in both the Marigold Engage and Campaign environments. Note that it's not available for Campaign-only users!
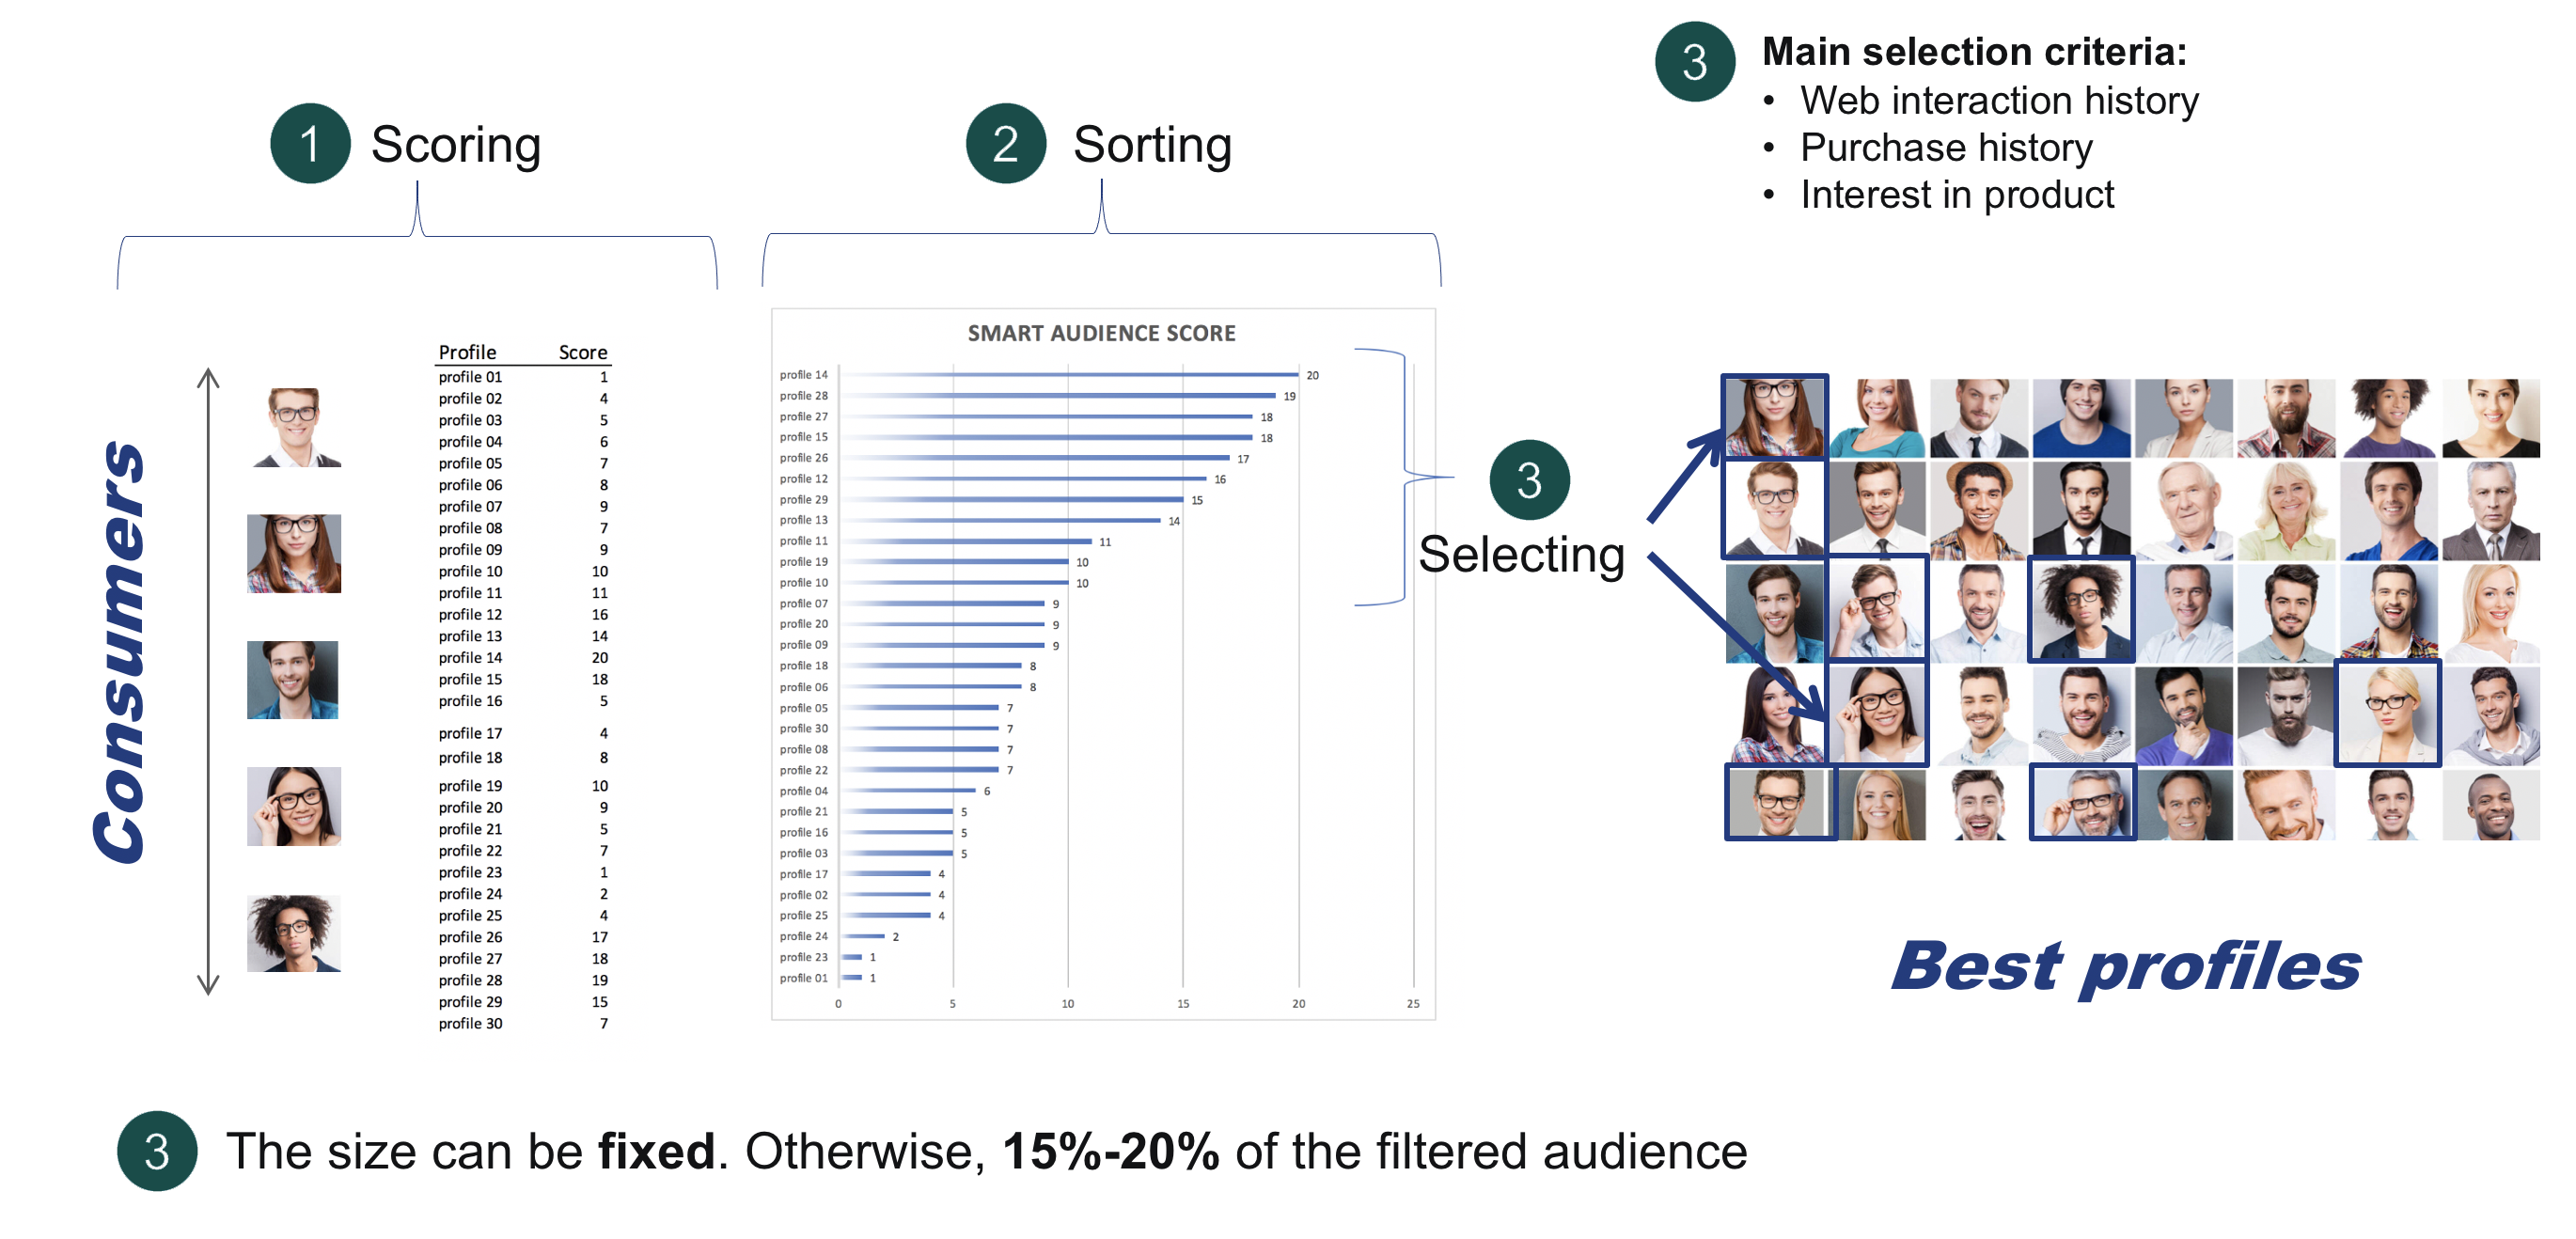
So how is this audience built? You first start by defining the type of content that you would want to send. This is done by means of filters. Based on this content the system will calculate a maximum of the top 20% of customers in the base who are most likely to engage with this content. The calculated audience will then be available for use in a journey.
Note: The content that is defined through the filter is an abstract content. It is not available as such for use in messages.
Smart Audience Overview
The Smart Audience overview shows a grid with all existing Smart Audience configurations.
From this screen, you can choose to :
- create a Smart Audience
- edit / copy / delete existing Smart Audience configurations using the interaction icons on the right of each configuration
 (viewing/editing can also be done by double-clicking a row)
 - search Smart Audiences
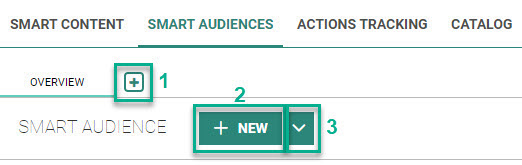
Create Smart Audience
To create a Smart Audience, click on one of the following :
- '+' button next to the Overview tab — to create a new Smart Audience from scratch
- '+ New' button next to the Smart Audience header — to create a new Smart Audience from scratch
- Drop-down arrow — to create a 'new Smart Audience' from scratch or a 'Smart Audience from template' when you want to use the settings of an existing configuration
Creation of a new Smart Audience
In the pop-up that appears to create a new Smart Audience, enter a Smart Audience name and click the Create button.
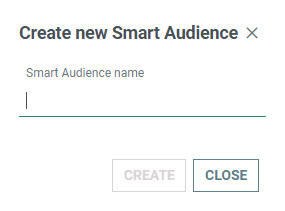
The Smart Audience is created and the configuration screen is shown.
Note: The maximum amount of Smart Audiences that can be created is limited to 100.
Creation of a Smart Audience from a template
In the pop-up that appears to create a Smart Audience from a template, enter a Smart Audience name and select an existing Smart Audience template from the drop-down. Then click the Create button.

A new Smart Audience is created and the configuration screen is shown.
By default, the configured settings are duplicated from the template.
Configuration of a Smart Audience

On this screen, set the following properties:
Smart Audience name — This is the name of the segment that you will see in Marigold Engage/Campaign.
Maximum audience size — The size can be a value between 0 and 1 million. When you define this fixed size, you ensure that only the top matching contacts as defined by the fixed size will be selected, keeping in mind the audience pre-filter rules & contacts with interactions.
The value can be set by :
- entering a value in the input field
- clicking the up/down arrows
- using the slider

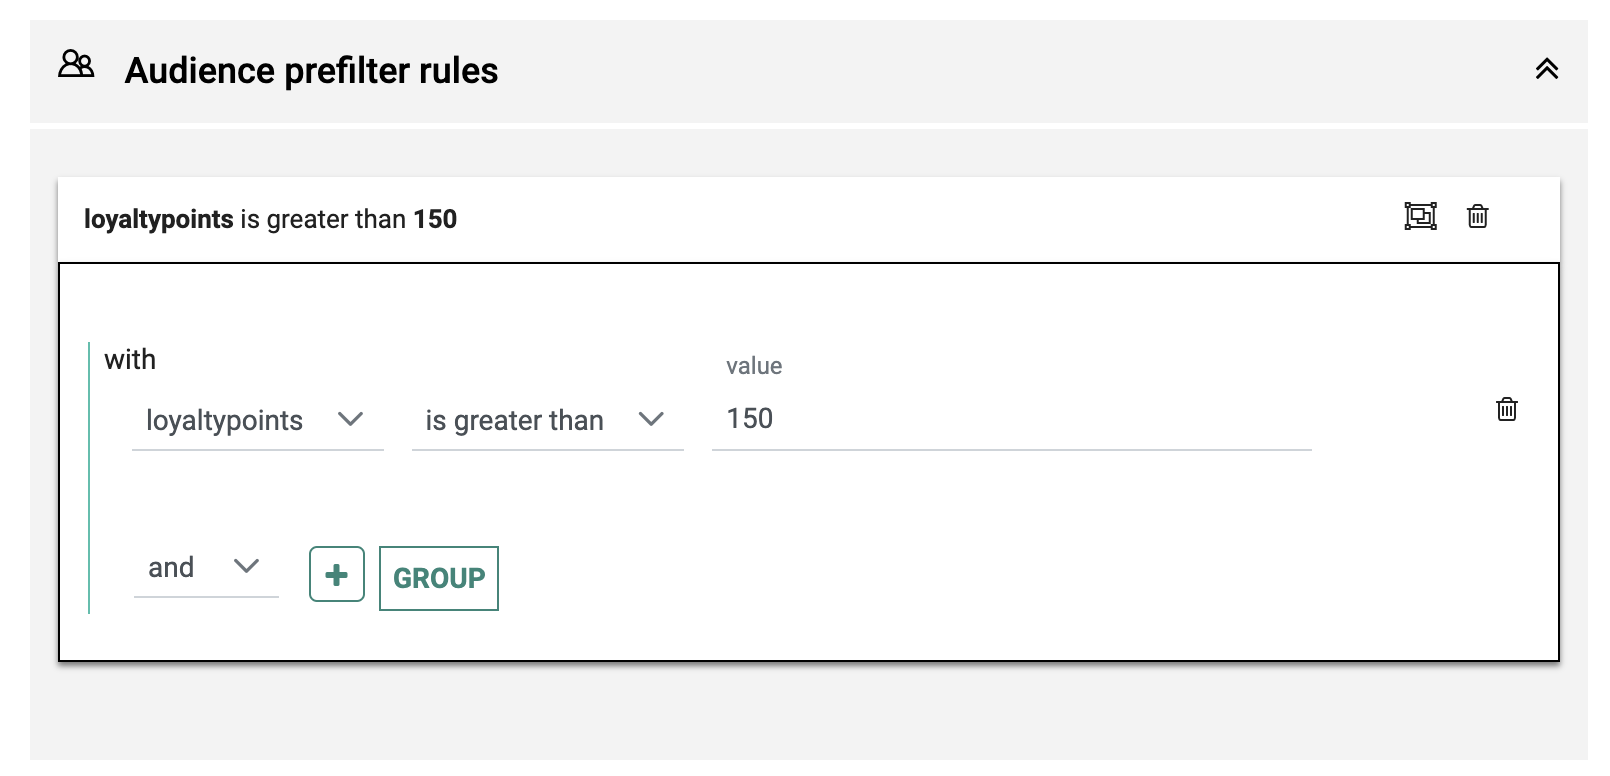
Audience prefilter rules — Click on the 'Add Filters' button to create one or more filters.

The following is shown :
-
Click the '+' button to add a filter — You can select a parameter and an operator. Depending on your selection, one or more values need to be entered/chosen.
Example :
The loyalty card points of the user need to be greater than 150.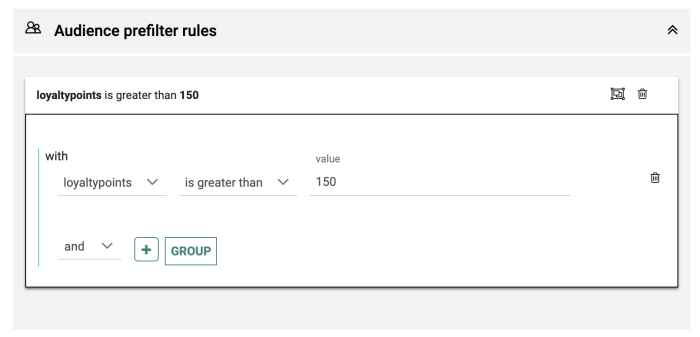
The operator between the different filters can be 'and' (to meet all filter criteria) or 'or' (to meet at least one of the filter criteria).
Click the 'Group' button to add a filter group — This will create a sub-group in which you can define a set of filters.
Example :
The contact has collected more than 49 points, and is opted in to your brand (= filter group to check if the optout field contains the value 0 or NULL).
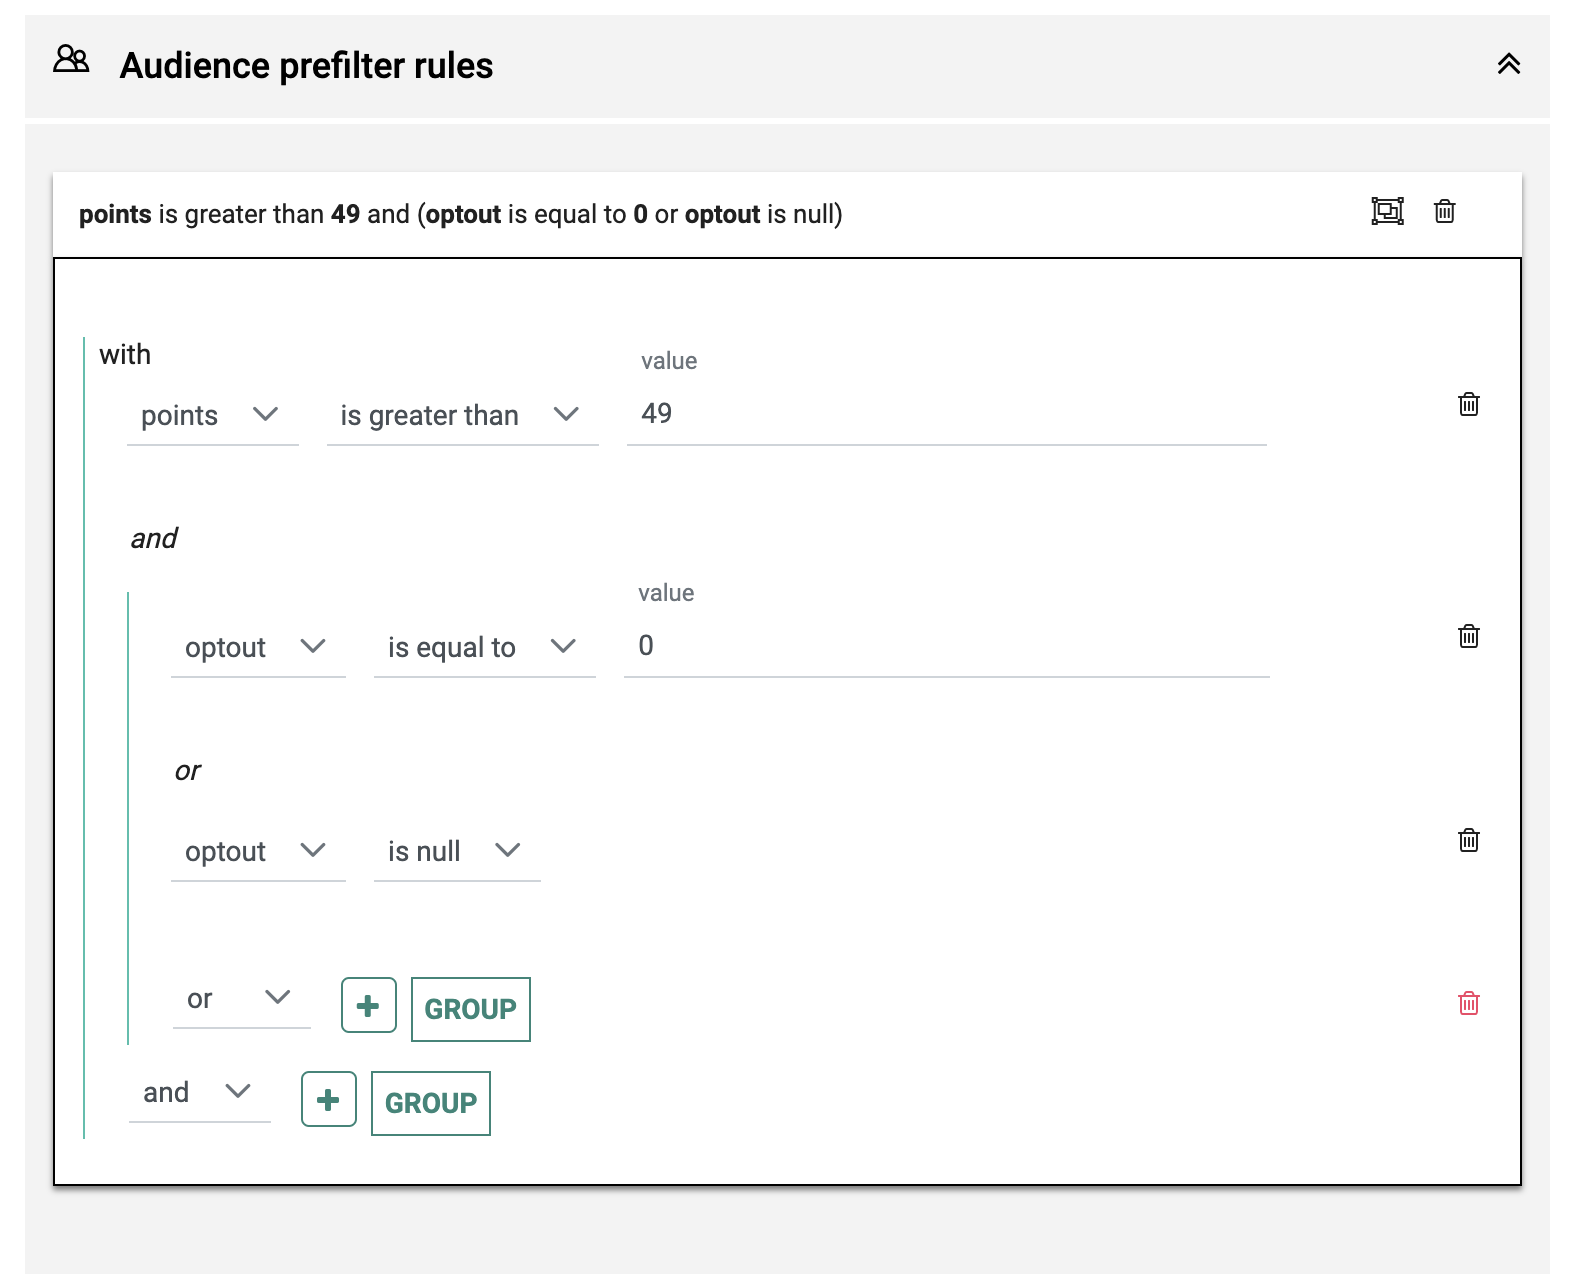
Note: Management of the available fields for the audience prefilter rules is explained here.
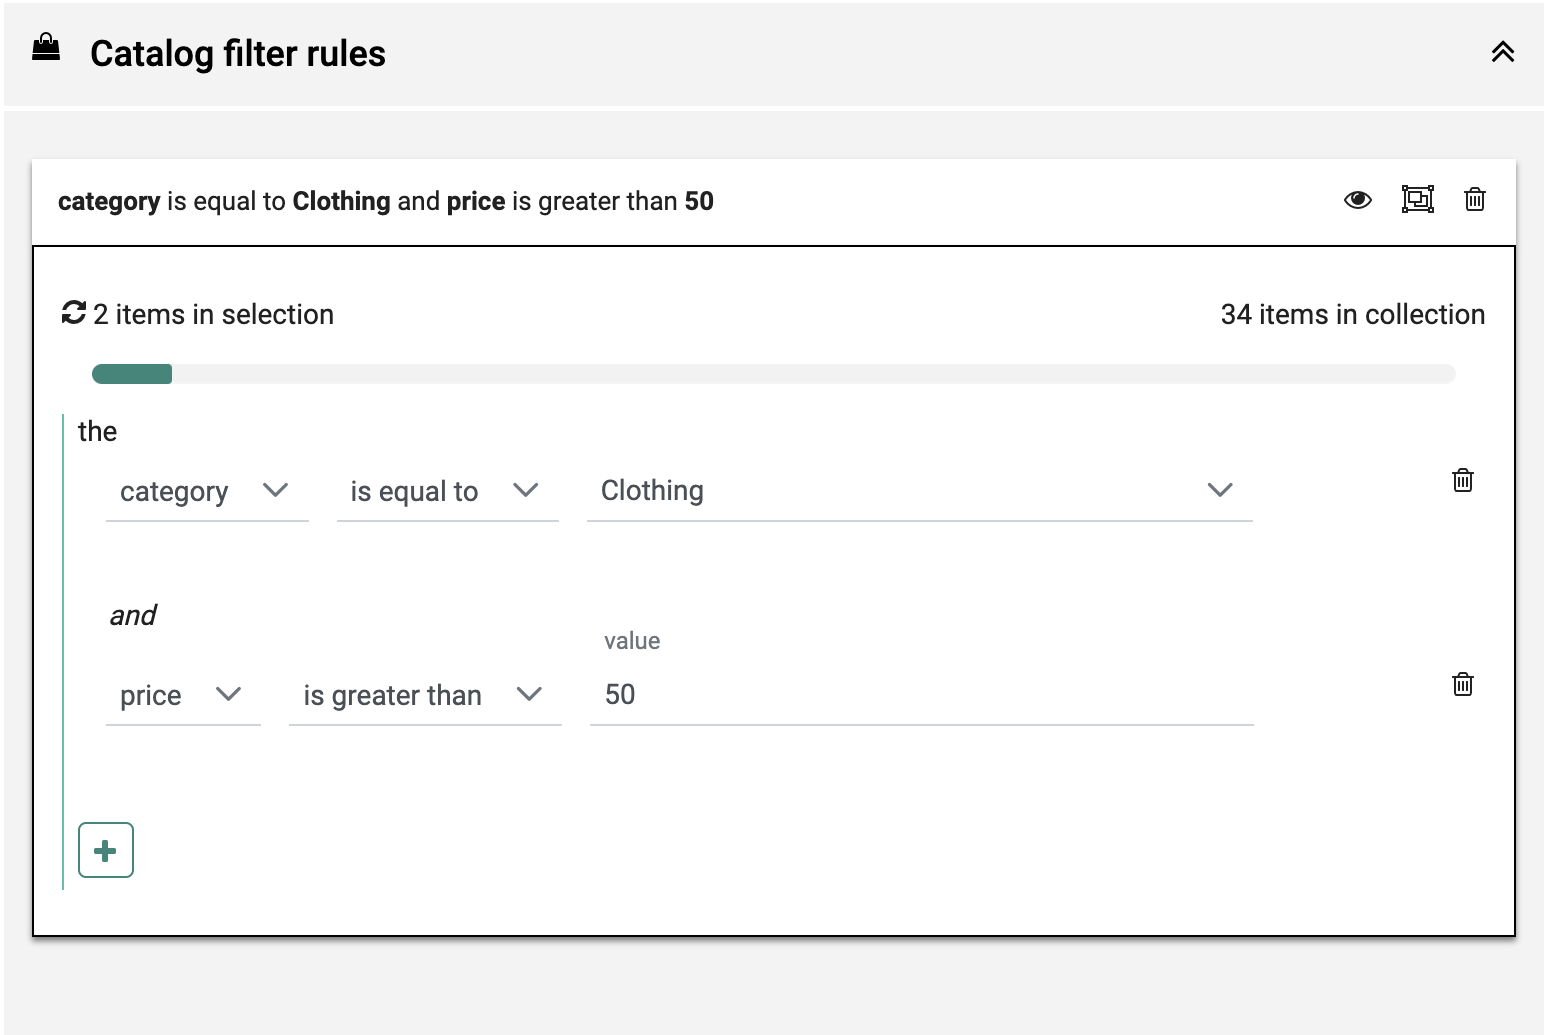
Catalog filter rules — Click on the 'Add Filters' button to create one or more filters.

The following is shown :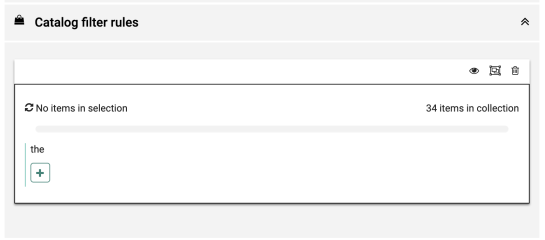
At the top-left, the number of items in your selection (= your catalog filter) is shown. As there's no filter set by default, 'No items in selection' is shown at the start.
At the top-right, the total number of catalog items in the collection (= the entire catalog) is shown.
- Click the '+' button to add a filter — You can then select a parameter and an operator. Depending on your selection, one or more values need to be entered/chosen.
Note: When clicking the values drop-down arrow, the available values are loaded from the catalog.
After setting your filter, click on the reload icon to show the actual number of items in your selection.
Note that this needs to be done each time you make a change to the catalog filter.Example :
The category is equal to 'Clothing'.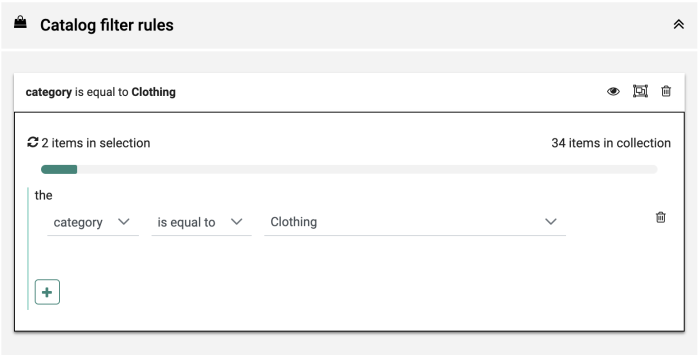
When combining multiple catalog filter rules, the 'and' operator is used.
Example :
The category is equal to 'Clothing' and the price is higher than 50.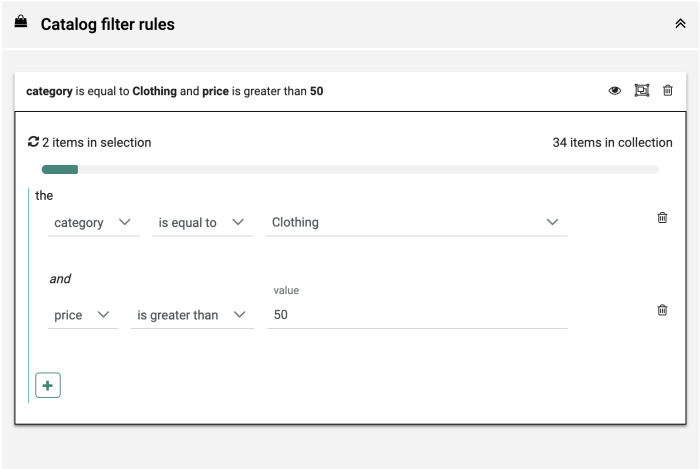
- The eye icon on the top-right of the catalog filter allows you to preview the filter.
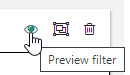
This will show a pop-up with the selected items, based on your filter selection.Note: The preview is limited to show a maximum of 12 items (the top 12).
Example:
Preview of the catalog filter rules : The category is equal to 'Fashion > Men > Sweaters' and the price is lower than 45.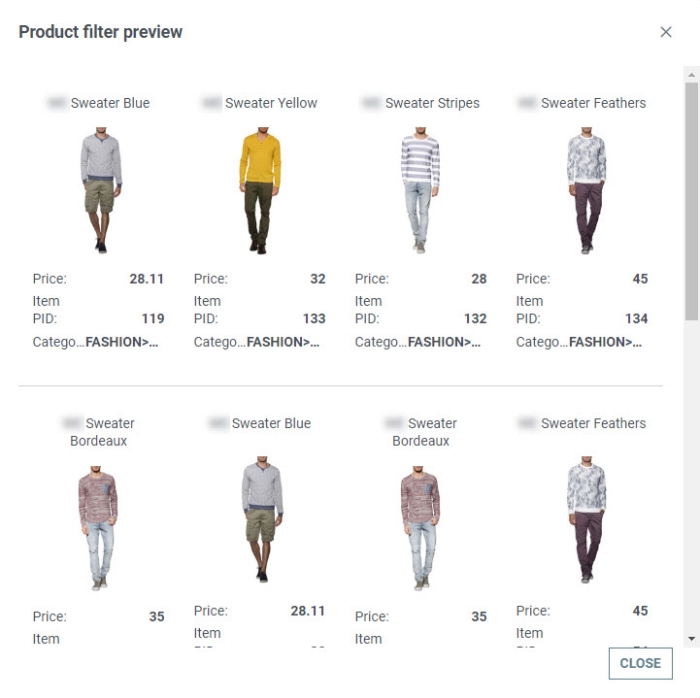

Note: If no products comply with the filter criteria then no Smart Audience can be calculated and in that case the filter should be reviewed.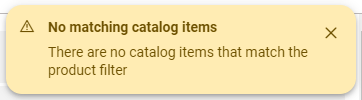
In that case, a warning message is shown after clicking on the reload icon, and the 'Calculate' button remains disabled.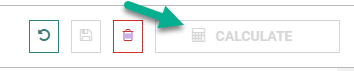
Note: All filters available for the creation of Smart Content are also available for the creation of the Smart Audience content. The only one that is not applicable for Smart Audiences is the Rule context because the filter condition always applies.
Both the Audience prefilter rules and the Catalog filter rules use the following general icons :
-
 — Open or close filter. When closed, only the filter caption is shown, all rules are hidden.
 -
 — Delete. This can be applied to a single filter rule, or on the combination of all rules (which is the audience prefilter or the catalog filter as a whole).
 -
 — Expand/Collapse. To collapse/expand the audience prefilter and catalog filter rules sections.
Note: Filtering on a date field can be done using multiple types of input :
- When using 'is older than' or 'is newer than', a drop-down appears that gives the user options such as 'in the last 2 hours, in the last 30 days, etc.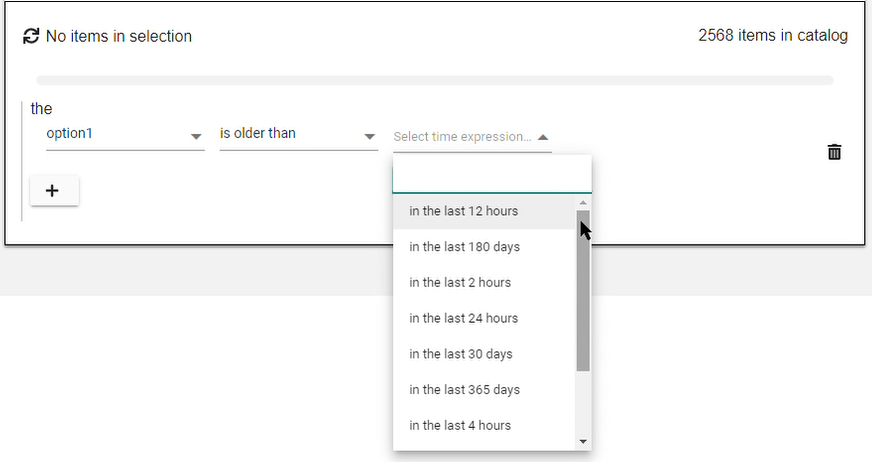
- For other values, a calendar pops up in which a date can be selected.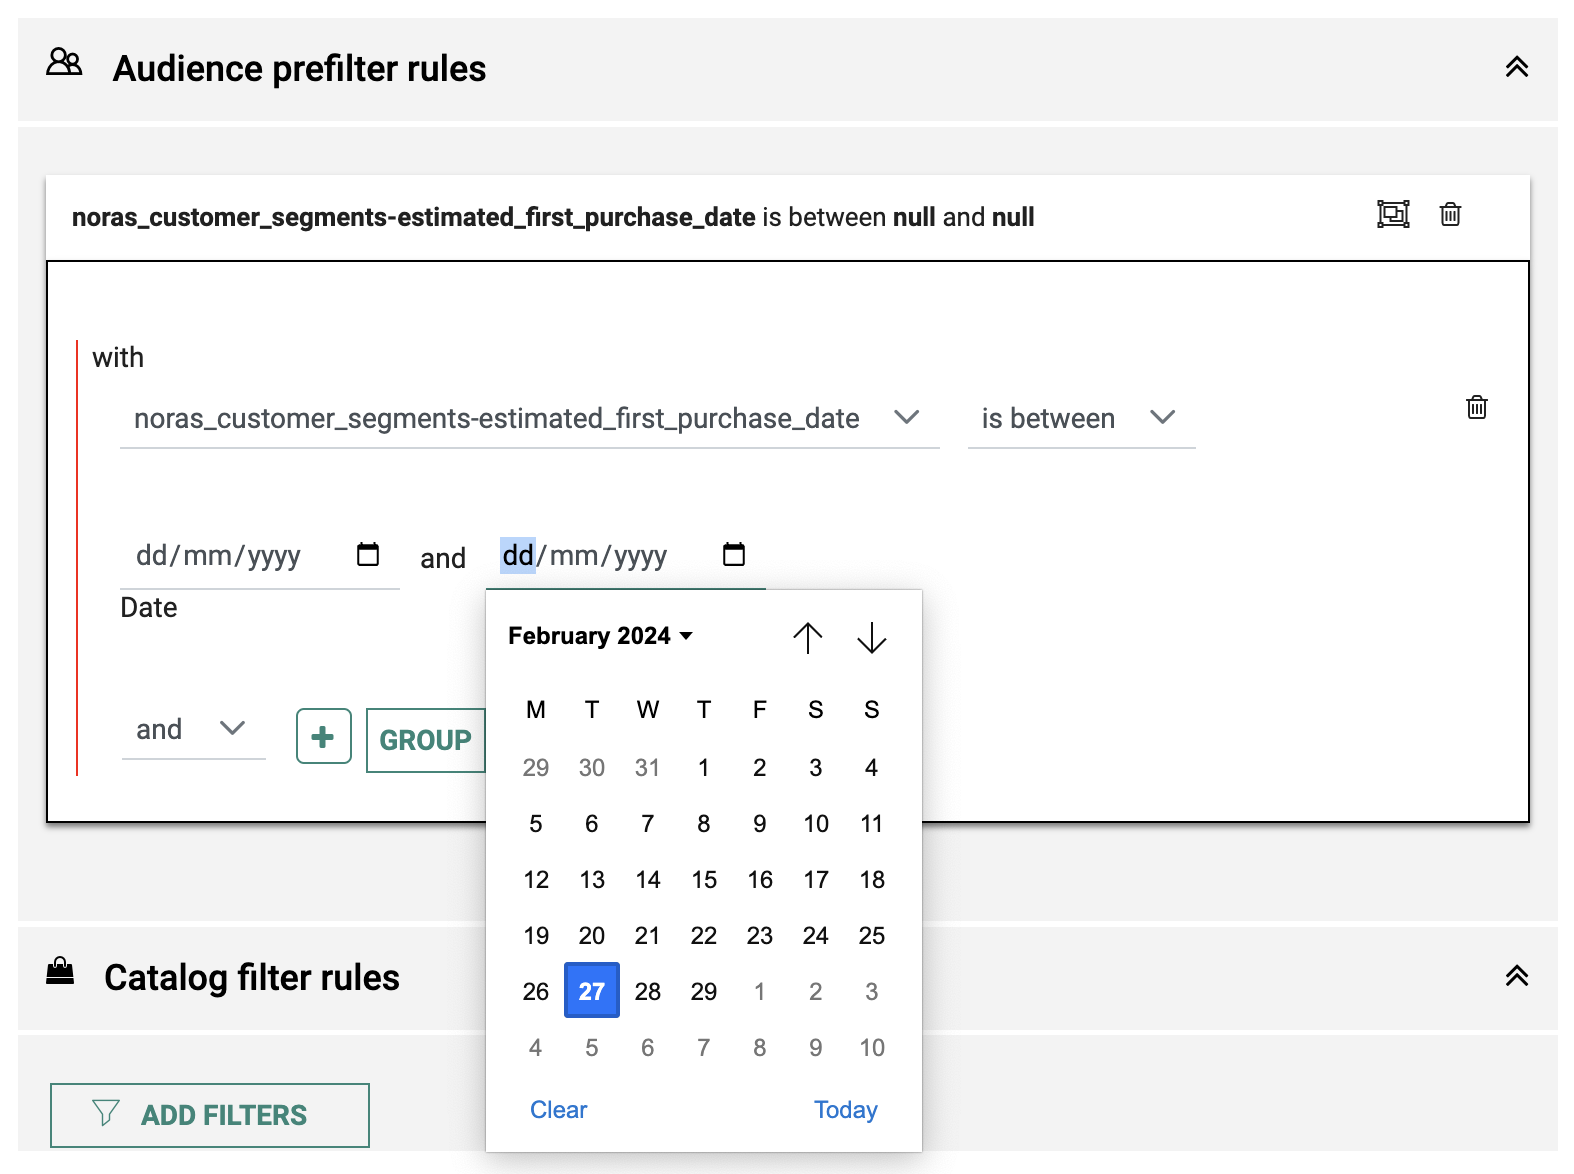
When your Smart Audience configuration is ready, click on the Save button at the top.

To revert all your changes to the last saved version, click on the Undo button.
To completely remove the Smart Audience, click on the Delete button. An additional confirmation is needed in this case.
Note: You can switch any time between the Smart Audiences overview and any opened Smart Audience configuration by clicking on the corresponding tab (the active one shows a blue line underneath).
Clicking on the cross icon next to a Smart Audience name, closes the configuration.
When there are unsaved changes when leaving a Smart Audience configuration (for example by switching to another tab), a dialog window appears to warn the user.
The user can then choose to :
- decline the changes by clicking 'Leave'.
- stay in the current Smart Audience configuration by clicking 'Cancel', so the changes can be validated and saved.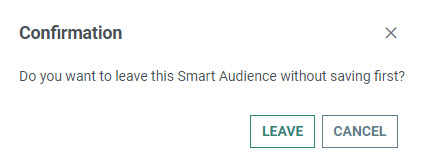
Calculation of a Smart Audience
Once you are done with the configuration, click the 'Calculate' button. This will calculate the audience that is most likely to interact with the message and generate a static segment.
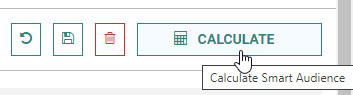
Note: As long as the calculation is ongoing, the Calculate button is disabled and shows a spinning hourglass icon :
To calculate the audience, the following rules are applied :
- By default, Smart Audience uses up to a maximum of 20% of the audience contacts that match the audience and catalog filters, only including the contacts that have interacted with the brand (visited the website, purchased products).
- When set to a fixed maximum audience size, Smart Audience resizes the number of contacts that match the filters and past interactions (visited the website, purchased products).
- For both the 20% default size and the fixed specified size, the contacts are sorted according to a score. The top contacts (best profiles to interact with your brand) are used to fill the Smart Audience.
- The Smart Audience segment can never exceed 1 million contacts.
- If the number of contacts is less than the default of 20% or the fixed specified size (depending on the filters), the segment contains a lower number of contacts.
Example :
When the calculation has finished, the calculated results are shown as a bar chart with a description underneath.
The bars in the chart have the following meanings :
-
prefilter — This is the segment size based on the audience prefilter rules.
-
interactions — This is the segment size based on the audience prefilter rules, including only contacts that have interacted with the brand (via website interactions and/or online/offline purchases). The contacts need at least one interaction with the brand, to be part of this segment.
-
segment size — The final calculated Smart Audience segment combining the audience prefilter rules with the interactions, for which scores are calculated and based on the contacts' interests in the products/items from the catalog filters (catalog filter rules).
After calculation, the Smart Audience is available as a static segment and can be used in journeys in Marigold Engage/Campaign.
Note: The name of the static segment created in Marigold Engage/Campaign is a concatenation of the name of the Smart Audience and the organization.
The segment is automatically linked to the list defined in the universe settings in Site when configuring the connection to Marigold Engage/Campaign.
Note: The algorithm finds correlations in the interaction data of contacts visiting the website and/or online/offline purchases, in order to find the best audience to send the defined content to.
