Setup step
When creating or editing a Data Synchronization, the Setup step is visible.
This step contains two tabs: Setup and Advanced.
Setup tab
On the Setup tab, you can define all the settings for the Data Sync.
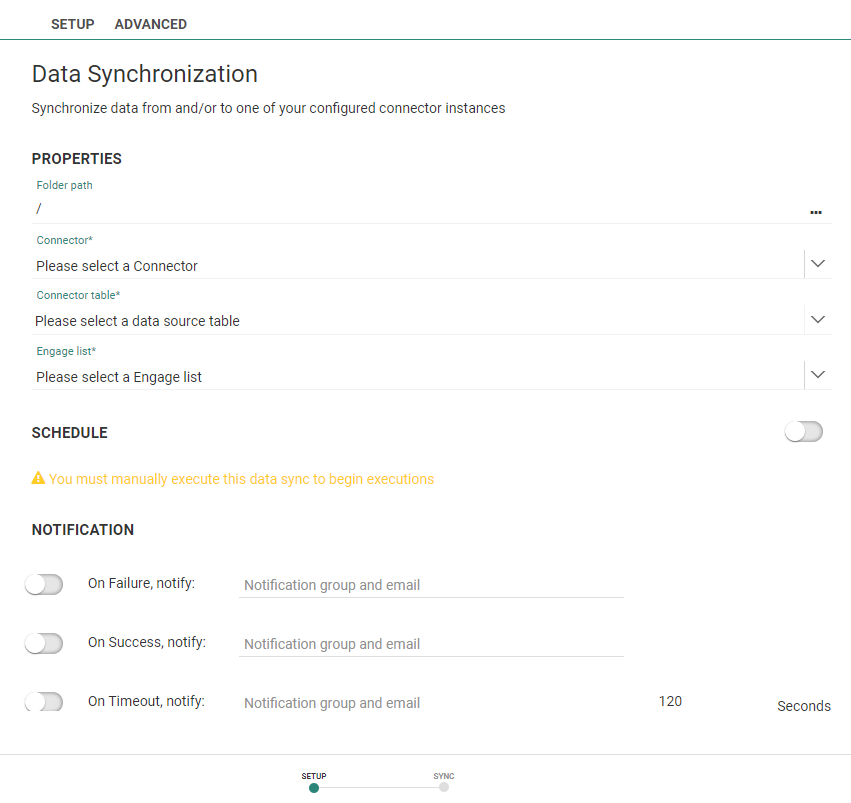
Properties
Connector — Choose any connector configured for the current organization in the Admin Configuration of Marigold Engage.
When a connector is selected, the header for the drop-down below changes from 'Connector table' to '<Connector name> table'.
Note: Currently we support Salesforce CRM, MSDynamics, SugarCRM, CDM, Shopify and Adobe Commerce as possible connectors.
Connector table — Select any table from the drop-down by clicking and scrolling through the list or by entering part of a table name (which filters the list) before making your selection. This list contains the tables from your Data source database, sorted alphabetically.
Engage list — Select any Engage list that exists in the current organization.
Note: As soon as you have selected all the properties, a Next button becomes available to navigate to the Sync step
Asset label — The label(s) assigned to this asset. Select one or more labels from the drop-down. (These labels are configured in the Admin configuration.) Users with the proper Access permissions can also create new labels here by typing the new label value in the field.
Note: Once you have defined the settings in the Sync step (created at least one record), and you return to the Setup step to change the connector, data source table or Engage list, a warning states that all sync settings will be lost.
Click 'Undo' to revert your changes to the original properties with the defined sync settings.![]() Note that you are only allowed to change the connector, data source table or Engage list, as long as the Data Sync has not yet been saved.
Note that you are only allowed to change the connector, data source table or Engage list, as long as the Data Sync has not yet been saved.
Schedule
By default, the Schedule switch is disabled, which means the Data Sync is not scheduled.
In that case, a notification is shown to explain that you can manually start the data sync execution and run it once.
The execution can be manually started through the  Execute once now button on the Connector Data Syncs Start page.
When the switch is enabled, the schedule settings become available: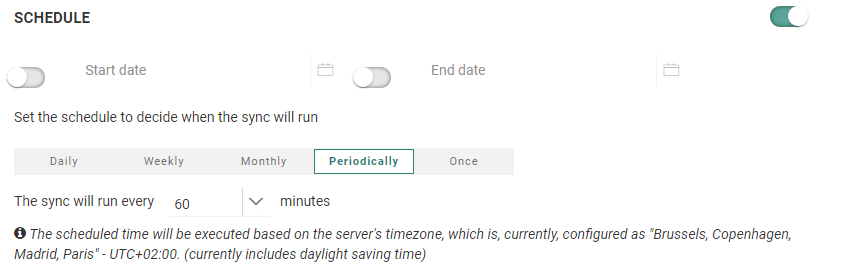
Start date and End date — You can set a start date and/or end date for the sync. For example, your task can start now but needs to run indefinitely.
Periodicity — Indicate when the sync should run:
- Daily — Select the times of day at which the sync should run. You can select more than one.
- Weekly — Select the day of the week on which the sync should run. The sync can run more than once a week. You can also set the start time.
- Monthly — Select the days of the month on which the sync should run. You can also select the time of day at which the sync should start.
- Periodically — Set the recurrence of the sync, expressed in minutes. For example, the sync runs every 10 minutes.
- Once — Set once if the sync needs to be executed just once. You can set the start time at every half hour of the day
Notification
A message can be sent when the Data Sync has been completed successfully, or if it fails or a timeout occurs.
To activate a notification, simply enable the corresponding switch and enter one or more email addresses (multiple email addresses are separated by a semicolon). You can also select a notification group. These notification groups are created in the Admin Configuration.
Note: Notifications are optional. When enabling one or more notifications, you need to provide at least one email address or group for each enabled notification.
Notification emails about erroneous data syncs contain the same information as shown on the History tab.

Advanced tab
On the Advanced tab, you can define the Data source batch size and the Engage batch size.
- Data source batch size — Used to determine how many records are retrieved per batch from the Data source (in case of Data source to Engage sync) or updated/inserted in the Data source (in case of Engage to Data source sync).
- Engage batch size — Used to determine how many records are retrieved per batch from Engage (in case of Engage to Data source sync) or updated/inserted in Engage (in case of Data source to Engage sync).
Example
Data source batch size is set to 500 and Engage batch size is set to 100.
- Data source to Engage sync — Per batch, 500 records are retrieved from the data source and put into a temporary table. The Engage batch size is then used to update/insert those 500 records from the temporary table to the Engage table in batches of 100. This process is repeated until all records are processed.
- Engage to Data source sync — Per batch, 100 records are retrieved from Engage and put into a temporary table. The Data source batch size is then used to update/insert those 100 records from the temporary table to the Data source table in batches of 100 (not 500, as only 100 records exist in the temporary table per batch). This process is repeated until all records are processed.
When you've completed the setup, press Next.
This will take you to the Sync step.
Sync step
This step contains three tabs: Sync, Filters and History.
Sync tab
The sync tab lets you define the Data source fields that need to be synchronized with the Engage fields. A mapping between the fields is defined as well as the direction of the sync. Engage fields can be selected from the parent list as well as linked lists.
Technical note: Make sure that the type and field length of the mapped fields correspond (such as syncing a Data source date field only with a Marigold Engage date field).
Note: When setting up a sync between the Data source and Engage, Data source tables and Engage lists can be used just once in a sync.

- Data source field — Data source fields can be selected from the Data source table (selected in the setup step) by clicking and scrolling through the list or by entering part of a field name (which filters the list) before making your selection.
- Scope — The Engage list (selected in the setup step) can be selected as parent list, and all of its 1:1 relations. By default, the scope 'Master' is selected.
- Field — Fields from the scope can be selected (a combo-box appears only when a scope is selected).
Note: When syncing a Engage list field with a Data Source field having a picklist associated to it, the picklist is automatically created as an Option list in Engage.
Note: When using an Engage list that has linked lists that are not shared with the current organization, you will not be able to use fields from these linked lists in the data sync. The user is informed when trying to select such a list in the data sync configuration.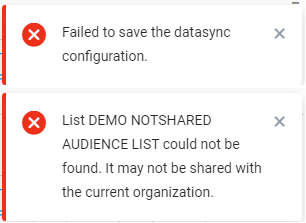
You can also determine the direction of the data sync using the following buttons
 — Engage list to Data source table
 — Both ways
 — Data source table to Engage list


Note : Computed fields (non-persisted and persisted) can be selected as field when the chosen direction is  (Engage list to Data source table). For 'bi-directional' and 'Data source table to Engage list', computed fields can not be selected.
More info about computed fields in lists can be found here.
Creation of new fields
It's possible to add a new field to the target list (selected as scope), using the 'Create new field' option.

When this option is selected, a new text field appears underneath the drop-down in which a field name can be entered. This value is required.
- The new field name has a default value equal to the Data source field name (in uppercase) unless that field name already exists. In this case, the field is empty (a placeholder is shown instead).
- The new field name cannot be the name of an existing field, already configured new field or a non-permitted keyword (front-end validation).
- Spaces in the field name are converted to underscores (for consistency).
- The type of the new field is automatically derived from the type of the selected Data source field.
- If the selected Data source field has data type TEXT or LINK with length=0, then the new field will have data type LONGTEXT
- As soon as the datasync is created/updated, the new fields are created on the list selected as scope.
Sorting
Syncs can be sorted by clicking on one of the column headers (Data source Field, Direction, Scope, Field).
Clicking on a header sorts the results in ascending order of the column values.
Active sorting is indicated by an up (ascending) or down (descending) arrow next to the column header.
Clicking on a header of an already active sorting column, changes the sorting direction for that column.
Deletion
A complete row can be deleted by clicking on the trash bin icon: 
The last remaining row cannot be deleted.
Filters tab
On the Filters tab, the user can define
- a Data source filter — This is a text-area in which you can type a filter. Only records matching the filter will be synchronized. The filter syntax depends on the connector that you are using. For more details on the syntax, please consult the corresponding manuals/support site.
- a Engage filter — Only records matching this filter will be synchronized during the datasync run. This filter can be built using the Constraint Builder, containing the same options as for building dynamic segments.
Note: Defining filters is optional. By default no filters are set.
When a filter is set for either the Data source fields or the Engage fields, this is indicated by a filter icon (![]() ) next to the corresponding header on the 'Sync' tab.
) next to the corresponding header on the 'Sync' tab.
When you click on a filter icon, the Filters tab is opened. 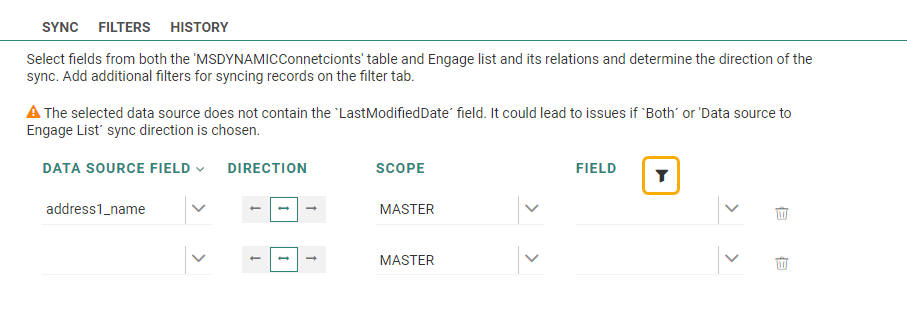
An organization filter is automatically applied to the Data Sync when it's defined on the audience list (See the List Sharing section in the List properties).
Note: This can only be the case for synchronization of audience list data from Engage to the Data source.
Note: If an organization filter and a Engage filter are applied, the Data Sync will be executed taking into account both filters.
History
The history of a data sync provides details on previous executions; This includes
- the source and destination table of the data sync
- the details per run :
- the run date
- the direction of the data synchronization
- the total number of records included
- the number of records that successfully synchronized, and the ones that failed
- the starting time of the sync
- the duration of the sync
Note: When no synchronization has been executed yet or no data is available yet, the user is informed: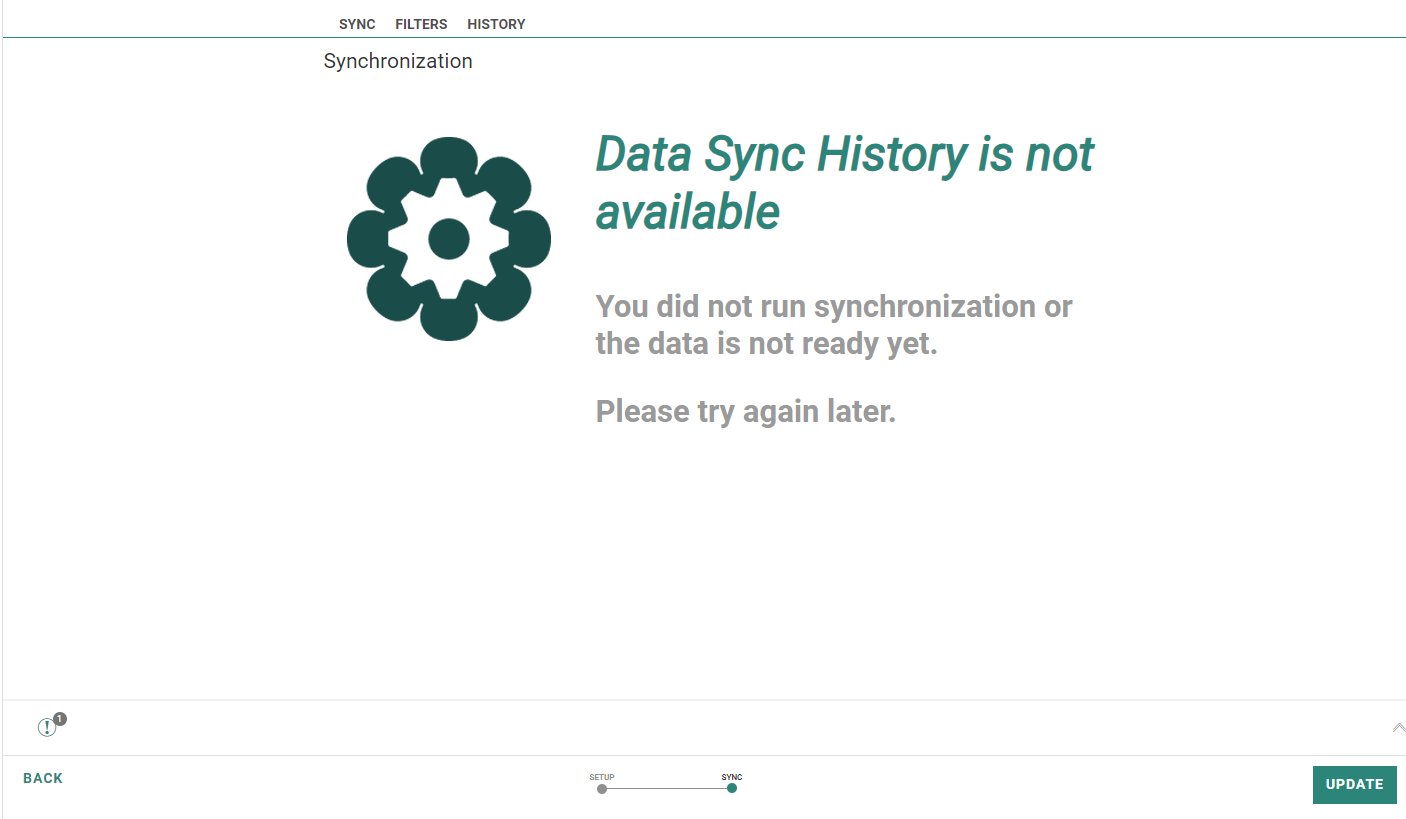
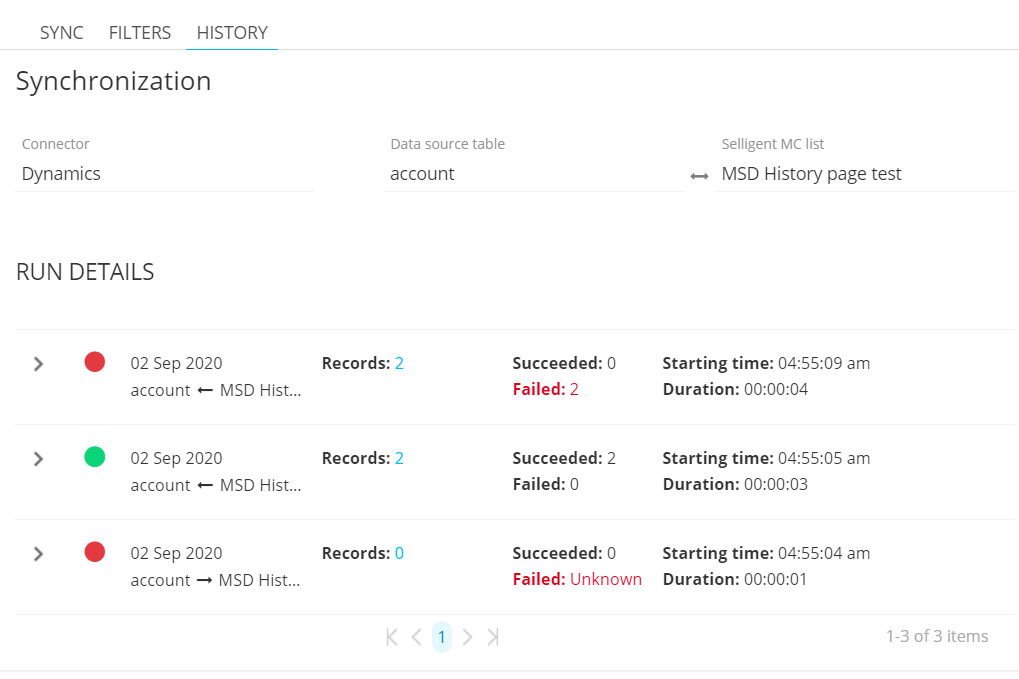
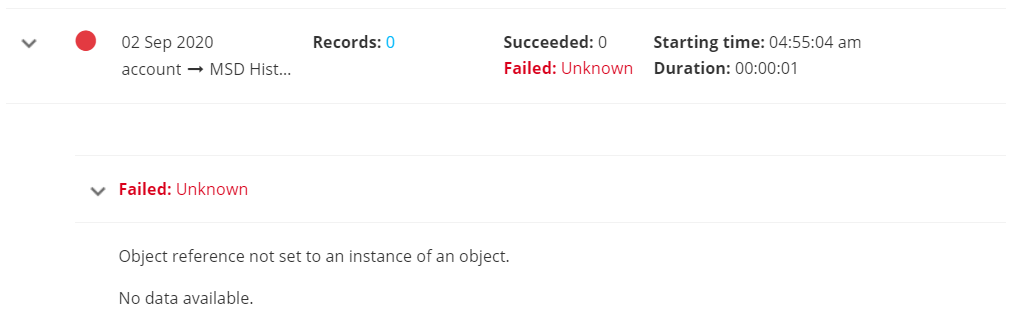
Each run can be expanded by clicking on the down-arrow on the left, to show more details about failed records.
When erroneous data is available, it will be shown here.

Note: When a data sync generates an error, this error will also be visible from the notifications in the top menu bar. Clicking a notification takes the user to the specific task's page.
When there are new unread messages, the number of unread messages is displayed on the Notification entry:
Failed records for which an error message is returned, can be exported to a CSV file. An Export button is available to launch the export. This Export button will NOT be available when the cause of the failed record is UNKNOWN or when there are no failed records.
When a failure happens before the individual records are captured, the system doesn't know how many records would have been included in the sync.
In that case, 'Unknown' is shown instead of the number of failed records.
Note : In case of a long list of failed records, only the first 10 failed records are shown.
Create/update Data sync
When you've finished configuring the sync, press the 'Save' button (or 'Update' button if you are modifying an existing Datasync).
The 'Save' (or 'Update') button is only available when at least one field map is defined. Otherwise the button is grayed out.
List of possible errors :
- Data source connector instance is in use
- Data source sync configuration is already disabled
- Data source sync configuration is already enabled
- Data source sync not scheduled
- Data source table field is used multiple times
- Data source table already used in data sync
- Schedule end date should be less than start date
- Invalid Data source batch size for Data source sync
- Invalid Data source connector instance
- Invalid Data source table
- Invalid Data source table field
- Invalid data sync direction
- Invalid list
- Invalid notification email address
- Invalid notification group
- Invalid notification timeout configuration
- Invalid notification type
- Invalid relation
- Invalid schedule data configuration
- Start date should be greater than current date
- Invalid schedule type
- Invalid Engage batch size for Data source sync
- Invalid Engage list field
- Invalid start time format
- Engage list already used in data sync
- Engage list field is used in Data source data sync
- Engage list is used in Data source data sync
- Notification configuration is missing
- Notification groups are not configured
- Schedule data configuration is missing
- Schedule end date is required
- Schedule start date is required
- Schedule type is required
- Engage list field is used multiple times
- Start time is required
- Failed to save the Data source sync data configuration
- Failed to delete the Data source data sync between Data source table [Data source TableName] and Engage list [listName]
- Failed to disable Data source sync between Engage list [listName] and Data source table [Data source TableName]
- Failed to enable Data source sync between Engage list [listName] and Data source table [Data source TableName]
- Failed to mark Data source sync between Engage list [listName] and Data source table [Data source TableName] for execution
List of possible warnings :
- The data type of the Data source table field and Engage list field does not match
- Field length of the Data source field and Engage list field does not match
Note: There are placeholders [listName] and [Data source TableName] in some messages, which are substituted at run time with information based on the context.
Errors and warnings are shown in a validation pane on the bottom of the screen after clicking the 'Save' button. In that case, the button label changes to 'Update'.
When navigating to the Sync tab and clicking on an error/warning in the validation pane, the row linked to the error/warning is highlighted (if applicable).
This allows issues to be easily resolved. When done, click on the Update button to save your changes.
Example:
When selecting a warning in the validation pane, the row that causes the problem is highlighted on the Sync tab. The label of the button shows 'Update'.
Some errors will continue to be displayed as notification messages on the top-right instead of using the validation pane, such as:
- 'The selected Data source table does not have any fields' (Setup step).
- 'The Data source table is already in use' (Sync step).
When everything has been set up correctly, the Data sync will be created and visible on the Start page.
Test your knowledge about data synchronization between Engage and the Data source
Data synchronization between Engage and the Data source is ...
Test your knowledge about data synchronization between Salesforce CRM and Engage
When setting up the data sync between Salesforce CRM and Engage, 'Synchronize deleted items' means :
1 - that items that are deleted in Engage will also be deleted in CRM
2 - that items deleted in CRM will also be deleted in Engage
3 - that items deleted on one side will automatically be deleted on the other side
