User Guide: SugarCRM Integration
To set up the integration between Engage and SugarCRM, the following steps need to be executed:
STEP 1: Simlink and Connector installation and Configuration
CRM connectors are in charge of the communication and exchange between CRM and Engage. CRM connectors are responsible for two main operations between the CRM database and the Engage database.
-
Data exchange: This includes bi-directional exchange/synchronization of data in any business object or any table, including the metadata.
-
Messaging: This implies the creation of records and the execution of functions within the CRM environment from within a Engage journey and use of feedback from the CRM environment to trigger next actions in a journey.
To enable the use of a CRM connector, the following technical components are required:
-
SIMLink web module on the Engage server. This module is required when no direct access from Simlink is possible to either the CRM or Engage environment.
-
SimLink service in combination with the connector.
The installation and configuration of these modules is explained in this dedicated topic: Installation and configuration of Simlink and CRM connectors
Note: The SIMLink and Connector/Plugin steps explained in this document are mandatory, in order to use CRM connectors within Engage.
Get in touch with your Marigold contact to get these steps done.
STEP 2: Set up the Integration in CRM
Execute the step explained in the SugarCRM Setup topic to set up the integration on the CRM side.
STEP 3: Set up the CRM Integration in Engage
Prerequisites
Make sure that the steps related to the setup of the SIMLink web module, SIMLink service and CRM Connector plugin are executed.
Connector Configuration in Engage
Note: Only users with administrator rights can configure Connectors.
Check out the topic on How to create a connector in Engage for a detailed overview on creation and configuration of the connector.
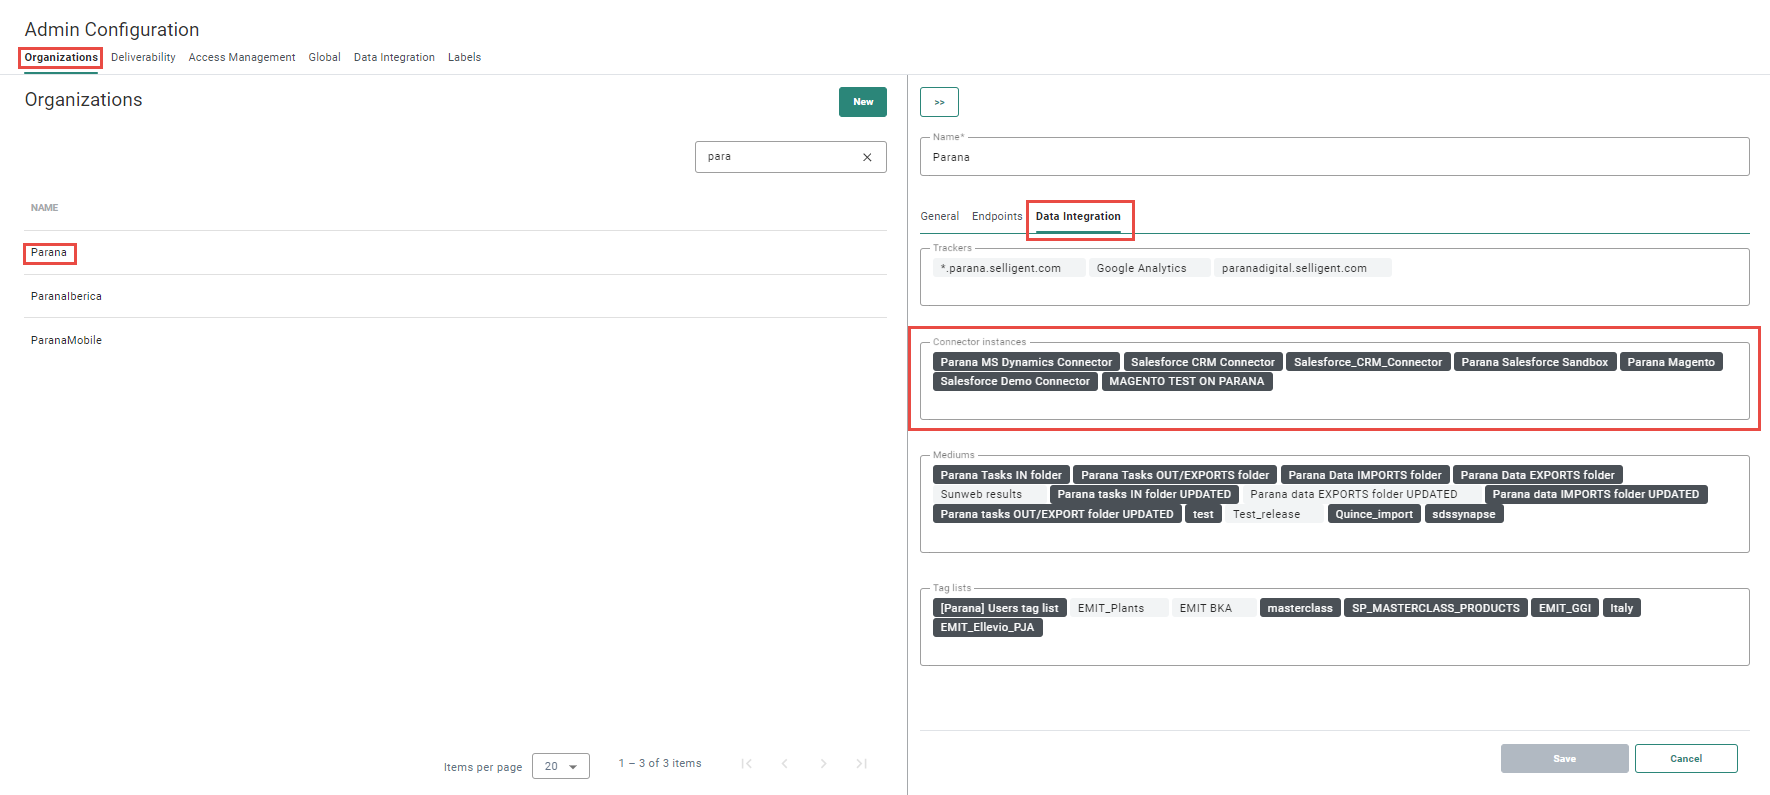
Link the Connector to Your Organization
Engage makes use of “Organizations”
CRM Connectors need to be linked to Organizations, to be able to use them in those organizations in Engage.
1. In the Admin Configuration module, select the Organizations tab on top.
2. Select the organization in which the CRM Connector instances will be used.
3. The organization properties are shown on the right. In here, select the Data Integration tab and add all connector instances that are needed. Save your changes.
STEP 4: Using the Engage-SugarCRM Integration
CRM connectors can be used in two ways in Engage, namely for:
-
Data Synchronizations – which are setup and executed in the Data Exchange chapter.
-
CRM Message Synchronizations – which are setup in the Data Exchange chapter, and executed through Custom Components in Custom Journeys in the Journeys chapter.
Data Synchronization
The Data Synchronization is set up in the Data Exchange chapter of Engage. More information on this can be found in the following topics:
Message Synchronization
CRM Connector Message Synchronization is a type of Custom Component within Engage and makes it possible to create/update/delete CRM information from within a Custom Journey execution through a CRM Connector instance.
The option is only available for users with permission rights for Custom Components, and for CRM Connectors for which the option Custom component - message sync is enabled (in the connector configuration in the Admin Configuration module, on the Data Integration tab).
Setup a CRM Connector Message Sync
The Custom Components tab can be accessed in the Data Exchange chapter.
A Start page is available giving an overview of all existing Custom Components. The Start page presents information on the Custom Component usage and allows the user to edit, duplicate, or delete a Custom Component.
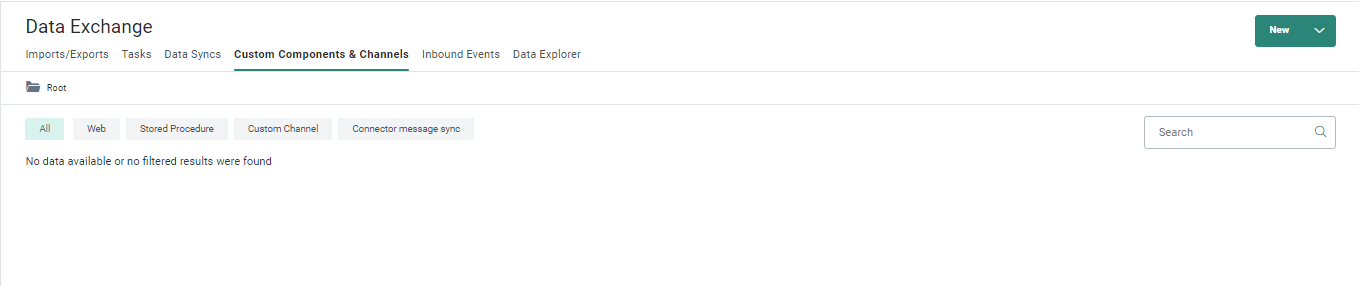
1. To create a new Custom Component , go to the Data Exchange fly-out menu and select Create Custom Component or, on the Custom Component Start page, click New. You can choose between Web, Stored Procedure, Custom Channel or Connector Message Sync.
A properties panel is then displayed:
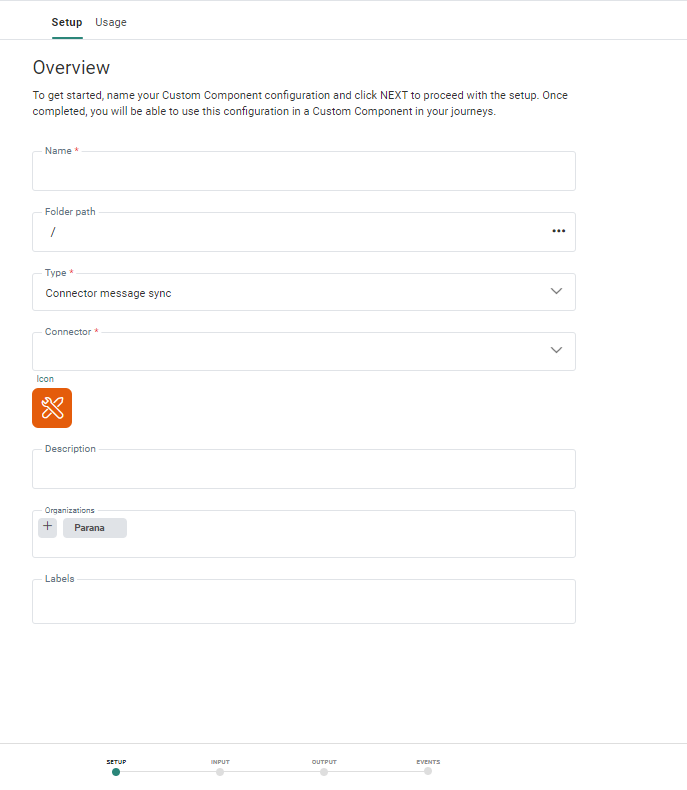
Name — Set a name for the component and make sure to give an explicit name as this will be used in the journey builder to select the Custom Component.
Type — Select the Connector message sync type.
When this type is selected, an additional field is available to select a Connector from a drop-down list. (All CRM connectors are listed that have message sync enabled in the Admin Configuration and that are available for the current organization.)
Icon — You can select a different icon to use for the component by clicking the icon and selecting a different one from the list of available icons.
The selected icon will be used in the custom journey when the component is placed on the canvas, and also in the component properties panel.
Depending on the chosen CRM connector, the icon is automatically updated (and can still be changed manually).
Description — Provide a clear description of what this component does.
Execution retry — A maximum number of 3 retries can be set. If the execution fails, a new attempt will be made until the selected number of retries is reached.
Organizations — Select one or more organizations for which this Custom Component must be available.
Tags — Add tags for easy search.
Note: Specific rights are required to be able to create a Custom Component.
2. When done, press Next.
The next step displays a drop-down containing all CRM messages associated with the selected CRM connector. When you choose a message, all input parameters available for that CRM message are shown. Values can be set here. Mandatory parameters are marked with an asterisk.
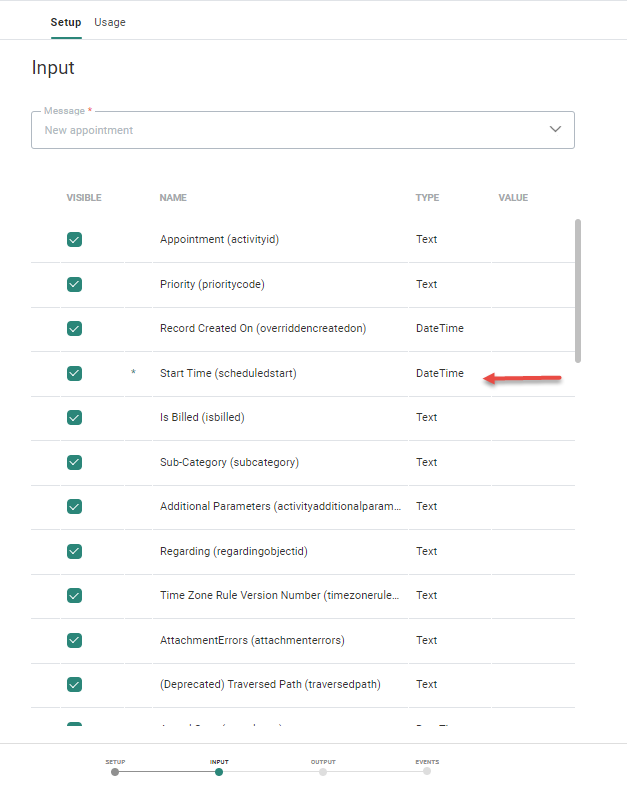
You have the possibility to check/uncheck the Visible checkbox for each input parameter, to define if the parameter should be visible or invisible at Journey level (in the CRM Component properties).
When you set a parameter as invisible (uncheck the checkbox) while it's a required parameter (shown with a *) and no default value is set (in the last column), an error icon appears :

Invisible parameters use the default value set once the Custom Component is used in a Journey.
They are not visible in the Custom Component properties, while fields that are defined as visible are available in the Journey.
3. Click Next. The following step contains text explaining that message syncs do not have any output parameters (other Custom Component types do).
4. Again, click Next. The Events step is the final step.
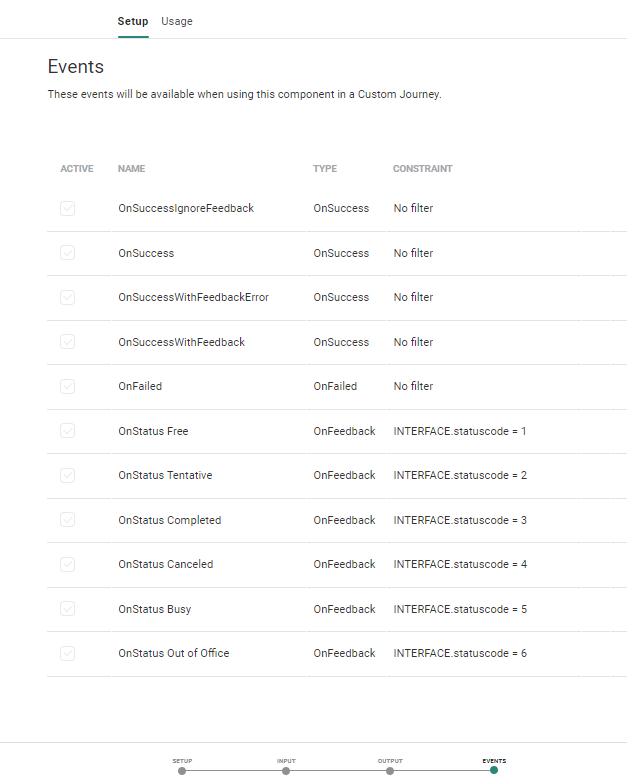
The events listed are linked to the selected CRM message. They will be available when using the Connector Message Sync Custom Component in a Custom Journey.
The following fields are listed:
- Active — Switch, which is enabled for all events.
- Name — Event name.
- Type — Event type : OnSuccess, OnFailed or OnFeedback.
- Constraint — The constraint that is set, or 'No filter' in case no constraint is set.
The events page is read-only.
4. Click Create Custom Component to finalize the creation. (Select Update Custom Component when you’re editing an existing Connector message sync custom component.)
The created CRM message sync is visible on the Custom Components Start page.
When you edit an existing CRM message sync, the input step is opened by default. The message drop-down is read-only.
On the setup step, the CRM connector field is read-only. The type can still be changed (for example to type web). When doing so, the next steps change accordingly, to support configuration for the selected type of Custom Component.
Usage
The Usage tab shows the journeys where the Custom Component is used. Components that are currently used in a journey cannot be deleted.
From the overview you can jump straight to the journey.
Note: When the Custom Component is used in a Journey that resides in a folder the user has no access to, the journey will not be listed in the Usage dialog.
History
The History gives insight on where the Custom Component is used and the execution details.
After selecting the journey from a drop-down list of linked journeys, all Custom Component execution details for that specific journey are listed.
- Custom channel name (as created in the Admin configuration)
- The fields of the custom channel. Depending on the selected custom channel, this list of fields will differ and hold the fields retrieved from the corresponding channel as well as the custom fields.
- The method used (ADD or UPDATE)
- Creation date
- State
- Execution date and time
- in case of fail, the error returned
The following states can be returned:
- 1= pickup
- 2= in progress
- 10= error
- 20= batch: file was created but not yet send
- 25= wait feedback
- 30= success (executed)
- 35= feedback error: successfully processed but a feedback error has occurred
- 40= feedback
- 50= canceled>
- 60= no handler: no handler was found (incomplete dispatch logic)
- 61= blocked by rule
Use a CRM Connector Message Sync in a Custom Journey
Setup a Custom Journey in the Journeys chapter in Engage.

Executing a CRM Connector Message Sync in a Journey can be done through the Custom Channel component.

A Custom Channel component can be used after any entry point (input, recurring batch, single batch) or event entry point (inbound event, etc.).
Your journey looks for example like this :
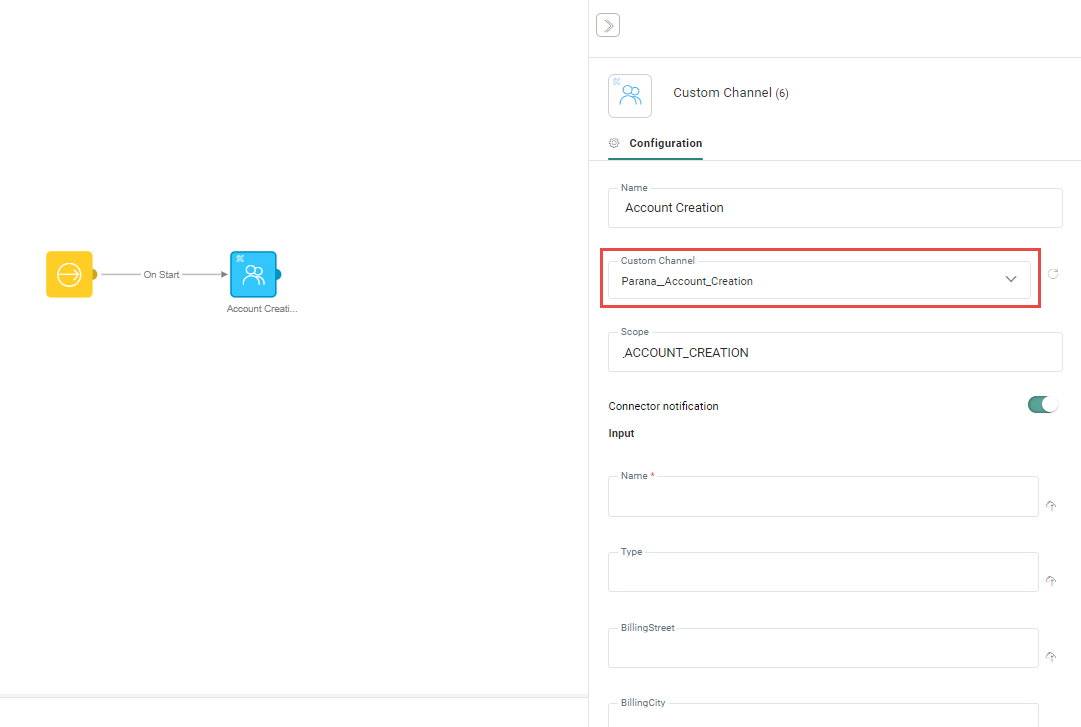
Properties of the Custom Channel component:
-
Name — Set a name for the component. This name is displayed on the Journey canvas.
-
Custom channel — Select the CRM Connector Message Sync (that was configured in the Data Exchange chapter). The properties panel then displays the extracted input parameters from the chosen Connector Message Sync.
-
Scope — The scope field lets the user define a specific scope for the content. This can come in handy when two identical custom channels are added to the journey. This way it’s possible to use one specific scope, and thus one of the two identical custom channels.
If no custom channels have been defined yet for this organization, a button Create one now is available. Click on it to go straight to the Data Exchange section and create a new Custom Component of type Custom Channel.
-
Send the same message multiple times — If this option is selected, the same message can be sent multiple times to the same contact.
Note that this property is only available for Single Batch and Recurring Batch Journeys.
-
Enable deduplication — If there are duplicate contacts in the journey's audience, you can use Deduplication to select a unique contact based on a field or a combination of fields. This avoids sending the message or creating the record more than once for the same contact.
-
Unique key — You can define the field in the audience that should be used to perform deduplication. This can be a combination of fields as well, for example the Name and phone number for a contact can be used to detect duplicates.
-
Prioritisation — Here you define what field in the audience should be used to define the record that has priority over the others in case duplicate records are found. For example, you can use the last update date as a prioritisation rule.
-
Sorting — Choose from ascending or descending to define the record that should be kept.
You can define the following settings:
Note that this property is only available for Single Batch, Recurring Batch and Custom Event Journeys.
-
Input — The input section lists all input parameters detected for the selected custom channel. You can fill them out with default values, values retrieved from a form, or values from the audience or linked lists. Use the following syntax:
-
[%RequestValue('FieldName')%] for form field values.
-
MASTER.FIELDNAME for fields from the audience
When an input parameter is linked to an option list, the field value can be selected through a combo box :
-
Output — For Custom Channel components of type CRM Connector Message Sync, output parameters do not apply.
Events
Two events are generated: Onsuccess and Onfailure.

Additional events are available when these have been defined for the Custom Component using a custom channel.
Validation
When entering a value or using an expression as value for an input parameter, the type and length of the entered value will be compared to those of the audience field used in the expression.
If the field is not found in the audience list or if the length or type is not compatible, a warning will be displayed (one warning per issue).
Save, validate and publish your journey to make it available for execution.
Activate the journey to execute it.
When the CRM Connector Message Sync custom channel is triggered, it will be executed.
