The Journey properties are accessible through the Properties icon in the toolbar of the journey.
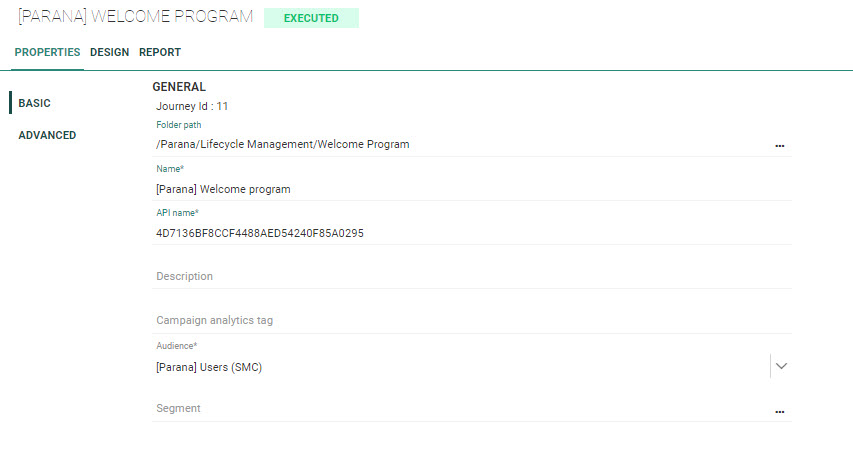
Following property fields are available in the Basic section:
- Folder Path — This is the folder in which the journey is created. By default it takes the folder that is currently selected on the Start page when the journey is created. You can modify the path if needed. Click the folder field to access the dialog and select a different folder.
- Journey ID — The ID of the journey after publish.
- Name — The name of the journey, used in the Start page for instance.
- API name — The name of the journey when used in the API.
- Asset label — The label(s) assigned to this asset. Select one or more labels from the drop-down. (These labels are configured in the Admin configuration.) Users with the proper Access permissions can also create new labels here by typing the new label value in the field.
- Description — The description of what the journey does. Use this field to clarify what the purpose is of this journey so other users know what this is about.
- Campaign analytics tag — Fill out one or more tags. These will be used when a tracker is activated.
- Audience — The audience for this journey. All interaction in this journey will be made with contacts from this Audience List.
- Segment — If segments have been defined for the selected journey, you can select a specific segment from the Folder selector. This segment will only target a portion of the selected Audience List and is applied throughout the whole journey.
Following properties can be set in the Advanced section:
Audience Pre-calculation
For some customers and in exceptional cases, it could be beneficial to pre-calculate the audience for an action in a journey well before the actual go-live, or when there’s less load on the environment. The actual journey execution will use the pre-calculated audience when it’s available to save time. The option is by default disabled.
- When — Only displayed when the audience pre-calculation is activated. You can choose from following options:
- Time before execution — The audience is calculated at a specific time interval (expressed in minutes) before the journey is executed. The journey must be scheduled in this case.
- At a fixed time — The audience is calculated at a specific day and time.
- When a task finishes — The audience is calculated when the selected task is finished. You can select a task from a drop-down list of tasks.
- When a task succeeds — The audience is calculated when the selected task succeeds. You can select a task from a drop-down list of tasks
Note: When the journey is included in a Cadence Plan, audience calculation completely ignores this and performs the calculation as if it is not part of a Cadence Plan. Audience calculation calculates whatever target your journey would have disregarding any possible reduction due to Cadence Management. Only at execution time cadence is taken into account to calculate the final audience.
Journey Tracking
In some cases you don't need the journey to be tracked. For example, a 'Password reset' journey does not require tracking.
Two options are available:
- Interaction tracking
- External analytics tracking
By default, these trackings are enabled. Toggle the option off to disable the tracking.
Interaction covers email opens, email clicks, link tracking (includes email links and shortened urls in SMS), and unsubscribe tracking. Disabling this will ensure all these interactions are not logged. This will have an impact on:
- Journey reporting
- Segmentation based on journey metrics
- Send-Time Optimization
But this will not have an impact on:
- Unsubscribe functionality — so when contacts unsubscribe, this will still work.
External analytics tracking.
External analytics tracking covers all the external trackers like for example Google UTM, Site tracker, Shop tracker.
When this type of tracking is disabled, no parameters from external trackers will be added to domain related links and hence the information can not be used by the external tracker. This will have an impact on:
- External analytics — E.g. Google analytics
- Site CRM identification — The m_bt parameter will not be added for domain links and hence CRM identification will not be done
- Shop tracker — The parameters that are added for the shop tracker will not be added and hence this will have an impact on revenue reporting
Cadence
When communication needs to be controlled over time and channel, Cadence Management allows the marketer to set these rules and define how much communication can go out. When cadence is enabled for a journey, the marketer can add the journey to a plan, ensuring that communication sent out through this journey happens in a controlled way, by applying the rules in the selected plan. When the journey is added to a plan it will be at the lowest priority. If you want to change this priority, go to the cadence plan Priority tab to change the order.
Note: The user needs access right for Cadence to be able to do this and the journey needs to be published.
Journey Execution priority
When multiple journeys are scheduled for execution at the same time, it is now possible to ensure that one journey will take priority over another. Some journeys might be more time sensitive or important than others, and this option allows you to prioritize journeys. By default the priority of the journey is set to medium, but priorities can range from low, over medium and high, to very high.
Example:
Journey A with high prio is scheduled at 09h00, Journey B with Medium priority is also scheduled at 09h00. Journey C with high priority is scheduled at 09h01.
Journey A is executed first. When execution is finished, Journey B and C are in the queue, but Journey C has higher priority than B and will be executed before Journey B.
Content Rendering
Content rendering is used to display Engage pages on a website, using the look, feel and branding of the website. To display Engage pages in a website, some programming logic is required on the customer website as well as some setup on the Marigold side. This is explained in detail in the Content Rendering topics.
In a Custom Journey with a page included, you can now indicate if and what alternative content renderer needs to be used to display the page on the website.
On to the Advanced tab of the properties, a URL needs to be provided, including a variable for the Campaign ID. The URL points to the location where the content renderer is installed on your environment.
Example: https://domain_name/renderers/Default.aspx?ID={ID}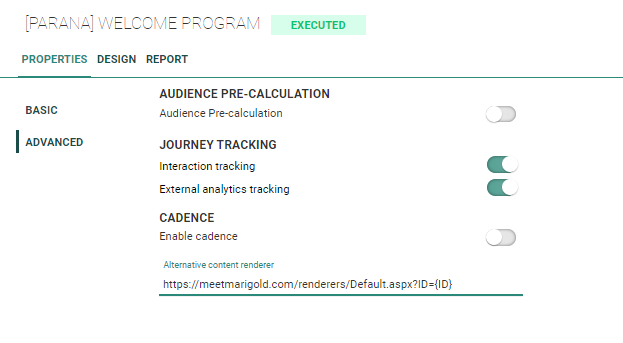
Technical Note: To be able to use content rendering, the Content Renderer module needs to be installed on your environment and a content renderer file must be created. Reach out to your Marigold contact person for more information.
The option 'Require authorization for all online actions' is only available when an Input Component is used in the Custom Journey. By default, this option is disabled, requiring no authorization at all.
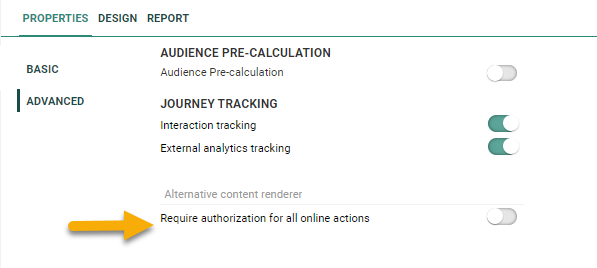
Toggle the option on, to protect this Input Component from unwanted external calls that may intervene with this journey.
Custom Journeys with Input Components have an optiext URL associated to them, which can be called to for example allow contacts to enter the journey after a click in an email. But also external applications, such as Grow, can make use of optiextension to provide data. However, Optiextension URLs, when known, can be misused by hackers.
By enabling the option, only requests containing a proper authorization will be able to trigger this journey. This authorization header needs to be added to any call that wants to trigger this journey.
