Introduction
Personalizing messages is key in any marketing campaign, allowing businesses to drive revenue with more relevant offers. Liveclicker helps you jump start this personalization, with content that is updated based on changing circumstances and personalized at the moment of opening the message. The time of opening, the location, weather, technology used, etc are all elements that can impact what and how the content is displayed.
Important Note: Liveclicker integration will at first only be available for US based customers. Later, it will also be available for all other customers. Over time, it will replace the current Live Content feature in email messages, templates and pages.
Following is an overview of the types of Liveclicker that can be added to your messages:
- LiveImages - A LiveImage is a dynamic image that gets updated in the inbox in real-time based on targeting rules and realtime data.
- Livetimer - The LiveTimer Element is used to countdown to events, promotions, registration deadlines, or time remaining in sales. The timer counts from the moment a person opens an email to the event or promotion date creating a sense of urgency.
- LiveCalendar - LiveCalendar allows you to create a dynamic calendar button that links directly to an event invitation from a featured calendar, depending on which email client a user opens the element in.
- LiveSlides - LiveSlides elements allow you to showcase a carousel of images in your email campaigns that can be personalized.
- LivePoll - The LivePoll element allows you to create interactive polls for your subscribers and embed them seamlessly into email campaigns with real-time results.
- LiveVideo - LiveVideo lets you display a video in the body of an email campaign when supported.
- LiveForecast - LiveForecast is a dynamic embedded weather forecast based on real-time opener data and the targeting rules you set up.
- LiveTracker - LiveTracker is a dynamic, time-saving element that gives you the advantage of sending live shipping information that updates as the status changes.
- LiveMap - A LiveMap is a local map showing the closest location to an opener based on real-time geo-location data.
- LiveReveal - LiveReveal is a dynamic image that reveals a hidden message when clicked or scratched. The aim is to entice openers to engage with your email campaign in a new, exciting, and somewhat mysterious way.
- LiveCoupon - LiveCoupon allows you to create and allocate personalized coupons to your openers in three different presentation types: text, barcode, and QR code.
- LiveSocial - The LiveSocial element allows you to embed the feed from your social networks to be displayed in your email campaigns.
- LiveFeed - Allows to add live feeds to your messages, such as RSS, XML or JSON
- LiveRender - LiveRender is an advanced element for setting complex personalized animations and images.
- LiveScrape - LiveScrape is a Live screen capture of a section of a website and gets updated in real-time in the inbox.
Note: To use this integration, you must have Liveclicker set up and enabled. In order to be able to use Liveclicker in a message, you must first create the Liveclicker campaigns in your Liveclicker account.
Add Liveclicker to a message
Create a Liveclicker Campaign
Once a Liveclicker account is configured for you by a Marigold admin, you must first create the Liveclicker campaigns in your Liveclicker account in order to add those elements to an Engage message.
For more details on how to set up Liveclicker campaigns, please refer to the documentation center in the Liveclicker tool.
Note: You must first sign in to your Liveclicker account to access these user guides.
- How to create a LiveImage
- How To Create a LiveTimer
- How to Create a LiveCalendar
- How to Create LiveSlides
- How To Create a LiveVideo
- How to Create a LiveForecast
- How to Create a LiveSocial
- How to Create a LiveTracker
- How to Create a LiveMap
- How to Create a LiveReveal
- How to Create a LiveCoupon
- How to Create a LiveRender
- How to Create an image-based LivePoll
- How to create a LiveFeed
- How to Create a LiveScrape
- How to Create Coupon Code Sets
- How to set up seed list (for testing purpose)
Use Liveclicker in your messages
To add a Liveclicker to your message:
1. Drag and drop the Liveclicker Component onto the message and click it to access the Properties panel on the right.

Note: The Liveclicker icon is greyed out when the user does not have sufficient rights to the Liveclicker feature. In this case, the component cannot be dragged and dropped into the message.
2. Click the Choose element button.
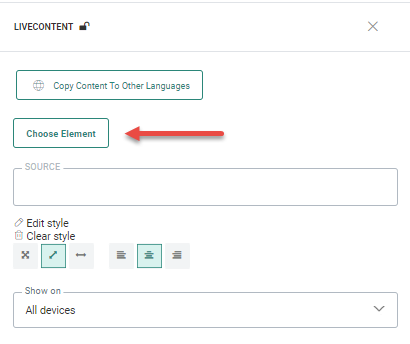
A dialog pops up listing all of the Liveclicker campaigns that have been created already.

Note: Only live, non-expired campaigns are listed.
You can search for an existing campaign using all or part of the campaign name as well as sort the results. Pagination is available when the list of available campaigns is long.
3. From the displayed list of campaigns on the left, select the desired Liveclicker campaign. On the right hand side, all elements in the selected campaign are shown.
Note: Every Liveclicker campaign can have one or more elements defined. For example, a Weather forecast campaign can have one element per language or per country.

4. Click Add element. The Liveclicker element is now added to the message.
5. Set the remaining properties for this Liveclicker such as the styling options. For more details on these properties check out this topic.
Technical note: You can also add the Liveclicker component directly in the source, using the following SG tag: <sg:livecontent id="ID_OF_LIVECONTENT" />
Note: When a Liveclicker campaign is added to the message, a link is automatically created and visible in the Links section of the message.
When no click through link has been defined for this Liveclicker campaign, this link will be listed as not used in the message. (displayed in red)
However, when a clickthrough link has been defined for the Liveclicker element, it will automatically be shown as used in the message. (displayed in green)
This link can also contain personalization fields. These personalization fields are added by default when custom fields are created and used in Liveclicker. For more details on how to use custom fields, please check out the corresponding documentation in the Liveclickertool.
Example of using custom fields to personalize your Liveclicker:
A Liveclicker campaign of type LiveImage is created, showing a birthday card image to the recipient. We want to personalize this birthday card with the name of the reader. For this we need custom fields.
1. In the settings of your Liveclicker environment, define the custom fields you want to use. In this example, we defined first name, name, email and language as custom fields. It is important to use the correct Engage syntax for the mapping between the custom field in Liveclicker and the personalization field in Engage.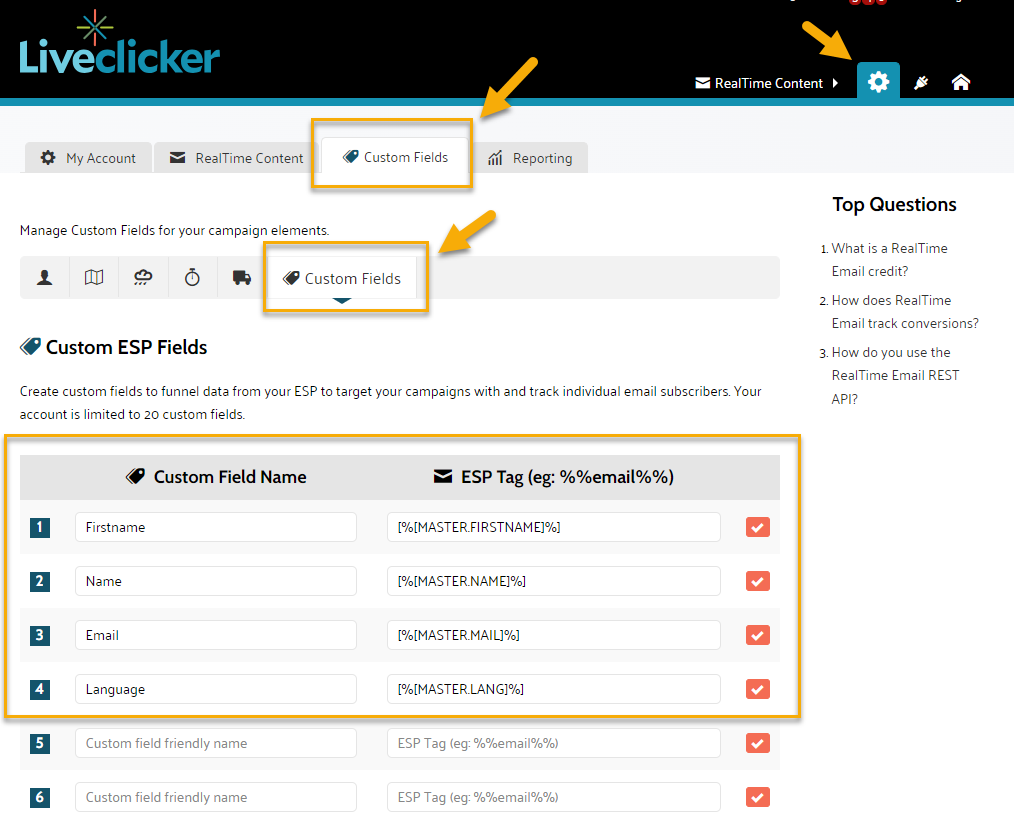
2. In your Liveclicker campaign, add an overlay text for the birthday image using custom fields. In the Overlay text configuration, select 'Add custom fields' from the drop-down field: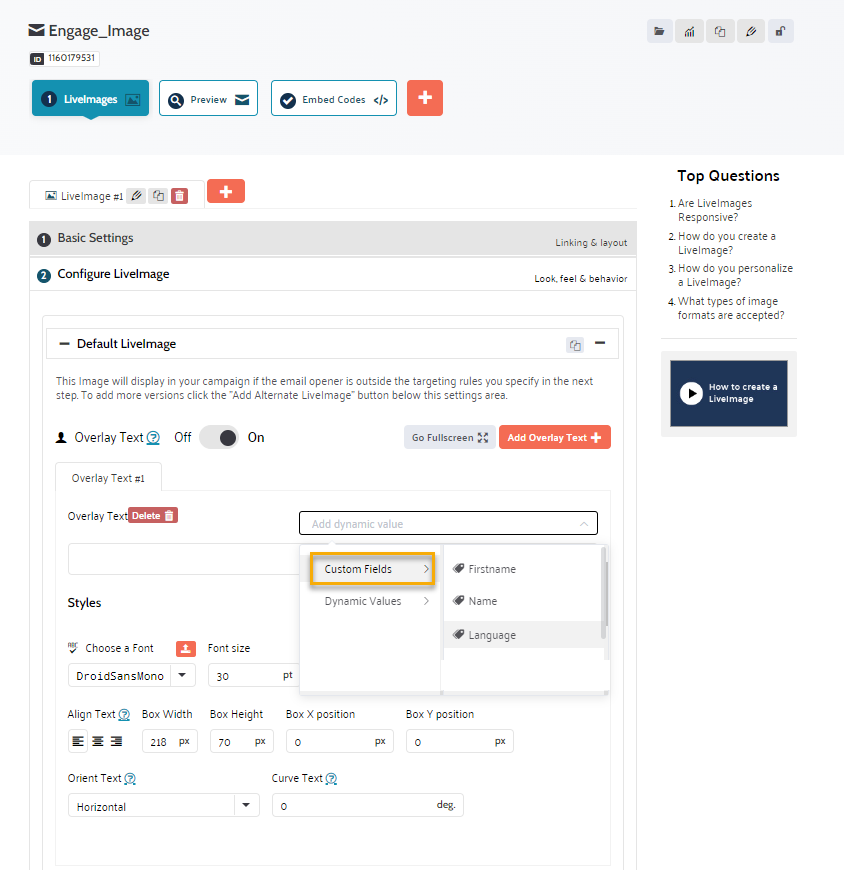
You can select one or more custom fields from the list of previously defined custom fields. The result is as follows. We have added a custom value for these custom fields to visualize the better the final result in the preview:
Note: You can also use custom fields in the targeting rules to show different versions of an image. For example, same image in different languages.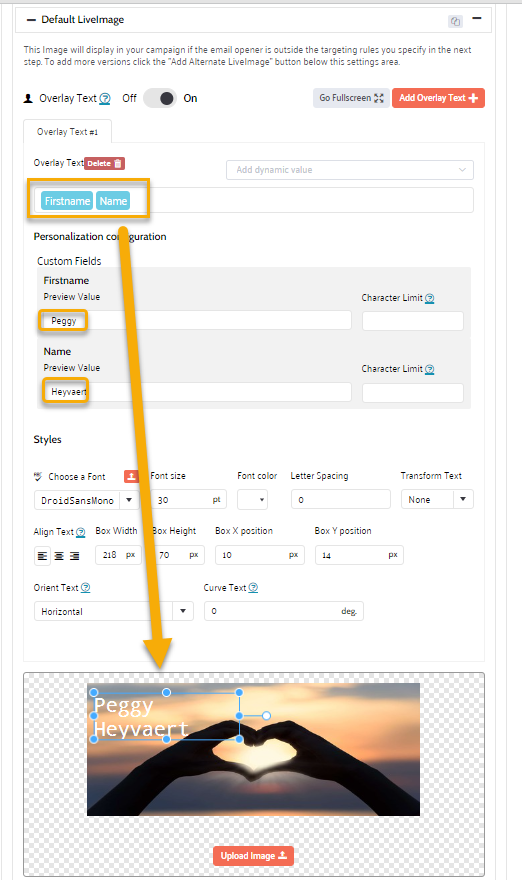
3. The embed codes in Liveclicker contains the following: the clickthrough link and the source of the image used, as well as the alternative text:
<!-- Start RealTime Email Embed - Patents Pending -->
<a href="https://em.realtime.email/service/rte?kind=liveimage_clickthrough&id=1477914907&esp_uid=[%[MASTER.MAIL]%]&dim1=[%[MASTER.FIRSTNAME]%]&dim2=[%[MASTER.NAME]%]&dim4=[%[MASTER.LANG]%]"><img src="https://em.realtime.email/service/rte?kind=liveimage&id=1477914907&esp_uid=[%[MASTER.MAIL]%]&dim1=[%[MASTER.FIRSTNAME]%]&dim2=[%[MASTER.NAME]%]&dim4=[%[MASTER.LANG]%]" border="0" alt="Sorry we couldn't display the image"/></a>
<!-- End RealTime Email Embed - Patents Pending -->
All custom fields are included in this embedded code and will also be available in Engage.
4. Add the Liveclicker campaign to your message. A link is automatically created in your message and visible in the properties of the Liveclicker component, together with the alt text:
5. In the Links section of the message, the link is added as well and personalization fields are passed on in this link: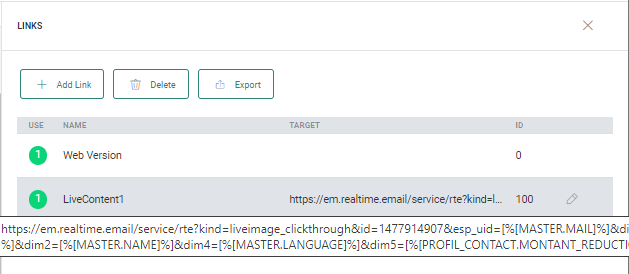
Note: By leaving the links unaltered, you will be able to benefit from full click reporting on the side of Liveclicker and Engage.
However, you are allowed to change the link in Engage to anything you want (like linking to another journey for example). In that case, only click reporting from Engage will remain. Impressions on Liveclicker elements will nevertheless still be visible in the Liveclicker dashboards.
6. Instead of selecting an already existing Liveclicker campaign, you can also create a new campaign by clicking on the 'Start New Campaign' button :
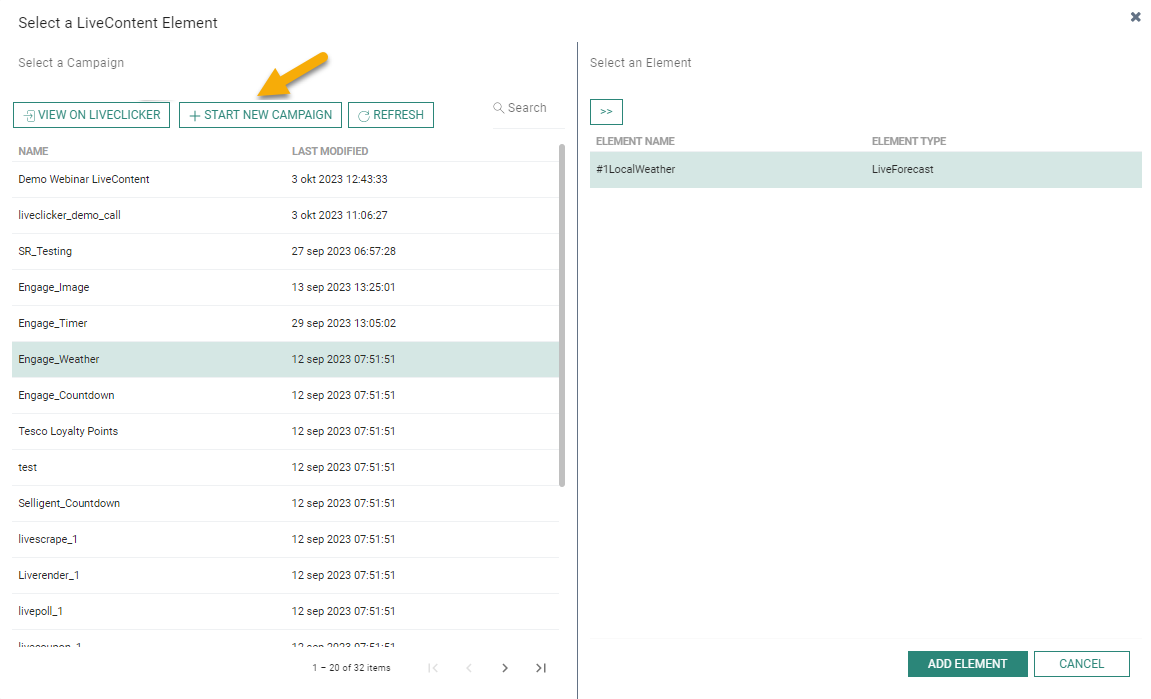
This leads to your Liveclicker account where you can set up new campaigns.
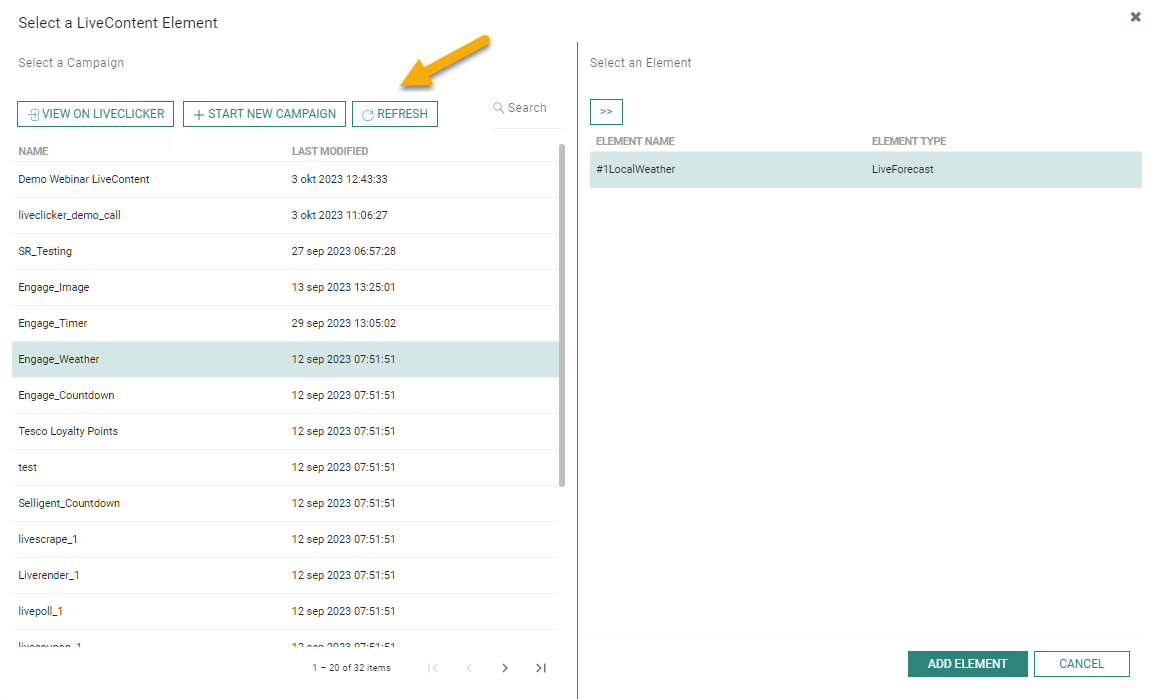
7. Click the Refresh button to load the most recent list of available campaigns :
8. Last, click the View in Liveclicker button to launch the Liveclicker tool and view all Liveclicker campaigns;

Preview and test Liveclicker in your messages
Go to Preview and Test to display a preview of the final message.
Important note: When previewing the message in which Liveclicker is embedded, an impression is always recorded on the content and requires Liveclicker credits.
For this there is a workaround to prevent charging credits during the design process of your message. In Liveclicker you can create a seed list of test users, whose emails correspond to the email addresses of the test users in Engage. A maximum of 100 seed emails can be created. This allows testing of Liveclicker using the value included in the seed list without charging credits. However, a maximum of 1000 test impressions per day is allowed.
Known behaviors/limitations
- When using the Location-based rules, the location of the recipient is derived from the email opener.
 Watch Liveclicker Learning videos
