In addition to the default Live Content, it is possible to display different content based on rules.
- Rules determine what content should be displayed when a specific rule applies.
- Rules are executed from top to bottom. The order of the rules can be changed by drag and drop.
- A rule consists of one or more constraints or groups of constraints.
- When none of the rules apply, the default content is displayed.
To create these rules, you first need to convert the default content. Use the button in the toolbar to do so.
Note: You can only convert Live Content when default content has been defined first.
A configuration panel to configure these rules is displayed. The default content already defined earlier is equally displayed. The default content will be displayed when none of the rules apply or when no rules are configured. Click it to make modifications when required.
To add a new rule:
1. Add an image to your design, then click it and click 'Choose Live Content'.
2. From the Select a Live Content dialog, click 'New' and select 'Rule based'.
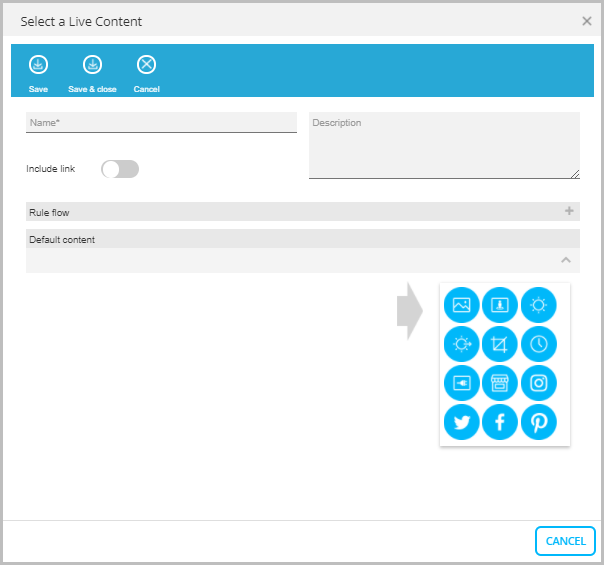
3. Enter a 'Name' and optional 'Description'.
4. If you want to include a hyperlink to a URL, click 'Include Link' and specify the URL.
5. Click the + button at the end of the Rule flow bar. The Constraint Editor appears.
6. Choose a constraint to configure. The following are available:
- Date & time — Choose a specific date and time, time of day, a day of the week, or a specific date. Different operators are available to define when the content should be displayed (e.g., time of day is after 22:00h, day of week is not on Sunday, etc.)
- Device — Select the device for the display. Content displayed will depend on the device used or the email client (for example, if the device is not a tablet, Email client is Outlook, etc.)
- Location — Select a contact from the drop-down list. The content will depend on the country of the contact. Choose whether to detect if the location is known, or determine if a contact is within a radius of x number of KM of a specific location (by using a map). For example, if the user is in the neighborhood of Brussels, you could send info about an event currently happening there To select the location and radius on the map, move the circle around to set the location and drag the borders to increase or decrease the radius:
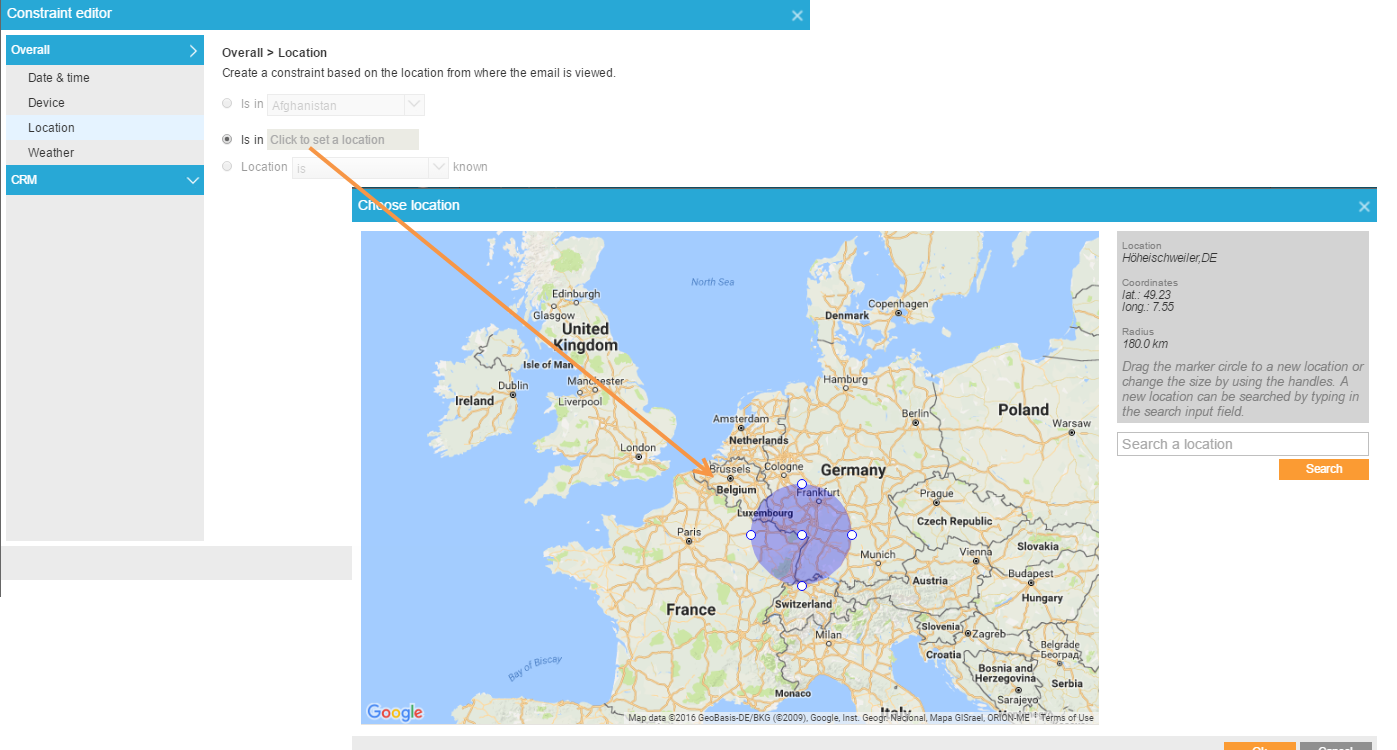
Note: Location-based content will not work at the city level when emails are opened through an app on a mobile device using 3G or 4G networks. The country can still be detected based on where the mobile network is situated. Also, for some web clients such as Google, it is not possible to detect the location for emails opened because those web clients use a proxy and make it impossible to know the user's IP and detect the location.
- Weather — Use this to display the weather at a specific location or at the recipient's location to determine the content. For example, if it is sunny, display summer dresses; if it rains, display umbrellas.
- Weather Forecast — Use the weather forecast at a specific location or at the recipient's location to determine the content. You can use temperature and weather descriptions (cloudy, light rain, etc). Move the pointer on the map to select a location or search for a location with the search field on the right.
Note: The contact's location is currently determined through the IP address and the weather forecast comes from OpenWeatherMap.
- CRM — Choose whether to use fields from the audience list or any extended list to set the constraint. Social data, behavioral information, survey results, etc. can all be used.
Important note: When CRM parameters are used in a constraint, they are added to the final image URL when the image is used in a message and are filled out with data when the message is sent. If you need to change these CRM parameters when the image was already used in an non-sent email, the image will have to be removed from the message and added again to ensure a new URL with the new parameters is generated. This means also that, when CRM parameters are modified AFTER an email is sent out with that image, these parameters are not correctly filled out as the image URL cannot be regenerated.
7. When the first constraint is defined, a Rule block is added.
8. Use the buttons Add group and Add constraint to add additional groups and/or constraints to this rule. The buttons in the upper right corner of the constraint block are used to edit the constraint, copy it or remove it. The selected group operator AND or OR applies to all constraints within the group. Each group can have its proper operator.
9. On the right, select the content type to display when the rule applies.
10. Click the corresponding Live Content icon to edit or define the content for the selected type and configure
the content. Refer to Live Content for details.
Note: The order of the rules is important as it determines which rule is tested first and therefore sets the image to display.
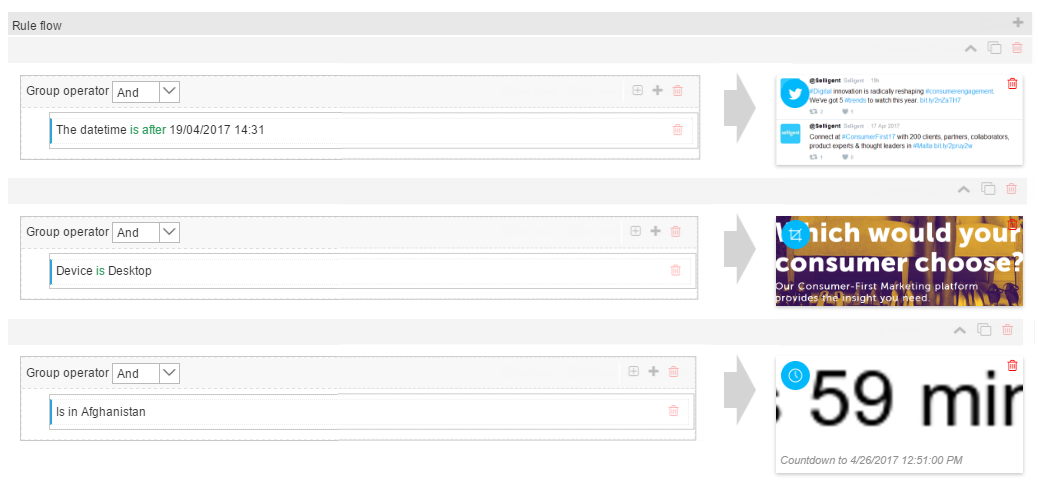
Following is an example of Live Content with three rules:
11. When done, click 'OK'. On the left, the constraint is displayed and on the right, a preview is shown of the image that will be displayed when this rule applies:

