With the Loyalty program you can reward your loyal customers and encourage them to make future purchases and further interact with your brand, leading to better sales, brand awareness and trust.
Note: When you're interested in getting started with Loyalty, please get in touch with your Marigold contact.
The first steps that need to be taken, is setting up lists, assets and journeys in Engage.
See below for more details.
Prerequisites
- A Loyalty environment is required. Get in touch with your Marigold contact for more info.
- A permission needs to be enabled in the Admin Configuration section of Engage to access the Loyalty module.
- Your Engage user needs to have the proper rights to set up lists, content and journeys.
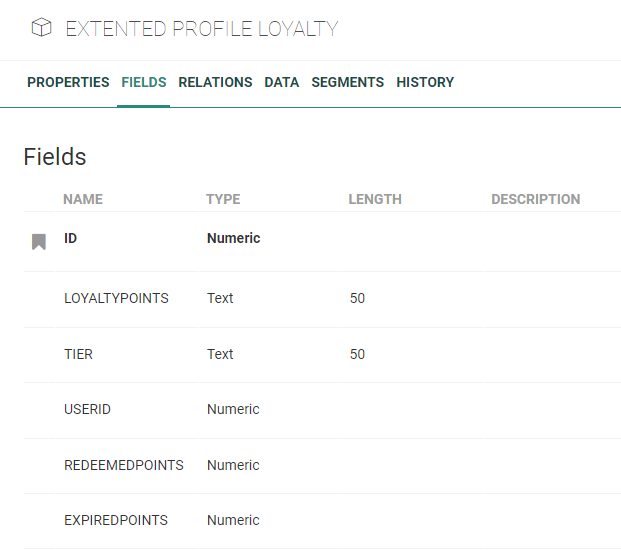
Configuration of an Audience List with a relation to an Extended Profile
1. In the Lists chapter of Engage, make sure that an Audience List exists.


3. Add a 1:1 extended profile relation between both lists, and name the scope 'ENGAGE_LOYALTY'.
Warning: The 'ENGAGE_LOYALTY' scope is mandatory for the integration to work as expected.

Note: The Audience List and Loyalty Profile Extension are used in the Personalization Details setup of triggered actions in Loyalty.
Creation of a Transactional Message
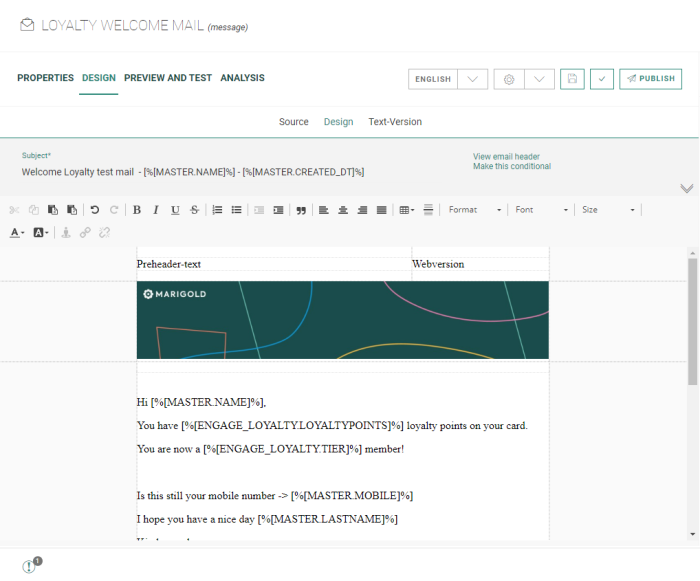
In the Content chapter of Engage, set up a transactional email message.
In this email, you can use transactional data and field values that are stored in the main Audience List (MASTER.xxx) and the extended Loyalty profile (ENGAGE_LOYALTY.xxx).
Important:
In the Properties of the message, set a fallback language for :
- contacts without a language (empty value)
- contacts with no match on language (a different language from the ones available)
These settings are required. When not set, it won't be possible to publish the message and create a Transactional Journey.
As all existing languages in the Organization will be available for selection in Loyalty when setting up the integration with Engage, fallback languages will allow the transactional message to be triggered when a different language is selected in the Loyaltysetup than the ones available in the message.
Note: Don't forget to save and publish your transactional email.
Creation of a Transactional Journey
When your transactional email is ready, you can create a Transactional Journey from it.
Note: The Transactional Journey is used in the Parameter settings of the triggered action in Loyalty.
Setting up an API Service Account
Once everything is set up and ready to be used (see the 'Usage in Engage' topic), Loyalty needs to be able to trigger the right Engage API calls. (see the API Explorer for more details)
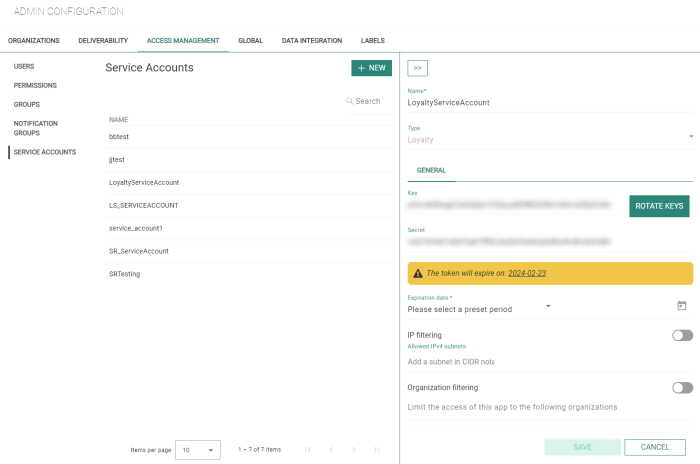
Therefore, it's necessary to create an API Service Account of type 'Loyalty' in the Admin Configuration section of Engage.
To create the Loyalty API Service Account, execute the following steps :
- In Admin Config > Access Management > Service Accounts, click 'New'.
- Enter a 'name' and select the type 'Loyalty' for your API Service Account.
- Click 'Save'.
After successfully saving this setup, additional fields become visible :
-
API key and API secret values are automatically provided. (it's possible to renew these values by clicking the 'Rotate keys' button)
-
Expiration date — Select 3 months, 6 months, 9 months or 12 months as the expiration period for the API key and API secret in the drop-down, or set a 'custom' value.
Note: As a warning, the token expiration date is mentioned.

When no expiration date has been specified, or when the token has expired, this notification appears :
-
IP filtering — You can enable/disable this setting.
When enabled, enter the allowed IP-addresses in the field underneath. This ensures that only calls from the given IP-adresses will be taken into account. If a call is made to the API from a different IP-adress, it won't work. -
Organization filtering — You can enable/disable this setting.
When enabled, select the allowed Engage organizations in the field underneath. This ensures that only calls from the given organizations will be taken into account. Other organizations are not allowed.
Click 'Save' to finish the configuration.
Note: The Loyalty API Service Account contains the applicable endpoint connections needed for the Loyalty with Engage integration (including the following 'Journeys/Transactional' API calls : 'Get', 'UpdateProfileAndSend' and 'Status' + the general API status get call).
Once the setup in Engage is done, you can go to the Loyalty module and setup the integration with Engage.


