Targeting and Retargeting
Access and Asset Rights
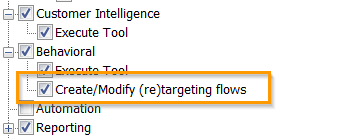
To be able to create 'targeting/retargeting/offer' journeys, the user must have the right to do so.
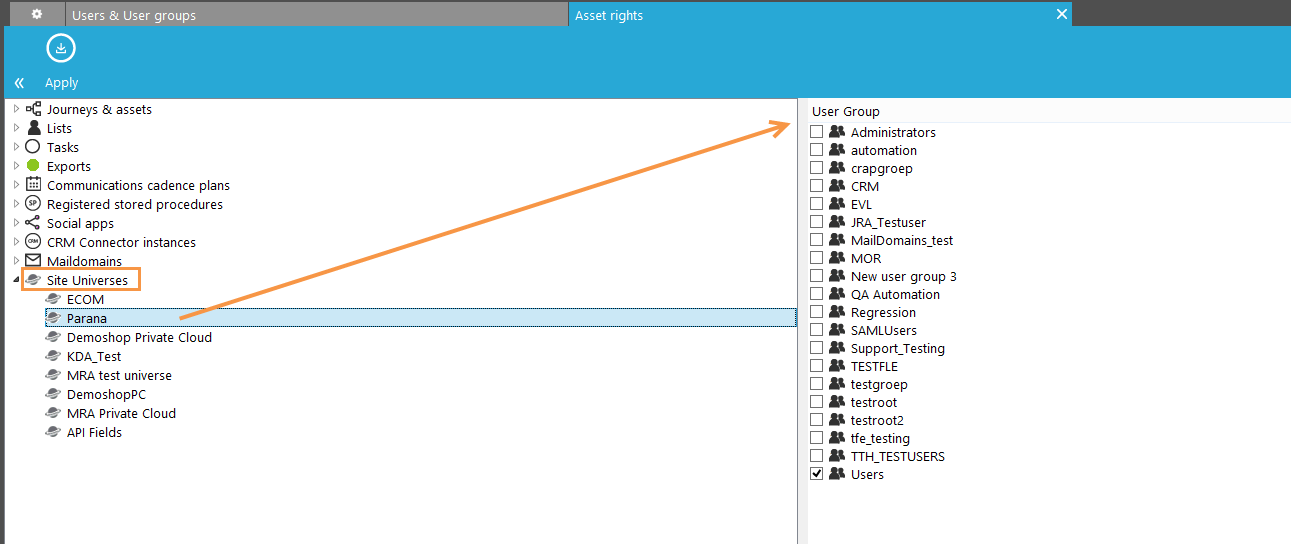
Now, you have to allow the Campaign developers to create journeys for a specific Siteuniverse. You can do this in Campaign, under ‘Settings, asset rights’ by giving them access to the Site universe(s). All universes that have a connection to Campaign are listed here.
Once the Campaign developers have access to Site universes, they can select them in a Journey and use the Journey in Site for targeting or retargeting.
Create Offer Journey
Site offer audiences can be filled with Campaign contacts as a result of a contact's interaction in a Campaign Journey.
An offer Journey uses a dedicated Offer component allowing adding contacts to the Site offer audience.
Note: this component can also be used in targeting and retargeting journeys.

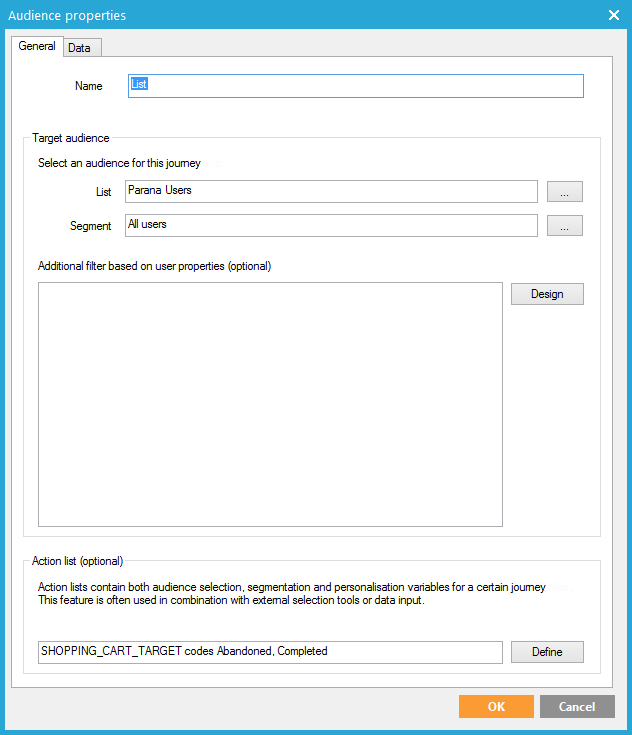
In the properties of the Journey, under 'Site', set it as a 'offer' Journey. The universe drop down list is limited by the user’s asset rights (see above).
In the properties of the Site offer component, select the offer. All contacts going through this Journey will be added to the audience of the offer as long as it is active and all the Campaign contact data, as configured in the universe, is sent along. If a profile already exists for the contact, the profile data is updated. If no profile exists the data is stored and will be merged the moment the contact is created as a profile in Site.
When the Journey is saved, an additional constraint is added to the offer audience. This constraint is added to the already existing constraints (if any) with the OR operator and cannot be edited or deleted.
The additional constraint looks like following: is added through external source [ABC]
What happens when a Websell Offer component is removed from a Journey? The user will be prompted to yes or no remove previously added contacts from the offer audience.
- If the contacts must be removed, previously entered contacts are removed, the offer audience constraint in Site will be removed as well and no new contacts will be added.
- If the contacts must not be removed, contacts data remains in the offer, but no new contacts are added. The constraint in Site can now be removed by the user.
And what if the offer itself is deleted? If the offer is deleted after the Journey was compiled, contacts cannot be added and an incident is generated.
Create Targeting Journey
Site offers can use Journey pages to populate placements (pop-up, pop-in, html content block).
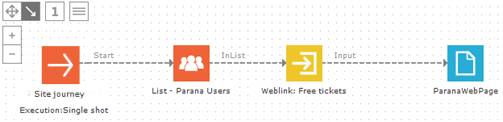
A targeting Journey typically has an Input component and at least one
page. The page will be the content for your popup or html placement.
Of course, more complex journeys are also possible. For instance to handle
a newsletter subscription, you would need a data component to handle validation
and storing and most likely a thank you page.
In the properties of the Journey, under 'Site', set it as a 'targeting' Journey. The universe drop down list is limited by the user’s asset rights (see above). Leave the scheduling to ‘single shot’, you do not need to activate the Journey. It is addressed from Site through the Input component.
In the properties of the Input component select 'behavioral targeting'. Three default parameters are created. Their values are automatically filled by Site:
- CONTENTID: holds the unique identifier of the content. This is a combination of the offer, action, placement and content and allows tracking clicks on external content (such as popups, popins)
- OFFER: holds the name of the offer from where the call to the Journey is made
- ACTION: holds the name of the action in the offer that generates the call to the Journey
Additional custom parameters can be created here. These parameters will be filled with information from Site when the targeting Journey is being called during a follow up on an offer. They can contain data from tags, profile or the offer and are configured within the offer.
Always give your targeting journeys and input parameters easily recognizable, descriptive names. They are used in Site’s offer settings.
You can personalize
the Journey page with the visitor's profile data (firstname, name…) if
Site knows the link between the Site profile and the Campaign
contact. In Site the profile is “CRM identified”.
This occurs when the Campaign user clicked a link in a Campaign email or page going to one of the websites defined in Site (a
tracker needs to be defined in Campaign). If Site knows the visitor, the Journey will be executed for
the known profile, no additional setup in the Journey is required.
If Site doesn’t know the Campaign contact, it can still
be that the Site profile is “Custom identified”.
In this case, you can create a custom input parameter (e.g. CUSTOMID)
and from Site pass his custom id (Profile data –> Custom id) to the
Journey. In the Journey, use a lookup component to switch to his Campaign profile and then personalize.
If the Site profile is not CRM- or custom identified, no personalization
can be done. The Journey will be executed anonymously. In Site this is
an “Anonymous
profile”.
If the pages are personalized, a proper Journey would try to catch all
3 possibilities, using decisions and a lookup to see if the user is identified
or not .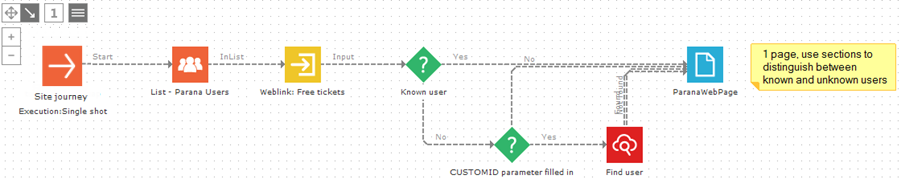
In an offer, you
can set an offer objective (conversion) the see if the visitor accepted
the offer or not. One option to measure this is using a “CRM (Journey)
page tag”. For instance, if the offer objective is to get visitors subscribed
to the newsletter, the ‘thank you’ page tag can determine if the goal
has been reached. See also ‘Offers,Why?
Define your objectives’.
Add the page tag in the properties of a page: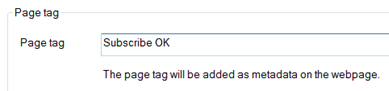
The tracking script must always be on the Journey page.
For offer action type Popup or Popin (See Define
offer actions) you can select a Campaign Journey (CRM)
or url as a placement. Because these types are opened in a new window
(Popup) or an iframe (Popin) the following script must be included on
the Journey page or url page:
- The default tracking script (see Universe
settings)
- To measure the click, behind the default tracking script: BT.trackClick(contentid);
Contentid is the identifier for the content that is loaded in the popin
or popup iframe. If the content is a Campaign Journey (CRM) the contentid
is passed to the Journey input component and can be retrieved using ~@CONTENTID~
in the Journey. If the content is HTML the content can be retrieved using
{CONTENTID}.
- If you need to measure the page as an offer activity or conversion with
setting "via API" (see Define
offers, Why?): BT.trackActivity(offerPublicName, activityName)
For more information on these functions, check the Site API manual.
Also see example "Loyalty card benefits" using BT.trackClick and the CONTENTID parameter.
Create Retargeting Journey
Site
uses retargeting journeys to communicate towards Site visitors when they
accept the offer ( follow up
on converted profiles) or when they did not accept the offer (retarget
not converted profiles).
A follow up message could
be an email thanking him and stating all the advantages he now has because
he accepted the offer.
And a retargeting message
could be an email convincing him what a great offer this is for him.
(See ‘Offers,Follow up and retargeting’ for information on how these journeys are used in Site.)
To set up the complete retargeting process in Campaign you need:
- an action list with action codes
- a Journey set as 'retargeting'
- an Audience list that uses the action list
- an Input component in the Journey
In this example we use emails, but it can also be a mobile message (sms) or any other interface component, like a Direct Print component. You can even change the contact's BPM state so he’s listed for a call with FrontOffice. We are also going to create the retargeting and follow up mails in the same Journey, but it can be separate journeys just as well.
Now retargeting is based on action records in an action list that triggers an execution for specific action codes. These action records are created automatically when Site triggers the Retargeting Journey. If input parameter values are passed on from Site, they are automatically stored in the action list and can then be used to personalize the message.
E.g. “Hey, Thanks
for accepting our offer. You get free tickets to ~TARGETACTIONS.EVENT~! …”.
EVENT would be a field in the Site action list holding the event name,
passed by Site through an input parameter EVENT in the Journey.
Following is an example of a Journey with two emails. Make sure you set both emails to ‘instant’. Site will trigger these mails, so leave the scheduling to ‘single shot’, you do not need to activate the Journey.
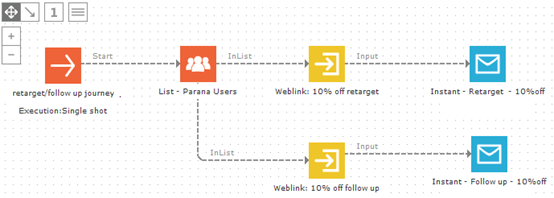
Both input components have a custom input parameter CATEGORY, for which we pass a value from Site.
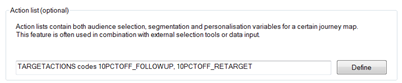
Create an Action list
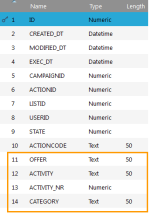
Create an action list (e.g. TARGETACTIONS) and add fields to store the input parameter values.
Add the action codes. (E.g. “10PCTOFF_RETARGET” and “10PCTOFF_FOLLOWUP”) to the action list.
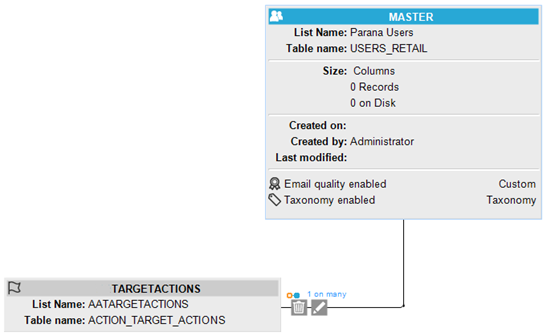
Link the action list 1:N to the Audience list that is used in Site (see also “Universe settings,Connect to Campaign”. In this example with scope name TARGETACTIONS)
Set the Journey as 'retargeting'
In the properties of the Journey, under 'Site', set it as a 'retargeting/conversion'Journey. The universe drop down list is limited by the user’s asset rights (see above).
Configure the List component in the Journey
In the Journey, in the properties of the List component, select the action list and the action code(s). (In this exampleboth action codes)
Configure the Input component
An action code must be added to the Input component. This ensures that when Site triggers the Journey and Input component that an action record with that specific action code is generated for that visitor.
To do so, go to the properties of the Input component. Select type “Behavioral retargeting with action code” and from the drop down select the action code (e.g. “10PCTOFF_RETARGET”).
Three default parameters are automatically created. Their values will automatically be filled in by Site:
- OFFER: holds the offer public name which made the call
- ACTIVITY: the activity name
- ACTIVITY_NR : the position of the activity in the activity list in Site (the position in the funnel)
Add another custom parameter CATEGORY.

When the Journey is triggered from Site an action record with action
code “10PCTOFF_RETARGET” is created. The incoming Site values for parameters
OFFER, ACTIVITY and ACTIVITY_NR are also stored in their respective fields.
This Input component will trigger the instant email with the created action
record (action code “10PCTOFF_RETARGET”).
Do the same for the Follow up input component but select the “10PCTOFF_FOLLOWUP” action code.
Always give your
targeting journeys and input parameters easily recognizable, descriptive
names. They are used in Site’s offer settings.
Check Campaign web help if you need more information on creating
action lists and journeys..
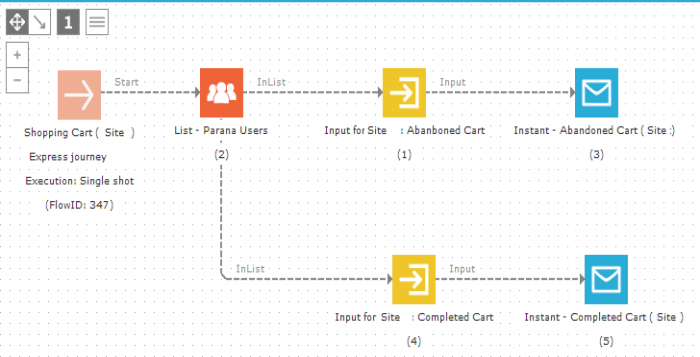
Create an 'Abandon/Checkout cart' Journey
Site contacts can be retargeted with emails or through other channels as a result of the contact's interaction with the cart. Profiles that have abandoned their cart or the opposite, completed the cart and finished the purchase, can be retargeted through Campaign journeys.
A Journey of type 'Abandon/checkout cart' needs to be created. This type of Journey works more or less in the same way as the Retargeting Journey, explained in the previous section.
To set up the complete process in Campaign you need:
- an action list with action codes to trigger the execution of the Journey
- a Journey set as 'abandon/checkout cart'
- an Audience list in the Journey that uses the action list
- an Input component in the Journey through which the Site visitors enter the Journey
In this example we use emails to interact with the visitor, There will be one email sent when the contact abandoned his cart and a second email when the contact finalizes the purchase and thus completes the cart. To be able to do this in one Journey, two Input components are required.
Now cart follow-up is based on action records in an action list that triggers an execution for specific action codes. These action records are created automatically when Site triggers the Journey. If input parameter values are passed on from Site, they are automatically stored in the action list and can then be used to personalize the message. In this case there are two default parameters passed from Site to the Journey: PRODUCTS and CART.
Create an action list with action codes
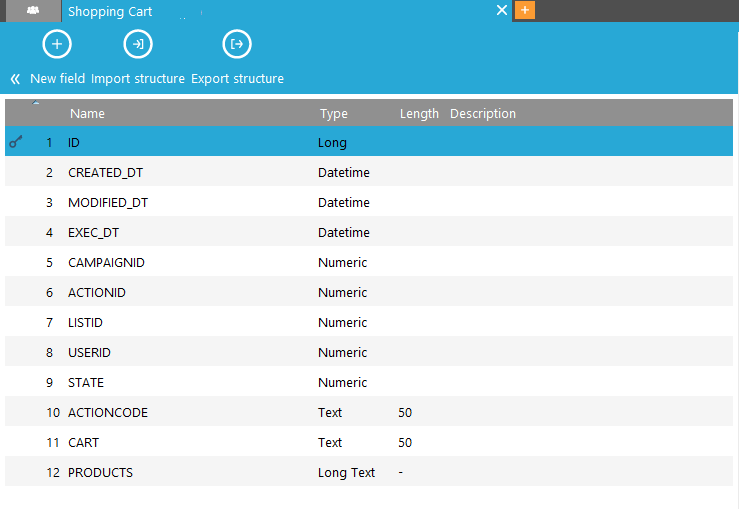
Create an action list (e.g. TARGETCARTACTIONS) and add fields to store the input parameter values for PRODUCT and CART. (You could add extra fields to store custom parameters if you want)
Add the action codes. (E.g. “ABANDON” and “COMPLETED”) to the action list. We need both because there are two different situations in which a Journey can be triggered.
Link the action list 1:N to the Audience list that is used in Site.
Set Journey as abandon/checkout cart
In the properties of the Journey, under 'Site', set it as a 'Abandon/Checkout cart' Journey. The universe drop down list is limited by the user’s asset rights (see above).

Configure the List component in the Journey
In the Journey, in the properties of the List component, select the action list and the action code(s) that should be used in the Journey. (In this exampleboth action codes need to be selected as we will treat both situations in one single Journey)
Configure the Input components in the Journey
As we will trigger the Journey as well for cart abandonment as for cart completion but send a different email, two input components need to be added to the Journey.
An action code must be added to each one of the Input components. This ensures that when Site triggers the Journey and Input component that an action record with that specific action code is generated for that visitor.
To do so, go to the properties of the Input component. Select type “Behavioral retargeting with action code” and from the drop down select the action code (e.g. “ABANDON” or "COMPLETED").
Two default parameters are automatically created. Their values will automatically be filled in by Site:
- CART: holds the cart public name which made the call
- PRODUCTS: the list of products in the cart. The structure of the parameter is as follows:PRODUCTID1|COUNT|VALUE;PRODUCTID2|COUNT|VALUE; ...
When the Journey is triggered from Site an action record with action code “ABANDON” (or COMPLETED) is created. The incoming Site values for parameters CART, PRODUCTS are also stored in their respective fields. This Input component will trigger the instant email with the created action record (action code “ABANDON”).
