Define Cart
Carts overview
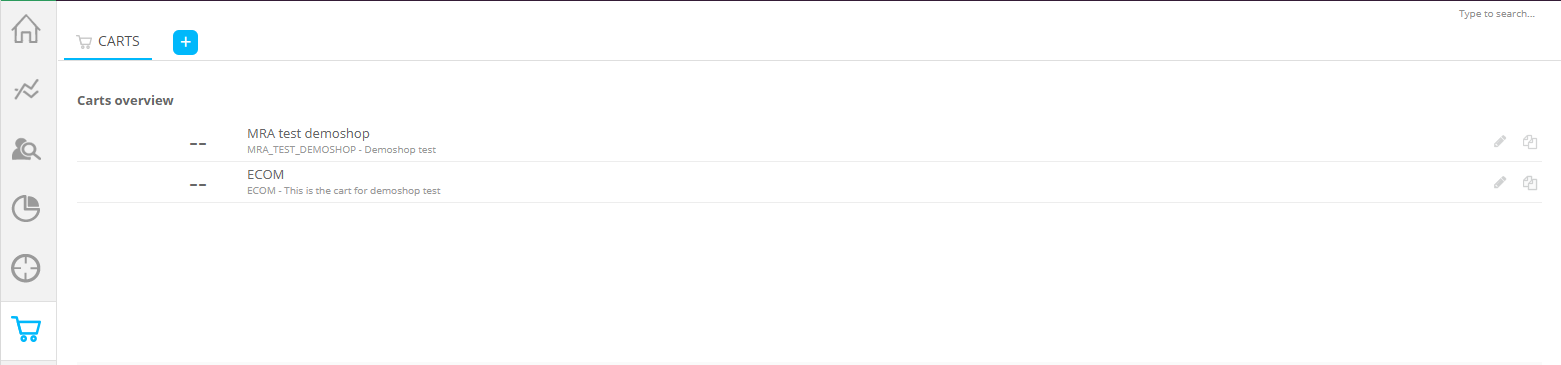
Right click the cart on the list to access a pop-up menu with following options:
- Pin component — adds the cart to the dashboard.
- Copy cart as a new cart — duplicates the selected cart and displays the properties in Edit mode.
- Edit cart — gives access to the properties in Read mode. You still need to select the Edit button to make changes.
- View report — displays graphs and tables with details about cart items.
Cart Details
To create a new cart, press the
'New cart' button
 . A new tab is added and the following
configuration page can be used to define the cart:
. A new tab is added and the following
configuration page can be used to define the cart:
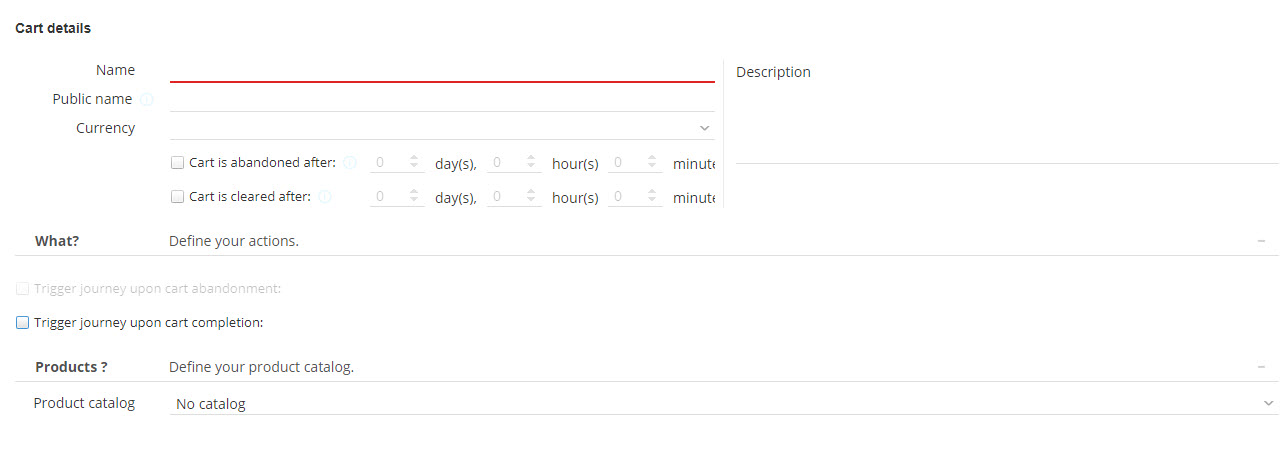
- Name & Descriptionof the cart. Make it specific, especially when working with multiple carts (e.g. for multiple websites)
- Public name — used in scripts. The n ame must be unique and cannot contain spaces.
- Currency — this is used for reporting purposes. Currently there is no calculation based on the currency. Prices need to be given in the currency specified for the cart.
- Cart is abandoned after (optional) — set a time frame after which the cart is considered abandoned. (e.g. after 2 days of no changes being made to the cart, it is an abandoned cart). If this option is set, you can define actions that should be performed when a cart is abandoned. The information can also be used in the constraint editor to create segments.
- Cart is cleared after — set a time frame after which items should be removed from the cart. This option can be used to imitate the behavior of the real cart.
Initially, we recommend that you set this option so that the cart is cleared automatically in Site in the same time frame as on the website. The website administrator could send calls to Site whenever the cart is cleared on the website. However, using the option in Site is easier to implement.
What? Define your actions
The two following options specify the actions to be taken when a profile abandons or completes their cart. The action itself is defined in a Engage 'Abandoned Cart' type Journey. This type of Journey requires an Abandoned Cart Event component through which the profiles can enter the Journey and receive an email, for instance.
Trigger Journey after cart abandonment:
From the drop-down, select the Engage Journey and its event component that must be triggered. The reason why an event component must be selected is that a Journey may contain multiple event components and you need to decide which event component the visitor enters the Journey through. (Note: only journeys linked to the current universe and configured as an 'Abandoned Cart' Journey are listed.)
If the Journey event component has custom input parameters, you can
pass Site values on to the Journey.
Two values are always passed on by default and are therefore not listed
here: the cart's public name (for Journey parameter CART) and the list
of products in the cart (PRODUCTS).
Use the ... button to the right of the field to set the values for the
Journey’s custom event parameters. Click on the ‘Edit’ icon to the right
of the custom parameter to select the value. A dialog is displayed in which
a choice can be made between profile data (hits, visits, visit durations, etc.),
tag values (Site tag values) and offer data (if the visiting user is in
an offer or not, and when he was in or out of the offer). Identification
data, Do not Track option and Reporting segments can also be used to
set the values for the parameters.
Trigger Journey upon cart completion: Select the event component of the Journey that the profile must be sent to when they have completed their cart. The fact that a profile has completed their cart is communicated from the website to target through the API at the moment when the profile completes their purchase. The parameters are set in the same way as for the previous option.
For more information on how to set up these journeys,
check out the topic Create
Abandoned Cart journeys.
For the step by step setup of the integration with Engage, see
the section on Engage integration setup in the Table of contents.
Create a new abandon cart offer:
this takes you straight to the Offer section, where you can start defining
an offer for the predefined audience 'Has abandoned cart <current cart>'.
What? Product catalog
Product catalogallows you to use
an XML file that maps the items in the cart with actual product names. When
items in the cart are sent back to Marigold Site, the item ID, value
and amount are passed on. Often, these item IDs don't say much. The XML file
is then used to map these item IDs to actual product names. The mapping
can even depend on the language.
Product mapping is used for instance in the constraint editor when
creating segments. Instead of being shown the product IDs, the user will
see the actual product names.
This XML file can be created manually or automatically. You can also choose to apply no mapping at all.
From XML: the user browses for the XML file to use for the mapping.

The XML file must have the same structure as in the following example.
example of XML file:
<PRODUCTMAPPING>
<PRODUCT PRODUCTID="1">Product 1</PRODUCT>
<PRODUCT PRODUCTID="1" LANG="FR">Produit 1</PRODUCT>
<PRODUCT PRODUCTID="1" LANG="NL">Produkt 1</PRODUCT>
<PRODUCT PRODUCTID="2">Product 2</PRODUCT>
<PRODUCT PRODUCTID="3">Product 3</PRODUCT>
<PRODUCT PRODUCTID="4">Product 4</PRODUCT>
<PRODUCT PRODUCTID="5">Product 5</PRODUCT>
</PRODUCTMAPPING>
From Marigold Engagedata selection list: in this case the
XML file is generated automatically based on the information retrieved
from the data selection list in Engage. For this to be possible, the following must be set:
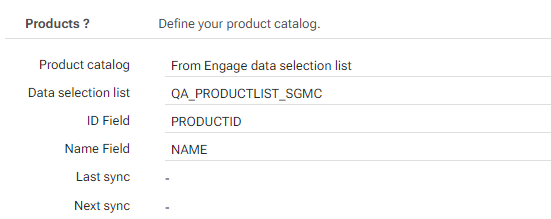
Select the name of the data selection list. The list contains all of the data selection lists in the Engage environment configured at Universe level.
Select the field on the data selection list that will be used as item ID to match the item in the basket with.
Select the field that will be used for the name of the item in the basket.
Last sync and next sync date and time tells you when the mapping was last performed and when the next one will happen.
