Create an 'Abandoned/Checkout cart' Journey
An 'Abandoned Cart' type Journey needs to be created. This type of Journey works more or less in the same way as the Retargeting Journey, explained here.
To set up the abandon cart process in Marigold Engage you need to :
In this example we use an email, but you can also use a mobile message or SMS.
Integrate Javascript calls in the webshop
Site does not automatically track the shopping cart on the customer’s website, this must be done manually by executing the necessary JavaScript calls to Site. Multiple abandoned carts can be defined in Site, so every call needs to include the unique public cart name. This can be found in the configured cart in Site.
The product ID, which is sent in the addCartItems and removeCartItems calls, should always refer to an existing product in the product catalog that is configured in the Site universe.
Note: Always make sure that the Site script is installed on your webshop. Targeting existing contacts can only be done when the visitor is a CRM identified visitor. More explanations here.
As every webshop has its own custom code, here are some generic examples of how you can add the different Javascript calls regarding Abandoned Cart to your webshop:
Add item to your cart
When a visitor adds one or more items to their shopping cart on the webshop, Site needs to be notified of this action. This is done by sending the product ID, price and item count for each of the products that are added in one BT.addCartItems request:
Example:
BT.addCartItems("PUBLIC_CARTNAME_IN_APPLICATION", [{
    id: % PRODUCT_ID % ,
    value: % PRICE % ,
    count: % COUNT %
}]);
Executing this request resets the internal Site timer for that abandoned cart.
Remove item from cart
When a visitor removes one or more items from the shopping cart, Site needs to be notified of this action. This is done by sending the product ID and item count for each of the products that are removed in one BT.removeCartItems request:
Example:
BT.removeCartItems("PUBLIC_CARTNAME_IN_APPLICATION", [{
    id: %PRODUCT_ID%,
    count: %COUNT_TO_REMOVE%
}]);
Executing this request resets the internal Site timer for that abandoned cart.
Checkout cart
When the visitor finishes their order, Site needs to be notified of this action. This is done by executing BT.checkoutCart request:
Executing this request completely removes the internal Site timer for that abandoned cart, meaning that no journey will be triggered for the current visitor.
Clear/empty cart
When all items are removed from the shopping cart, Site needs to be notified of this action. This is done by executing a BT.clearCartrequest:
Executing such a request completely removes the internal Site timer for that abandoned cart, meaning that no journey will be triggered for the current visitor.
Call tracking calls
For each of the abandon cart calls, you should see a new tracking call appear in the network tab of your browser’s debugging console containing the “carts” node in the request JSON.
Example:
{
    "universeId": "c853d6db-1781-40fe-abf4-7872ea9cc79b",
    "profile": null,
    "profile": null,
    "profileId": "7ZjY5YzgzMDYtZTcwZC00MzdmLTg5MTEtYjczZTRmOTI5NDI0OzODQ0MzY5YTUtOTIzYS00MTcwLWJkZjAtNTExNmFmNDM3NDI4OzsA:",
    "url": "https://www.yourwebsite.com/",
    "referer": "",
    "isEvent": true,
    "carts": [{
        "cart": "MyCart",
        "action": "Add",
        "items": [{
            "id": "39289",
            "value": "4.99",
            "count": 1
        }]
    }]
    "tagValues": [],
    "allowCookies": true,
    "allowLocalStorage": true,
    "pageTitle": "",
    "metaTags": {}
}Note:
Important to keep in mind is that Site does not automatically rebuild the shopping cart when the visitor returns to the website. This is something that needs to be implemented by the website itself.
Note:
It is however possible to send a unique shopping cart (rebuild) id to Site through tagging, which can be added to links that return to the website when clicking in the abandoned cart email. Again, the website itself needs to make sure that the correct shopping cart data is loaded when landing on the website.
Configure your Cart in Site
In order to use an abandoned cart you first need to configure a cart in Site. You can check here how a Site cart can be setup.
Note:
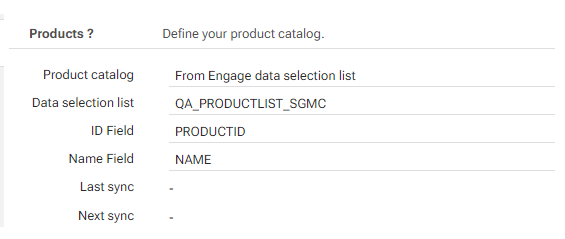
Don’t forget to define your product catalog in your cart. This links the Data Selection List from Engage to your cart.
Create the Abandoned Cart email
The best way to show abandoned cart data inside an email is by using a repeater component. The data coming from the webshop (as a JSON string) will be iterated inside the repeater by matching a lookup field from the Data Selection list with the cart data. In order to make this happen, you need to:
Make sure the webshop catalog exists in Engage as a Data Source list, for example: 
The list needs to have a (unique) numeric field which will be used as the lookup field in the Data Selection of the email (PRODUCTID).
Note: The fields named "PRICE" and "QUANTITY" shouldn't be in the Data Selection List as they will be coming from the Site cart itself. You can add fields which represent some form of price to the list if it's named differently. More info can be found here.
The Data Selection List needs to be specified as the product catalog in your Site cart. The appropriate fields need to be mapped too, e.g. the ID field and the name field.
The next step is to create a Data Selection in the Engage email:
Use the Data Selection List which has been defined in the Site Cart.

In the second step, include fields that will be used for personalization in the email. 
In the filters section, indicate that this is a lookup data selection. The Data Selection Field matches the lookup field which was configured in the Data Selection List (PRODUCT_ID) and the Audience fields should correspond with e.g. CART.PRODUCTS (SCOPE.Fieldname coming from the Abandoned Cart Event Component in the Abandoned Cart Custom Journey.
Also indicate that items without a language are included too.
In the design mode of the email, use a repeater component to visualize the cart content. In the repeater component, select the Data Source that was just created.
There are 3 types of values that can be used in the repeater component:
- eventValue() refers to the untransformed data passed through from the Abandoned Cart event
- cartValue() refers to the fields provided by Site e.g. PRICE or QUANTITY
- itemValue() refers to the fields in the repeater. It will differ per item record.
Create the Abandoned Cart Custom Journey with Event Component
Add the Abandoned Cart Event component to the Custom Journey
In the properties of this component you'll find:
A Name should be given to Abandoned Cart. Make them easily recognizable and descriptive as they are used in Site's offer settings.
A Scope is required. This way, the expression '[%eventValue('SCOPE.PARAMETER')%]' can be used throughout the journey to call the parameters. Supported locations for this expression are content (emails, pages, mobile messages) and data components.
The User lookup and Split components do not support the event parameters yet.

Two read-only system parameters are added automatically, containing values from Site :
CART — contains the public name of the cart that made the call
PRODUCTS — the list of products in the cart. The structure of the parameter is as follows:[{"ID":"8","CONTENT":{"QUANTITY":1,"PRICE":399.0}},{"ID":"11","CONTENT":{"QUANTITY":2,"PRICE":649.0}}]
Additional custom parameters can be added (e.g. QUANTITY, PRICE).
Add the Abandoned Cart email
To complete this journey, we add and connect the abandoned cart email to the Abandoned Cart Component in our journey. After saving, validating and publishing the journey, we can activate it in order to make the whole abandoned cart cycle go live. Visitors who trigger an abandoned cart on the webshop will now receive an abandoned cart email.
How about a Completed Cart?
The setup of a completed cart is basically the same as an abandoned cart one, the differences are:
- you will design a completed cart email with the purpose of showing bought articles.
- in your Site cart you need to configure the completed cart to trigger a completed cart journey instead of the abandoned cart one.
Also check out the Abandoned Cart Use Case Example, here.
