Create a product journey
In the previous step, we created all the product journey assets. The journey looks like this:

After the contact clicks the link in the invitation "Free tickets" email, the Product assign component will reserve two tickets for the contact. This way, the tickets will be available to them when they complete the survey. With the Product confirm component, we definitely assign the tickets to the contact after the survey is completed. We could have used the Product assign component after completing the form and immediately assign the tickets, without a Product confirm component. But if someone completed the survey faster, and all tickets are gone, we had to display the "Free tickets handed out" page to them although they completed the survey. Seems a bit unfair.
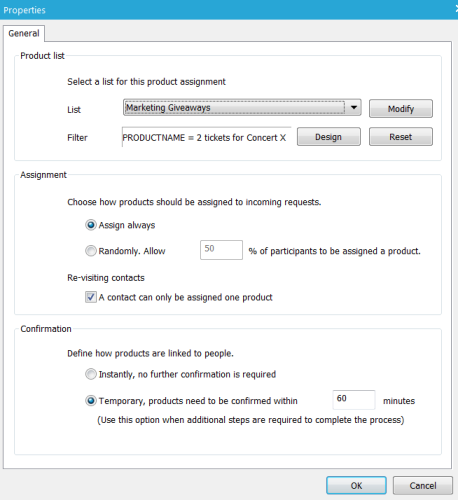
1. In the properties of the Product assign component select the Product list and add a filter, selecting only the tickets for this journey: PRODUCTNAME=2 tickets for Concert X. We are reserving tickets for the contact, so select "Assign always" and "Temporary, product need to be confirmed within" 60"minutes". Check "a contact can only be assigned one product". The contact has one hour to complete the survey. If not, the tickets will be released so someone else can get the tickets.
PRODUCTNAME "2 tickets for Concert X" is also used in the next step, so keep them the same.
2. Add tickets to the product list: Right click the Product assign component and select "View products". The "Product manager" window pops up. On the top, left click the button 'Add Products'. For item type enter 'Concert X', for Product name '2 tickets for Concert X '. Add 50 records to the Product list. The Product assign component assigns only one product (record) after the click. So one record will stand for 2 tickets. Presuming we have 100 tickets, there are 50 records ( (2x50=100 tickets in total).
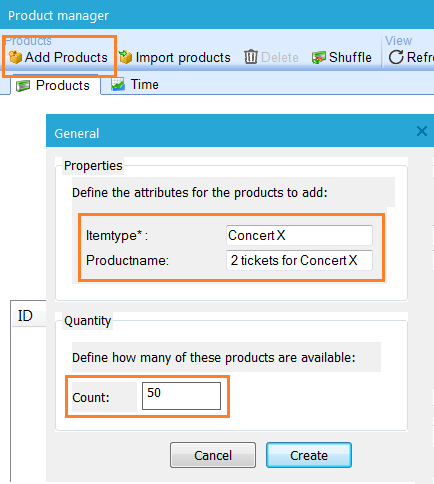
If you don't select a product, the entire selection is taken. You can select products from the overview holding Control (ctrl) or Shift.
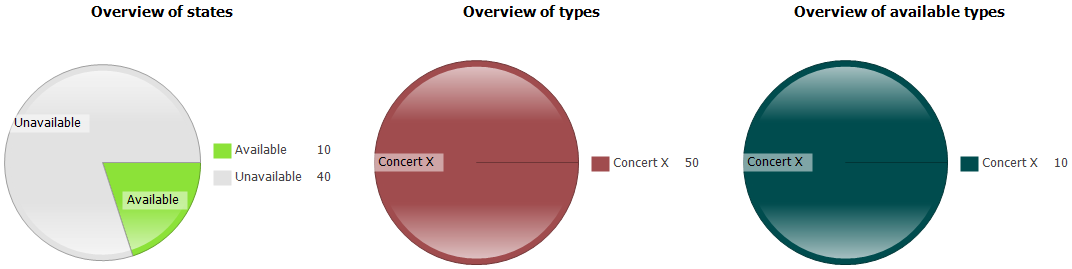
In this example we have 10 products currently available. Products in a product list can have the following states:
- Available: the product is available for assignment
- Unavailable: the product will become available after a certain moment in time (see shuffle)
- Reserved: the product is reserved for a contact but not yet confirmed
- Assigned: the product is already assigned to a contact
4. The pie diagrams provide an overview of the types and availability of your products. On the tab 'Time' you can also see if and how your products are available/assigned over time.
Close the product manager.
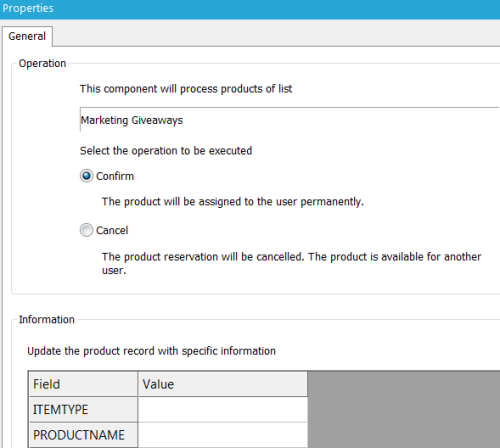
After the form has been submitted the Product confirm component assigns the tickets (product record) definitely to the contact. In the properties of the component you will see that the component is set to 'confirm' by default. You can also use this component to 'cancel' the confirmation. The product record is released immediately after a click. If needed you can also update the product record.
In the thank you page and email the scope PRODUCT_ITEM is used to show the product name and image, retrieved from the product list: ~PRODUCT_ITEM.PRODUCTNAME~ and ~PRODUCT_ITEM.PRODUCTIMAGE~
If the contact already has tickets assigned or there are no more tickets, the triggers "Already assigned" and "No product" resp. will be executed.
