The Product Assign component is used to assign a product from a Product list to a contact. The Product Assign and Product Confirm components are used in combination with a Product list. A Product list is used to store information about "marketing products" used in the Selligent journey. It is not used to store all your company's products (items you sell), but rather your marketing "giveaways": tickets, gadgets, vouchers, etc. With the product assign component you assign a product (record in a product list) to a contact, with the product confirm you can let the contact confirm before assigning definitely.
The product can be assigned permanently to a contact or for a limited amount time. Assignment can be done instantly, without a Product Confirm component or temporarily, in which case the Product Confirm is used to let the contact confirm that they want the assigned product.
A product can have three possible statuses: Assigned, Reserved, Available. All available products can be assigned. Reserved products are temporarily assigned to a contact until the contact confirms the product (with the Product Confirm component). Assigned products are no longer available.
Technical note:
After a Product has been assigned, you can refer to the product field values
in emails and pages (for instance to inform the contact what product was
assigned to him) with the scope: PRODUCT_ITEM, followed by the field name.
E.g. ~PRODUCT_ITEM.PRODUCTNAME~
Example:
Contacts filling out a survey get rewarded with a product (tickets
to a concert). When he clicks the sensor in the invitation email, a product
is temporarily assigned to him. This way the product is 'reserved' for
him, and not 'available' for someone else while he fills out the survey.
After the survey is submitted, a Product Confirm component assigns the
product definitely. He will receive an email with details about his rewarded
product

Click here to create this "Free tickets" example step by step.
Events
The Product Assign component generates three events:
- Product Assigned — Triggered when the product has been assigned to the contact.
- No product — Triggered when products are no longer available or when the contact was not assigned a product (when only a percentage of the participating contacts are assigned a product randomly, and he did not get a product)
- Already Assigned — The contact was previously assigned a product and can only be assigned one product (set in the Product Assign component properties).
Properties
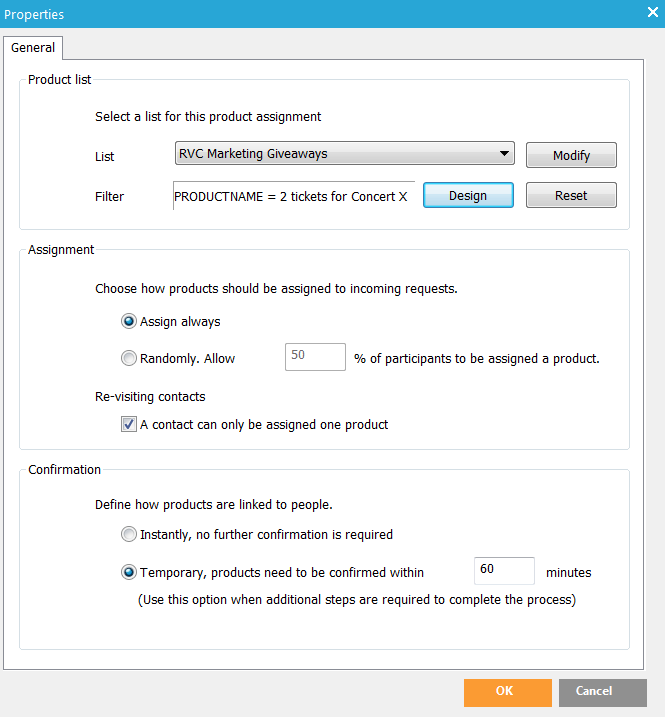
1. From the ‘List’ drop-down menu, select the Product list to be used for assigning products. If only one product list is available, it is selected by default.
2. Use the 'Modify' button to access, modify, and view the details of the selected product list. The ‘Product Manager’ dialog is displayed:
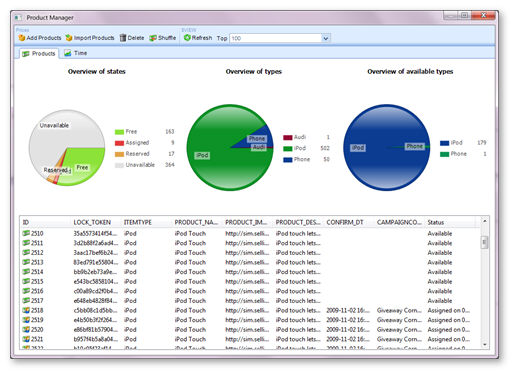
The 'Products' tab displays product related information such as status, type, confirmation date, etc.
The lower section of the dialog lists all products in the product list. Each product is displayed with its status.
The upper section of the dialog gives a graphical overview of the products and their status. Three possible statuses can be distinguished:
- Available —The products still available for assignment to contacts
- Reserved —The products reserved for contacts but not yet confirmed
- Assigned —The products already assigned to contacts.
New products can be added to the product list manually with the 'Add products' button, or imported (see 'Lists').
Use the ‘Add products’ button in the toolbar of the Product Manager to manually add new products to the list. A dialog is displayed to enter the product details:
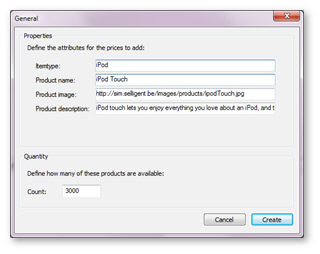
NOTE: The fields displayed in the dialog correspond to the custom fields defined in the Product list.
The value entered in the ‘Count’ field indicates the number of products (records in the Product list) generated with the properties defined above.
Use the ‘Import products’ button to import a list of products into the selected product list. The Import dialog is displayed.
With the ‘Shuffle’ button you can set the availability of the products. Select a number of products in the list (holding Shift or Ctrl) and click 'Shuffle". The following dialog is displayed:
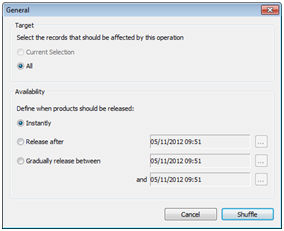
Indicate if only the selected records must be shuffled or all records.
Next, define when the products should be available:
- Instantly —The products are immediately available
- Release after —The products are available after the indicated date. Before that date the products are set unavailable and will appear as such in the Product Manager.
- Graduallyrelease between —The products availability is gradually and equally distributed over the indicated period of time.
Example:
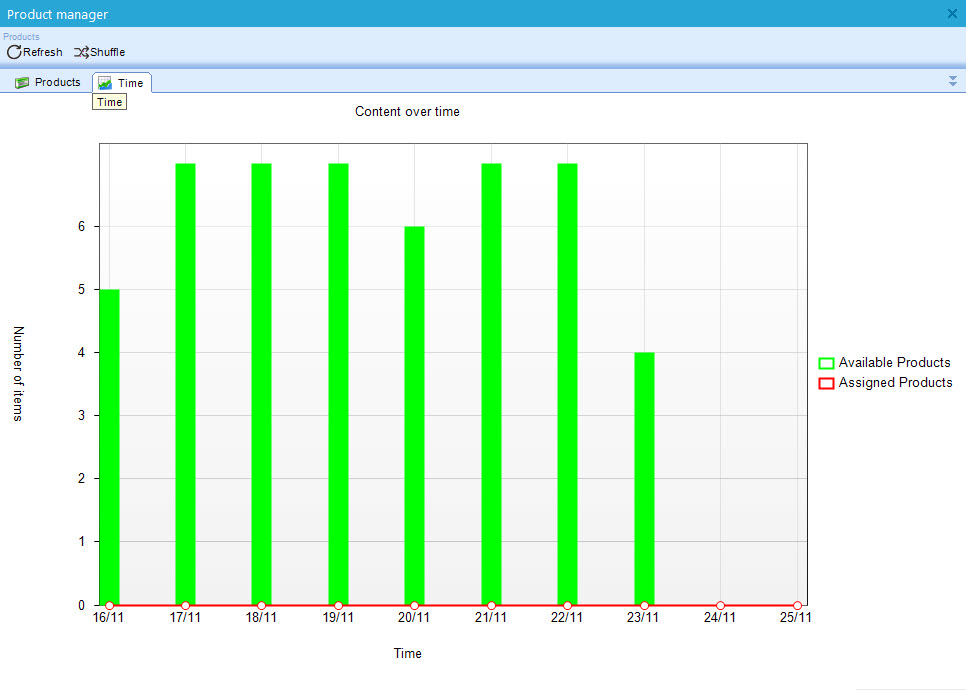
The screen below shows that a shuffle was performed on 6 products, released
over 6 days. The Status column gives more information on the date of availability.
One product is set available for assignment immediately, 5 other products
are set available at a random date.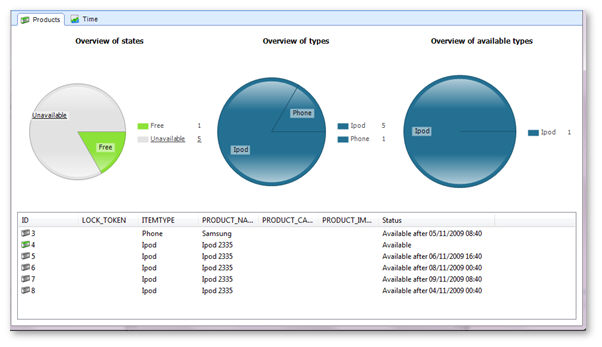
The 'Time'tab of the Product Manager shows how many products are available and assigned over time.
When done, close the Product Manager dialog to return to the properties of the component.
NOTE: The Product Manager can also be accessed by right-clicking the component in the journey and selecting 'View products'
3. If required, define a filter
on the product list. For example, you may want to select only products
with a certain type or product name.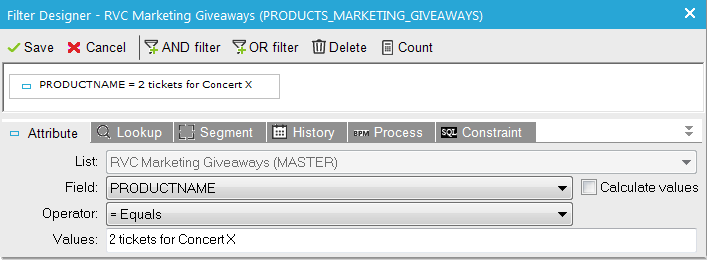
4. Next, define how products should be assigned to contacts:
- Assign always —Every contact is assigned a product until no more products are available
- Randomly assign to x % of the participants: only a percentage of the participating contacts will be assigned a product. The decision is done randomly a the moment. E.g. 50% will not assign a product now and not the next time, etc. It will have 50% chance of getting assigned.
5. Define if a returning contact can be assigned only one product or more than one by checking the corresponding check box.
6. In the last step, decide if a product must be assigned instantly or if confirmation is required (using the Product Confirm component). Use the corresponding options:
- Instantly, no further confirmation is required —The product is assigned immediately to the contact.
- Temporary,
products need to be confirmed within x minutes —When confirmation is
required, this must be done within a predefined period of time. If
this is not the case, the product will be available again for assignment
to another contact. A temporary assignment should always be followed
by a Product Confirm component in the journey
