The email header is a very important part of the email as it influences how your email is perceived, not only by the reader, but by email servers as well. It's very important to have a valid from address with a valid domain. Emails without subjects aren't sent and are marked as 'bad template'.
Valid
mail domains are configured at the Organization level for each language.
However one mail domain might have multiple From and Reply addresses per
language, as well as a default From and Reply address. If
multiple From and Reply addresses are configured for a mail domain, you
can modify the From and Reply addresses here in the email header section by
selecting a different one from the drop-down list.
Moreover,
the user can change the default aliases for the Reply and To addresses.
To access the email header and other Design elements, select the Edit option in the toolbar.
Setting the email header properties
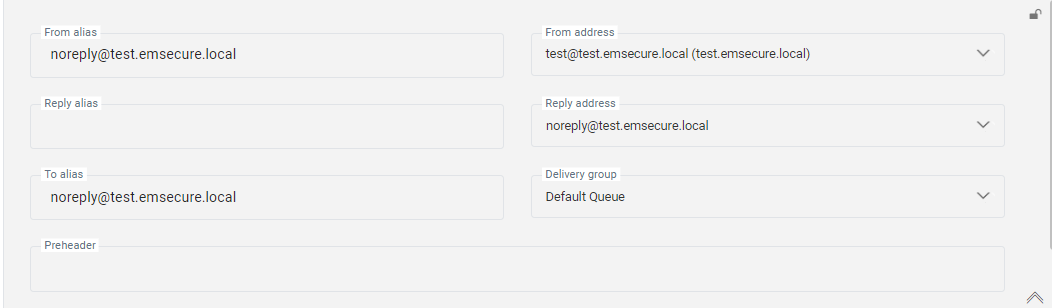
The email header consists of following configurable elements:
- From alias — Enter the name for the sender that will be used as an alias for the From email address. The alias is the name that you see in the email client. When a default From alias is defined for the selected mail domain, this field is already filled out.
- From address — A default From address is filled out based on the language of the message and the corresponding mail domain. When multiple possible From addresses have been defined for the domain, you can select a different one from the drop-down list.
- Reply alias — Enter the name for the Reply address that will be used as an alias. The alias is the name you see in the email client instead of the email address. The Reply alias is not mandatory.
- Reply address — A default Reply address is filled out automatically based on the language of the message and the corresponding mail domain used for that language. You can change this by selecting a different Reply address from the drop-down list or enter a Reply address manually.
Note: when entering a Reply address manually, it's the responsibility of the marketer to ensure the email address is correct and properly configured. If not, this may result in bad spam scores.
- To alias — Enter the name of the recipient that will be used as an alias. This will be shown instead of the email address of the recipient. Personalization fields, such as an audience value or a profile extension field, can be used to fill out this field (example: MASTER.FIRSTNAME). When a default To alias is defined for the selected mail domain, this field is already filled out.
- Preheader — A preheader is the text following the subject line when an email is previewed. A preheader is one of the first three items a subscriber sees when viewing an email, next to the sender's name and subject line. Many mobile, desktop and web email clients provide them to tip you off on what the email contains, before opening it. The text can be personalized and is displayed just under the subject line. It will not be displayed in the body of the email. Limit the preheader message to 80 until 100 characters.
- Subject — Enter a subject for the message. This is mandatory in any email.
Note: If the email header is unlocked in a template, it's possible to create a template without all the fields being filled out, allowing the fields to be filled out in the email message created from the template. For email messages, the email header fields must always be filled out.
Note: It's possible to use audience fields, profile extension fields, data selection fields and variables (custom and system) to personalize the fields as well as emoticons.
Adding personalization
The email header can be personalized using the following features:
- using Personalization fields. These can be added to every field in the email header (from, reply, to alias as well as preheader and subject).
- using emoticons. These can be added to the preheader and subject lines.
- using expressions
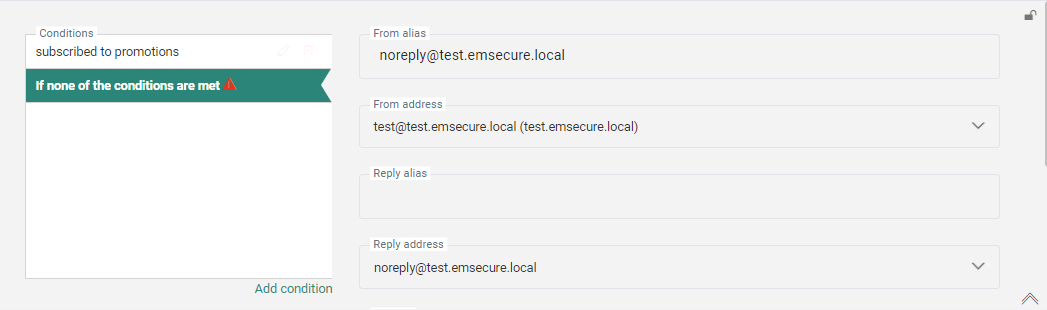
Adding conditions to the email header
The email header can be different depending on specific conditions met. This applies to the From, To , and Reply alias, From and Reply address, preheader and subject. A default set of data needs to be provided in case none of the conditions are met.
Example: Display different subject lines depending on the age. Make sure to have a default subject in case the age of the contact is unknown.
1. The link 'Make this conditional' at the bottom of the email header gives access to a Constraint Builder.

2. In the Constraint Builder, define the constraint to apply and give it a name.
3. When at least one constraint is defined, the email header is displayed differently, with all the defined constraints on the left, and on the right, the set of fields that might change depending on the selected constraint:
4. To define the content of the fields for a specific constraint, select first the constraint on the left and next fill out the fields on the right. By default, the fields are filled out with the default information.
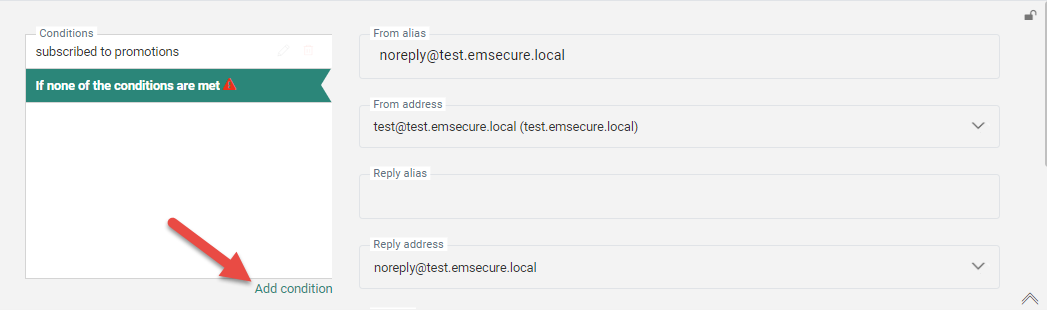
5. To define additional constraints, click Add condition. The constraint editor is launched and another constraint can be configured. When done, it is added to the left pane. Again, select the constraint and next fill out the fields on the right.
Locking the email header (templates only)
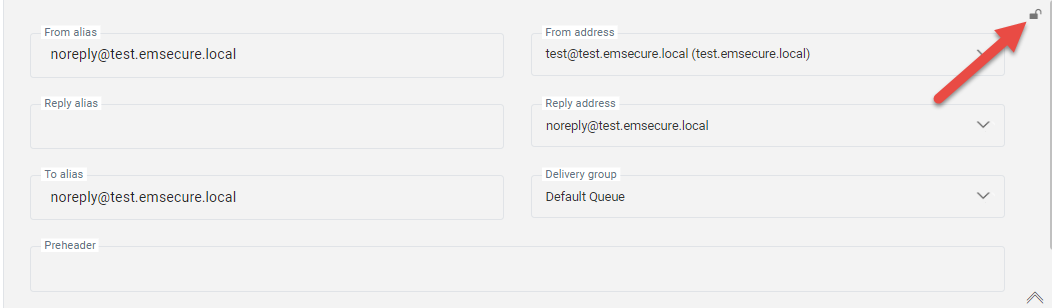
The fields in the email header can be locked at the template level. Marketers using the template to create a message in a journey can not modify a locked email header. Locking is applied to all fields in the header at once.
To lock the email header, click the locking icon in the top right corner. To unlock again, click again. When done, click Save.
Note: Remember, when the email header is locked on template level, all email header fields must be filled out.
