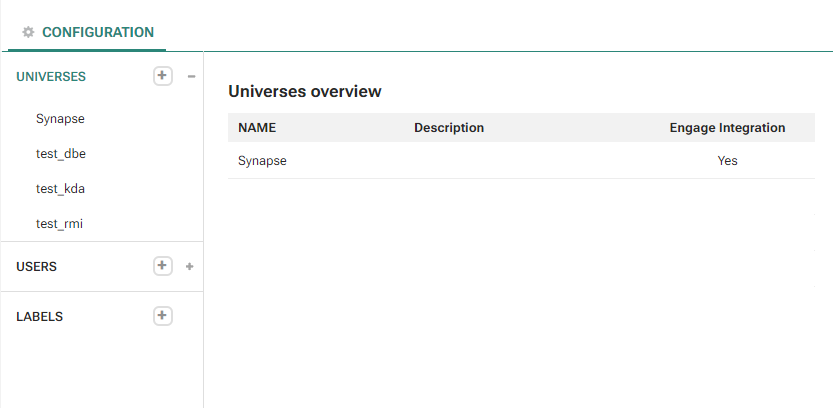
Create Universe
What is a universe?
For instance, imagine that a tag in Site gets its values from a meta-tag ‘category’ (html), and this meta-tag is on all pages, on all the websites. If a visitor goes to a page with category “Fashion” on website A, and category “Electro” on website B, both values will be collected for the Site tag and used to determine their profile.
<head>
    <metaname="category" content="fashion">
    <!-- other html elements -->
</head>
This allows you, as a marketer, to see what the visitor is really interested in, across all websites: “Fashion” or “Electro”. The same goes for all the general, default values we collect: visit duration, average times, device type...
Thus, Site will generate ONE Site profile per visitor across the different websites.
- For a company with 1 website, setting up a universe is straight-forward: 1 universe with 1 website.
- For a company with many websites, e.g. a publisher with 3 newspaper brand web sites, creating 1 universe for the 3 websites results in ONESite profile, reflecting the overall activity of that visitor over all 3 newspaper websites (we call this a “visitor-centric approach”).If the publisher were to create 3 universes, 1 for each brand website, this would result in THREESiteprofiles for the same visitor, there is no link between the 3 profiles. So these are considered to be 3 separate visitors.
By creating a universe, statistics on all websites within the universe are grouped together and all configuration settings defined for the universe apply to all the websites.
Obviously, 1 universe for multiple websites is preferred.You can create separate universes, for instance if you have a “staging” and a “live” environment. All reporting, tag values, segments… will be separated. All elements in Site are created per universe.
Per universe you can link to one
Engage Audience. If Site recognizes the visitor as a Engage contact (they clicked in a Engage email), they are ‘CRM
identified’. And you can use the Audience data to target the visitor.
This is fine if you have one Engage Audience for the different
brand websites. But if you have different Engage Audiences,
let’s say one for each brand website, and you want to use them all in
Site, you have to create a universe
per brand website.
You will get different Site profiles for the same person; one profile per
brand website. But the same goes for your Engage Audiences. The
same person is also not recognized across the different Audiences. If
this is the setup in your Engage environment, it is probably
intentional, so in this case, creating a universe per brand website makes
sense.
Note: By default only one universe can be created. If more universes are required, please contact Marigold.
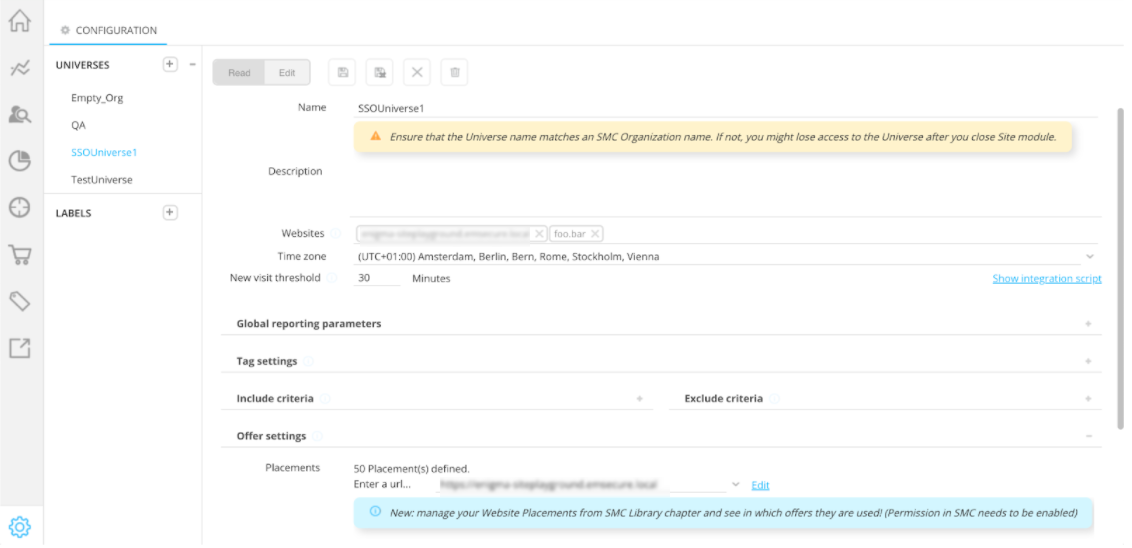
Universe Settings
To create a new universe click the + icon on the Universes drop-down.
To edit a universe, double-click its name or click ‘Edit’ in the top bar.
Note: Multiple users cannot edit a universe at the same time. A message alerts the user if the universe is being edited by another user. A button 'Unlock' in the alert message unlocks the universe and allows editing it. Note that all unsaved changes by the other user are lost.
Note: If the maximum number of universes has been reached, the 'New' icon is no longer available.
The properties set for a universe apply to all websites within the universe.
General properties
- Name — Define a universe name and description to provide a clear explanation on the use and purpose of the universe.
- Domains — Specify the domains that are valid for the universe. Separate the different domains by typing a space or pressing ENTER. Tracking calls are only allowed from these domains. There is no limit on the number of domains in a universe.
Note: Enter the domain
(e.g. subdomainname.com or domainname.com) and do not specify the website
location (e.g. http://www.domainname.com/location).
Note: Anonymous users across different domains may impact performance as a profile is being created for each one of these domains. Also, a large number of subdomains may have an impact on performance.
- Time Zone — Select the time zone from a pick list. This is the time zone applicable to the universe. The information is used for real-time measures (reporting times, times in constrain editor, offer start and end times), which are based on data of the current day and are reset every night using the time zone of the universe. (A default time zone is filled out.)
- New visit threshold — How long must a visitor be inactive in an open browser session, to be considered as a new visit? Once a value is set and the universe is saved it is no longer possible to modify this setting.
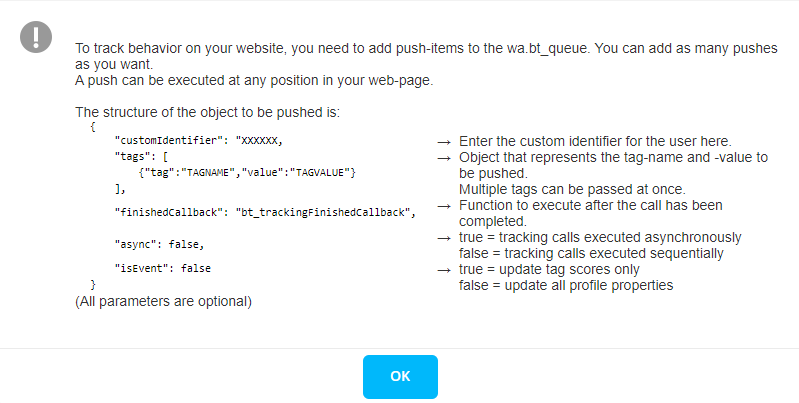
- Show integration Script — Shows the Java script that is to be copied to the all webpages that must be tracked. The script contains the references of the universe and the url to the tracking file.
var wa = document.createElement("script");
wa_s = document.getElementsByTagName("script")[0];
wa.src = "//PATH PROVIDED/target.emsecure.min.js";
wa.type = "text/javascript";
wa_s.parentNode.insertBefore(wa,wa_s);
wa.bt_queue = [];
wa.bt_queue.push(JSON_OBJECT);
The path used in this script points to a CDN (Content Delivery Network) where every universe has its proper folder and file.
This file is generated automatically and includes information about placements defined for the universe. It is different for each install.
Click the  icon to display additional information on this script:
Global reporting parameters
All these settings are used in the reporting:

- Last activity — When is a visitor is considered as active? (E.g. if their last activity was less than 3 days ago)
- Default interval — Defines the starting point in time, from where growth is measured. Under ‘Visitor insights’ there is a ‘Growth’ report. It indicates if you have more or less profiles then 1 day, week, month… ago. It is this interval that is used. It can be set in days, weeks, and months.
- Default period — Some reports show data per day, per week or per month. This is the default value used and can be changed by the user in the report itself.
- Visitor profiles — A choice can be made between active profiles and all profiles. This is the default value used and can be changed by the user in the report itself.
- Affiliates — The list of affiliate websites, used for the default tag 'Traffic source'. Traffic sources can be Search, Paid search, direct, social, email and affiliate.
- Paid search engines — This tag value ‘Paid search’ is no longer reliable since most search engines do not return data anymore. The tag value has therefore no use anymore and will be removed from Site in the near future
Tag settings

- Recency — Indicates the
% by which tag scores must be decreased over time. It is possible
to override this setting on the tag itself
For instance, the 'number of purchases' will never decrease in time (0% decline). Your first purchase will always be your first purchase. While others, like a visit to the Electro products overview page, most likely aren't valid forever. Perhaps it’s valid even only for 1 day (100% decline/day).
Example:
*Decrease of 50% day. With an initial tag score (hits) of 4 for a profile.
No additional hits for the tag are tracked for this profile.
Day 0: 4 hits, Day 1: 4-(4*50%)=2, Day 2: 2-(4*50%)=0
*When decrease hits 0 the value will be deleted from the system. Site does
not keep track of previous hits.
*If Day 1 gets another click it will be added and the countdown is reset.
Day 1: 2+1=3. Day 2: 3-(3*50%)=1.5
*This is correct if there is exactly 1 day between each calculation
moment. The decrease value decreases continuously. E.g. When it’s already
half through the day the decrease is already halfway 50%, thus 25%. E.g.
Half way Day 1: 4-(4*25%)=3.
*Decrease is calculated each time a new hit occurs.
*Note: the score in the reporting is based on the score calculated when
the reporting is calculated. So this is a snapshot of the score at the
moment the reporting was calculated. Once a day, this moment is different
on each client universe.
*Other example: Decrease 50% per week. With an initial score of 1. And
no additional hit. The value will disappear in 2 weeks.
If the tag is hit again after 1 day, the new score is (1-(1/7*50%))+1=1.92857
- Day parts — Indicates the different day parts for the default tag “Moment of day in week”. Minimum 2 and maximum 10. The minimum allowed time frame is 30 minutes.
To remove
a day part, click the 'Close'
button in the text box.
To add one, click a position
on the bar. An additional button is added to the bar and the part is now
available for configuration:

To change the starting time of a day part, drag it on the bar. The new time is indicated as a tooltip:

Include criteria for Quality profiles
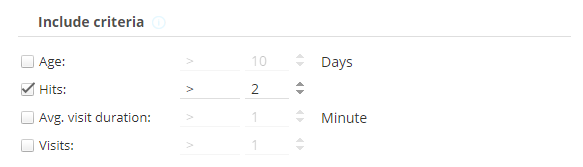
When is a profile qualified for
use in Site? (Quality profile)
To avoid storing a huge amount of profiles that you don’t want to measure,
a minimum profile qualifying level should be set.
For instance, you don’t want to track data from profiles who visited just once, or from whom you received only 1 hit. This creates too much ‘noise’ and influences your reporting, so you can’t track and target properly.
Only profiles that answer the qualifying criteria are stored (e.g. should have at least 5 hits). If they do not reach the criteria; the criteria that they did reach (e.g. 2 hits) are stored in a persistent cookie on the visitor's computer. Otherwise Site would not know when to start building profiles.
Note: Profiles are never deleted. So when you change this setting, all profiles that now qualify are updated and measured, from that moment on. This will reflect in the reporting. If you suddenly have more or less profiles you measure, you’ll see the shifts in the reporting.
- Age — How old is the profile (E.g. the profile must be at least 1 week old)
- Hits — All pages that include Site tracking script will generate a ‘hit’. So all page views. But also every time you send JavaScript values back to Site. This can be on page load (view) or on a click (event).
- Average visit duration(in minutes)
- Visits — Each time a person visits one of your websites.
Note: Non-quality profiles are not tracked. Only when the visitor complies with the include criteria, Sitestarts tracking the profile.
Exclude Criteria for quality profiles
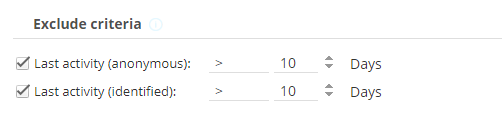
When must a profile be excluded from measurement? You can use different exclude criteria for anonymous and identified profiles.
E.g. If you are a publisher, and
the visitor didn’t come back for a month, you don’t want to track their
behavior anymore. Keep on tracking them would again create too much ‘noise’
and influences your reporting, so you can’t track and target properly.
The last activity would be set to 30 days.
But if you are a retailer, you want to track the visitor’s behavior if
they buy every 3 months. After this they can be excluded to do proper tracking
and targeting. The last activity would be set to 90 days (3 months)
- Last activity (in days) — The last time Site received a hit. Visitors that haven't shown any activity since x days are excluded.
Offer settings for placements and capping
Offers are used for reporting and targeting on the website. (E.g. stimulate a second purchase, an offer for first-time buyers). Here you can create placements and define default offer settings.
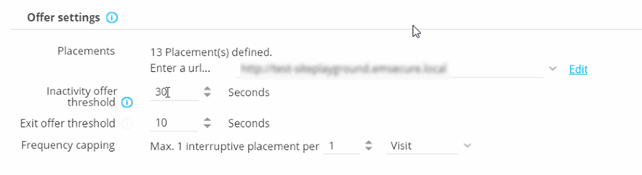
- Placement — Placements are user-defined sections within a page that indicate where specific offer content should be placed on the website, such as banners, pop-ins, pop-ups, etc. The number of placements currently defined is indicated. The 'Edit' button allows the definition of new placements. Note that no content is defined in a placement, that is done in the offer itself. Different offers can therefore use the same placement.
Important Note: Since release Version 5.12, placements can be configured in the Engage library. We advise configuring your placements in Engage. Two conditions must be met: permissions need to be set in Engage and the universe name must be the same as the organization name. This information is also visible on the configuration page.
- Frequency
capping — Define how many times these interruptive placement(s)
can be shown. This setting is per
visitor. Example: max 1 interruptive placement per 2 visits.
Note: There are two levels of frequency capping in Site. One on placement level like explained in the paragraph above, but also on universe configuration level, more info can be found here.
Example 1:
Universe A has capping configured on universe configuration level to have a maximum of 3 interruptive placements per visit (this is the total for all potential different interruptive placements).
Placement X is an interruptive placement, with capping configured to show 1 time per visit.
Conclusion: The visitor visits the website, could potentially see a maximum of 3 interruptive placements in total, but only see placement X once because it is capped to show it only 1 time per visit.Example 2:
Universe A has capping configured on universe configuration level to have a maximum of 3 interruptive placements per visit (this is the total for all potential different interruptive placements).
Placement X is an interruptive placement, with capping configured to show 2 times per visit and is used in Offer1 (Offer1 is higher in priority than Offer2).
Placement Y is also an interruptive placement, with capping configured to show 3 times per visit and is used in Offer2 (which is lower in priority than Offer1)
Conclusion: The visitor will see "Placement X" 2 times and "Placement Y" only 1 time. This is due to the universe configuration capping of only 3 interruptive placements per visit. - Inactivity offer threshold — Set the time delay after which a visitor is considered as being inactive. This information can be used to define offers that target inactive visitors.
- Exit offer threshold — Set the time delay after which a visitor is considered as having the intent to leave the website. This information can be used to target visitors with exit intent with specific offers.
Note: An inactivity offer is an action that's triggered after the inactivity threshold is reached (for example 2 minutes).
'Inactivity' means no mouse or keyboard action on the page.
Switching between browser tabs or desktop apps is activity that won't reset the count for the threshold.
If the inactivity threshold for example is set to 2 minutes, and you switch between tabs after 1 minute, the count continues up to minute 2.
If you then navigate back to the web page on the initial tab after the 2nd minute, the action (for example a pop-in) will be triggered.
Note: Inactivity and exit offers can be perceived as annoying by the website visitor when used too much. It is advised to use these in combination with frequency capping.
Exit intent is triggered when the mouse pointer moves outside the window.
Connect to Marigold Engage

The 'Connect to Marigold Engage' checkbox indicates that the tool is being used in combination with Marigold Engage when checked.
If the visitor is a known Engage contact (CRM-identified profile), their Site profile, tag, segment and offer data can be transferred to Engage and stored in extended profiles (1:1 linked lists). You can also use their Engage profile data to track (reporting segments) and target (offers) them in Site.
Engage contacts visiting
the website(s) are identified through a parameter (M_BT). This parameter
is added to the link in a Engage email or page.
This option makes it possible to detect how many Site profiles are also
Engage contacts.
- Integration URI — Specifies the Engage REST API url. This web service is used to export Site data to, and retrieve Engage fields from the selected parent profile list or its extended profile. The url is usually https://YOUR_SELLIGENT_MC_DOMAIN_NAME/Portal/api.
- Application key and secret — The application key and secret from the service account , required to access the web service. This service account is created in the Admin Configuration section of Engage.
Important note: When entering the application key and secret, you'll need to wait until the lists/scopes are fully loaded.
When this is done, a popup will appear :
Only save your configuration when the loading has finished!
Otherwise the updated key/secret are reverted, and old values will appear.
Once a connection is made, additional fields are displayed.
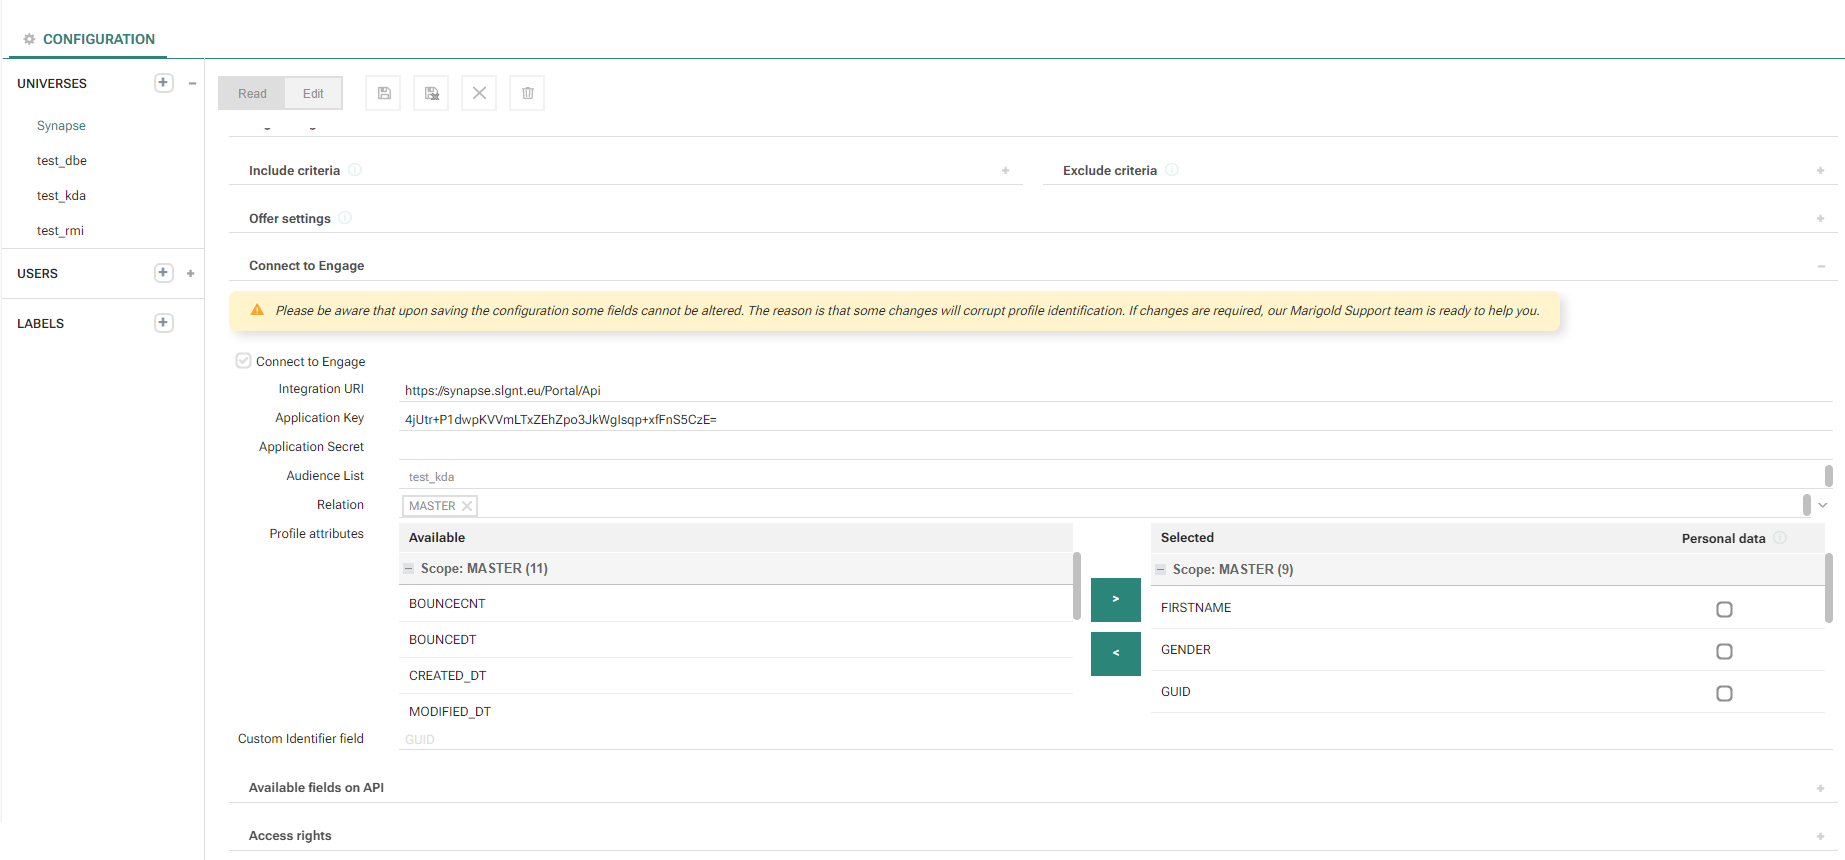
- Audience list — The Engage Audience List from where fields
can be used in the Site environment. This is also the list that will be used for targeting and retargeting journeys.
Note: This field will only display a drop-down with all available lists in Engage when the connection is successful. Only one Audience List can be selected.
- Relation — The selected list is either the parent profile list or a 1:1 linked list. When selecting a relation, all fields of that relation become available on the Profile attributes.
- Profile attributes — When a parent or linked list is selected, fields from that list are visible in the 'Available' column. They can be moved to 'Selected' fields column to include them in the integration. To deselect a field, simply move it to the ‘Available’ column again.
The selected fields are used to define Reporting segments, for Offer personalization and Offer audience constraints. Selected fields will also be updated from Engage to Site every 24 hours. It is recommended to pick non-volatile fields.
Selected fields may also be exposed to the API.
The Personal data tickbox prevents that field from being exposed to the JavaScript API (and will therefore not be available for selection in the next section 'Available fields on API'), although the field can still be used in Offer personalization and for selection in segments and filter criteria.
Note: It's safer to select fields that do not disclose personal information about a visitor, so choose them only if they are to be used for personalization or if they are needed for selections (used in reporting segments or offer criteria).
- Custom Identifier field — Select a field from the Engage audience or its profile
extension that corresponds to the contact's unique identifier (e.g.
CUSTOMER_ID). This field is immutable once it has been chosen.
A visitor can be ‘custom-identified’, meaning their unique identifier was sent back in the JavaScript tracking call. For instance, after logging in on the website, their unique customer id was sent back.
If that value matches the value in this Engage field (e.g. CUSTOMER_ID), the visitor will also be ‘CRM-identified’. Their Engage profile is linked with their Site profile. They didn’t even need to click in a Engage email, which would also make them ‘CRM-identified’.
If you have such a field in the Engage Audience List, it is advisable to select it here.
More info on profiles can be found here (anonymous vs identified).
Note: A scheduled synchronization job can be used to keep the Engage values of the custom identifier field in sync with the client database values.
Note: The universe name in Site has to be exactly the same as the organization name in Marigold Engage, in order to set up a connection!
Available fields on API
With SiteJavaScript on your web pages you can pass tag values (E.g. tag Category=”Sports”) to Site for tracking and targeting. When you rely on offers to target the visitor, this section can be skipped.
The following explanation is only needed when you want to customize your website, apart from showing offers, but still based on Site tracking data. You can use a custom JavaScript call-back function, executed after tracking data has been sent to Site and profiles are updated.
In the JavaScript tracking call, indicate which tracking tags and fields (number of clicks, avg. visit duration, is identified ...) need to be returned, so you can use them in your call-back function. These can be profile fields, tags, offers, carts, CRM fields or reporting segments. Here, select fields you want to expose to the front-end. An example JavaScript tracking call is created
Note: Only the selected
fields will be exposed to the front-end. If you ask for fields in
the JavaScript tracking call that are not selected here, their values
will NOT be returned. A few examples of exposed fields that can be selected are:
Only CRM fields selected previously for integration (in the section Connect
to Engage) are available for inclusion in the API.
To add fields to the list of exposed fields, press the 'Column' button. A dialog is displayed allowing the selection of profile fields, tags and CRM fields. For tags functions can be selected as well.
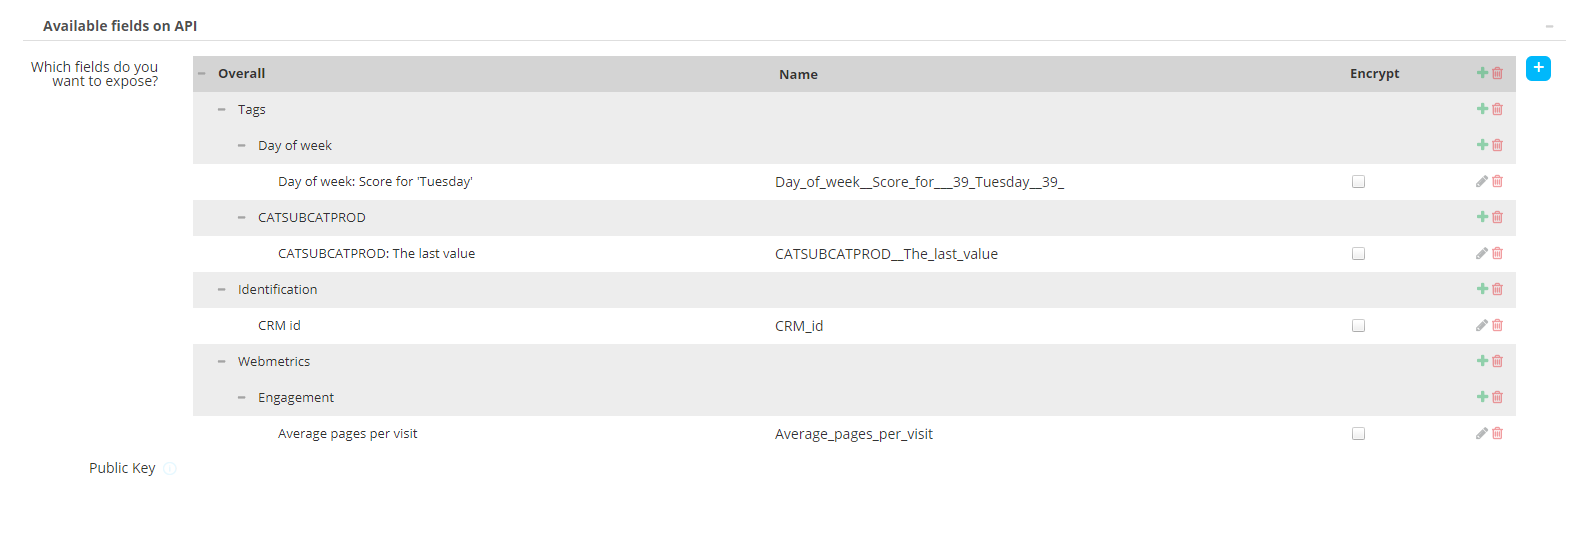
The check box ‘Encrypt’ protects the information that will be exposed to the front-end. When the request is being made by the front-end tracking call, the data will be returned encrypted. When one field is ticked for encryption a public key is required (Public-Private key encryption).
Note: This public key must
be obtained by the customer and entered in the ‘Public key’ field.
For more information on public-private encryption, see Wikipedia,
Public-key cryptography
An example script is created and helps to easily build the required code for the tracking call (see also Using JavaScriptor the Site API manual). The script translates the selected tags and fields into the correct property, uses the public names, and provides the correct syntax.
"exposedFields": [
    {"fields":"Reidentified"},
    {"fields":"Identified"},
    {"fields":"CustomId"},
    {"fields":"FirstHitDateTime"},
    {"fields":"AvgVisitDuration"},
    {"fields":"HitsVisit"}
]"exposedFields": [
{
"fields": "DAYOFWEEK",
"type" : "Count",
"parameter" : ""
},
{
"fields": "MOMENTOFWEEK",
"type" : "Count",
"parameter" : ""
},
{
"fields": "BOUGHTITEMS",
"type" : "Count",
"parameter" : ""
}
]- Public tagname
- Type — By default “Count” is used, all options are :
-
- Count — Counts the number of values measured for the given tag (tag values and, for hierarchical tags, including the sub-values), for the given level (see parameter)
- Last — The last value measured for this tag
- Last3 — The last 3 values
measured for this tag. Returned pipe (|) separated.
E.g. Phones|Computers|Cameras - TopCategory — Returns the highest scoring value for the tag, for
the given level
(see parameter) - Top3Category — Returns the 3 highest scoring
values for the tag,
for the given level
(see parameter). Returned pipe (|) separated. E.g. Phones|Computers|Cameras - TopCategoryScore — Returns the score of the highest scoring value for the tag, for the given level (see parameter).
- Top3CategoryScore — Returns
the scores of the 3 highest
scoring values, for the
given level
(see parameter). Returned pipe (|) separated. E.g. 173,221|114,793|57,410 - TopTagValue — Returns the highest scoring valuefor any level in the tag, starting from the given level (see parameter)
- Top3TagValue — Returns the 3 highest scoring
valuesfor
any level in the tag, starting from the given level (see parameter).
Returned pipe (|) separated.
E.g. Phones|Computers|Cameras - TopTagValueScore — Returns the score of the highest scoring value for the tag, for any level in the tag, starting from the given level (see parameter)
- Top3TagValueScore — Returns the scores of the
3 highest scoring values, for
any level in the tag, starting from the given level (see parameter).
Returned pipe (|) separated.
E.g. 173,221|114,793|57,410
-
Parameter (optional) — This attribute is used for hierarchical tags and indicates on which level the information needs to be retrieved. (Example: parameter:"Phones" => indicates that information needs to be retrieved on the first level of the hierarchy. Parameter:"Phones_iPhones" => indicates that information needs to be retrieved on the second level of the hierarchy. If the parameter is empty, the highest level is taken. )
Access rights

Give users access rights to the current universe. The same can be done under ‘Users’.
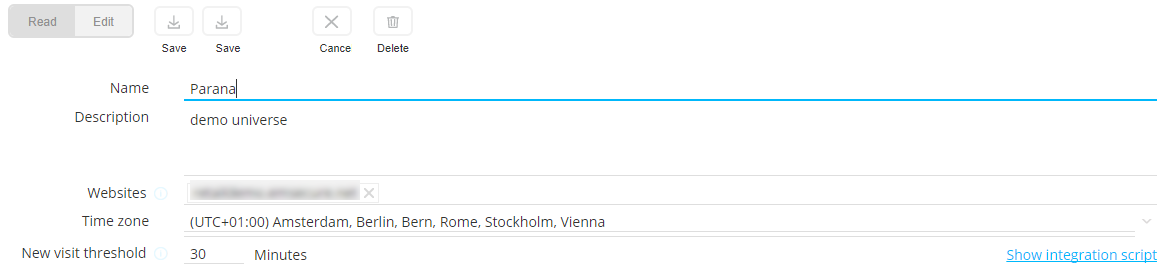
Example universe
Below is an example of the Parana demo universe. All settings defined in this universe will be applied to the website “demoshop_v2”. Here, just one website has been added, but if you have multiple websites, list them in the “websites” text field. When visitors go to this website, on each page where the tracking script has been added, their behavior is tracked and profiles are built in Site.
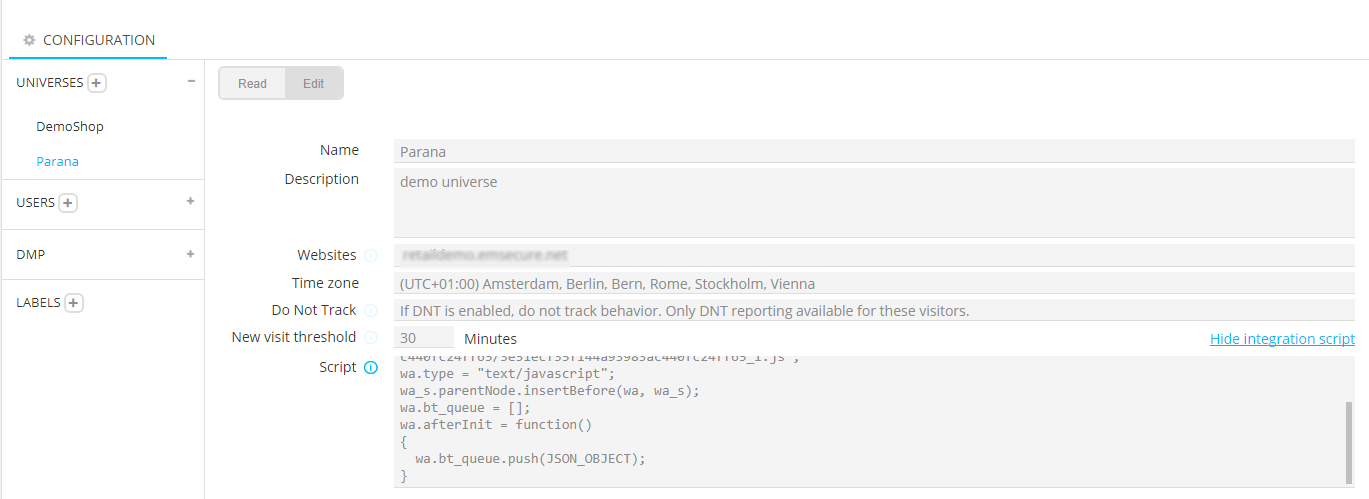
This Parana demo universe is linked to a Engage environment, resulting in an exchange of information in both ways. Engageinformation is used in Site (in Reporting segments or Offers) and Site information is available in Engage as profile extensions to the Audience.
