Define Offers
Offer Overview
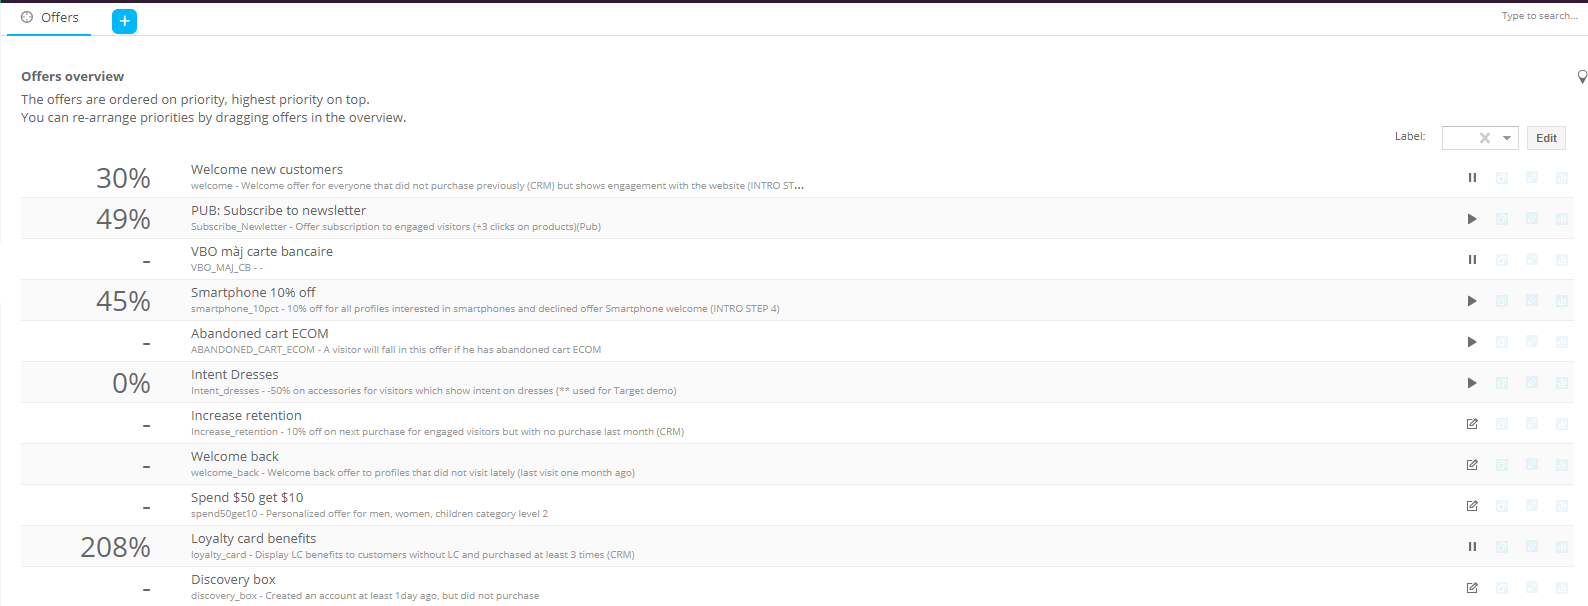
The status of an offer is represented by following icons:
 in design
 is running
 a starting date in the future
 finished
 paused
The number in front of an offer indicates the percentage of profiles that have been converted for the offer. If the option ‘Don’t measure performance’ is checked, no numbers are displayed.
Note: This percentage is based in the expected number of conversions defined in the 'Why?' section of the Offer configuration. If the expected number is 10 and 2 visitors have converted, you will see 20% in the overview for that offer.
Use the Label field in the upper right corner to filter the list of offers based on the label assigned to them.
The 'Edit' button in the upper right corner makes the 'Offers' overview editable. It allows changing the order in which the offers appear. Offers can be moved around through drag and drop. The position of the offer in the list determines the order in which these offers are executed (priority).
Note: Editing the overview locks out other users, so when finished press 'Release' as soon as possible
Note: It is important to set the offers in the right order.
If a visitor falls in multiple offers at the same time, and these offers
use the same placement, offer priority is used to display the offer’s
content. The offer with the highest priority (highest in the overview
list) comes first. The offers with lower priorities will be shown in rotating order afterward. Of course, if these offers use different placements,
all offers are shown simultaneously.
When frequency capping is applied (universe settings), it does not impact the priority of the offers. Offers with
higher priority will be executed first but if the maximum number of interruptive
placements (like a popup, see universe
settings) has been reached, lower priority offers will not be executed anymore. When no frequency capping is applied, all offers will be displayed in order of priority.
(More details and examples on offer priority and capping can be found in this topic.)
While editing the overview, it is locked for other users. When finished, press the 'Release' button.
Right-click the offers in the list to access a pop-up menu with following options:
- Pin component — adds the offer to the dashboard
- Copy offer as a new offer — duplicates the selected offer, displays the properties in Edit mode.
- Edit offer — access to the properties in Read mode. You still need to select the Edit button to make modifications
- View report — displays the report for the selected offer
Note: Offers that are shown to all visitors (tracked and non-tracked visitors) have an "eye" icon (and tooltip) displayed on the right hand side.
Offer Details
To create a new offer, press
 . A new tab is added and the following
configuration page allows defining the offer:
. A new tab is added and the following
configuration page allows defining the offer:
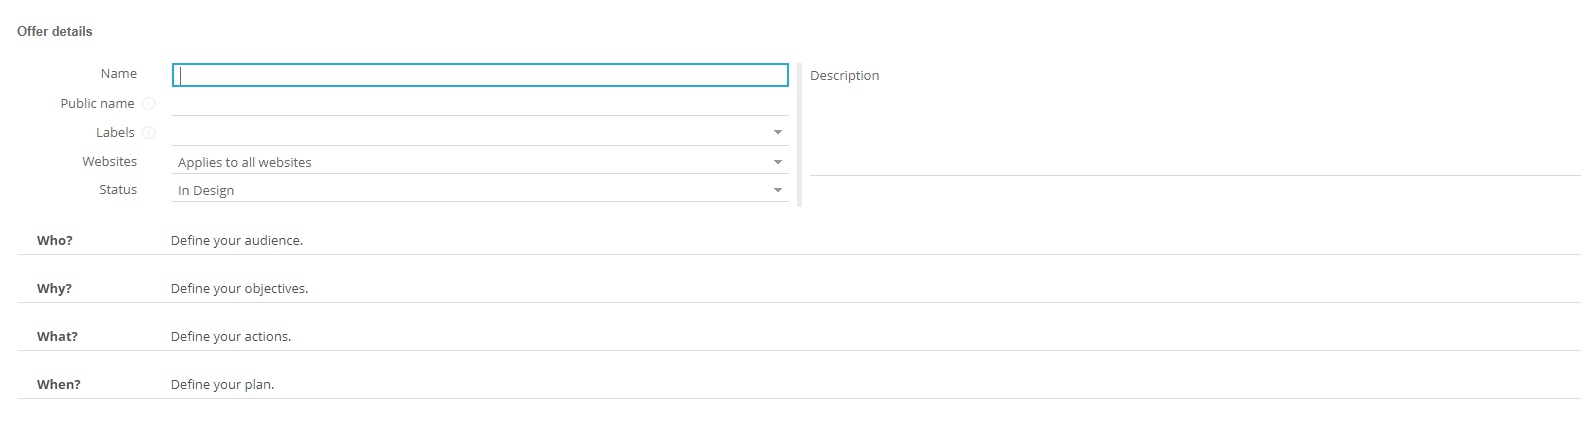
General:
The General section allows defining the general properties of the offer:
- Name & description— Give a name and good description to identify the offer. Use something meaningful to this offer. Limited to 50 characters maximum, this name is presented in the Offers Overview.
- Public name— This is the name that will be used in the script as reference for the offer, in the Constraint Editor (Reporting segments and offers) and in Export to Engage. It is limited to 50 characters. This name needs to be JavaScript friendly.
- Applies to all websites — Preferred option
- Applies to these websites only — A list with all websites defined for the universe is available to choose from. Select all websites on which the offer applies.
- Applies to all but these websites — A list with all websites defined for the universe is available to choose from. Select the websites on which the offer does NOT apply.
- Status
- In design => still pending
- Active => currently running
- Paused => temporarily de-activates the offer (and reporting updates)
- Finished => ends the offer, no data is collected for the offer the offer report will not be updated anymore and report figures reflect the status up until the finished date. Finished offers cannot be edited.
Example:
Start by creating an offer showing a loyalty program to the website visitor.
First, general properties are set for the offer. Saving the offer at this point will return a warning that some info is missing: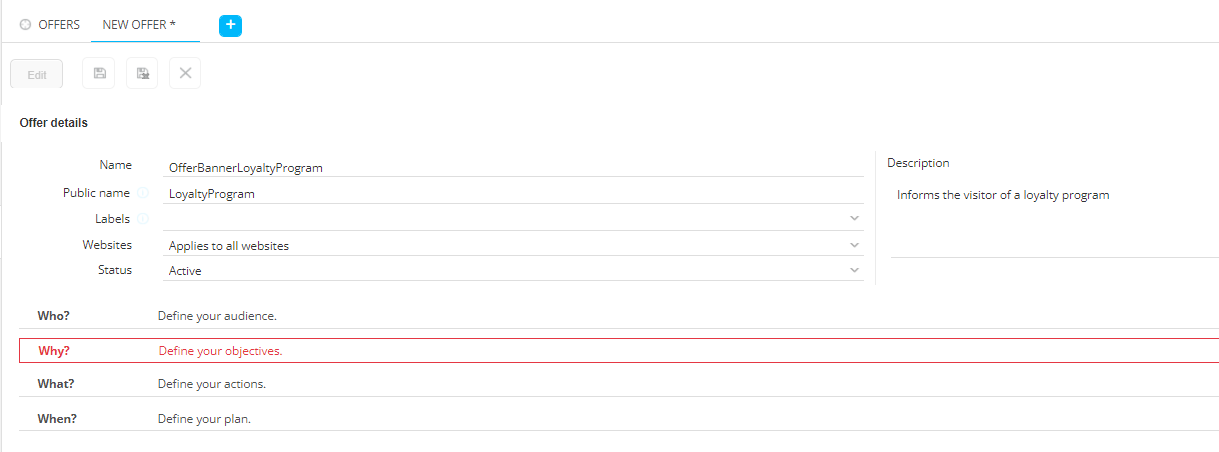
In the Why? section, the option 'don't measure performance' is by default not selected. In this first step, we will check it and not worry about any conversions.
Now, save the offer.
Who? Define your audience
Define your offer audience using the constraint editor. Link constraints using the operators And, Or, AndNot, OrNot. Create groups to group conditions together. When no audience is defined, the offer is triggered for every profile.

To build the audience, overall and session information can be used.
Example:
Include visitors that were inactive the last 10 minutes and target them with special offers.
Target visitors that are most active on Saturdays.
Target all contacts included in a specific segment
Target visitors who didn't give their consent to be tracked.
When the audience has been configured, you can also save it as a Reporting segment. Enter the name, public name and description and click ‘OK’.

Note: Contacts can be added through more than one Journey. These journeys are set as 'targeting' journeys.
Example:
We want to show the offer to website visitors that are CRM identified, but do not have a loyalty program running yet. Loyalty cards are stored in a 1:1 linked list HASLOYALTYCARD.
In the Who? section you can define this target audience in the following way:
When done, activate the offer.
Top Tip:
To test your offer you need to activate it. To avoid your offer being seen
by normal website visitors, you can add a constraint: The URL has a text parameter
with a certain value. A parameter name and value that is not used on the
website.E.g. 'DEBUG' is equal to 'true' or MYFIRSTNAME is equal to 'Your_firstname'.
When you visit the website and add the parameter, only you should see
the active offer. E.g. www.companyname.com/index.apsx?DEBUG=true
Why? Define your objectives.

No offer without an objective, right? Here, you can define when a visitor has been ‘converted’. For instance, if your offer stimulates a second purchase, evidently he is converted when the number of purchases is 2. This can be a tag value for a numeric tag “Number of purchases”, for which the value is returned with JavaScript on the purchase thank you page.
But you don’t always have to offer him something to create an offer. Let’s say you want to get visitors without a newsletter subscription (you get this information from Engage) to subscribe. The offer content can try to get him to subscribe, without actually ‘rewarding’ him. He is converted when he reached the newsletter’s subscription thank you page.
Note: The offer content can be a Engage Journey. See ‘What? Define your actions’
You can also define steps before the visitor reaches the conversion goal. These are called “activities” (optional). This way, you can create a funnel report listing all the steps. For instance if your goal is to stimulate a purchase, the activities can be “added an item in the basket”, “entered payment details” and finally the conversion would be “confirmed the purchase”. The report will show the number of profiles in each step.
You can always create an offer without setting a conversion goal. It
will have no end goal.
If so, check 'Don't measure performance'
For both activities and conversion:
- Name: Name of the activity or conversion.
- Define when the activity has been done or conversion reached. Following elements can be tested:
-
- Page title: the page’s html title-tag value. E.g.:<title>Purchase confirmed</title>
- Page url: a page url, for instance from the order confirmation page
- Meta tag: a html meta-tag value. E.g. :<metaname="purchased" content="1">
- CRM (Journey) page tag: the page tag of a Journey page in Engage
Note: The tag is set in the properties of the Journey page. The Site tracking script must be on the Journey page!
-
- Site tag: a Site tag value: Number of purchases (NUMBER_OF_PURCHASES) = 2
- Via API: the values are received from the JavaScript tracking call. In the tracking call you can use a function trackActivity(offer,activity). The function parameters are the offer’s public name, and the activity’s unique name.
- On click: when the offer is clicked
- Operator: possible values are: is/ contains/ starts with/ ends with
- Enter the value to make the comparison with.
To add a second activity, press the + sign to the right and start over. To remove an activity, press the red button.
Example:
The 'Number of expected conversions' is used in the offer reporting to see how much of your goal has been reached (50/200 conversions, 25% converted)
Some notes about conversion: when an offer is paused, the offer will
no longer be shown but contacts that are already in the conversion flow
can still convert but will no longer receive the retargeting emails.
A contact can only convert for the last action for which he has shown engagement.
This means that if there are two offers and the contact shows engagement
for the first one and then for the second one, he can only convert for
the second one. Once the contact has shown engagement for an offer he
can continue to convert for that offer without showing engagement .
Allow only one conversion per engagement: Only one conversion is allowed after the visitor has clicked the offer content. No other activities or conversion is measured until the visitor clicks the content again. Use this option to avoid that a conversion is detected every time the conversion condition is met at the next click. When the option is checked no conversion will be detected anymore unless the user clicks the offer content once again.
Example:
We are checking the option 'Don't measure performance' at this point. In a later example we will come back to this and define conversion criteria.
What? Define your actions

Actions are the content of your offer. In the universe settings, placements were defined. Here we setup what should be displayed in these placements, the offer content that should be displayed in the image banners, pop-ups, pop-ins or other html content elements.
Note: In an offer all placements
defined in the universe settings can be used. There is no setting that
links a certain placement with a certain offer. If you limit the websites
for an offer (the ‘websites’ drop-down) only placements linked to these
websites are available.
When you create an offer action you can add a constraint when to show the
action. This can be a page title or url, meta-tag, Site tag or a Journey
page tag (Engage).
For each action a name, description and type is given. The red icon at the end deletes the corresponding action. The toolbox icon provides access to its properties.
The button 'Preview' provides a view on what the webpage looks when applying the configured action(s). Previewing is possible applying landscape or portrait layout as well as using different devices such as PC, Tablet, smartphone, phone
The creation of actions is covered by this dedicated topic. This also includes a small example on how to define an action.
The second part 'Follow-up' is used to determine what needs to be done when the visitor does or does not convert.
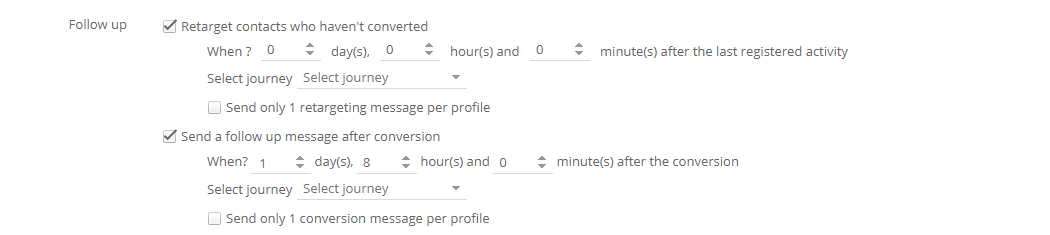
You can send the visitor a message
(mail, sms,…) if they accepted or not your offer within a certain
time frame. I.e. converted or
not.
When the visitor did not convert, you can send him a retargeting
message. E.g. an email convincing him what a great offer this is.
When the visitor converted, you can send him a follow- up message. E.g. an email thanking him.
The messages are created in Engage journeys.
Note: Follow-up journeys only work if the visitor is known in Engage (CRM identified).
- Retarget contacts who have not converted:
Set the delay for sending
the message. Visitors must have hit
an activity before Site triggers the Journey. Under “Why? Define your
objectives”, you’ve created activities. The visitor must be in one of
these activities (a step in the funnel), but not yet reached the conversion
(final step in the funnel).
Thus, if you don’t define activities, you cannot send a retarget message.
Technical note: The reason
for this is simple. You can create offer content without any click in
it. E.g. no banners to click, just showing html content or images, to
highlight your loyalty card advantages for instance. In this case Site
does not know if you have converted or not. So you cannot send a retargeting
message.
If you only setup a conversion and no activities, and the visitor did not
reach the conversion, Site has no way of knowing when the Site message
should be sent, because there was no ‘hit’ from the visitor. Site does
not send retarget messages to visitors that simply are in an offer for
a period of time.
In this aspect; it’s also no use creating an activity that is the same
as your conversion goal. Because once he’s converted a follow-up message
will be sent, so your activity for retargeting will be passed by, we are
already in the final step of the funnel.
In other words, you need steps in a funnel, and Site sends the retarget
message if the visitor is in one of these steps for a certain time, but
not the final one, then the user is converted and a follow up message
is sent.
From the drop-down, select the Engage Journey and its Input Component that must be triggered. The reason why an Input Component must be selected is that a Journey may contain multiple Input Components and that you need to decide through which Input Component the visitor enters the Journey. (Note: only journeys linked to the current universe and configured as ‘Retargeting/conversion Journey, are listed.)
If the Journey Input Component has custom input parameters, you can
pass Site values to the Journey.
Three values are always passed on by default and are therefore not listed
here: the offer’s public name (for Journey parameter OFFER), the activity
name (for Journey parameter ACTIVITY) and the position of the activity
in the activity list (the position in the funnel, for Journey parameter
ACTIVITY_NR).
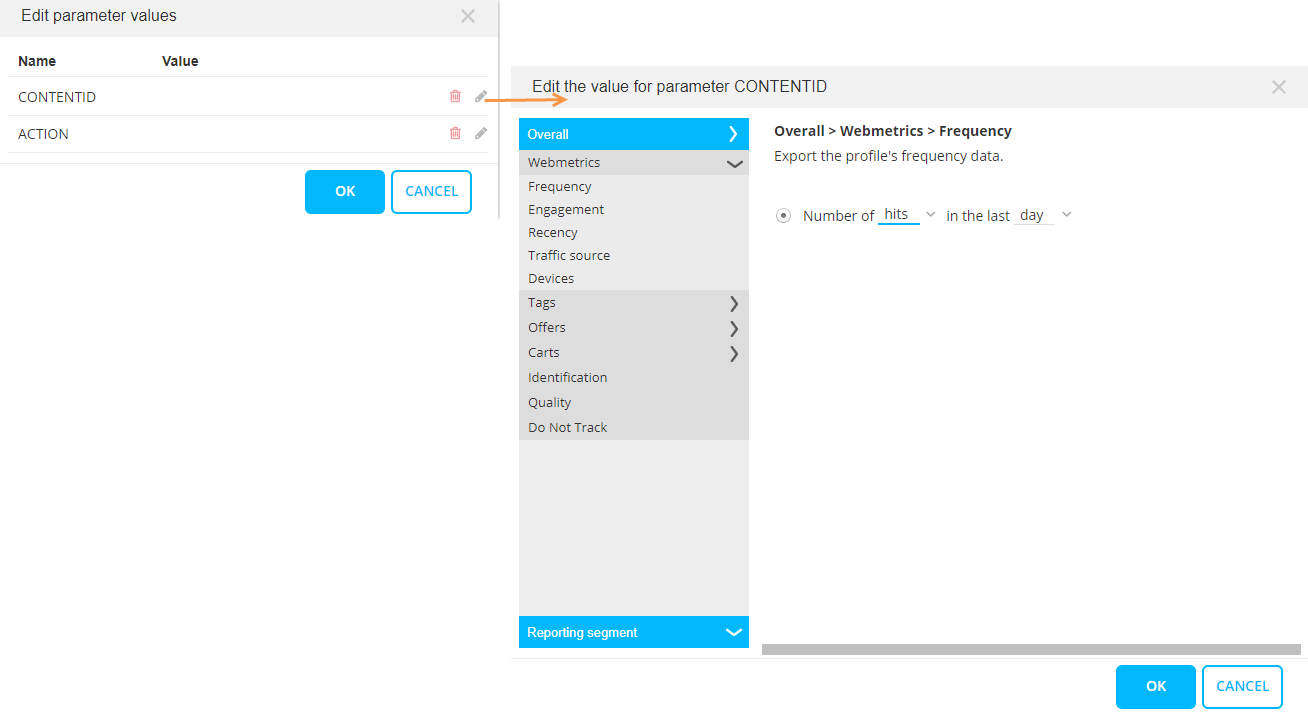
Use the ... button to the right of the field to set the values for the
Journey’s custom input parameters. Click
the ‘Edit’ icon to the right
of the custom parameter to select the value. A dialog is displayed where
a choice can be made between profile data (hits, visits, visit durations…),
tag values (Site tag values) and offer data (if the user visitor is in
and offer or not, and when he was in or out of the offer). Identification
data, Do not Track option and Reporting segments can equally be used to
set the values for the parameters..
(More details in Define Actions topic.)
If checked 'Send only 1 retargeting message per profile’: if the visitor hits a first activity, a retarget message is sent. Later when the visitor hits a next activity, a second retarget message will not be send.
-
Send a follow-up message after conversion: sends a Engage Journey message after the visitor converts.
Again, a Journey must be selected and the time frame within which the message must be sent. Only journeys linked to the current universe and configured as ‘Retargeting/conversion Journey, are displayed.
Note: Setting a Journey and its Input Component values is done in the same way as a retarget message. See above.
Important note: It is not enough that a visitor sees your offer action without clicking it. For retargeting and conversion to work, there must be a click on an offer action that leads to an activity (for retargeting) or conversion (for follow up).
When? Define your plan
Offers can be planned for a very specific time period. Some offers only need to be triggered on specific days at a specific time and timing can be different depending on the day of the week on which it is triggered. E.g. During the weekend offers can be triggered all day long, but during week days you might want to trigger them only after working hours for instance). Or, trigger offers on Wednesdays and weekends only.
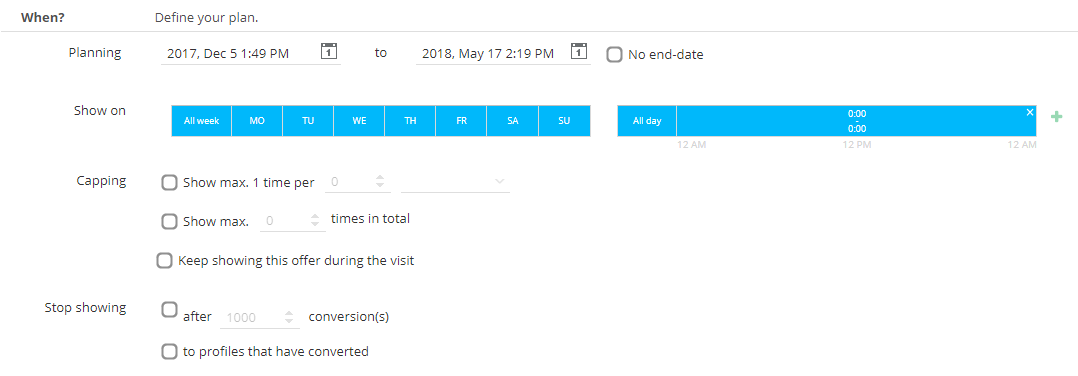
Planning: indicate when the offer should be visible. A calendar is available to choose a start and end date. An end date is not required. In that case the offer is planned infinitely.
Note: When the end date of an offer has been reached, the status of the offer is set to 'Paused'. An offer that is paused can still be modified and re-activated.
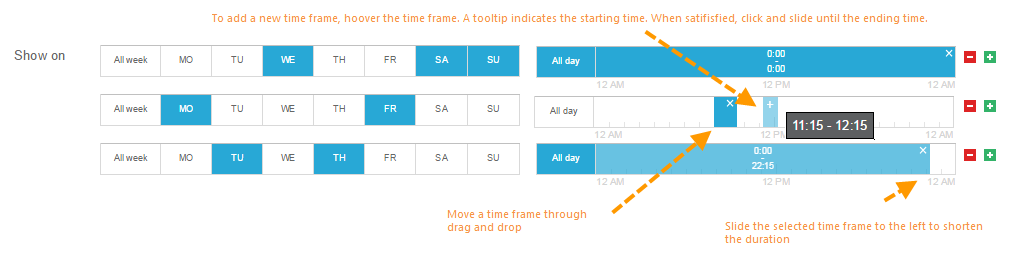
Show on: select the days on the left and time frames on the right. By default
the complete time frame is selected. Drag and drop the right border of
the selected time frame to the left to make it shorter. To add an additional
time frame for the same selection of days, hoover over the time frame
and select the area.
If different times are required on different days, click the + button to
add another time table:
Example:
Capping:
- Show max 1 time per x visits/pages/minutes/hours/days/weeks/months
- Show max x times in total
- Keep showing this offer during the visit.
Note: These settings are less restrictive than the settings on action level.
Example: Capping is applied per visitor.
E.g. capping is set to a maximum of 1 time per visit (or session). This means that each visitor who falls into this offer will see it the first time they are landing on the offer webpage, but when navigating on the website and coming back on the offer webpage, they won’t see it anymore (as it’s 1 time per visit - per visitor). After being inactive for at least 30 min (or the custom visit threshold set in universe configuration), and coming back on the website, the visitor sees the offer again. The same scenario applies as for his first visit.
Stop showing:
- After x conversions: when x conversions have been reached, the offer should no longer be shown.
- to profiles that have converted: once a visitor is converted stop showing the offer to that visitor
Any combination of the above options can be used and provides endless possibilities:
- show an offer after 18h but never on Sunday.
- show an offer maximum once a month but when a visitor is converted never show it again
- show an offer every hour to really push it, but once the visitor is converted never show it again.
- show an offer max once a day but no more than 5 times in total.
- Show an offer only after working hours but never more than 4 times per visitor.
- ...
Example:
Activate the offer from now on forward, with no end date. It will also only be shown once per visit.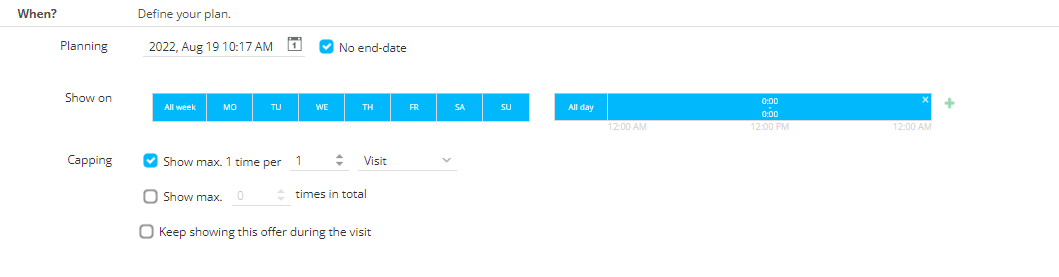
Update Site tracking script
To indicate that Site has to show offers on a webpage, the setting "isTargeting":true must be added to the tracking script push. (see this topic)
wa.bt_queue.push('{"isTargeting":true}');
If a visitor is considered as “consentless” this information must be passed as a parameter in the tracking call of Site (via JavaScript isConsentless:true / isConsentless:false ).
Note: Tracking of consentless visitors needs to be activated on request through your Marigold contact.
