| New features in Selligent Marketing Cloud March 2021 Tamarillo |
SMC Image folder relocation
Beginning with the Satsuma-release, new URLs will be generated for all SMC image references. The previously generated URLs will continue to function normally until June 2021.
Previous image URLs: #client#.slgnt.eu/portal/resourcehandler/#organisation-guid#/resource/#image_name# (Example: https://paranasolution.selligent.com/portal/resourcehandler/xxxxxxxx-xxxx-xxxx-xxxx-xxxxxxxxxxxx/resource/footer1.png)
New image URL:
- SMC Global folder: #client#.slgnt.eu/images/SMC/#image-name# (Example: https://paranasolution.selligent.com/images/smc/footer1.png)
- SMC Organization subfolder: #client#.slgnt.eu/images/SMC/.org/#organisation-guid#/#image-name# (Example: https://paranasolution.selligent.com/images/smc/.org/xxxxxxxx-xxxx-xxxx-xxxx-xxxxxxxxxxxx/footer1.png)
IMPORTANT: The previously generated URLs will continue to function until the V-release, currently planned for June 2021. At this time the old URLs will stop working and any images referenced by these URLs will no longer be displayed. This will impact any content SENT prior to the Satsuma-release, and any references to these images in content not automatically generated by SMC or in external systems
![]()
About Screen
An About SMC menu item now provides access to information about the current installed version. This menu item can be found in the User menu:
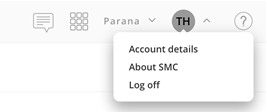
The resulting dialog shows the following information:

Clicking the About Us button takes the marketer to the Selligent website.
![]()
Lookup Component Enhancements 
Previously, the Lookup Component only allowed for checking if a record already existed in a list and switching back to the profile data for use further in the journey.
The Tamarillo release introduces a new option for the Lookup Component that allows a marketer to load the data retrieved through the Lookup and use it for personalization in the message and in Journey Components (Split, Data Save and Validation)
The Lookup configuration is now as follows:

Toggle the ‘Load Data’ tab to enable this option and make the data retrieved from the matched record in the selected list available for message personalization.
In the Advanced section of the component’s properties, it is possible to define an optional scope as well.
Note: When multiple Lookup Components are used in a Custom Journey and perform a lookup on the same list, a scope will be needed to retrieve the right data. Without using a scope, the data from the first lookup could be overwritten by the second lookup. By using a scope for each component, it can later be specified in the expressions used in a message or page to load the right data from the right lookup.
A dedicated expression is available to use this lookup data for personalization and in all Journey Components following the Data Lookup Component. An instruction is added to the interface to make the user aware of this expression and explain how to use the loaded data.
With scope defined: [%journeyLookupValue('LIST_API_Name', 'FIELDNAME', 'MY_SCOPE')%]
With NO scope defined: [%journeyLookupValue('LIST_API_Name', 'FIELDNAME')%]
Example: A Custom Journey contains 2 Lookup Components. One does a lookup in the orders and filters on the most recent order. The other one does a lookup in the same orders but filters on the first order. Each lookup has a scope: RecentOrder and FirstOrder.
When using the lookupdata in a message, the scope is specified
[%journeyLookupValue('Orders', 'Amount', 'RecentOrder')%] => returns the amount of the last order
[%journeyLookupValue('Orders', 'Amount', 'FirstOrder')%] => returns the amount for the first order
![]()
STO in Single Batch Custom Journey
To extend the availability of STO to all Single Batch Journeys, a new component has been added to the Custom Journey canvas, allowing the marketer to set up STO for Custom Journeys starting with a Single Batch Component.
 The Delivery Optimization component, available from the ‘Select and optimize’ section, is added after the Single Batch Start Component and defines the best send-time for each contact in the Audience.
In line with STO for Single Batch Journeys created through the wizard, a time zone can be defined to set the end of the day to the desired time zone as only same day delivery is supported.
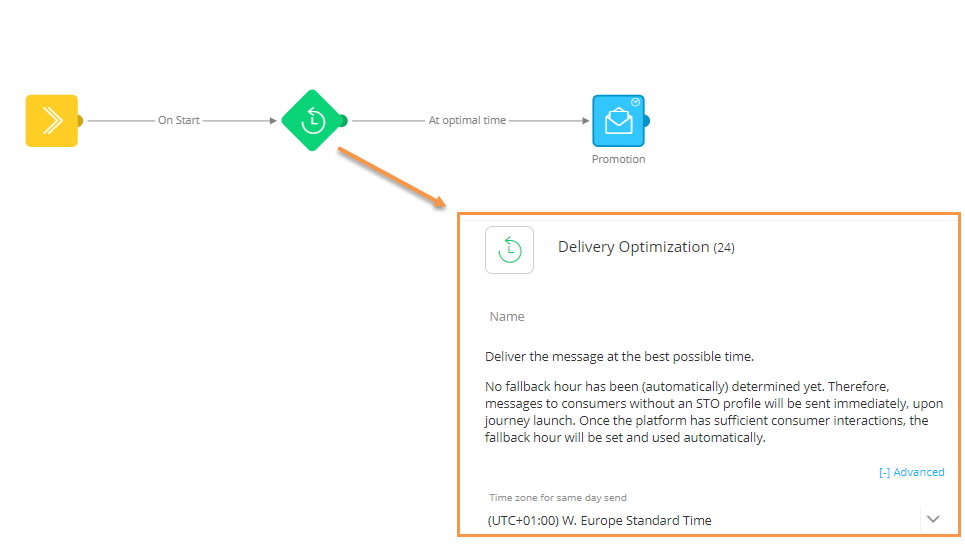
Note that only emails can be added after this component.
![]()
Abandoned Cart Data in messages and Visibility Constraints
When an Abandoned Cart Journey is triggered, Site sends information to SMC regarding the Cart that triggered this journey and the products in the abandoned cart (ID, price and quantity). This data is passed to SMC via the PRODUCTS parameter. Below is an example of an Abandoned Cart Component in a Custom Journey.

When communicating with visitors of your website who have an abandoned cart, you want to send messages that have relevant information for them.
The data selection list is the catalog containing all items and item properties such as prices. However, when a website visitor puts items in the basket, a reduced price might be suggested in an offer on the website. When sending out a message to this visitor regarding the abandoned cart items, you want to use this reduced price in the message and not the catalog price.
Also, based on the cart data, you might want to display or hide certain items. This is now also possible by using the cart data in a visibility constraint.
How it worked Previously - Abandoned cart information could only be used in a message through the function [%eventValue(ABANDONED.PRODUCTS)%]. This then returned the following:

When a data selection is configured for the message (returning only the products from the catalog that correspond to the ones in the abandoned cart), information was displayed in a more structured way with a specific layout. However, the data only came from the Data selection list, not from the Site Abandoned Cart.
New in this release, is the possibility to use the Abandoned Cart data for personalization of messages and in visibility constraints.
To be able to do this, a new function has been introduced in the Personalization dialog and the Visibility Constraints dialog, called cartValue(). This function returns the Site Abandoned Cart data for a specific item.
Example in the Personalization dialog: Instead of showing the price from the Data selection list, we want to display the price from the Site Abandoned Cart. If no value can be found in the Abandoned Cart, the value from the Data selection list is used.
When the Abandoned Cart value is used in the message, it looks like the following: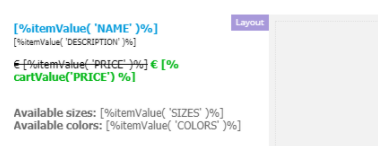
Name, description, size and colors are product properties retrieved from the Data selection list. The price property is retrieved from the Abandoned Cart information returned by Site.
Example in the Visibility constraint used outside of the repeater:
Only display the item if the price is more than €50.
When using itemValue('Products',0,'PRICE'), the price used is the one stored in the Data selection list.
When using cartValue('Products',0,'PRICE'), the price used in the constraint is the one in the cart data returned by Site.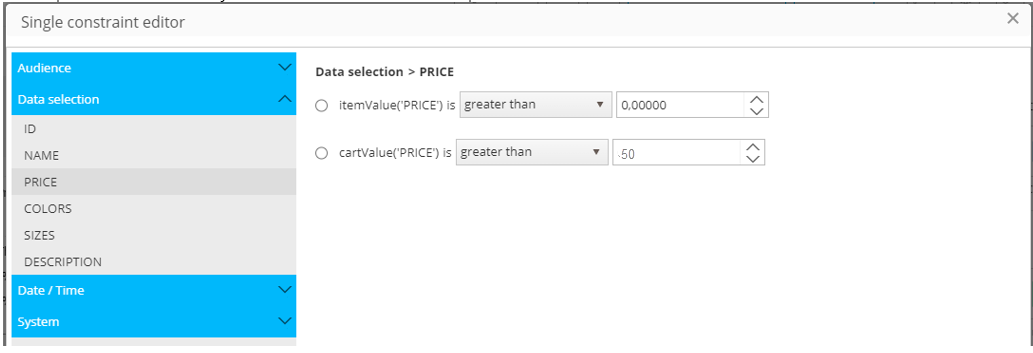
This cartValue() function is only available in the Personalization and Visibility constraints dialog:
- For all fields in a data selection
- When the option ‘use as a lookup up data selection’ is activated and only items are retrieved from the Product list that have an ID corresponding to the items in the abandoned cart

Note: The cartValue expression is available for every field in the data selection. However, currently only Price and Quantity are supported. If no Site cart data can be found for the selected field, then by default the value is taken from the data selection list.
Technical note : When previewing messages using the cartValue expression, it is not possible to show the cart data. The preview of the message will instead show the data from the data selection.
![]()
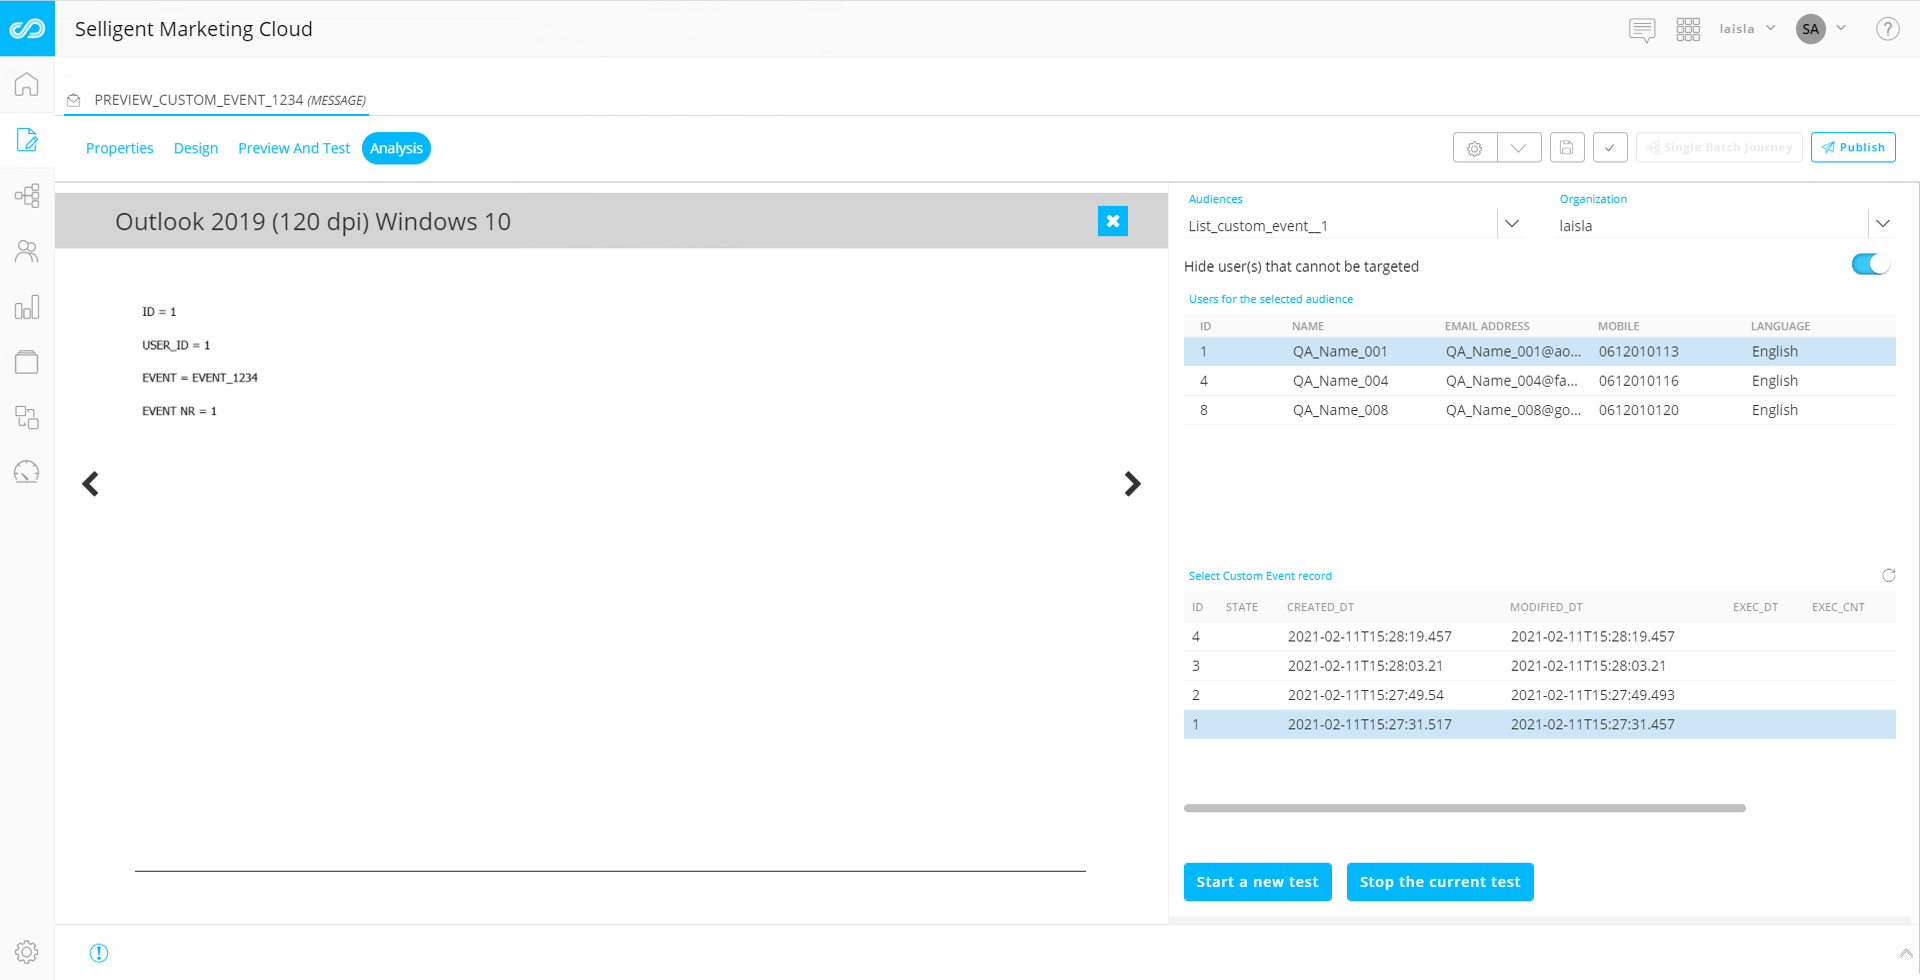
Custom Events
In the previous release, we introduced the possibility to use Custom Events data in a message preview for the selected test user. In this release, it is also possible to send a test message with Custom Events data to the test user as well as using this Custom Events data in the inbox analysis.
![]()
Dashboards and Reporting
The Tamarillo release introduces the possibility to access journey reports without having explicit rights to create/update/delete journeys.
Visually for the marketer, there are no changes in how the access rights are configured. The changes happen in the background where the Reporting chapter only checks the reporting rights, and no longer includes journey access rights.
![]()
Site Enhancements
The Pop-in Placements editor has been improved and contains new properties that were previously only editable via CSS code. These enhancements make it easier for the marketer to define and design the pop-in placement.
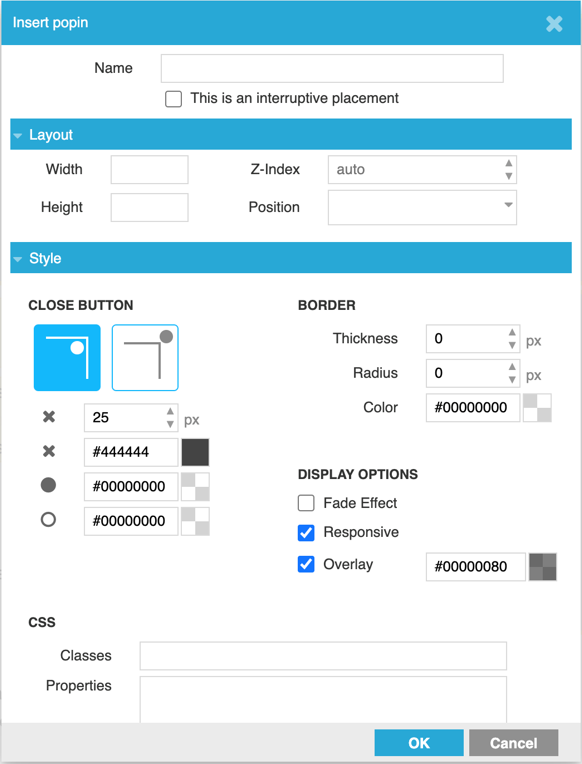
The following styling options have been added:
- responsiveness - Adapts to the size of the screen
- the dialog style such as the radius, thickness and color of the border
- the Close button style such as position, color and size
- Overlay: transparent color which covers the rest of the web page
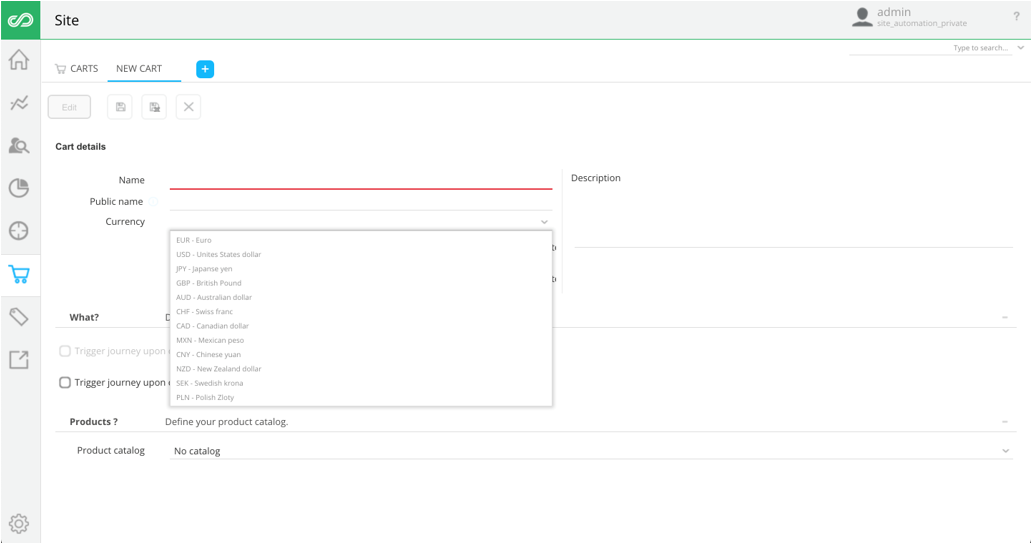
In addition, the polish currency has been added to the Cart configuration
![]()
Documentation
In addition to the release feature related updates in the online help, we have updated some existing topics to help our readers better understand the use of certain features
- Updates in the repeater and data selection topics
- Updates in all topics related to STO
- More details related to the Google Third party cookie policies
- Site and cookies
In this release, we have new video courses and updates.
- The Site course Retargeting Abandoned Carts, teaches how to configure an abandoned cart, create a pop-up offer and create the Custom Journey with the associated email retargeting communication in Marketing Cloud.
- For Marketing Cloud users, we have updated the Creating a Transactional Journey course to reflect updates to the Admin Config section of the platform.
- Finally, Custom Journey Basics is a new course that provides an introduction to the custom journey creation process and interface.
![]()
Corrections
- When adding components in the content of a responsive message, the drop-indicator was always shown at the top of the column, even when you wanted to drop items lower. We get that this can be confusing, so we fixed that.
- When someone else started editing the message you were editing, you would receive a strange error when trying to save. Though "strange" can be good at times, it wasn't good here. So we fixed that.
- When a journey uses a Custom component, this usage is recorded. However, when activating the journey, the usage was no longer recorded. This has now been rectified
- When there are errors in expressions used in a Custom Journey, more validation info is now provided to the end user
- Audience filter component is no longer deleted when you edit a date filter and click on "delete" on your keyboard
- Using Option list codes in a filter of type 'is one of' is no longer case sensitive
- It is no longer allowed to create a Custom journey with 2 Event entry points that require each their own actionlist.
- [SMC] Norwegian special characters ø is now allowed in folder names
- When a user has no List rights, he still needs to be able to select the list and segment when creating a Single Batch Journey, while it is possible when creating a template. Now, the user can also select the segment in a SBJ.
- Custom AB journey launches with STATE 1 instead of 11 with as result no winner selection. This has been corrected and now gets the correct state of 1.
- [SMC] Settings in a template-based journey are now being saved after ignoring the Warning dialog and saving
![]()
