![]()
Images can be added from different sources:
- From the library as a fixed image (Via the Choose image button).
- By entering the URL of the image directly in the Source field.
- By using an image field in a data selection and using a personalization field as the source.
- From the Live Content library via the Choose Live Content button.
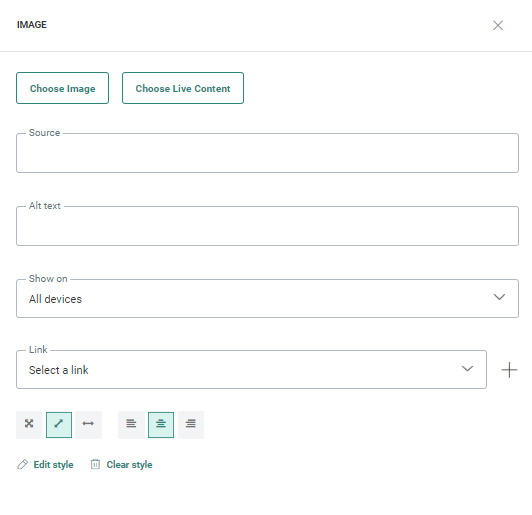
When an Image Component is added to the content, the following properties panel is available:
Use an image from the library
Press Choose image to access the Library, navigate the folders and select an image. The URL is automatically added to the Source field.
Note: Check out
the section on Library for more
details on how to manage images.
Personalization fields can be used to complete the path to an image in
the library.
Example:
[%resource(concat([Variable.PATH],'Name of the image',[MASTER.LANG],'.jpg'))%]
In this example, we use a template variable that holds the name of the
folder in the library. The language field from the parent profile is retrieved, so that the image can be used in the preferred language of the contact. A function
'concat' is used to concatenate the different elements making up the entire
path to the image.
Use the URL of an image
You can also type in a URL manually. Personalization of the URL is possible.
Note: Make sure the URL points to a location everyone has access to.
Personalized image
example: Different images exist and are used based on the language
of the contact. Add the language field as a personalization field and
make sure the images exist with these names.
[%concat('http://[Path]/','IMAGENAME',[MASTER.LANG],'.jpg)%]
Use an image from a data selection
When a data selection is defined in the template/message, the images stored in the data selection can be used and displayed in the content. Use the personalization fields to retrieve the field in the data selection holding the image.
When an image is added to a Repeater, you can select the Image field from the list of fields in the data selection. If an image from the data selection must be used outside the Repeater, select the correct item and field from the list of fields returned by the data selection. When the data selection returns 5 items, there will be five items to choose from in the Personalization dialog):
Example: Using
a personalization field to retrieve an image [%itemValue('MANUALSELECTION',
0, 'IMAGE')%] from the data selection used outside the Repeater: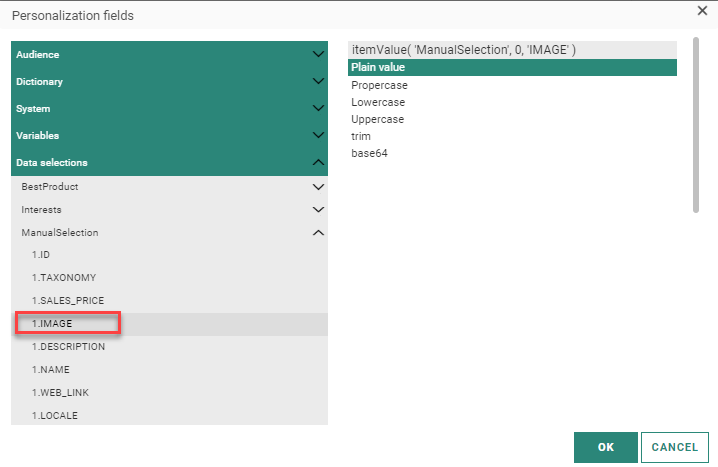
Use Live Content
When Live Content is used
in the template, click the Choose Live
Content button to select an existing image or create a new one.
The Source field is automatically
filled out with the selected image. For more details on all the options
available for Live Content, click this topic.
Example:
[%livecontent('530506b4-99fe-4957-af16-3424a668805a')%])
 Watch Live Content Learning videos
Set image Properties
When an image is added to the design, the following properties must be set:
- Alternate text — Enter the text which needs to be displayed in case the image can't be found.
- Link — (Required) Select a URL link for the image from the drop-down list or create a new one through the +.
- Edit style — Click the pencil to access the Style editor and edit the style.
- Delete — Click the trash bin to clear the custom style options.
- Edit style — Lets you format the image:
![]() —
100% width
—
100% width
![]() — Fixed width : this is a value in pixels which can be used as the width.
— Fixed width : this is a value in pixels which can be used as the width.
![]() — Grow by content: the original size of the image will be used.
— Grow by content: the original size of the image will be used.
Note: Some email clients may have issues regarding responsiveness when using fixed width (for example if the email width is 600 pixels and the image fixed width is set to 700 pixels).
It's advisable to use fixed width only for images that are narrower than the email's breakpoint.
The breakpoint is the width value at which the email starts to behave in a responsive way on smaller screens.
This is set to 480 pixels (and can not be changed).
![]() — Aligns the image left, center
or right.
— Aligns the image left, center
or right.
- Show on— Choose to display the content on all devices, desktop only or mobile only. If select anything except All devices, it will exclude the one you do not select. For example, if you select Mobile, the image will not be displayed on Desktop devices and vice versa.
Example: We
have added an image from the library for the Parana logo and used the
link to the website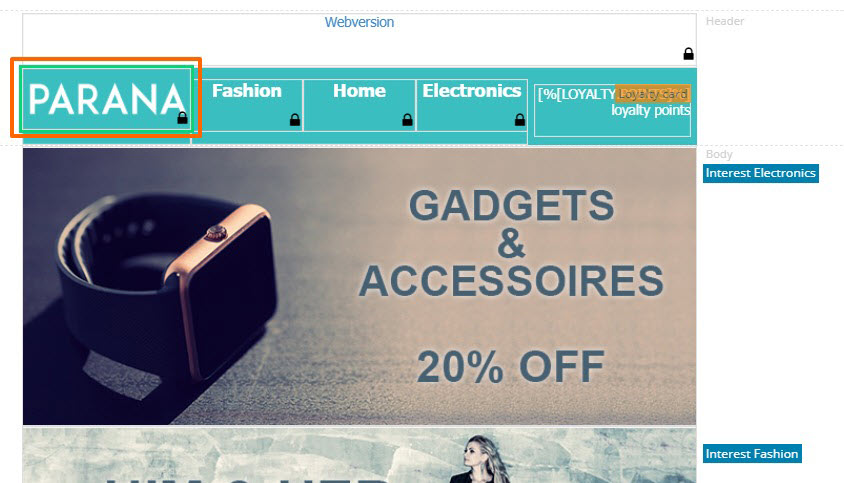
Copy Image content to other languages
By default, when adding new Content Components to a message, only the structure of the component is copied automatically to other languages. However, using the function copy content to other languages, you can now copy the component with its content to one or more languages.
This option is available once the component is placed onto the message and multiple languages have been defined for the message.
Click the button Copy content to other languages in the component properties.

A dialog is displayed in which the target languages can be selected.

