During creation of new content (template, email or page), the user has the option to import existing HTML code.
To import HTML code and images:
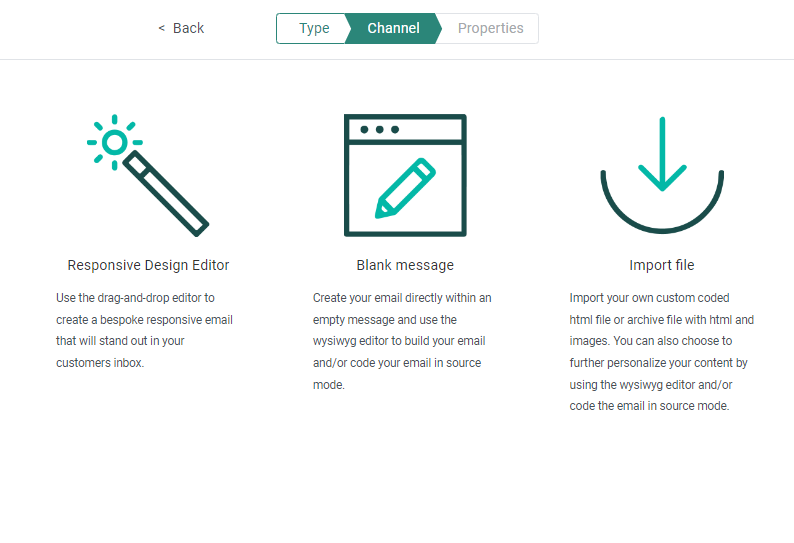
1. Select Import file and click Next.

2. On the next screen, set the properties of the content (Name, API-Name, Description, Audience and Languages). For more information on these properties, check this topic for template properties , this topic for messages properties and this topic for Page properties.
3. Click Next and configure the settings for the imported HTML:
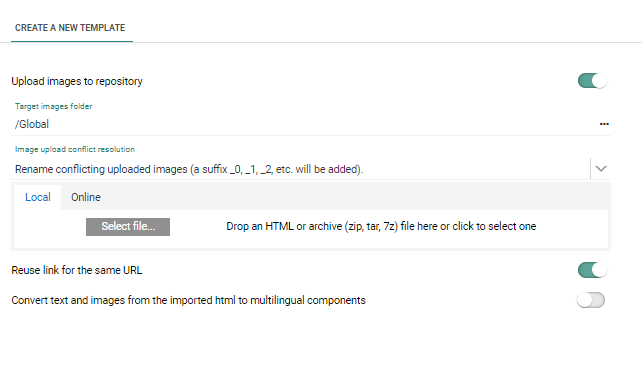
- Upload images on/off — Toggle this option to choose whether or not to upload images associated with the HTML files.
- Target images folder — When image upload is enabled, you will need to specify the Engage folder where these images should be stored. You can click the [...] button to browse for the location.
- Image upload conflict resolution — Select from this drop-down list
how you want the system to resolve any conflicts with existing images
of the same name.
- Rename conflicting uploaded images — The uploaded images will get the original name + an index
- Replace existing images with uploaded images — The existing image is deleted and the new image is uploaded.
- Keep existing images — The uploaded template will use the existing images and conflicting images are not uploaded
4. Next, you can choose to upload a file from a local folder or retrieve the HTML content from an online URL.
- Local — Click the 'Select file button to browse for the file or drop a file. This can be an HTML file or a zip file. The zip file typically contains an HTML file and some images. The HTML will be imported as content (template, message or page) and the images are stored in the selected folder.
- Online — Enter the URL from where the HTML content should be retrieved.
Note:
Make sure the ZIP file contains exactly one HTML file.
Only HTML and image files are supported in the ZIP, not TXT files for example.
Issues with encoding of the filename of the content of the file may cause a failure of the import. Ensure these are correctly coded.
Note: Only when image references in the template/message are absolute can they be uploaded.
8. The option 'Reuse link for the same URL' will, when ticked, group all links pointing to the same URL in one single link in Engage. If the option is not ticked, a distinct Engage link is created for each <a> found in the source, even if it points to the same URL.
9. The option 'Convert text and images from the imported HTML to multilingual components' lets you choose if the HTML tags should be converted to Engage SG tags. If you are working with multiple languages then we recommend to check this option. The Engage SG tags let you create different content for the different languages. If you are working with only one language, we recommend to de-activate this option.
Note: If you check this option, HTML tags are converted to Engage SG tags and the global styling will be applied on these components. If you want to keep the HTML as is, with all the styling defined in there, leave the option unchecked.
10. Press Next. The content is displayed in Source mode.
Note: When multiple languages are selected, the content will be the same for each one of the languages since the same HTML is used. However, by adding content components to the HTML, you can set different content for the different languages.
Technical note:
When the option Convert text and images from the imported HTML to multilingual components is on, a number of HTML tags are converted to
Engage specific SG tags and
properties:
* all IMG tags are converted to <SG:img id:x>
* text content is converted to <SG:content> tags.
When these tags are clicked in the source panel, the properties panel is
displayed on the right where the text and images can be edited .
* Links (<a>) in the source are converted to tracked links in Engage.
These links are added to the Links tab for the template or message and
are also automatically linked
* Links on images are also converted to tracked links for the template
or message. In addition they are added as property on the image.
* Engage specific SG-tags (eg. sg:var, sg:image, ...) and attributes (eg. data-link, unsubscribe-link, ...) are only supported in Content Blocks created in the Library. Currently, they are not supported for use when importing HTML for messages, templates and pages.
The following image file extensions/mime types are supported during the HTML import functionality:
.art;image/x-jg
.bmp;image/bmp
.cmx;image/x-cmx
.cod;image/cis-cod
.gif;image/gif
.ico;image/x-icon
.ief;image/ief
.jfif;image/pjpeg
.jpg;image/jpeg
.pbm;image/x-portable-bitmap
.pgm;image/x-portable-graymap
.png;image/png
.pnm;image/x-portable-anymap
.ppm;image/x-portable-pixmap
.ras;image/x-cmu-raster
.rf;image/vnd.rn-realflash
.rgb;image/x-rgb
.tiff;image/tiff
.wbmp;image/vnd.wap.wbmp
.xbm;image/x-xbitmap
.xpm;image/x-xpixmap
.xwd;image/x-xwindowdump
Example 1:
Conversion of <a> tags to tracked links, the source:
<a href="https://www.google.com" target="_blank">
Becomes:
<a expr:href="LINK(101)">
All links will be added to the Links tab.
Note:
When the imported link is converted, a new tracked link is created in the Links panel with a random ID.
When the source HTML already contains the correct syntax (for example <a expr:href="LINK(101)">), it does not need to be converted and a tracked link with that exact ID will be created.
This implies that if you want to use the standard webversion Link(0), you need to use the Engage syntax in your source and use the ID=0.
<a expr:href="LINK(0)">Webversion</a>
In this case, no new tracked link is created, but the existing webversion link(0) is used instead.
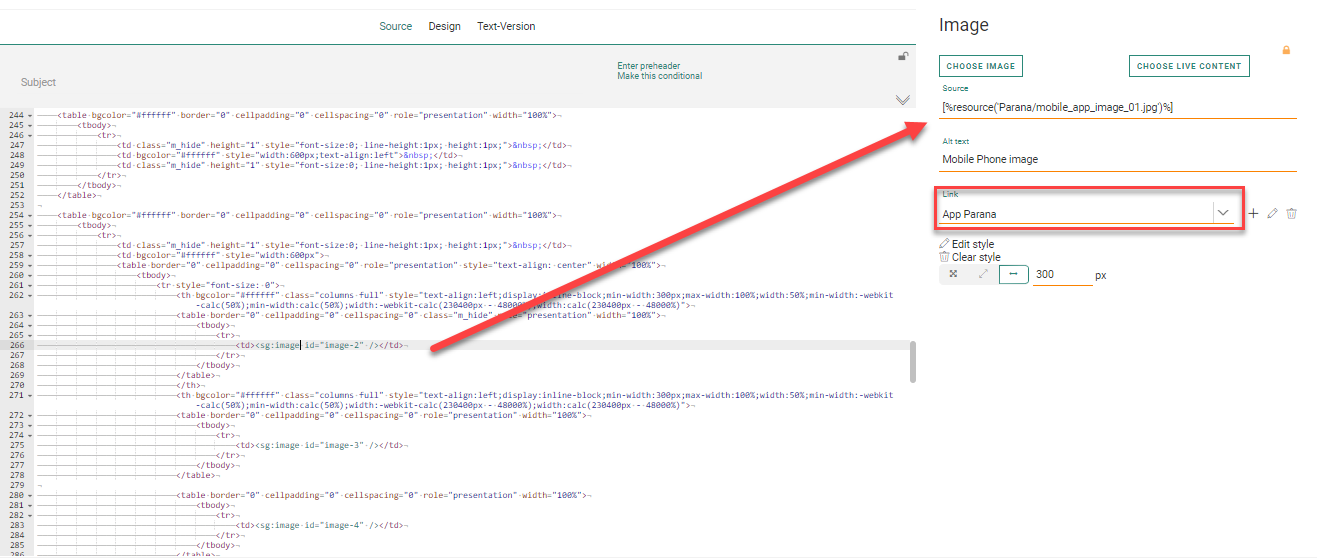
Example 2: conversion of IMG tags into <SG> tag
In the source HTML the following IMG tag is available. The source of the image is a relative path.

In the Engage template source, this is translated to an SG tag:
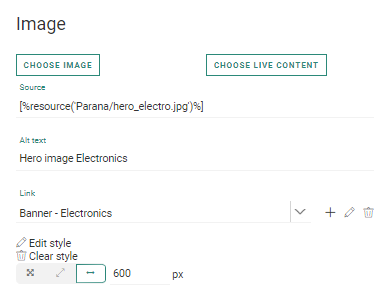
The source and alt text are taken over as well as the styling options.
If the source of this image is a relative path, the image is not
uploaded and the following is displayed in the source field.
Example: ONLY_ABSOLUTE_IMAGE_PATH_ARE_SUPPORTED - images/spacer.gif)
However, if the source of the image is an absolute path, the image will be referenced correctly in the source field in the properties. (e.g., [%resource('img/logo.jpg')%])
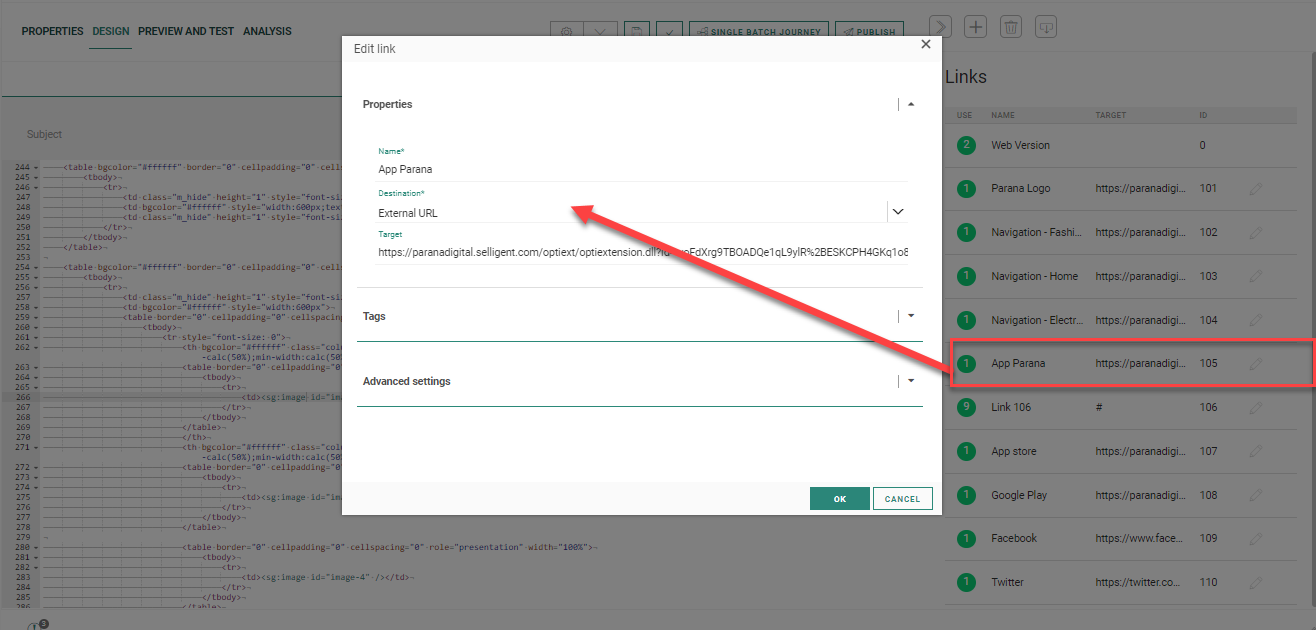
If a link is available on the image, that link will be translated into a property on that image. The link will be added to the list of links and will be added to the properties of the image as well.
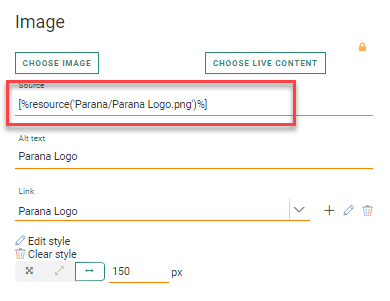
The following file is an example:
The image will be converted to an SG tag:
On the right, the link behind the image is added to the properties. It is also added to the Links tab:
Example 3: conversion of text content in the source HTML:

The following SG tag is created:
Clicking the tag in the source gives access to the properties of the corresponding content component.
