Editor: Discovering the Interface
The Editor interface is built as following
- a Home tab followed by a series of Asset tabs, one per opened asset. An asset can be an email or page.
- a main window in which the message is designed. The main window is composed of a canvas and a series of tabs on the right and bottom of the canvas
- a tree view of folders, subfolders and assets that have been created within Selligent Campaign. It also provides a folder Audiences and a Webfolder.
Home tab
The 'Home' tab is always available and holds all recently modified and pinned messages. These favorites are added by the user, manually, by selecting the option 'Pin this' from the pop-up menu after a right click on a message in the tree view.
On the right hand side of every Home page, a news feed is provided.
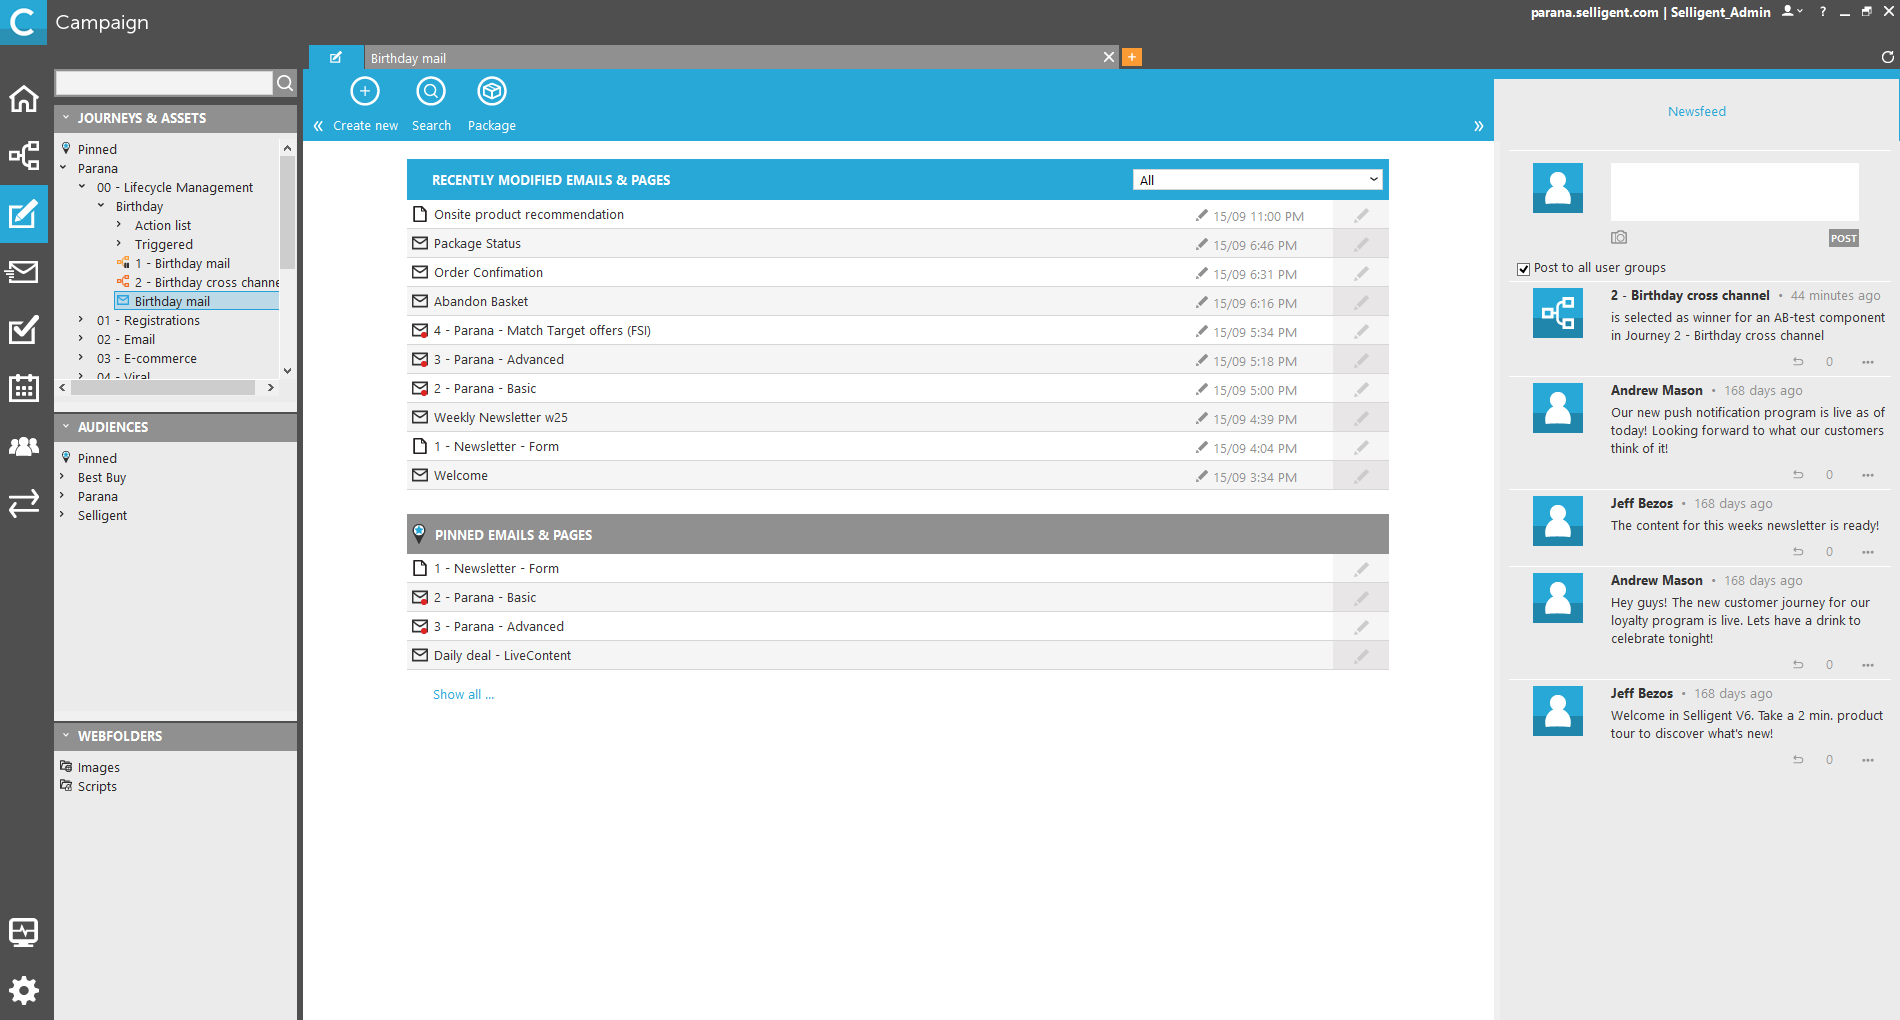
All messages on the 'Home' tab can be accessed through double click or clicking the pencil icon.
A search field in the Recently modified Emails and Pages section allows filtering the journeys by
- last modified from my location
- last modified by me
From the 'Home' tab it is possible to
- Create a new email, through the 'Create new' icon.
- Open or search for a message
- Export/import packages
The + tab, displayed by default, is used to create a new message. A new tab is automatically added to the right of the 'Home' tab. The content of the main window is as following:
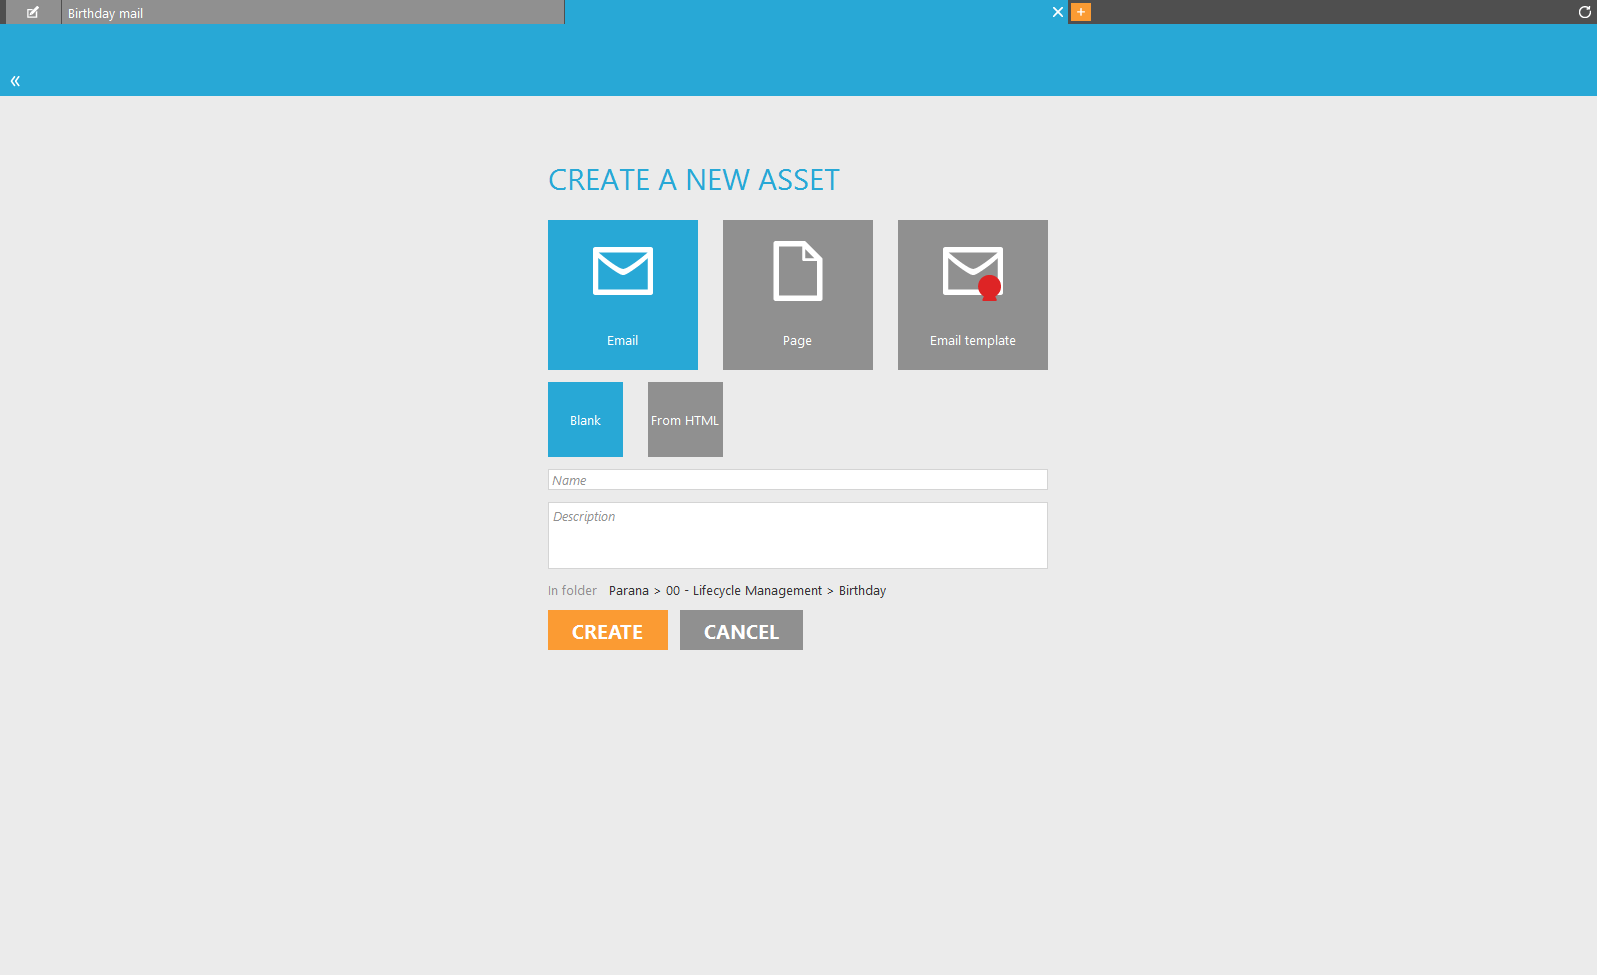
From here, a new message (email, page or template)
can be created.
The user can start from a blank message or import an existing HTML ('From
HTML' button).
The folder in which the message will be created is based on the current
selected folder in the tree view. Select another folder if required.
Press 'Create' to store the new
message and start its design.
Asset tabs
For each open asset, a tab is displayed next to the 'Home' tab.
Whenever an asset is selected from the tree view or a new asset is created, an additional tab is added holding the name of the selected asset.
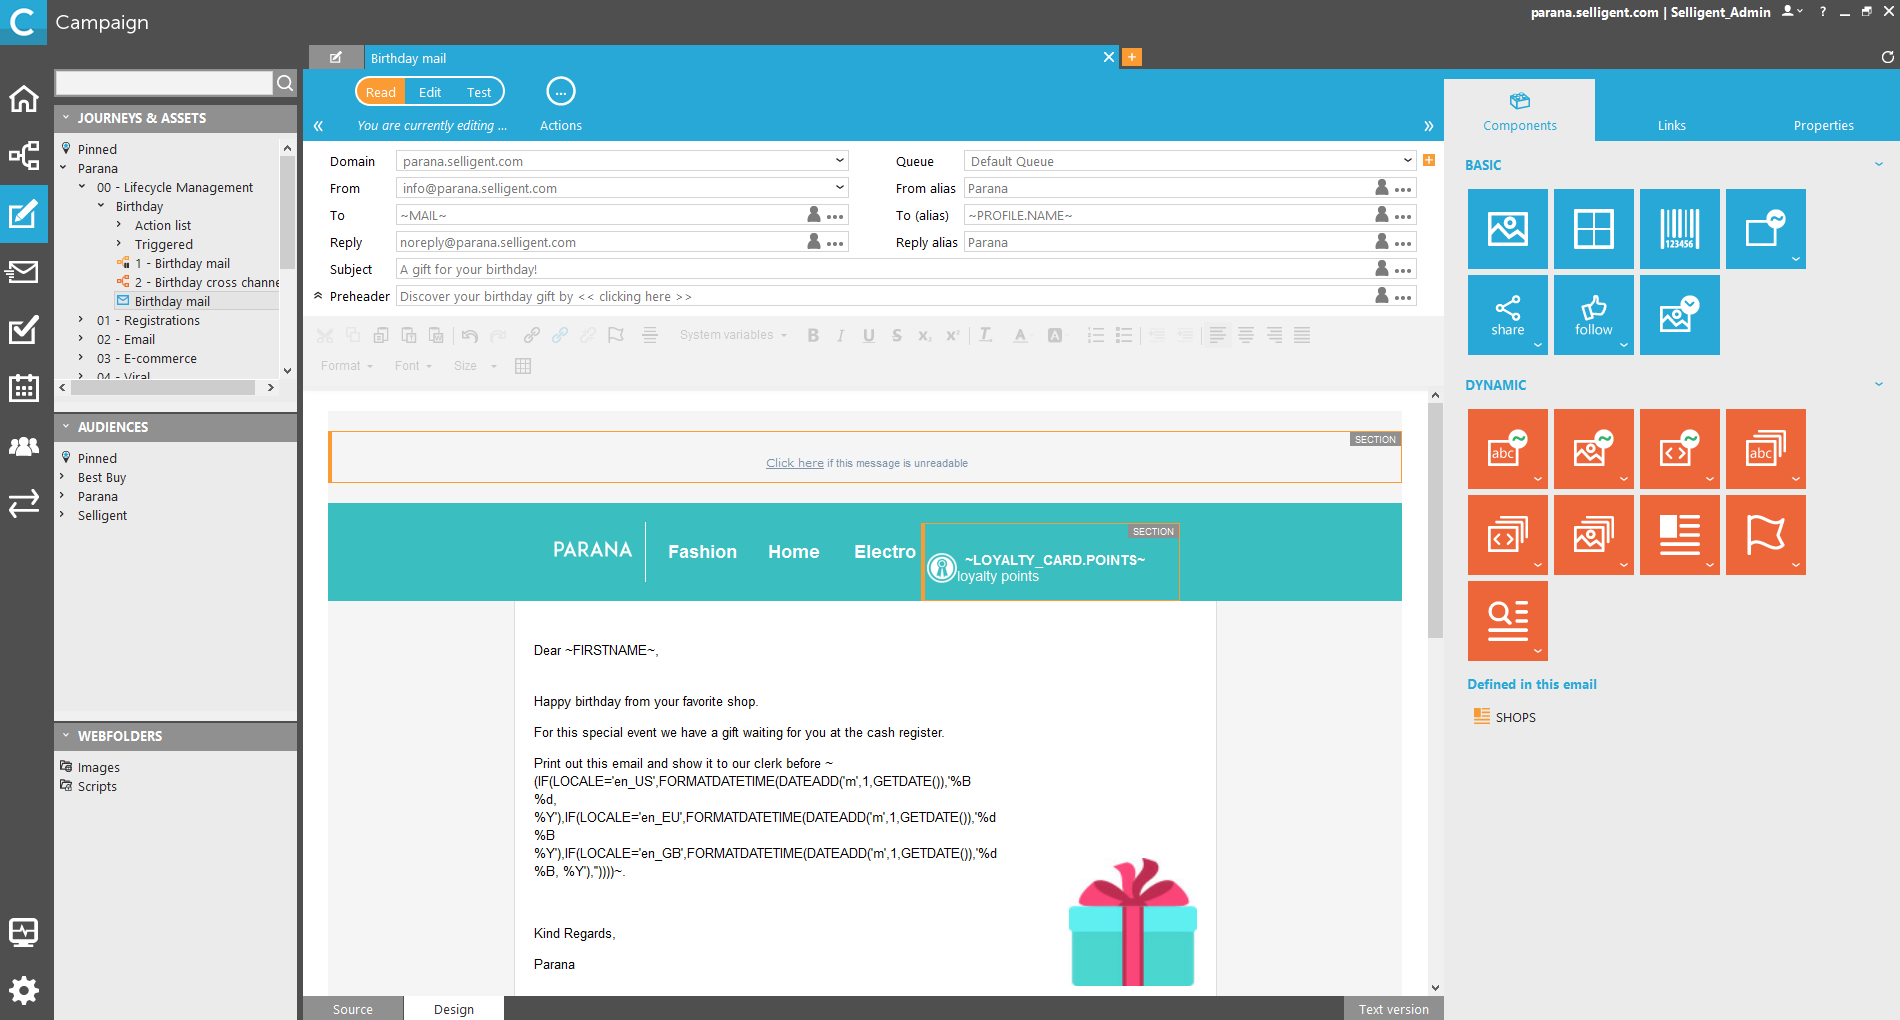
The body of the 'Asset' tab contains a status menu and buttons that are currently applicable to the message. All non relevant buttons are by default hidden:

Following status menu is displayed. Only one status at a time can be selected:
- Read: the message is displayed in Read mode, no changes can be made. This is the default status of a selected message
- Edit: the Edit state will
lock the element by the current user. If the element was previously
locked by another user, that user's name will be displayed just below
the status menu. The message can now be modified and the interface
is adapted to provide the necessary building blocks: properties can
be set, sensors created and components added.

- Test:
allows testing the message, by previewing it, sending test emails,
checking the spam score or visualizing it in different
emails clients (thanks to Email On Acid
integration).

A series of buttons provide additional functions:
- Save: saves the current changes made to the message. Only available in Edit mode
- Actions:
- Pin this: adds the current message to the list of pinned items on the Home page for easy access. The item will also be visible from the portal dashboard.
- Rename: defines a different name for the current message
- Duplicate: creates a copy
- Export: exports the message as an HTML file
- translate: translates the message based on the language selected in the message properties
- Versions/change log
- Find/Replace
- Extract text version: creates the text version from the HTML encoded message. Note that this text version requires some modifications
- Change type to email/page
- make this a template: converts a standard email to a template. Additional options, such as article containers, are available
- Automation XML (for template emails only): generates the XML that can be used as an example for automation (broadcast API)
- Delete: removes the message
Main window
The main window is where the messages are designed. It is composed of different building blocks:
- Canvas: this is where the content of the message is displayed and where the message is designed. A wysiwyg toolbar is available.
- Tabs at the bottom of the canvas: these depend on the state of the message.
- In Design/Read mode following tabs are available:
- Source: contains the source code of the message. It is possible to switch from design to source mode and vice versa. This is especially helpful for designers with HTML knowledge. It will allow them to make adjustments to a message that was built in design mode or to check the results of a message created in HTML.
- Design: on the 'Design' tab you can create messages in a wysiwyg editor (What You See Is What You Get)
- Text version (email message only): displays the text version of the email message. A text version is required if email clients cannot read the HTML version
- AMP: This tab is only visible if the feature "AMP for email' is enabled on the environment. It allows to create email messages with dynamic content through embedding interactive elements like carousels, accordions, purchase buttons, etc. Currently, AMP is supported by Gmail, Outlook.com and Mail.ru.
When sending AMP emails, Gmail recognizes the email as an AMP-email and validates it. If something goes wrong with rendering, the reader is informed. For a recipient to see the dynamic content, settings in Gmail should be activated that enable dynamic email. In Gmail, go to Settings and enable dynamic email. Moreover, when an email with AMP is forwarded, it will no longer be interactive.Note: To make it possible to use any of the Gmail AMP widgets a specific AMP-HTML-head is added to the message properties. This allows you to add or edit the necessary AMP script code that allows the use of these widgets. (for more information on the available components: https://amp.dev/documentation/components/?format=email)
Technical note:
To enable AMP for email, please contact Selligent to set up your environment.
A setting AMP4EMAIL=TRUE must be added.
To be able to send AMP emails, each client needs to register with Google (https://developers.google.com/gmail/ampemail/register) to get their sender address certified.
This implies:
* Send a demo email to Google so they can allow the from-address. This needs to be done for each sender address used by the client.
* Fill out a registration form at Google (https://forms.gle/fV2hZmmoFApQA3sH8)
* Wait for a response from Google, typically within 5 days
- in Test mode
- Desktop
- web client
- Tablet
- Mobile
- Tabs to the right of the canvas: these depend on the state of the message
- Edit & Read mode:
- Properties: the properties of the message
- Sensors: An overview of all sensors used in the current message
- Components: all possible components that can be placed in a message
- Template properties: specific email template properties
- Test mode:
- Preview: preview the messages with pre-filled values and different sections for different test contacts. This allows testing if constraints and values are correct.
- Send test emails: send emails to test contacts.
- Email analysis: spam analysis and email client preview
Tree view
The tree view contains the following root folders:
Journeys and Assets: the tree view provides a hierarchical view of all the messages in Selligent Campaign. The tree view facilitates the organization of your messages in logical folders. You can create multi-level folders, like in windows explorer. Depending on your user rights, you can create, delete, move, view or modify folders and messages.
Double clicking an asset displays the asset content and properties in a new tab.
Two type of messages can be created, each represented by its specific icon:
 : email messages, send out using the Email
component in a journey
: email messages, send out using the Email
component in a journey
 : pages used on a website or directly accessible
by a contact. They are added as a Webpage
component to a journey.
: pages used on a website or directly accessible
by a contact. They are added as a Webpage
component to a journey.
Audiences: The Audiences root folder comprises all available lists. Lists contain fields that can be incorporated as personalization fields in the message. Personalization can equally be used to pre-fill forms. E.g. when adding an input box to a form, the value of the input field can come from a field in the list. The input field will be pre-filled with the contact's data.
NOTE: the tree view of messages created in the Editor is the same as the one used for the journeys. Deleting or adding a folder here will automatically do the same in the Journey section.
Webfolder: the webfolder contains by default two subfolders, in which images and script are stored and can be used in a message. Webfolders are defined in the configuration.
New folders can be created and existing one deleted.
Use drag and drop to copy files from the local drive or network into the webfolders.
NOTE: images in the webfolder can be added to the message directly by right clicking and selecting 'Insert'
